Amplify Stadio - UI Library を試してみる


ちょっと遅れましたが、2021年のre:Inventで発表されたAmplify Studioの新機能(UI Library)を触ってみました。
公式の以下の記事プラスでAppSyncとの連携まで試してみたので、メモしておきます。
AWS Amplify Studio – 最小限のプログラミングでFigmaからフルスタックのReactアプリを実現
最終的に作成するページ

事前準備
-
Amplify Hosting->Amplify Studio起動 までは以下の記事などを参考に完了していること
-
Figmaのアカウントを作成済みであること
-
Reactアプリ(
npx create-react-app sample-app)でアプリを作成済であること
手順
- データモデル作成、サンプルデータ登録
- サンプルコンポーネント取り込み
- コンポーネントプロパティ設定
- サンプルデータを取得するコーディング
データモデル作成、サンプルデータ登録
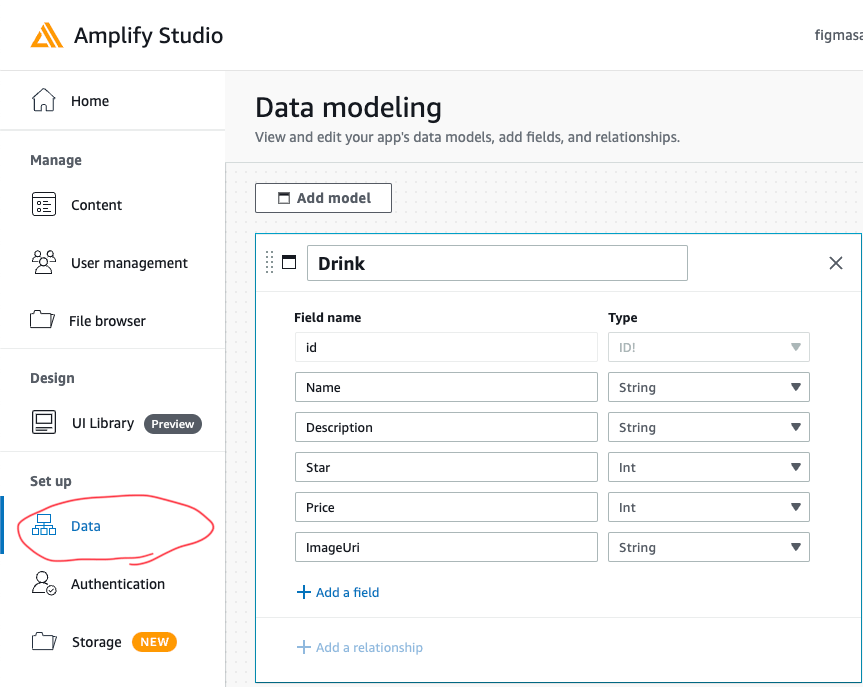
データモデル生成
Amplify Studioを起動したら、Set up -> Dataから添付の通りの定義のモデルを生成します。
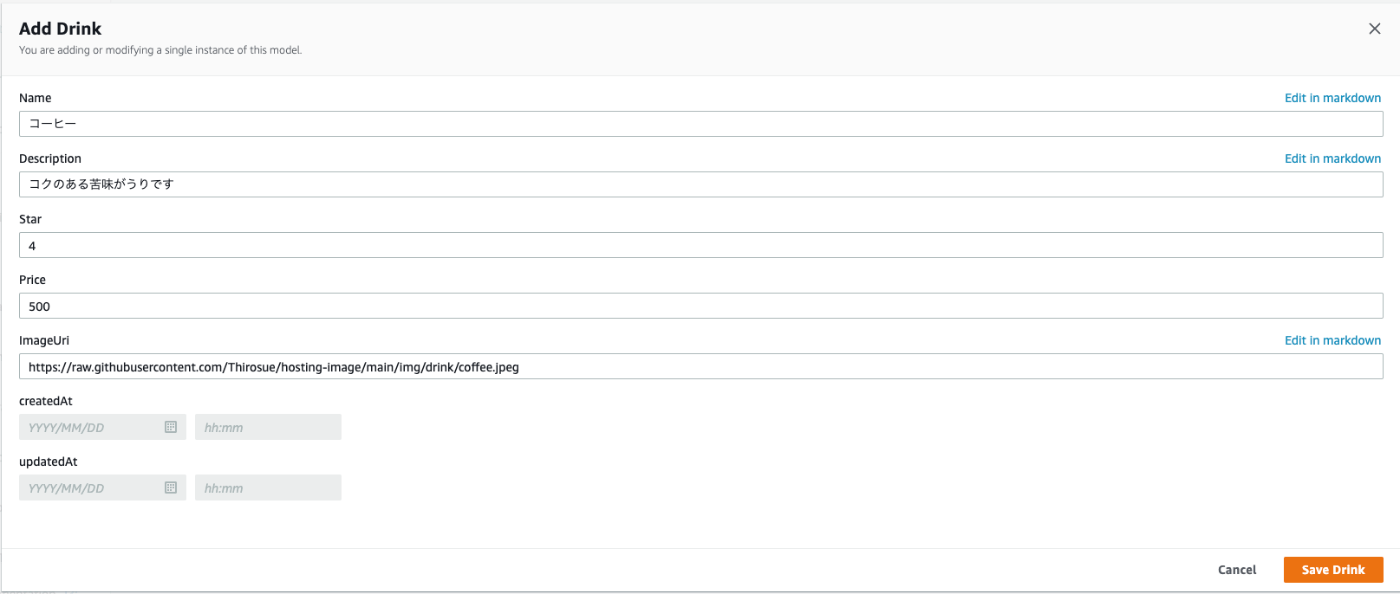
サンプルデータ生成
つぎに、Mangage -> Contentから以下のテストデータを投入します。

| Name | Description | Star | Price | ImageUri |
|---|---|---|---|---|
| コーヒー | コクのある苦味がうりです | 4 | 500 | https://raw.githubusercontent.com/Thirosue/hosting-image/main/img/drink/coffee.jpeg |
| ホットティー | 風味豊かな紅茶です | 5 | 700 | https://raw.githubusercontent.com/Thirosue/hosting-image/main/img/drink/tea.jpeg |
| オレンジジュース | 濃縮還元100%です | 3 | 600 | https://raw.githubusercontent.com/Thirosue/hosting-image/main/img/drink/orange.jpeg |
テストデータ投入後の状態

サンプルコンポーネント取り込み
AWSよりAWS Amplify UI Kitが提供されているので、Figmaのアカウントにコンポーネントを複製する。

取り込んだコンポーネントから右クリック -> Copy/Paste as -> Copy linkで共有ファイルのリンクを取得する。
Design -> UI Librayに上記で取得したリンクを貼り付ける。

Acccept allで全て取り込む。
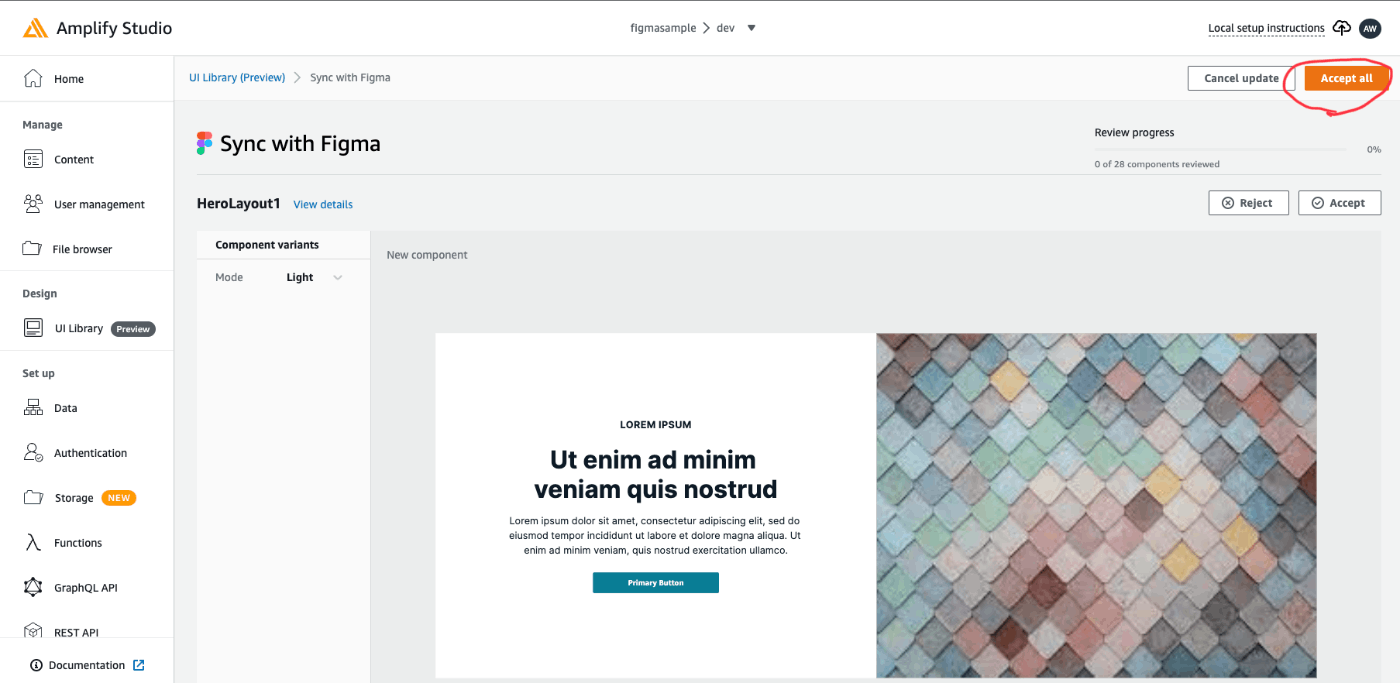
正常終了するとコンポーネントが28個取り込まれる。

コンポーネントプロパティ修正
今回のサンプルでは、以下コンポーネントを利用するため、コンポーネントプロパティを修正し、カスタマイズできるようにする。
- NavBar
- HeroLayout4
- CardC
- MarketingFooter
NavBar, HeroLayout4, MarketingFooter
レスポンシブデザインに対応するため、widthを変更できるようにする。
-
Configure->Add Prop
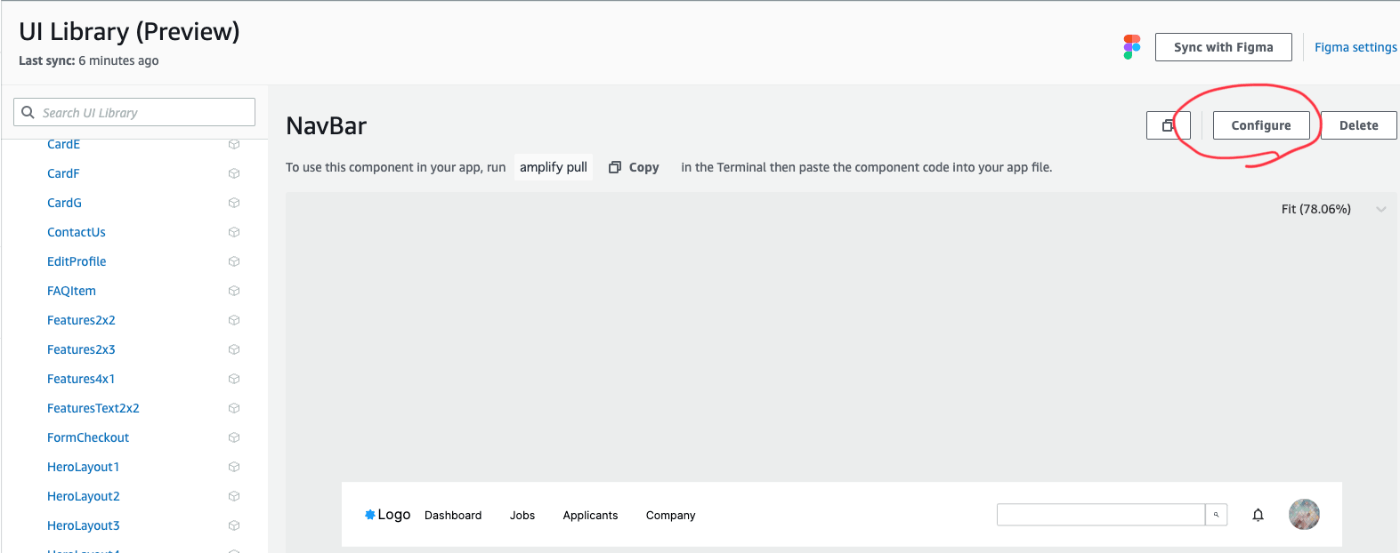

Nameをwidth、TypeをStringで追加する

Element tree -> NaviBar(最上位のツリー)にフォーカスを当てる

Propにwidthを選択し、上記で作成したプロパティのwidthを選択する。

同様に、HeroLayout4コンポーネント、 MarketingFooterコンポーネントもwidthをカスタマイズできるようプロパティを追加する。
CardC
CardCについては、プロパティを以下の2つ追加する。
データモデルを作成している場合、Typeとして作成したデータモデルを選択できる
- Name: thumbnailHeight / Type: String / Default: 250px
- Name: drink / Type: Drink

-
Image の height に
thumbnailHeightを設定 -
Image の src に
drink.ImageUriを設定
作成したモデルのプロパティを設定可能

- Main Text の 名前 Label に
Drink.Name

- Main Text の 説明 Label に
Drink.Discription

- Rating の
valueにDrink.Star

- Main Text の 料金 Label に
Drink.Discription+ "円" を連結
Concatenateで固定値を連結してラベルを生成可能

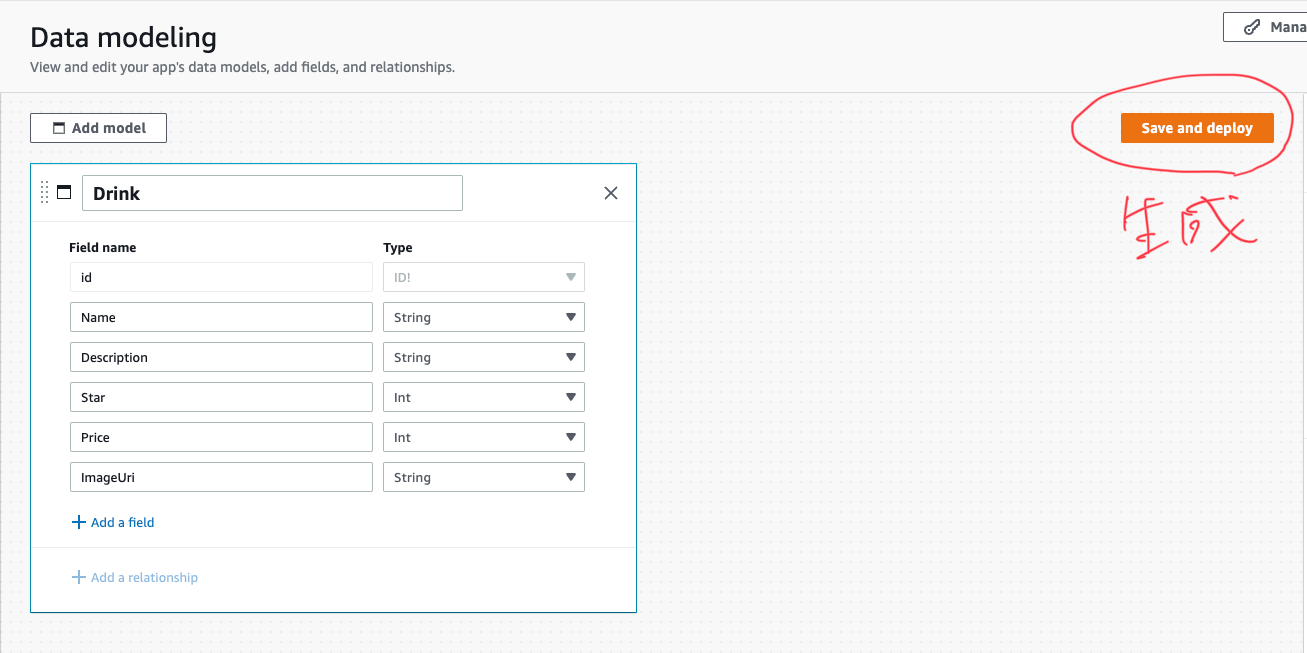
設定完了後、amplify pullでローカルにコンポーネントを同期する。
サンプルデータを取得するコーディング
amplify setup
Get compornent code -> Initial project setup の通り、index.jsを編集する。

- 修正差分
import React from 'react';
import ReactDOM from 'react-dom';
import './index.css';
import App from './App';
import reportWebVitals from './reportWebVitals';

import Amplify from 'aws-amplify'; # <---追加
import "@aws-amplify/ui-react/styles.css"; # <---追加
import {AmplifyProvider} from "@aws-amplify/ui-react"; # <---追加
import awsconfig from './aws-exports'; # <---追加
Amplify.configure(awsconfig); # <---追加

ReactDOM.render(
  <React.StrictMode>
    <AmplifyProvider> # <---追加
      <App />
    </AmplifyProvider> # <---追加
  </React.StrictMode>,
  document.getElementById('root')
);

// If you want to start measuring performance in your app, pass a function
// to log results (for example: reportWebVitals(console.log))
// or send to an analytics endpoint. Learn more: https://bit.ly/CRA-vitals
reportWebVitals();
Tailwind CSS
ブログ記事では、コレクション機能でリスト表示を実現していましたが、CSS ユーテリティでも同様のことが実現できるため、本サンプルでは、TailwindをCDNから利用します。
- 修正差分
    <link rel="manifest" href="%PUBLIC_URL%/manifest.json" />
    <!--
      Notice the use of %PUBLIC_URL% in the tags above.
      It will be replaced with the URL of the `public` folder during the build.
      Only files inside the `public` folder can be referenced from the HTML.

      Unlike "/favicon.ico" or "favicon.ico", "%PUBLIC_URL%/favicon.ico" will
      work correctly both with client-side routing and a non-root public URL.
      Learn how to configure a non-root public URL by running `npm run build`.
    -->
    <script src="https://cdn.tailwindcss.com"></script> <!-- 追加 -->
    <title>React App</title>
作成したコンポーネントを利用する
App.jsを編集し、UI-Libraryから連携されたコンポーネントを利用してみる。
- 修正差分
import { NavBar, HeroLayout4, CardC, MarketingFooter  } from './ui-components';

function App() {
  return (
    <>
      <NavBar width={'100%'} />
      <HeroLayout4 width={'100%'} />
      <div className="mt-16" />
        Contents
      <div className="mb-16" />
      <MarketingFooter width={'100%'} />
    </>
  );
}

export default App;
Figmaどおり表示されている

データ取得
フックを追加し、データを取得する。
- 修正差分
import { useEffect, useState } from 'react';
import { DataStore, Predicates } from 'aws-amplify';
import { Drink } from './models';
import { NavBar, HeroLayout4, CardC, MarketingFooter } from './ui-components';

function App() {
  const [drinks, setDrinks] = useState([]);
  useEffect(() => {
    async function fetchData() {
      const drinks = await DataStore.query(Drink, Predicates.ALL, {
        page: 0,
        limit: 10
      });
      console.log(drinks)
      setDrinks(drinks)
    }
    fetchData();
  }, [Drink]);

  return (
    <>
      <NavBar width={'100%'} />
      <HeroLayout4 width={'100%'} />
      <div className="grid m-32 grid-cols-3 gap-20">
        {drinks.map((drink, i) => <CardC key={i} drink={drink} thumbnailHeight={'250px'} />)}
      </div>
      <MarketingFooter width={'100%'} />
    </>
  );
}

export default App;
所管
- UI/UX検証型開発(デザイン変更が多めの案件)でデザインチームが作成したモックを開発チームがプロダクト反映するプロセスの辛みが軽減される未来があるかも
-
UI-Kit(ex: Base UI-Kit by Tatiana)は、プロジェクト資源とは別管理し、必要なものを育てていく - プロジェクトで利用するコンポーネントは、上記、
UI-Kitからクローンした部品で生成し、基本使い捨てるが良さそう - 機能性重視の管理者向けの管理画面は、
Tailwind CSS、MUIなどを素直に利用する方が生産性は高くなりそう
参考記事
Discussion