Python 1.14 GIL フリー版を使ってみる
はじめに
このブログでは、Python 3.13で試験的に導入され、3.14で正式にサポートされたGILフリー版の使い方について解説します。
The free-threaded build of Python is now supported and no longer experimental. This is the start of phase II where free-threaded Python is officially supported but still optional.
https://docs.python.org/3.14/whatsnew/3.14.html#new-features
インストール方法
uv経由でインストールするのが簡単です。バージョンの後ろにtを付けるとGILフリー版がインストールされます。
uv self update
uv python install 3.14t
uv python listで、自機にインストールされているpythonの一覧を取得できます。brewなど、uv以外でインストールされたpythonも検出します。
私のmac環境では、以下のように複数のPythonバージョンがインストールされていることが確認できます。なお、.local/share/uv配下にあるものは、uv経由でインストールされたPythonです。

プロジェクトの作成
先ほどインストールした Python 3.14t(GILフリー版)を使って、uv経由で新しいプロジェクトを作成します。
uv init my-python-3.14-prj
cd my-python-3.14-prj
uv python pin 3.14t
uv sync
正しいバージョンのpythonを参照しているかは、.venv/pyvenv.cfgを見ると分かります。
home = /Users/tafu/.local/share/uv/python/cpython-3.14.0b2+freethreaded-macos-aarch64-none/bin
implementation = CPython
uv = 0.7.13
version_info = 3.14.0b2
include-system-site-packages = false
prompt = python-3-14
コードを書く
ここからは、実際に Python コードを書いて動作を確認していきます。
まずは、Python 3.14で新たに導入されるテンプレート構文を試してみましょう。
このテンプレート構文は、DjangoテンプレートやJavaScriptのmustacheのように、
HTMLテンプレートエンジンの実装に便利な機能です。
本ブログの趣旨からは外れるため詳しくは説明しませんが、
html = t"My name is {user_name} and I love programming in Python."
のように、テンプレートを定義した上で、for item in html:でループで回しながら、テンプレート内にインジェクトされた各要素に対して処理を行うことができます。例えば、scriptタグを除去するサニタイズ処理などを書きます。
from string.templatelib import Template, Interpolation

def main():
    user_name = "Alice"
    html = t"My name is {user_name} and I love programming in Python."

    # render the template
    for item in html:
        if isinstance(item, Interpolation):
            print(item.value) # 実際はここでサニタイズとかする
        else:
            print(item)

if __name__ == "__main__":
    main()
実行します。このように表示されればOKです。

GILフリーの検証
いよいよ本題の GIL フリー環境を見ていきましょう。
とはいえ、特別な手順があるわけではなく、従来どおりマルチスレッドのコードを書くだけです。
ただし、本当に GIL が無効化されているかを確認するために、以下のようなコードを使ってチェックしてみましょう。
sys._is_gil_enabled() # FALSEが返ればOK
以下は、典型的なマルチスレッド処理の例です。
    num_threads = os.cpu_count()

    threads = []

    for i in range(num_threads):
        thread = threading.Thread(target=worker, args=(i, iterations_per_thread))
        threads.append(thread)
        thread.start()

    # Wait for all threads to complete
    for thread in threads:
        thread.join()
各スレッドが実行する処理を、worker 関数に記述します。
ここでは例として、指定された回数 n だけ整数を加算する単純なタスクを実装しています。
def worker(n):
    result = 0
    for i in range(n):
        result += i
全体のコードはこちらになります。コア数/2 のスレッドを生成するようになっています。
全体のコード
import os
import threading
import time
import sys

# Function to perform a CPU-intensive task
def compute_sum(n):
    result = 0
    for i in range(n):
        result += i
    return result

# Function to run the task in a thread
def worker(thread_id, iterations):
    print(f"Thread {thread_id} starting")
    start_time = time.time()
    result = compute_sum(iterations)
    end_time = time.time()
    print(f"Thread {thread_id} finished in {end_time - start_time:.2f} seconds, result: {result}")

# Main function to create and run threads
def main():
    # Check if GIL is enabled
    gil_enabled = sys._is_gil_enabled()
    print(f"GIL enabled: {gil_enabled}")

    # Parameters
    num_threads = os.cpu_count()
    print("Number of threads to use:", num_threads)

    iterations_per_thread = 100_000_000

    # Create threads
    threads = []
    start_time = time.time()
    for i in range(num_threads // 2):
        thread = threading.Thread(target=worker, args=(i, iterations_per_thread))
        threads.append(thread)
        thread.start()

    # Wait for all threads to complete
    for thread in threads:
        thread.join()

    end_time = time.time()
    print(f"Total execution time: {end_time - start_time:.2f} seconds")

if __name__ == "__main__":
    main()
実行しましょう。
以下は、私の mac 環境で実行した際の結果です。
ご覧のとおり、全体の処理時間と各スレッドの処理時間がほぼ同じであることから、
すべてのスレッドが並列(パラレル)に実行されていたことが確認できます。
これは、GIL フリー環境で複数の CPU コアが有効に使われている証拠です。

比較のために、GILフリー対応していない、素の3.14で試して見ましょう。バーチャル環境を削除して、3.14をインストールします。
rm -rf .venv
uv python pin 3.14
uv sync
cat .venv/pyvenv.cfg
実行します。ご覧の通り、複数のスレッドのGIL争奪戦になるため、全体の実行時間はシングル・スレッドで実行したのとほぼ同じになります。

上の結果で、GILは5msで強制的に取り上げられるプリエンプティブな作りになっているので、それぞれのスレッドの終了時間はほぼ同時になっています。
The
intervalvalue is available for the user to read and modify
using the Python APIsys.{get,set}switchinterval().
CPythonの実装はceval_gil.cにあります。特定のスレッドが繰り返しGILを取得しないような作りになっています。
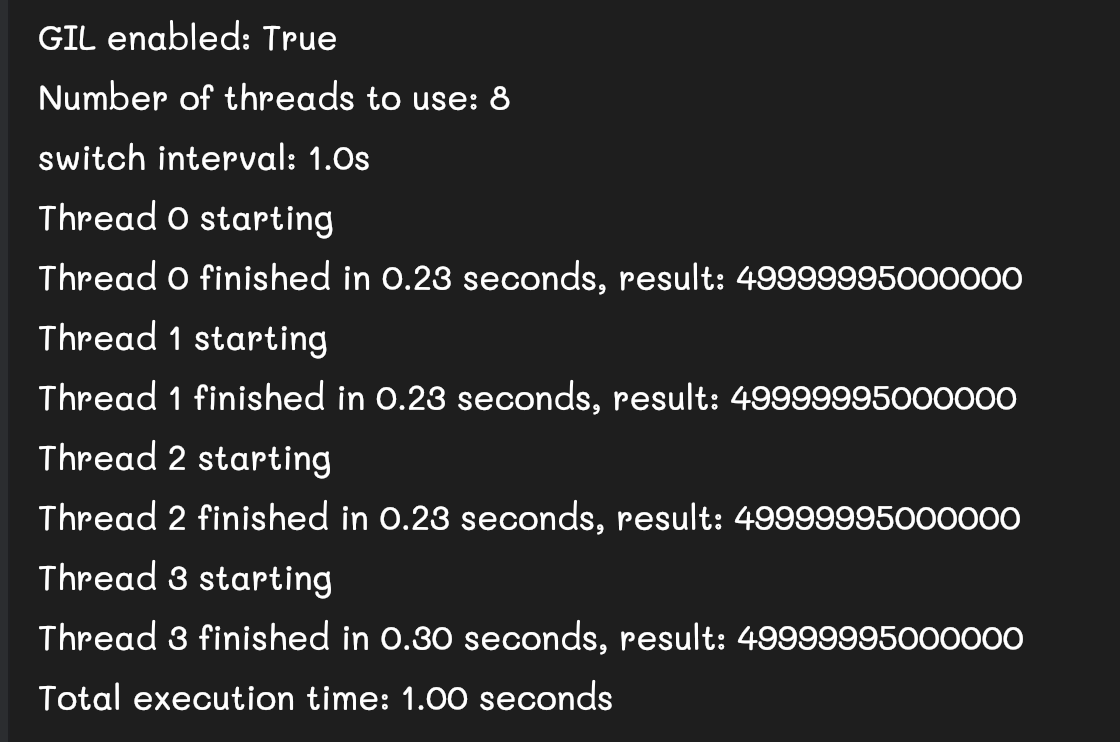
試しに、setswitchintervalで1秒に変更して見ましょう。
sys.setswitchinterval(1.000) # 1秒
このように Thread0 から3が、逐次的に実行されたことがわかります。スレッドが完了するまでGILを掴んで離さないため、他のスレッドがロック待ちになったためです。
参考
Discussion