🌈
【Unity】レインボーロードを作る
はじめに
Unityで一定時間ごとに色相が変わるオブジェクトを並べて、虹色に光る道を作ります。
目標物
制作例
実装環境
Unity 2021.3.0f1
制作
並べたタイルの色相を一様に変化させる
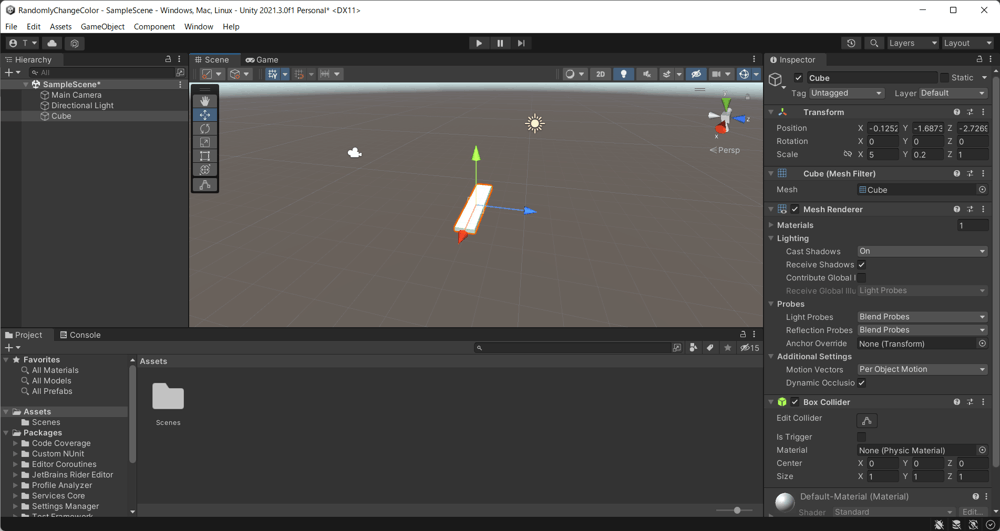
タイルとして並べるオブジェクトを作成します。

後にTileと命名しました
Emptyオブジェクトを作成し、コンポーネントに新規スクリプトLayOutTiles.csを作成します。
LayOutTiles.cs
using System.Collections;
using System.Collections.Generic;
using UnityEngine;

public class LayOutTiles : MonoBehaviour
{
    public GameObject tile;
    // Start is called before the first frame update
    void Start()
    {
        for (int i=0;i<=30;i++)
        {
           GameObject obj = Instantiate(tile, new Vector3(0f, 0f, -1f*i), Quaternion.identity);
            //(0,0,0)から(0,0,30)までz座標を-1ずつずらしてオブジェクトをインスタンス化(クローン)
        }
    }

    // Update is called once per frame
    void Update()
    {
    }
}
その後、TileオブジェクトにColorChange.csを作成します。
ColorChange.cs
using System.Collections;
using System.Collections.Generic;
using UnityEngine;

public class ColorChange : MonoBehaviour
{
    public float duration;
    public GameObject tile;

    // Start is called before the first frame update
    void Start()
    {
    }

    // Update is called once per frame
    void Update()
    {
        float theta = Time.time/duration*10;
        /*
        * Time.time: ゲーム開始からの経過時間(秒)
        * theta = Time.timeでも時間によって色相を変えることは可能だが、間隔を変えられるようにTime.time/durationに
        * 1から100の間で数値変更できるようTime.time/duration*10に
         */
        float amp = (Mathf.Cos(theta)+1.0f)/2;

        /*
         * -1 <= Mathf.Cos(theta) <= 1
         * 0 <= Mathf.Cos(theta)+1.0f <= 2
         * 0 <= (Mathf.Cos(theta)+1.0f)/2 <= 1
         */
        tile.GetComponent<Renderer>().material.color = Color.HSVToRGB(amp, 1, 1);
        /*
         * Color.HSVToRGBの戻り値はColor入力された値と一致するHSVを持つ不透明色
         * ゲームオブジェクト"tile"のcolorに(H, S, V)=(0,1,1)~(1,1,1)をセット
        */
    }
}
TileオブジェクトをAssetsにドラッグ&ドロップしてPrefab化します。
その後、TileオブジェクトのColorChangeコンポーネント内"tile"・GameManagerオブジェクトのLayOutTilesコンポーネント内"tile"に、それぞれTileオブジェクトをアタッチします。
ここまでで、並べたタイルの色相が一様に変化するようになります。
並べたタイルの色相変化処理にランダムな初期値を与える
ColorChange.csを下記のように編集します。
ColorChange.cs
using System.Collections;
using System.Collections.Generic;
using UnityEngine;

public class ColorChange : MonoBehaviour
{
    public float duration;
    public GameObject tile;
    public float initial;
    // Start is called before the first frame update
    void Start()
    {
        initial = Random.value;
        //Random.value: 0.0~1.0の範囲のランダムな値を返す
    }

    // Update is called once per frame
    void Update()
    {
        float theta = (initial+Time.time)/duration*10;
        /*
         * initialの値をクローンされる毎に変えると、初期値がずれた状態で等間隔に色相が変わる
         */
        float amp = (Mathf.Cos(theta)+1.0f)/2;

        tile.GetComponent<Renderer>().material.color = Color.HSVToRGB(amp, 1, 1);
    }
}
先ほど追加した変数initialを用いて、タイルそれぞれの色相変化処理に等間隔に増加する初期値を与えられれば良さそうです。
レインボーロード完成
ColorChange.csを下記のように編集します。
ColorChange.cs
using System.Collections;
using System.Collections.Generic;
using UnityEngine;

public class ColorChange : MonoBehaviour
{
    public float duration;
    public GameObject tile;
    public float initial;
    // Start is called before the first frame update
    void Start()
    {
        //initial = Random.value;
        //↑削除

    }

    // Update is called once per frame
    void Update()
    {
        float theta = (initial+Time.time)/duration*10;
        /*
         * initialの値をクローンされる毎に変えると、初期値がずれた状態で等間隔に色相が変わる
         */
        float amp = (Mathf.Cos(theta)+1.0f)/2;

        tile.GetComponent<Renderer>().material.color = Color.HSVToRGB(amp, 1, 1);
    }
}
LayOutTiles.csを下記のように編集します。
LayOutTiles.cs
using System.Collections;
using System.Collections.Generic;
using UnityEngine;

public class LayOutTiles : MonoBehaviour
{
    public GameObject tile;
    // Start is called before the first frame update
    void Start()
    {
        float count = 0;

        for (int i=0;i<=30;i++)
        {
            GameObject obj = Instantiate(tile, new Vector3(0f, 0f, -1f*i), Quaternion.identity);
            obj.GetComponent<ColorChange>().initial = count;
            //インスタンス化したオブジェクトのColorChangeスクリプト内にある変数initialにcountを代入
            count += 0.1f;
            //countの値を0.1ずつ変える
	    //countの増加幅を小さくするほど、タイル間の色相がなめらかに変化します
        }
    }

    // Update is called once per frame
    void Update()
    {
    }
}
これでレインボーロードは完成です。
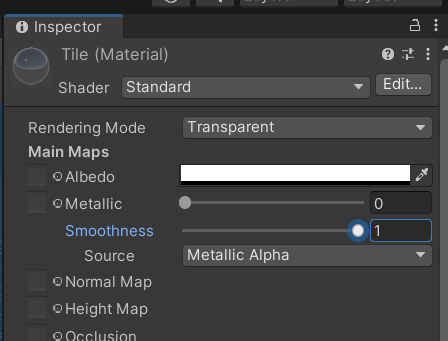
おまけ: 透明感を出す
- Rendering Mode: Transparent
- Smoothness: 1
- Albedo内A: 0
新規にマテリアルを作成し、上記のように設定を変更し、Tile Prefabにアタッチします。

A(透明度)はAlbedoの色表示をクリックすると変えられます
ColorChange.csを下記のように編集します。
ColorChange.cs
using System.Collections;
using System.Collections.Generic;
using UnityEngine;

public class ColorChange : MonoBehaviour
{
    public float duration;
    public GameObject tile;
    public float initial;
    // Start is called before the first frame update
    void Start()
    {
    }

    // Update is called once per frame
    void Update()
    {
        float theta = (initial+Time.time)/duration*10;
        float amp = (Mathf.Cos(theta)+1.0f)/2;
        Color tileColor = Color.HSVToRGB(amp, 1, 1);
        // 透明度だけを変更するメソッドがないので、Color.HSVToRGB(amp, 1, 1)で得られるRGBの値だけを用いて色のセットをする
        tile.GetComponent<Renderer>().material.color = new Color(tileColor.r, tileColor.g, tileColor.b, 0.5f);
	// Color型はRGBA(RGB + 透明度)で指定できるので、ここに1未満の数値を入れれば時間経過で色相が変わる透明度1未満の色が作れる
    }
}
これでタイルに透明感を出せました。
この作り方の場合は、タイルがより細かく分かれているほうが見栄えがいいと思います。
参考
- Unityで一定時間ごとに色(色相)を変える - まゆたまガジェット開発逆引き辞典
- いろいろなオブジェクトのクローン(複製)について - ソフトライム
- Object.Instantiate - Unity Documentation
- Time.time - Unity Documentation
- Color.HSVToRGB - Unity Documentation
- Random.value - Unity Documentation
- Rendering Mode - Unity Documentation
付録
ColorChange.cs コメント省略版
ColorChange.cs
using System.Collections;
using System.Collections.Generic;
using UnityEngine;

public class ColorChange : MonoBehaviour
{
    public float duration;
    public GameObject tile;
    public float initial;
    // Start is called before the first frame update
    void Start()
    {
    }

    // Update is called once per frame
    void Update()
    {
        float theta = (initial+Time.time)/duration*10;
        float amp = (Mathf.Cos(theta)+1.0f)/2;
        tile.GetComponent<Renderer>().material.color = Color.HSVToRGB(amp, 1, 1);
    }
}
LayOutTiles.cs コメント省略版
LayOutTiles.cs
using System.Collections;
using System.Collections.Generic;
using UnityEngine;

public class LayOutTiles : MonoBehaviour
{
    public GameObject tile;
    // Start is called before the first frame update
    void Start()
    {
        float count = 0;

        for (int i=0;i<=30;i++)
        {
            GameObject obj = Instantiate(tile, new Vector3(0f, 0f, -1f*i), Quaternion.identity);
            obj.GetComponent<ColorChange>().initial = count;
            count += 0.1f;
        }
    }

    // Update is called once per frame
    void Update()
    {
    }
}
Discussion