Open13
Djangoハンズオンレクチャ覚書1
Djangoを初心者の後輩に教えるときのメモ書きです
ディレクトリを作成します
macTerminal
$ mkdir django;cd django
$ mkdir tutorial;cd tutorial
windowsPowershell
> mkdir django;cd django
> mkdir tutorial;cd tutorial
Python仮想環境を作成し有効にします
macTerminal
$ python -m venv venv
(venv) $ source venv/bin/activate
windowsPowershell
> python -m venv venv
> cmd
> venv\Scripts\activate.bat
(venv) >
Djangoをインストールします
macTerminal
(venv) $ pip install django
windowsPowershell
(venv) > pip install django
webApp1という名前のプロジェクトを作成します
macTerminal
(venv) $ django-admin startproject webApp1
(venv) $ ls
venv	webApp1
windowsPowershell
(venv) > django-admin startproject webApp1
(venv) > dir
 c:\dev\django\tutorial のディレクトリ

2021/05/18  14:02    <DIR>          .
2021/05/18  14:02    <DIR>          ..
2021/05/18  09:36    <DIR>          venv
2021/05/18  14:01    <DIR>          webApp1
webApp1プロジェクトのサーバを開始します
macTerminal
(venv) $ cd webApp1
(venv) $ python manage.py runserver
windowsPowershell
(venv) > cd webApp1
(venv) > python manage.py runserver
ブラウザで動作を確認します
- URL:http://localhost:8000/ または http://127.0.0.1:8000/
- 以下のように表示されれば動作成功です
未適用のマイグレイションを適用します
-
ctrl+Cコマンドでサーバを停止させます - マイグレーションを適用します
macTerminal
(venv) $ python manage.py migrate
windowsPowershell
(venv) > python manage.py migrate
Djangoアプリbbsを作成します
macTerminal
(venv) $ python manage.py startapp bbs
windowsPowershell
(venv) >python manage.py startapp bbs
アプリbbsのディレクトリ構造を確認します
macTerminal
(venv) $ pwd
/Users/sharland/dev/django/tutorial/webApp1
(venv) $ tree
.
├── bbs
│   ├── __init__.py
│   ├── admin.py
│   ├── apps.py
│   ├── migrations
│   │   └── __init__.py
│   ├── models.py
│   ├── tests.py
│   └── views.py
├── db.sqlite3
├── manage.py
└── webApp1
    ├── __init__.py
    ├── __pycache__
    │   ├── __init__.cpython-37.pyc
    │   ├── settings.cpython-37.pyc
    │   ├── urls.cpython-37.pyc
    │   └── wsgi.cpython-37.pyc
    ├── asgi.py
    ├── settings.py
    ├── urls.py
    └── wsgi.py

4 directories, 18 files
windowsPowershell
・・・・・
設定ファイルsettings.pyを編集します
- 設定ファイルパス:django/tutorial/webApp1/settings.py
アプリbbsを登録します
- 設定箇所:
INSTALLED_APPS - 追加内容:
'bbs.apps.BbsConfig',
settings.py
INSTALLED_APPS = [
    'django.contrib.admin',
    'django.contrib.auth',
    'django.contrib.contenttypes',
    'django.contrib.sessions',
    'django.contrib.messages',
    'django.contrib.staticfiles',
    'bbs.apps.BbsConfig',
日本語対応を登録します
- 設定ファイルパス:django/tutorial/webApp1/settings.py
- 設定箇所:
# Internationalization - 追加内容:
-
LANGUAGE_CODE:'ja' -
TIME_ZONE:'Asia/Tokyo'
-
settings.py
LANGUAGE_CODE = 'ja'
TIME_ZONE = 'Asia/Tokyo'
Postモデルを設計します
| 適用 | 項目1 | 項目2 | 項目3 |
|---|---|---|---|
| 項目名 | タイトル | 投稿内容 | 投稿日時 |
| 仕様 | 最大長150バイト | 自動追加 |
Postモデルを実装します
- 実装ファイルパス:django/tutorial/webApp1/bbs/models.py
- 実装コード
-
from django.db import modelsは最初から実装されています
-
models.py
from django.db import models

class Post(models.Model):
  title = models.CharField("タイトル", max_length=150,)
  body = models.TextField("投稿内容")
  posted_at = models.DateTimeField(("投稿日時"), auto_now_add=True,)
マイグレーションします
macTerminal
(venv) $ python manage.py makemigrations
Migrations for 'bbs':
  bbs/migrations/0001_initial.py
    - Create model Post
windowsPowershell
(venv) >python manage.py makemigrations
Postモデルに必要な変更をデータベースに加えます
macTerminal
(venv) $ python manage.py migrate
Operations to perform:
  Apply all migrations: admin, auth, bbs, contenttypes, sessions
Running migrations:
  Applying bbs.0001_initial... OK
windowsPowershell
(venv) >python manage.py migrate
Operations to perform:
  Apply all migrations: admin, auth, contenttypes, bbs, sessions
Running migrations:
  Applying folderAccess.0001_initial... OK
Django Shellを起動します
macTerminal
(venv) $ python manage.py shell
Python 3.7.4 (default, Aug 13 2019, 15:17:50)
[Clang 4.0.1 (tags/RELEASE_401/final)] on darwin
Type "help", "copyright", "credits" or "license" for more information.
(InteractiveConsole)
>>>
windowsTerminal
(venv) c:\dev\django\tutorial\webApp1>python manage.py shell
Python 3.9.5 (tags/v3.9.5:0a7dcbd, May  3 2021, 17:27:52) [MSC v.1928 64 bit (AMD64)] on win32
Type "help", "copyright", "credits" or "license" for more information.
(InteractiveConsole)
>>>
POSTモデルを読み込んでデータを1件登録します
>>> from bbs.models import Post
>>> Post.objects.create(title="最初の投稿", body="これは最初の投稿です")
<Post: Post object (1)>
データベースに登録したデータの1レコード目を読み込みます
>>> post = Post.objects.first()
>>> post.title
'最初の投稿'
>>> post.body
'これは最初の投稿です'
>>>
Django Shellを終了します
>>> quit()
-
ctrl+Dを押下しても終了することができます
管理者ユーザを作成します
macTerminal
(venv) $ python manage.py createsuperuser
ユーザー名 (leave blank to use 'sharland'): teruroom
メールアドレス: teruroom@mail.site.com
Password:
Password (again):
Superuser created successfully.
windowsPowershell
(venv) c:\dev\django\tutorial\webApp1>python manage.py createsuperuser
ユーザー名 (leave blank to use 'sharland'): teruroom
メールアドレス: teruroom@mail.site.com
Password:
Password (again):
Superuser created successfully.
管理者ユーザでDjango管理サイトにログインします
サーバを起動します
macTerminal
(venv) $ python manage.py runserver
Watching for file changes with StatReloader
Performing system checks...

System check identified no issues (0 silenced).
May 10, 2021 - 23:03:00
Django version 3.2.2, using settings 'webApp1.settings'
Starting development server at http://127.0.0.1:8000/
Quit the server with CONTROL-C.
windowsPowershell
(venv) c:\dev\django\tutorial\webApp1>python manage.py runserver
Watching for file changes with StatReloader
Performing system checks...

System check identified no issues (0 silenced).
May 18, 2021 - 20:15:07
Django version 3.2.3, using settings 'webSite.settings'
Starting development server at http://127.0.0.1:8000/
Quit the server with CTRL-BREAK.
ブラウザでDjango管理サイトにアクセスし、ログインします
- URL:http://127.0.0.1:8000/admin/
- ユーザー名:teruroom
- パスワード:*******
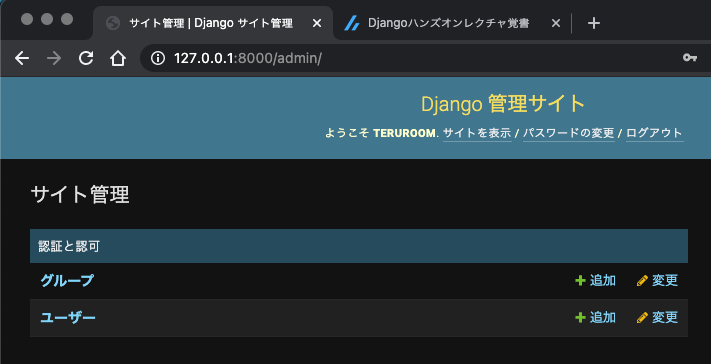
Django管理サイトが表示されます
Django管理サイトにbbs POSTモデルを登録します
- 実装ファイルパス:django/tutorial/webApp1/bbs/admin.py
- 実装コード
-
from django.contrib import adminは最初から実装されています
-
admin.py
from django.contrib import admin
from bbs.models import Post

admin.site.register(Post)
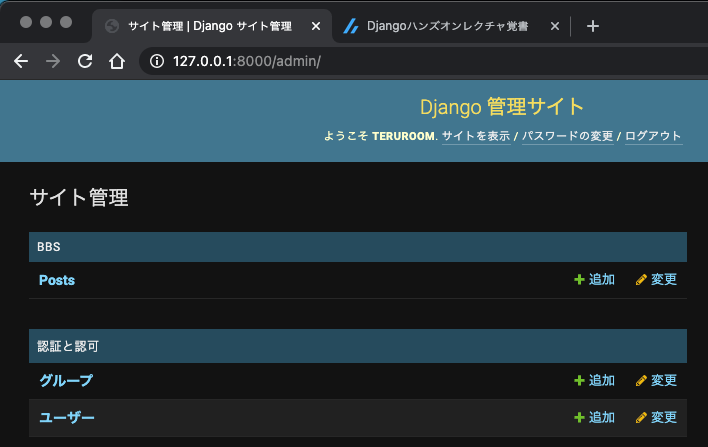
Django管理サイトをリロードします
BBSアプリにPostモデルが追加されています
投稿内容を確認します
-
BBSのPostsリンクアンカーをクリックします -
Post object (1)リンクアンカーをクリックすると投稿内容が表示されます
投稿の新規追加、削除、変更ができます
モデルを参照します
Django Shellを起動します
macTerminal
(venv) $ python manage.py shell
Python 3.7.4 (default, Aug 13 2019, 15:17:50)
[Clang 4.0.1 (tags/RELEASE_401/final)] on darwin
Type "help", "copyright", "credits" or "license" for more information.
(InteractiveConsole)
>>>
windowsPowershell
(venv) c:\dev\django\tutorial\webApp1>python manage.py shell
Python 3.9.5 (tags/v3.9.5:0a7dcbd, May  3 2021, 17:27:52) [MSC v.1928 64 bit (AMD64)] on win32
Type "help", "copyright", "credits" or "license" for more information.
(InteractiveConsole)
>>>
bbsアプリからPostモデルをインポートします
>>> from bbs.models import Post
投稿一覧を取得します
>>> Post.objects.all()
<QuerySet [<Post: Post object (1)>, <Post: Post object (2)>]>
一つ目の投稿を取得します
>>> Post.objects.all()[0]
<Post: Post object (1)>
投稿内容を全て取得します
-
forループを使って全ての投稿を取得します
>>> for post in Post.objects.all():
...     print(post.id, post.title, post.body, post.posted_at)
...
1 最初の投稿 これは最初の投稿です 2021-05-09 15:04:36.356171+00:00
2 二つ目の投稿 Django管理サイトから[POSTを追加]ボタンを押してこの投稿をしました 2021-05-10 14:37:16.195718+00:00
3 今日は暑いですね 気温が25°C以上の夏日だそうです。汗をかきそうです。 2021-05-11 14:22:19.378899+00:00
-
post.id:ユニークキーとしてDjangoにより自動採番されます
特定のデータを1つ取り出します
- 引数で
id番号を指定します -
id番号は1から始まります
>>> post = Post.object.get(id=2)
Traceback (most recent call last):
  File "<console>", line 1, in <module>
AttributeError: type object 'Post' has no attribute 'object'
>>> post.title
'二つ目の投稿'
モデルを作成、更新します
投稿内容を作成します
-
create()メソッドを利用して新規作成します
>>> Post.objects.create(title="4つ目の投稿", body="4つ目の投稿の本文です。")
投稿内容を更新します
-
save()メソッドを利用して投稿内容を取り出します - 取り出した投稿内容のプロパティに値を設定し、
save()メソッドを利用してモデルに保管します
>>> post = Post.objects.get(id=3)
>>> post.title = "3つ目の投稿です"
>>> post.save()
作成、更新した投稿のタイトルを確認します
>>> for post in Post.objects.all():
...     print(post.title)
...
最初の投稿
二つ目の投稿
3つ目の投稿です
4つ目の投稿
投稿一覧ビューを作成します
ビューにpost_item_list()メソッドを実装します
- 実装ファイルパス:
django/tutorial/webApp1/bbs/views.py - 実装コード
- 最初から実装されている
from django.shortcuts import renderは削除します -
bbsアプリのmodelsオブジェクトからPostモデルをimportして利用します -
TemplateResponse()メソッドの引数に以下を与えます- ブラウザからの
responseオブジェクト - テンプレートHTMLファイル名:
post_item_list.html - 投稿内容一覧オブジェクト:テンプレートに渡されます
- ブラウザからの
- 最初から実装されている
views.py
from django.template.response import TemplateResponse
from bbs.models import Post

def post_item_list(request):
  return TemplateResponse(
    request,
    "post_item_list.html",
    {"postList": Post.objects.all()}
  )
URLリストに登録します
- 実装ファイルパス:django/tutorial/webApp1/webApp1/url.py
- 実装コード
-
bbsアプリのviewsオブジェクトからpost_item_list()メソッドをインポートします-
from bbs.views import post_item_listを追加します
-
-
urlpatternsにベースURL''が指定されたらpost_item_list()メソッドを呼び出すように指定します - ベースURL
''にname引数でpost_item_listという名前をつけます-
path('', post_item_list),を追加します
-
-
urls.py
from django.contrib import admin
from django.urls import path
from bbs.views import post_item_list

urlpatterns = [
    path('admin/', admin.site.urls),
    path('', post_item_list, name="post_item_list"),
]
投稿一覧テンプレートを作成します
templatesディレクトリをbbsアプリディレクトリの直下に新規作成します
- ディレクトリ名は必ず
templatesとする必要があります
macTerminal
(venv) $ mkdir bbs/templates
windowsPowershell
(venv) c:\dev\django\tutorial\webApp1>mkdir bbs/templates
テンプレートpost_item_list.htmlを実装します
- 実装ファイルパス:django/tutorial/webApp1/bbs/template/post_item_list.html
macTerminal
(venv) $ touch bbs/templates/post_item_list.html
windowsPowershell
(venv) >powershell New-Item bbs/templates/post_item_list.html
- 実装コード
- このテンプレートには
postという名前のオブジェクトがTemplateResponse()メソッドの引数で渡されます-
postオブジェクトのid、title、posted_atの各プロパティの値を画面に表示するように指定します
-
- リンクアンカー
<a>のリンク先URLにはurl.pyの配列urlpatterns内のpath()メソッドのname引数で与えられたルートURL'postitem/<int:item_id>/'の名前post_item_contentsを指定します。URL中のitem_idにはpostオブジェクトのidプロパティを指定します- これで投稿内容画面に進むことができます
- このテンプレートには
post_item_list.html
<h1>掲示板</h1>
<table>
  <tr><th>ID</th><th>タイトル</th><th>投稿日時</th></tr>
  {% for post in postList %}
    <tr>
      <td>{{ post.id }}</td>
      <td><a href="{% url 'post_item_contents'  post.id %}">{{ post.title }}</a></td>
      <td>{{ post.posted_at }}</td>
    </tr>
  {% endfor %}
</table>
ブラウザで動作を確認します
- URL:http://localhost:8000/ または http://127.0.0.1:8000/
- 以下のように表示されれば動作成功です
投稿内容画面を作ります
URLを設計します
- URL:
/postitem/item_id番号/
URLを登録します
- 実装ファイルパス:
django/tutorial/webApp1/webApp1/url.py - 実装コード
-
bbsアプリのviewsオブジェクトからpost_item_list()とpost_item_contents()メソッドをインポートします-
from bbs.views import post_item_list, post_item_contentsを追加します
-
- urlpatternsに投稿内容画面のURL
postitem/<int:item_id>/が指定されたらpost_item_contents()メソッドを呼び出すように指定します - パス
postitem/<int:item_id>/にname引数で"post_item_contents"という名前をつけます-
path('postitem/<int:item_id>', post_item_list, name="post_item_contents"),を追加します
-
-
url.py
・・省略・・
from bbs.views import post_item_list, post_item_contents

urlpatterns = [
    path('admin/', admin.site.urls),
    path('', post_item_list, name="post_item_list"),
    path('postitem/<int:item_id>/', post_item_contents, name="post_item_contents"),
]
ビューにpost_item_contents()メソッドを実装します
- 実装ファイルパス:
django/tutorial/webApp1/bbs/views.py - 実装コード
- 引数としてブラウザからの
responseの他にID番号item_idをとります - 投稿内容を
Post.objects.get(id=item_id)で取得します-
item_idをget()メソッドの引数とします
-
-
TemplateResponse()メソッドの引数に以下を与えます- ブラウザからの
responseオブジェクト - テンプレートHTMLファイル名:
post_item_contents.html - 投稿内容一覧オブジェクト:テンプレートに渡されます
- ブラウザからの
- 引数としてブラウザからの
views.py
・・省略・・
def post_item_contents(request, item_id):
  post = Post.objects.get(id=item_id)
  return TemplateResponse(
    request,
    "post_item_contents.html",
    {"post":  post}
  )
投稿内容テンプレートを作成します
テンプレートpost_item_contents.htmlを実装します
- 実装ファイルパス:django/tutorial/webApp1/bbs/template/post_item_contents.html
macTerminal
(venv) $ touch bbs/templates/post_item_contents.html
windowsPowershell
(venv) >powershell New-Item bbs/templates/post_item_contents.html
- 実装コード
- このテンプレートには
postという名前のオブジェクトがTemplateResponse()メソッドの引数で渡されます-
postオブジェクトのtitle、body、posted_at各プロパティの値を画面に表示するように指定します
-
- リンクアンカー
<a>のリンク先URLにはurl.pyの配列urlpatterns内のpath()メソッドのname引数で与えられたルートURL''の名前post_item_listを指定します- これで投稿一覧画面に戻ることができます
- このテンプレートには
post_item_contents.html
<h1>{{ post.title }}</h1>

投稿日:{{ post.posted_at }}
<hr/>

{{ post.body }}

<hr/>
<a href="{% url 'post_item_list' %}"><=投稿一覧に戻る</a>
ブラウザで動作を確認します
- URL:http://localhost:8000/3/ または http://127.0.0.1:8000/3/
- 以下のように表示されれば動作成功です