App Actions on Windows の Action Provider(COMタイプ)をつくる
もくじ
環境/使うもの
- 環境
- 2025/08/10 頃に実験
- VisualStudio2022 ver 17.14.11
- .net8
- 使うもの
- TargetFramework:net8.0-windows10.0.26100.0
- OSのバージョン等もすべて10.0.26100.0以上
- WindowsSdkPackageVersion:10.0.26100.67-preview
- テストツール:App Actions Testing Playground 0.1.0.62
ベースにするMS Docs
下記を見ながら実装実験した。
MicrosoftのAction Providerに関するドキュメント
COMのActionProviderのサンプル
ただ、2025/08/10前後時点で、この2つ(docとサンプル)は整合性が取れておらず、docの中でこれを使えというSDKとサンプルで使ってるそれとのバージョンが違っているせいで、両方を見ながら実装を試すと謎に動かないということが多発した。
ので、全部は理解できてないがなんとか動かせた時点までに行った手順を以下にまとめる。
下準備
必要なパッケージを入れる。
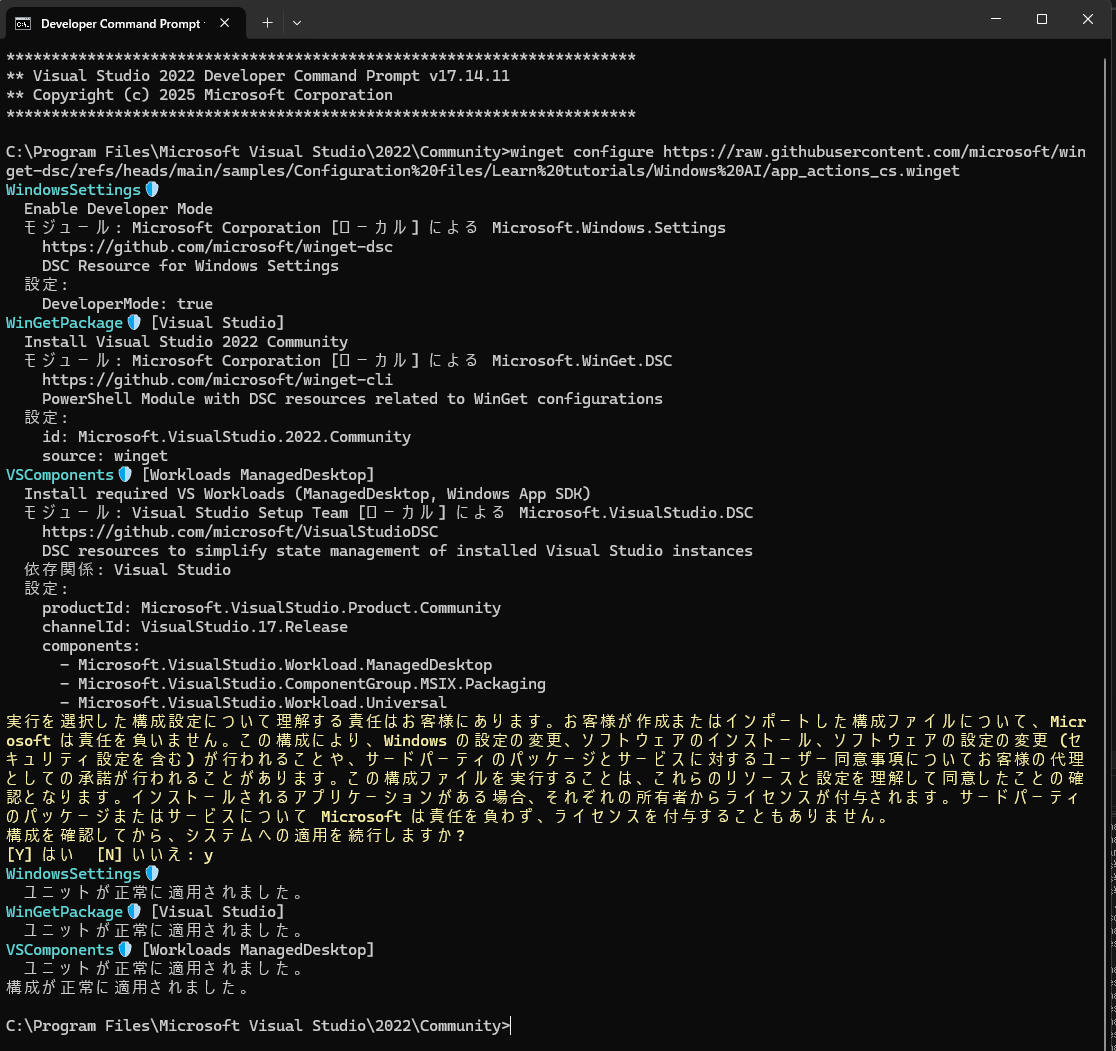
VS2022 開発者コマンドプロンプトを開き、下記を実行する。
(自宅で実験したのでCommunityを使用。)
winget configure https://raw.githubusercontent.com/microsoft/winget-dsc/refs/heads/main/samples/Configuration%20files/Learn%20tutorials/Windows%20AI/app_actions_cs.winget
実行すると、こんな感じになる。
プロジェクトを作る
C#のコンソールアプリを、VSのテンプレートから作成する。
今回はMyActionProviderというソリューション/プロジェクト名にした。

プロジェクトをWindows対象にする
プロジェクトを、Windowsの10.0.26100.0対象にする。
プロジェクトのプロパティを開いて、下記のように設定する。

プロジェクトの設定にWindowsSdkPackageVersionの指定を入れる
プロジェクトの.csprojを開き、下記を追加する。
(現時点ではSDKに標準で入っていない機能だから、プレビュー版のSDKを指定する必要があるっぽい)
<WindowsSdkPackageVersion>10.0.26100.67-preview</WindowsSdkPackageVersion>
現時点では、.csprojはこうなった。
(x64以外のコンフィグレーション(AnyCPU)は消した)
<Project Sdk="Microsoft.NET.Sdk">

  <PropertyGroup>
    <OutputType>Exe</OutputType>
    <TargetFramework>net8.0-windows10.0.26100.0</TargetFramework>
    <ImplicitUsings>enable</ImplicitUsings>
    <Nullable>enable</Nullable>
    <Platforms>x64</Platforms>
    <WindowsSdkPackageVersion>10.0.26100.67-preview</WindowsSdkPackageVersion>
  </PropertyGroup>

</Project>
パッケージプロジェクトを追加する
App Actions on Windowsを使うには、パッケージIDが必要。
イコール、パッケージアプリにする必要があるので、上のコンソールアプリをパッケージするためのパッケージプロジェクトを追加した。

ターゲットバージョンは下記のようにした。

そのパッケージPJから、コンソールアプリを参照に入れる。
パッケージプロジェクトのPackage.appxManifestの依存ファイルのバージョンを上げる
Dependenciesの中に書かれているWindows.UniversalとWindows.Desktopのバージョン指定を上げる。今回は下記のようにした。
  <Dependencies>
	  <TargetDeviceFamily Name="Windows.Universal" MinVersion="10.0.22000.0" MaxVersionTested="10.0.22621.0" />
	  <TargetDeviceFamily Name="Windows.Desktop" MinVersion="10.0.22000.0" MaxVersionTested="10.0.22621.0" />
  </Dependencies>
アクション定義のための.jsonファイルを追加する
コンソールアプリのプロジェクトの方に、アプリが実装するActionをWindowsに知ってもらうためのjsonファイルを作成する。
今回は、RegistActions.jsonというファイルを追加する。

作成したファイルの内容は下記のようにした。
※clsidは、VSのGUID作成ツールで今回新しく作成したGUIDを使用した。
{
  "version": 2,
  "actions": [
    {
      "id": "MyActionProvider.DisplayMessage",
      "description": "メッセージを表示します。",
      "usesGenerativeAI": false,
      "inputs": [
        {
          "name": "message",
          "kind": "Text"
        }
      ],
      "inputCombinations": [
        {
          "inputs": ["message"],
          "description": "Display message '${message.Text}'"
        }
      ],
      "outputs": [
        {
          "name": "result",
          "kind": "Text"
        }
      ],
      "invocation": {
        "type": "COM",
        "clsid": "E51778ED-4B5A-41A3-A853-119AB7AF0F4F"
      }
    }
  ]
}
このファイルは、アプリのインストール先にもコピーされている必要がある。
内容を編集したら、RegistActions.jsonのビルドアクションを「コンテンツ」にする。
また、ビルドアクションを「新しい場合はコピー」に直す。
パッケージプロジェクトのPackage.appxManifestを編集して、アクションとアプリを紐づける
パッケージプロジェクトのほうのPackage.appxManifestを開いて、下記のように編集する。
編集(追加)したのは下記の「」の部分と、それに必要なnamespaceの追加の部分。
<?xml version="1.0" encoding="utf-8"?>

<Package
  xmlns="http://schemas.microsoft.com/appx/manifest/foundation/windows10"
  xmlns:uap="http://schemas.microsoft.com/appx/manifest/uap/windows10"
  xmlns:rescap="http://schemas.microsoft.com/appx/manifest/foundation/windows10/restrictedcapabilities"
  xmlns:uap3="http://schemas.microsoft.com/appx/manifest/uap/windows10/3"
  xmlns:com="http://schemas.microsoft.com/appx/manifest/com/windows10"
  xmlns:com2="http://schemas.microsoft.com/appx/manifest/com/windows10/2"
  xmlns:com3="http://schemas.microsoft.com/appx/manifest/com/windows10/3"
  IgnorableNamespaces="uap rescap">
<!-- ↑uap3,com,com2,com3の部分を追加した -->

  <Identity
    Name="aba6103a-ea3a-4a81-b70d-79df2c94588e"
    Publisher="CN=masa"
    Version="1.0.0.0" />

  <Properties>
    <DisplayName>MyActionProviderPackage</DisplayName>
    <PublisherDisplayName>masa</PublisherDisplayName>
    <Logo>Images\StoreLogo.png</Logo>
  </Properties>

  <!-- ここのバージョンを更新した -->
  <Dependencies>
	  <TargetDeviceFamily Name="Windows.Universal" MinVersion="10.0.22000.0" MaxVersionTested="10.0.22621.0" />
	  <TargetDeviceFamily Name="Windows.Desktop" MinVersion="10.0.22000.0" MaxVersionTested="10.0.22621.0" />
  </Dependencies>

  <Resources>
    <Resource Language="x-generate"/>
  </Resources>

  <Applications>
    <Application Id="App"
      Executable="$targetnametoken$.exe"
      EntryPoint="$targetentrypoint$">
      <uap:VisualElements
        DisplayName="MyActionProviderPackage"
        Description="MyActionProviderPackage"
        BackgroundColor="transparent"
        Square150x150Logo="Images\Square150x150Logo.png"
        Square44x44Logo="Images\Square44x44Logo.png">
        <uap:DefaultTile Wide310x150Logo="Images\Wide310x150Logo.png" />
        <uap:SplashScreen Image="Images\SplashScreen.png" />
	  </uap:VisualElements>

    <!-- ★ここを追加★ -->
	<Extensions>
		<com2:Extension Category="windows.comServer">
			<com2:ComServer>
				<com3:ExeServer Executable="ExampleAppActionProvider.exe" DisplayName="ExampleAppActionProvider">
					<com:Class Id="E51778ED-4B5A-41A3-A853-119AB7AF0F4F" DisplayName="ExampleAppActionProvider" />
				</com3:ExeServer>
			</com2:ComServer>
		</com2:Extension>
		<uap3:Extension Category="windows.appExtension">
			<uap3:AppExtension Name="com.microsoft.windows.ai.actions" DisplayName="Example App Action Provider" Id="appactionprovider" PublicFolder="Assets">
				<uap3:Properties>
					<Registration xmlns="">registration.json</Registration>
				</uap3:Properties>
			</uap3:AppExtension>
		</uap3:Extension>
	</Extensions>
    </Application>
  </Applications>

  <Capabilities>
    <Capability Name="internetClient" />
    <rescap:Capability Name="runFullTrust" />
  </Capabilities>
</Package>
ここでの変更点は下記。
ComServer の定義
起動するexeの名前を記載した。
また、先ほどRegistActions.jsonで作成したGUIDに、ClassのIdを合わせた。
DisplayNameは好きなものにした。
RegistActions.json の配置場所の設定
パッケージが持っているマニフェストの中に、RegistActions.jsonの置き場所を記載しておくことで、このアプリがどういうActionを持っているか、Windowsが把握できるようにする。
AppExtension のcom.microsoft.windows.ai.actionsという名前の項目を設定することで配置場所を設定する。
DisplayName と Id は、好きなものでよいが、PublicFolderは、パッケージアプリの出力先フォルダの構成に合わせないといけない。要注意。
例えば、今回は、MyActionProvider プロジェクトの中に「Assets」フォルダを作成して、その中にRegistActions.jsonができるようにしているので、
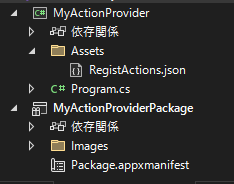
PublicFolderは
PublicFolder="MyActionProvider\Assets"
にする。
コードを書く
今回は、Program.csの中に、必要なものを全部書く。
下記のようなコードを書いた。
using System.Runtime.InteropServices;
using Windows.AI.Actions;
using Windows.AI.Actions.Provider;
using Windows.Foundation;
using WinRT;

namespace MyActionProvider;

internal static class NativeMethods
{
    [DllImport("ole32.dll")]
    internal static extern int CoRegisterClassObject([MarshalAs(UnmanagedType.LPStruct)] Guid rclsid, [MarshalAs(UnmanagedType.IUnknown)] object pUnk, uint dwClsContext, uint flags, out uint lpdwRegister);

    [DllImport("ole32.dll")]
    internal static extern int CoRevokeClassObject(uint dwRegister);
}

internal static class Guids
{
    public const string IClassFactory = "00000001-0000-0000-C000-000000000046";
    public const string IUnknown = "00000000-0000-0000-C000-000000000046";
}

[ComImport, ComVisible(false), InterfaceType(ComInterfaceType.InterfaceIsIUnknown), Guid(Guids.IClassFactory)]
internal interface IClassFactory
{
    [PreserveSig]
    int CreateInstance(IntPtr pUnkOuter, ref Guid riid, out IntPtr ppvObject);
    [PreserveSig]
    int LockServer(bool fLock);
}

[ComVisible(true)]
internal class WidgetProviderFactory<T> : IClassFactory where T : IActionProvider, new()
{
    public int CreateInstance(IntPtr pUnkOuter, ref Guid riid, out IntPtr ppvObject)
    {
        ppvObject = IntPtr.Zero;

        if (pUnkOuter != IntPtr.Zero)
        {
            Marshal.ThrowExceptionForHR(CLASS_E_NOAGGREGATION);
        }

        if (riid == typeof(T).GUID || riid == Guid.Parse(Guids.IUnknown))
        {
            // Create the instance of the .NET object
            ppvObject = MarshalInspectable<IActionProvider>.FromManaged(new T());
        }
        else
        {
            // The object that ppvObject points to does not support the
            // interface identified by riid.
            Marshal.ThrowExceptionForHR(E_NOINTERFACE);
        }

        return 0;
    }

    int IClassFactory.LockServer(bool fLock)
    {
        return 0;
    }

    private const int CLASS_E_NOAGGREGATION = -2147221232;
    private const int E_NOINTERFACE = -2147467262;
}

//-----------------ここから上はアプリ特有ではない部分(CreateInstance内でIActionProvider使ってるが)---------------------

[Guid("E51778ED-4B5A-41A3-A853-119AB7AF0F4F")]
public partial class AppActionProvider : IActionProvider
{
    public IAsyncAction InvokeAsync(ActionInvocationContext context)
    {
        return InvokeAsyncHelper(context).AsAsyncAction();
    }

    async Task InvokeAsyncHelper(ActionInvocationContext context)
    {
        NamedActionEntity[] inputs = context.GetInputEntities();

        //var actionId = context.ActionId;
        var actionId = context.ActionId;
        switch (actionId)
        {
            case "MyActionProvider.DisplayMessage":
                foreach (NamedActionEntity inputEntity in inputs)
                {
                    if (inputEntity.Name.Equals("message", StringComparison.Ordinal))
                    {
                        TextActionEntity entity = (TextActionEntity)(inputEntity.Entity);
                        string message = entity.Text;

                        // ここで、メッセージに対してやりたいことをやる
                        Console.WriteLine(message);

                        string response = "応答メッセージです(responseという名前のテキストエンティティ)";
                        TextActionEntity result = context.EntityFactory.CreateTextEntity(response);
                        context.SetOutputEntity("response", result);
                    }
                }
                break;
            default:
                break;
        }
    }
}

internal class Program
{
    static void Main(string[] args)
    {
        Guid CLSID_Factory = Guid.Parse("E51778ED-4B5A-41A3-A853-119AB7AF0F4F");
        var a = NativeMethods.CoRegisterClassObject(CLSID_Factory, new WidgetProviderFactory<AppActionProvider>(), 0x4, 0x1, out var cookie);

        Console.WriteLine("エンティティ付きのアクションを実行します。エンターを押したら終了します。");
        Console.ReadLine();

        NativeMethods.CoRevokeClassObject(cookie);
    }
}
AppActionProviderクラスに付けているGuidAttributeに指定するGUIDは、先ほどRegistActions.jsonに書いたGUIDと同じにする。
完成
ここまで実装したら、パッケージプロジェクトをスタートアッププロジェクトに指定して、一度実行する。(デバッグビルド版を、PCにインストールするため)
そうすると、下記のような画面が出てくる。

一旦、子のコンソールは閉じる。
次に、
App Actions Testing Playgroundアプリを起動する。
作ったActionのアプリがうまく作成できていて、インストールされていると、「アクションカタログ」画面に以下のように、作ったアクションが表示される。

表示されているアクションを押すと、下のように表示される。
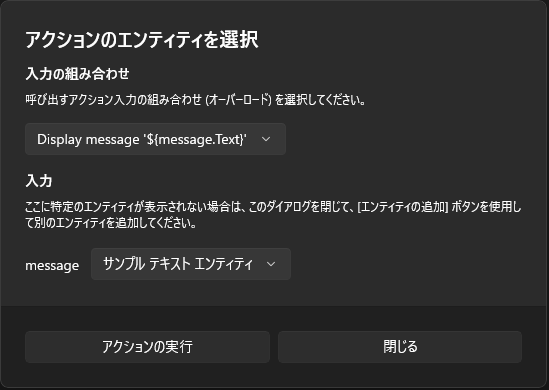
おそらく、標準で「サンプルテキストエンティティ」というエンティティが登録されているので、それを「message」ランで選択して「アクションの実行」を押す。
そうすると、こういう表示が出て、アクションからの出力の内容が表示される。

と同時に、アクションの方のアプリが起動し、アクションが実行されたときの動作をする。
※今回の実験だと、コンソールに入力のエンティティの文字列の内容を表示する。

アプリが起動していないときだと、アプリが起動してアクションを実行する。(上の図の通り)
アプリがすでに起動していると、起動しているアプリの中で、アクションが実行される。例えば、上で起動した後に、コンソールを閉じずに、さらに同じアクションを同じinputで動かすとこうなる。
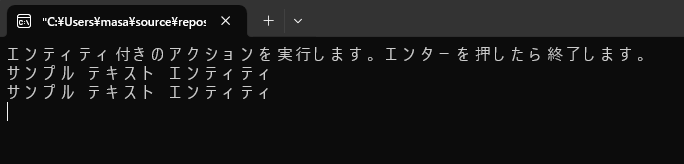
という感じに動作した。これで、簡単なアクションプロバイダーの動作は確認できたと思う。
感想
まだ、Action Providerの機能を十分に使い切れていないので変なことは言えないが、ここまでの挙動は、以前必死になって調べたトーストを押したときにアプリを起動するときの挙動と似ているなと思った。
トーストからアプリ起動させるのよりも、Entityとして画像や電話番号など、種々の情報を渡すことができる、逆に結果を受け取ることができる、というのが便利ポイントになってくるのかなと思う。
MSのbuild2025でも、アクションに対するin/outについては「どういう情報がほしいか、フィードバックください、追加していきます」みたいなことを言っていたので、これからEntityはどんどん変わる/追加されるのだと思う。
※現に、WindowsSdkPackageVersionの10.0.26100.59から10.0.26100.67に上がるだけで、APIのカタチが結構変わって、そのままではビルドできないようになっていた(そのせいで大混乱した)。まだガンガン変わっていきそうな気がする。
また、一番気になるのは、Windows.AI.Actionsという名前空間のものをつかうのに、AI味が感じられないというところ。
唯一、Action登録のためのjsonの中にusesGenerativeAIなる項目があるが、まだ使い方不明。これを活用するときになったら、AI味を帯びてくるのかも?
MSBuild2025動画では、Actionへのinputを要約するとかなんとか言っていた気がするが、どういうことなのかはあまり理解できずだった。
もしくは、Action Provider自体を使う側が、MCPサーバーなどのAI関連機能である想定だったりするのか?
ともかく、とりあえず動かすことはできたので、あと👇を作ってみたい。
- Action Provider(URIタイプ)
- Action Consumer
今回の実験コード
参考
- Get started with App Actions on Windows
App Actionsを自作するときの入り口ドキュメント
- App Actions on Windows のサンプルアプリ
この中に、ActionProvider、Consumer両方のサンプルがあった。
- App Actions Testing Playground アプリ
Discussion