みんしゅみ 宣言的Pillowの夢をみる
PillowをReactみたいに宣言的に書けるライブラリを作ろうという試み
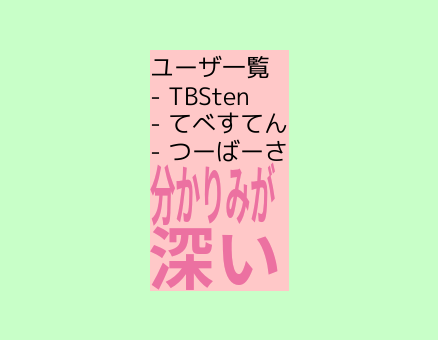
こんな感じのコードを動かしたい
from basic.attribute import a
from basic.element import p
from element import Element
from image import to_image

names = [
    "TBSten",
    "てべすてん",
    "つーばーさ",
]

a_bg_red = a.bgColor((255, 200, 200))
a_side_padding = a.padding(top=0, bottom=0, left=100, right=100)
a_surround_padding = a.padding.all(50)

user_list :list[Element] = [p.text(text=f"- {name}") for name in names]

image = to_image(
    p.column(
        attrs=[
            a.bgColor((200, 255, 200)),
            a_surround_padding,
        ],
        elements=[
            p.column(
                attrs=[
                    a_side_padding,
                    a_bg_red,
                ],
                elements=[
                    p.text("ユーザ一覧"),
                    *user_list,
                    p.img("./test.png"),
                ],
            )
        ],
    )
)

image.save("output.png", save_all=True)
paddingに苦戦中
基本は
size計算 -> offset計算 -> 描画
を淡々とこなしていけばいいはず...

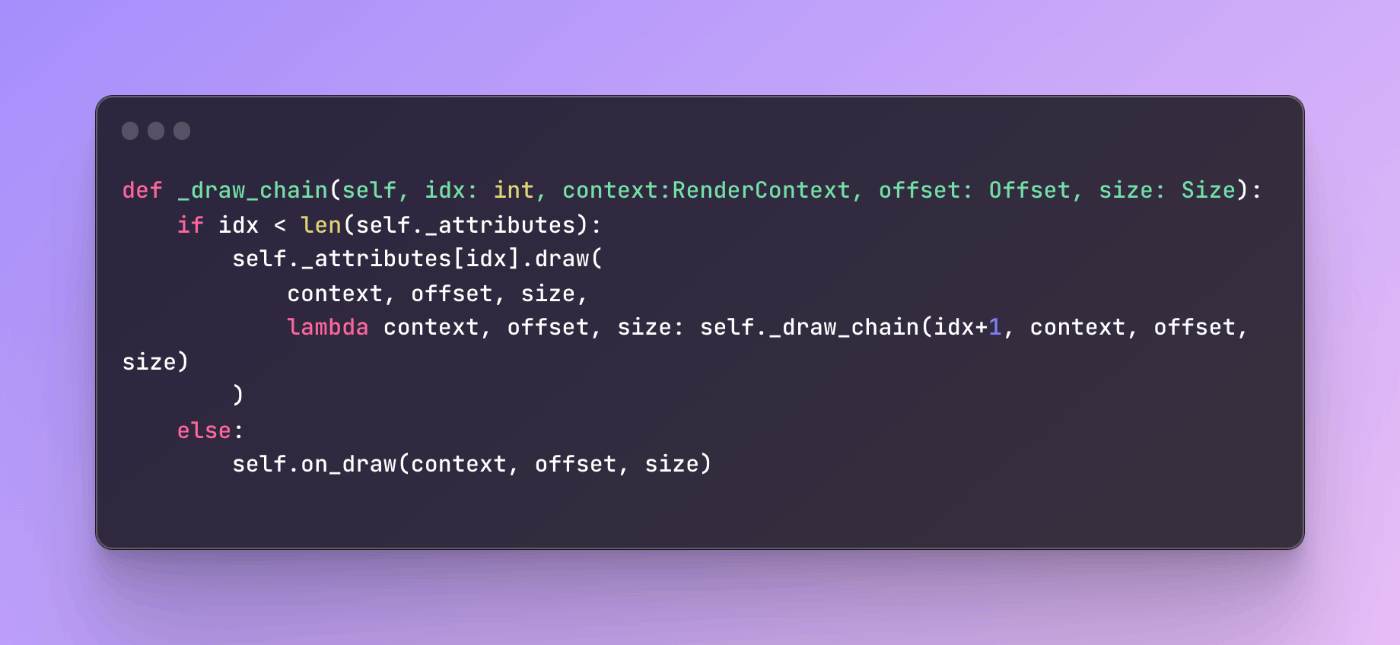
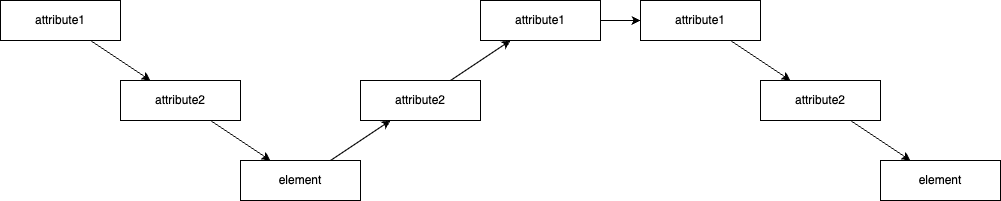
Attributeにon_drawはやして、子要素の内容はdraw_content()させればいいのでは?
class PaddingAttribute:
  def measure_size(...):
    ...
  def on_draw(self, context: RenderContext, offset: Offset, size: Size, draw_context: Callable[[RenderContext, Offset, Size], None]):
    draw_background(...)
    draw_content(...) # 描画位置をいい感じにずらす
そうじゃなくても、draw時にattributeがいざこざできるメソッド生やすのは必須そう。
親element -> 自分(element) とmeasure_sizeとかdrawとか呼び出されるのを
親element -> attribute -> 自分(element)(戒め)
とインターセプトさせるイメージでいいはず
Attributeの実行タイミングの話
全体的に命名のリファクタリングの余地ありまくりやな
再帰をいい感じにしたい

いちいちImage.alpha_compositeしないといかんのめんどい
なーんでtextは何もしなくてもalpha compositeしてくれるのに、rectangleやpasteはalpha compositeしてくれないんやーーー
alpha compositeたくさんしてもあんまパフォーマンスの影響少なそう...?
githubにpushしといた
@vercel/og を使うことになったので触らなーい。けど気が向いたらやろー
色々やりなおしてる
image_drawをキャッシュしてたせいでレイヤー分けが一生できなかったwww
これだけでもネストと行数がすごい
image = to_image(
    ColumnElement(
        children=[
            TextElement(text="test-1"),
            RowElement(
                children=[
                    TextElement(text="test-2-1"),
                    TextElement(
                        attributes=[
                            BackgroundAttribute((0, 0, 255)),
                            PaddingAttribute(24, 24, 24, 24),
                        ],
                        text="test-2-2",
                    ),
                    TextElement(text="test-2-3"),
                ],
            ),
            TextElement(text="test-3"),
        ],
    )
)
こっちの方がいい...?
to_image(
    ColumnElement(
        TextElement(""),
        RowElement(
            TextElement(""),
            BackgroundAttribute(
                (0, 0, 255),
                PaddingAttribute(
                    (24, 24, 24, 24),
                    TextElement(""),
                ),
            ),
            TextElement(""),
        ),
    )
)
本来はこの手のFlutterみたいなネスト多くなる問題が嫌だったからやめたはずなのにこっちの方がいいのかもっていう結論になっちゃってるなぁ
言語との相性ってやっぱあるのかね
こうすると children を child にできるから 可変長引数を最後に指定しないといけない問題 をクリアできるのはいいと感じてる
多分これが一番短い形な気がする
to_image(
    ColumnElement(
        Text(""),
        RowElement(
            Text(""),
            Text("", attrs=background(Color.BLUE).padding(24)),
            Text(""),
        ),
        Text(""),
    )
)
メソッドチェーンはPythonでは拡張性がないから却下
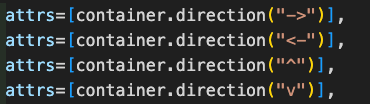
container(container.direction(">"))(
    container(container.direction("v"))(
        text("a"),
        text("b"),
        text("c"),
    ),
    image("./icon.png", size=(100, 100)),
    container(container.direction("v"))(
        text("d"),
        text("e"),
        text("f"),
    ),
)

# or

container(container.direction(">"))(lambda con : [
    container(container.direction("v"))(lambda con: [
        text("a"),
        text("b"),
        text("c"),
    ]),
    image("./icon.png", size=(100, 100)),
    container(container.direction("v"))(lambda con: [
        text("d"),
        text("e"),
        text("f"),
    ]),
])
んーやっぱりwith句でコネコネする方がいいように感じてきてしまう。。。
呼び出しパターンまとめ
image = to_image(
    container(
        attrs=[container.dir.row()],
        children=[
            container(
                attrs=[container.dir.column()],
                children=[
                    text("a"),
                    text("b"),
                    text("c"),
                ],
            ),
            image("./icon.png"),
            container(
                attrs=[container.dir.column()],
                children=[
                    text("d"),
                    text("e"),
                    text("f"),
                ],
            ),
        ],
    )
)
カスタム要素の例
def my_container(attrs:Attrs=[], children:Elements=[]):
  return container(
    attrs=[*attrs],
    children=[
      *children,
    ],
  )

my_container(
  children=[
    ...
  ],
)
-
container+container.dir.row()/container.dir.column()でレイアウト方向を指定する。 - ⭕️ React, flutterなどになるべく近い形。ゆえに馴染み深い人も多いはず...?
- ⭕️ 学習コストは最も低そう。
- ⭕️ カスタム要素が作りやすそう(ただの関数 or 変数のため)
- ❌ 条件分岐や繰り返しが書きにくい。(pythonの使いにくい三項演算子などを使う必要がある)
- ❌ attrsやchildrenの指定の都合上、ネストが深くなる。
@easy_pillow.image
def generate_my_image():
    with container(dir="row"):

        with container(dir="column"):
            text("hoge")
            text("hoge")
            text("hoge")

        image("./icon.png")

        with container(dir="column"):
            text("fuga")
            text("fuga")
            text("fuga")

my_image = generate_my_image()

my_image.save("output.png")
カスタム要素の例
class MyContainer(Element):
  def __init__(self, attrs:Attrs=[]):
    super().__init__(attrs)
  def build(self, content):
    with container(self.attrs):
      content()

with MyContainer():
    ...
- memo:各要素の命名をアッパーキャメルケースにした方が良さそう
- それかカスタム要素には指定のデコレータをつけてそのデコレータ経由でcotnent()を呼び出すとか
- ⭕️ if, forなどをそのまま使える。
- ⭕️ パターン1よりはネストが浅い
- ❌ with句をこのように使うのに初め抵抗(学習コスト)がある
- ❌ generate_my_imageのトップの要素を複数指定できてしまう。
- ❌ 子要素を持つカスタム要素を作りにくい。
image = to_image(
    h_stack()(
        v_stack()(
            text("a"),
            text("b"),
            text("c"),
        ),
        image("./icon.png"),
        v_stack()(
            text("d"),
            text("e"),
            text("f"),
        ),
    )
)

image.save("./output/sample-output.png")
カスタム要素の例
def my_container(attrs: Attrs = []):
  def my_container_impl(*children: Element):
    return container(attrs=[*attrs])(
      *children,
    )
  return my_container_impl

my_container()(
  text(""),
  text(""),
  text(""),
)
- ⭕️ キーワード引数と子要素の指定(位置引数)を両方利用できる。
- ⭕️ ネストも比較的深くなりにくそう
- ❌ 子要素を持つカスタム要素を作りにくそう

flet参考になりそう
attrsは最初の引数じゃなくてもいいのかもしれない
こういう感じらしい
import flet as ft

def main(page: ft.Page):
    page.title = "Flet counter example"
    page.vertical_alignment = ft.MainAxisAlignment.CENTER

    txt_number = ft.TextField(value="0", text_align=ft.TextAlign.RIGHT, width=100)

    def minus_click(e):
        txt_number.value = str(int(txt_number.value) - 1)
        page.update()

    def plus_click(e):
        txt_number.value = str(int(txt_number.value) + 1)
        page.update()

    page.add(
        ft.Row(
            [
                ft.IconButton(ft.icons.REMOVE, on_click=minus_click),
                txt_number,
                ft.IconButton(ft.icons.ADD, on_click=plus_click),
            ],
            alignment=ft.MainAxisAlignment.CENTER,
        )
    )

ft.app(target=main)
このスライドは研究におけるバイブルかもしれない
コンポーネントに区切りやすいかはとても大事な気がする。
Element, Attributesツリー -> DrawNodeツリー を生成するように作り直すよ
一応メモ
class Tag:
  def __init__(self, tag:str):
    self.tag = tag
  def build(self):
    return Box(
      attrs=[padding(30), background(Color.PURPLE), round(9999)],
      content=[Text(self.tag)],
    )

def Tag(tag:str):
  return Box(
    attrs=[padding(30), background(Color.PURPLE), round(9999)],
    content=[Text(tag)],
  )

summary = VStack([
  HStack([
    Image("./icon.png"),
    VStack([
      Text("つーばーさ"),
      Text("称号")
    ]),
  ]),
  Spacer(h=20),
  HStack(
    attrs=[HStack.item_space(9)],
    content=[
      Tag("SF"),
      Tag("アクション"),
      Tag("アニメ"),
    ],
  ),
])

image = to_image(
  attrs=[
    Width.Fill,
    Height(100),
  ],
  content=Grid([
    [summary, label, arts]
  ]),
)

image.save("output.png")

だと思ってたものが
だったということが判明した
何はともあれここまで行けた
import sys

from attributes.background import BackgroundAttribute
from attributes.border import BorderAttribute
from attributes.combine import CombinedAttribute
from attributes.padding import PaddingAttribute
from attributes.size import HeightAttribute, WidthAttribute, size
from core.align import HorizontalAlign, VerticalAlign
from core.color import Color
from core.elements import Element
from core.image import to_image
from elements.column import ColumnElement
from elements.grid import Grid
from elements.row import RowElement
from elements.spacer import Spacer

GREEN = Color(0, 255, 0)
RED = Color(255, 0, 0, 128)
BLUE = Color(0, 0, 255)
BLACK = Color.BLACK
WHITE = Color.WHITE


def test1():
    spacers: list[Element] = [
        Spacer(attrs=[
            BackgroundAttribute(RED.copy(a=255*0.5)),
            size(30, 30),
        ]),
        Spacer(attrs=[
            BackgroundAttribute(RED.copy(a=255*0.25)),
            size(30, 30),
        ]),
        Spacer(attrs=[
            BackgroundAttribute(RED.copy(a=255*0.125)),
            size(30, 30),
        ]),
    ]
    row_sample = RowElement(
        horizontal_gap=10,
        horizontal_align=HorizontalAlign.CENTER,
        attrs=[size(100, 100)],
        children=spacers,
    )
    col_sample = ColumnElement(
        vertical_gap=10,
        children=spacers,
    )
    img = to_image(
        Grid(
            vertical_gap=10,
            horizontal_gap=20,
            vertical_align=VerticalAlign.CENTER,
            horizontal_align=HorizontalAlign.RIGHT,
            children=[
                [row_sample, col_sample],
                [row_sample, col_sample],
            ],
        )
    )
    img.save("./output/test1.png")


test1()

layout constraintsも行けた....!
row_sample = RowElement(
        horizontal_gap=10,
        horizontal_align=HorizontalAlign.CENTER,
        attrs=[
            BackgroundAttribute(Color.BLUE.copy(a=16)),
            BorderAttribute(2, WHITE),
            WidthAttribute(200),
            HeightAttribute(100),
        ],
        children=[
            Spacer(attrs=[
                BackgroundAttribute(RED.copy(a=255*0.5)),
                size(30, 30),
            ]),
            Spacer(attrs=[
                BackgroundAttribute(RED.copy(a=255*0.25)),
                size(30, 30),
            ]),
            Spacer(attrs=[
                BackgroundAttribute(RED.copy(a=255*0.125)),
                size(30, 30),
            ]),
        ],
    )
    col_sample = ColumnElement(
        vertical_gap=10,
        attrs=[BorderAttribute(1, WHITE)],
        children=[
            Spacer(attrs=[
                BackgroundAttribute(RED.copy(a=255*0.5)),
                size(30, 30),
            ]),
            Spacer(attrs=[
                BackgroundAttribute(RED.copy(a=255*0.25)),
                size(30, 30),
            ]),
            Spacer(attrs=[
                BackgroundAttribute(RED.copy(a=255*0.125)),
                size(30, 30),
            ]),
        ],
    )
    img = ColumnElement(children=[
        RowElement(children=[
            row_sample, col_sample,
        ]),
        RowElement(children=[
            col_sample, row_sample,
        ]),
    ])

to_image(img,debug=True).save("./output/test1.png")
経緯
Arributeは各Elementsを囲うような実装にしているがそれだとcolumnとかにwidthとかを設定できなくて詰むのでconstrantsでレイアウト前に指定できるようにしてみた
layout constraints はlayout時に制約をもたせる機能。
columnのlayoutが走る前にcolumnのサイズをあらかた決めておきたいというのが発端
現状の実装としてはlayout前に親要素や各attributeからconstraintをsetしてもらってるのでループ数が増えてるのなんかなーって感じ
いい感じに先にsetしとくなりできないかな....
ElementをLayoutNodeに命名変更しても良さそう
Contextをlayout用のとdraw用のにわけるのもやっておきたい
(layout用のdrawでは描画系のメソッド触ってほしくないお気持ち)
既存のImageとの相互運用のためのコンポーネントもいるよね
on_place attrもほしい
CombinedAttribute、Attributeと密結合やなって思ったり
alpha意外とむずかった
いったん後回し
fill が案の定むずめ
いろんな言語・フレームワークの宣言的UIを集めてみる
React
❌ JSX という特殊記法を用いるためコンパイラが必要
<div style={{ padding: 15 }}>サンプル</div>
Jetpack Compose
❌ Kotlin の表現力の高さの上に成り立っており、python では表現不可能な部分が多い
Text(
    modifier = Modifier.padding(15),
    text = "サンプル",
)
Swift UI
Text("サンプル")
    .padding(.all, 16)
flutter
❌ 実装はしやすいがスタイリングのための無駄なネストが多くなる
Padding(
    padding: EdgeInsets.all(15),
    child: Text("サンプル"),
),
flutter (+widget extensions)
❌ 汎用性を高くするにはpythonにはない言語機能である拡張関数が必要になる
Text("サンプル")
    .paddingAll(15),
caching APIのトレース
1 static
    2 static
        3 static
    4 dynamic
        5 dynamic
    6 static
        7 dynamic
    8 dynamic
        9 static
| draw | cache | current |
|---|---|---|
| 1 static | - 1 static | 1 static |
| 2 static | - 1 static + 2 static | 1 static + 2 static |
| 3 static | - 1 static + 2 static + 3 static | 1 static + 2 static + 3 static |
| 4 dynamic | - 1 static + 2 static + 3 static | None |
| 5 dynamic | - 1 static + 2 static + 3 static | None |
| 6 static | - 1 static + 2 static + 3 static | 6 static |
| - 6 static | ||
| 7 dynamic | - 1 static + 2 static + 3 static | None |
| - 6 static | ||
| 8 dynamic | - 1 static + 2 static + 3 static | None |
| - 6 static | ||
| 9 static | - 1 static + 2 static + 3 static | 9 static |
| - 6 static | ||
| - 1 static + 2 static + 3 static | 9 static | |
| - 6 static | ||
| - 9 static |
1 static
    2 static
        3 static
    4 dynamic
        5 dynamic
    6 static
        7 dynamic
    8 dynamic
        9 static

↓

- 1 cache-start
- 2 cache-append
- 3 cache-append
- 4 cache entry append . current cache target clear
- 5 cache entry append (None) . current cache target clear
- 6 cache-start
- 7 cache entry append . current cache target clear
- 8 cache entry append (None) . current cache target clear
- 9 cache-start

cache entry append . current cache target clear

↓

キャッシュ
- 1: 1-3
- 6: 6
- 9: 9

↓

2回目
- cache[1]
- 4
- 5
- cache[6]
- 7
- 8
- cache[9]
こう言うやり口もありやな
pythonで組んでたらパフォーマンスに限界があるなこれ