Mastra で遊ぶ
このスクラップについて
Mastra で遊ぶ過程を記録していく。
参考になりそうな Zenn 本
公式ドキュメント
インストール
cd ~/workspace
pnpm create mastra@latest my-mastra-app
┌  Mastra Create
│
◇  Project created
│
◇  pnpm dependencies installed
│
◇  mastra installed
│
◇  Dependencies installed
│
◇  .gitignore added
│
└  Project created successfully


┌  Mastra Init
│
◇  Where should we create the Mastra files? (default: src/)
│  src/
│
◇  Choose components to install:
│  Agents
│
◇  Add tools?
│  Yes
│
◇  Select default provider:
│  OpenAI
│
◇  Enter your openai API key?
│  Skip for now
│
◇  Add example
│  Yes
│
◇  Make your AI IDE into a Mastra expert? (installs Mastra docs MCP server)
│  Skip for now
│
◇
│
◇   ─────────────────────────────────────────────────────────╮
│                                                            │
│                                                            │
│        Mastra initialized successfully!                    │
│                                                            │
│        Add your OPENAI_API_KEY as an environment variable  │
│        in your .env.development file                       │
│                                                            │
│                                                            │
├────────────────────────────────────────────────────────────╯
│
└
   To start your project:

    cd my-mastra-app
    npm run dev
Biome のインストール
pnpm add --save-dev --save-exact @biomejs/biome
pnpm biome init
OpenRouter Prover のインストール
pnpm add @openrouter/ai-sdk-provider
これはしなくても動くかも知れないが一応インストールしておこう。
Agent ファイルの編集
import { createOpenAI } from "@ai-sdk/openai";
import { Agent } from "@mastra/core/agent";
import { LibSQLStore } from "@mastra/libsql";
import { Memory } from "@mastra/memory";
import { weatherTool } from "../tools";

const openrouter = createOpenAI({
  baseURL: "https://openrouter.ai/api/v1",
  apiKey: process.env.OPENROUTER_API_KEY,
});

export const weatherAgent = new Agent({
  name: "Weather Agent",
  instructions: `
      You are a helpful weather assistant that provides accurate weather information.

      Your primary function is to help users get weather details for specific locations. When responding:
      - Always ask for a location if none is provided
      - If the location name isn’t in English, please translate it
      - If giving a location with multiple parts (e.g. "New York, NY"), use the most relevant part (e.g. "New York")
      - Include relevant details like humidity, wind conditions, and precipitation
      - Keep responses concise but informative

      Use the weatherTool to fetch current weather data.
`,
  model: openrouter("deepseek/deepseek-chat-v3-0324:free"),
  tools: { weatherTool },
  memory: new Memory({
    storage: new LibSQLStore({
      url: "file:../mastra.db", // path is relative to the .mastra/output directory
    }),
    options: {
      lastMessages: 10,
      semanticRecall: false,
      threads: {
        generateTitle: false,
      },
    },
  }),
});
開発サーバーの起動
pnpm dev
Playground にアクセス

トラブル発生

何かいけなかっただろうか
OpenRouter の接続テスト
touch test.ts
pnpm i ai
pnpm i -D tsx
import { createOpenAI } from "@ai-sdk/openai";
import { streamText } from "ai";

async function main() {
  const openrouter = createOpenAI({
    baseURL: "https://openrouter.ai/api/v1",
    apiKey: process.env.OPENROUTER_API_KEY,
  });

  const { textStream, response } = streamText({
    model: openrouter.chat("deepseek/deepseek-chat-v3-0324:free"),
    prompt: "OpenRouter とは何ですか?",
  });

  for await (const text of textStream) {
    process.stdout.write(text);
  }
}

main().catch((err) => console.error(err));
pnpm exec tsx --env-file .env.development test.ts
**OpenRouter**は、複数のAIモデル(GPT-4、Claude、Gemini、Mistralなど)を単一のAPIで利用できる**AIモデル統合プラットフォーム**です。開発者や企業がさまざまな最先端のAIを簡単に比較・切り替えできるように設計されています。

### 主な特徴
1. **マルチモデル対応**
   OpenAI、Anthropic、Google DeepMind、Mistralなどの主要モデルを統合。モデルごとに性能や価格を比較可能。

2. **統一API**
   異なるプロバイダーのモデルを、OpenRouterの共通APIで呼び出せます。コードを書き換える必要がありません。

3. **コスト最適化**
   モデルごとの価格(トークン単価)が可視化され、安価なモデルを選択可能。自動ルーティングでコスト削減も。

4. **追加機能**
   - チャット履歴の保存
   - 使用量分析ダッシュボード
   - ユーザー認証の簡素化(OAuth対応)

### 主な用途
- 複数AIの性能比較
- ベンダーロックインの回避
- コスト効率の良いAIアプリ開発

### 料金モデル
各モデルの提供元が設定した価格に従い、トークン単位で課金されます。無料枠のあるモデル(例:Mistral 7B)も利用可能。

OpenRouterは、特定のプロバイダーに依存せず柔軟にAIを活用したい開発者にとって有用なツールです。詳細は[公式サイト](https://openrouter.ai/)をご覧ください。
ちゃんと動いている、もしかすると .env が読み込まれていないのかも。
.env は正しく読み込まれていた
そうなると deepseek が tools に対応していない可能性を調べてみよう。
無料の DeepSeek は tools に対応していないかも
仕方がないので生の DeepSeek を使おう。
プロバイダーとモデルの変更
import { createOpenAI } from "@ai-sdk/openai";
import { Agent } from "@mastra/core/agent";
import { LibSQLStore } from "@mastra/libsql";
import { Memory } from "@mastra/memory";
import { weatherTool } from "../tools";

// const openrouter = createOpenAI({
//   baseURL: "https://openrouter.ai/api/v1",
//   apiKey: process.env.OPENROUTER_API_KEY,
// });

const deepseek = createOpenAI({
  baseURL: "https://api.deepseek.com/v1",
  apiKey: process.env.DEEPSEEK_API_KEY,
});

export const weatherAgent = new Agent({
  name: "Weather Agent",
  instructions: `
      You are a helpful weather assistant that provides accurate weather information.

      Your primary function is to help users get weather details for specific locations. When responding:
      - Always ask for a location if none is provided
      - If the location name isn’t in English, please translate it
      - If giving a location with multiple parts (e.g. "New York, NY"), use the most relevant part (e.g. "New York")
      - Include relevant details like humidity, wind conditions, and precipitation
      - Keep responses concise but informative

      Use the weatherTool to fetch current weather data.
`,
  // model: openrouter("deepseek/deepseek-chat-v3-0324:free"),
  model: deepseek("deepseek-chat"),
  tools: { weatherTool },
  memory: new Memory({
    storage: new LibSQLStore({
      url: "file:../mastra.db", // path is relative to the .mastra/output directory
    }),
    options: {
      lastMessages: 10,
      semanticRecall: false,
      threads: {
        generateTitle: false,
      },
    },
  }),
});
これで再チャレンジ

ツールの呼び出しには成功したが Niigata Nagaoka が登録されていないようだ
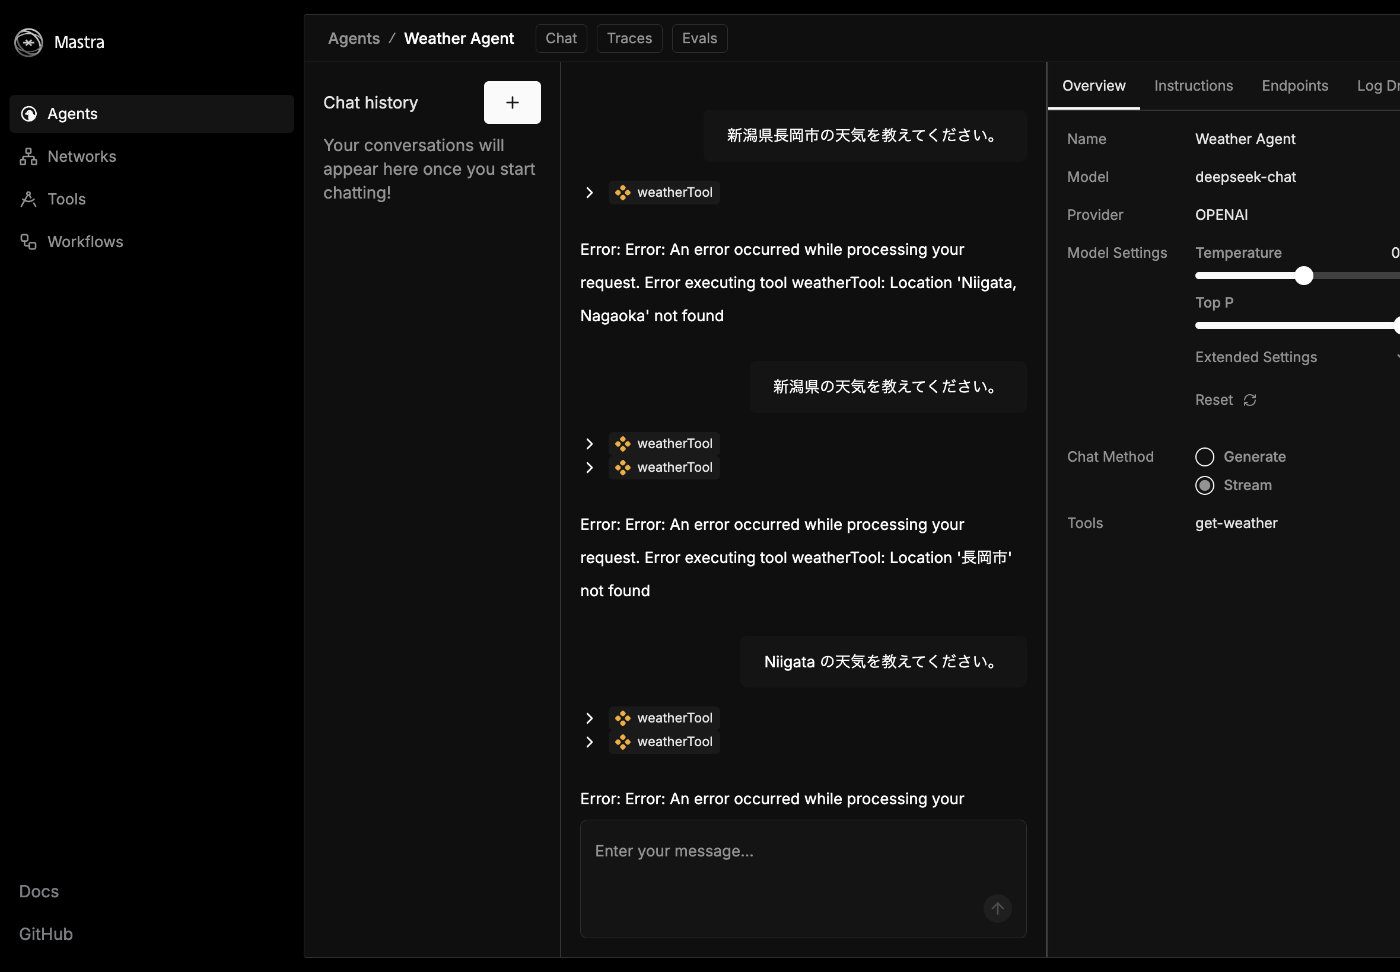
なかなかコツがいるようだ
サンフランシスコは成功した

けっこう寒い
API でも使用してみる
curl -X POST http://localhost:4111/api/agents/weatherAgent/generate \
  -H "Content-Type: application/json" \
  -d '{"messages": ["ロンドンの天気を教えてください"]}'
レスポンスは長いので割愛するがテキストはこんな感じ。
ロンドンの現在の天気は以下の通りです:
- 気温: 7.2°C (体感温度: 4.8°C)
- 天候: 晴れ
- 湿度: 87%
- 風速: 8 km/h (突風: 16.9 km/h)
寒いので、暖かくしてお過ごしください!
次にやること
次はめちゃくちゃ簡単な自作ツールとそのエージェントを作ってみよう。
ツールの作成
touch src/mastra/tools/add.ts
import { createTool } from "@mastra/core";
import { z } from "zod";

export const addTool = createTool({
  id: "add",
  description: "Add two numbers together",
  inputSchema: z.object({
    a: z.number().describe("The first number"),
    b: z.number().describe("The second number"),
  }),
  outputSchema: z.object({
    sum: z.number().describe("The sum of the two numbers"),
  }),
  execute: async ({ context }) => {
    return {
      sum: context.a + context.b,
    };
  },
});
エージェントの作成
touch src/mastra/agents/add.ts
import { createOpenAI } from "@ai-sdk/openai";
import { Agent } from "@mastra/core/agent";
import { addTool } from "../tools/add";

const deepseek = createOpenAI({
  baseURL: "https://api.deepseek.com/v1",
  apiKey: process.env.DEEPSEEK_API_KEY,
});

export const addAgent = new Agent({
  name: "Add Agent",
  instructions: `
    You are a helpful assistant that adds two numbers together.
  `,
  model: deepseek("deepseek-chat"),
  tools: {
    addTool,
  },
});
エージェントの登録
addAgent を追加する。
import { createLogger } from "@mastra/core/logger";
import { Mastra } from "@mastra/core/mastra";
import { LibSQLStore } from "@mastra/libsql";

import { weatherAgent } from "./agents";
import { addAgent } from "./agents/add";

export const mastra = new Mastra({
  agents: { weatherAgent, addAgent },
  storage: new LibSQLStore({
    // stores telemetry, evals, ... into memory storage, if it needs to persist, change to file:../mastra.db
    url: ":memory:",
  }),
  logger: createLogger({
    name: "Mastra",
    level: "info",
  }),
});
動作確認
pnpm dev
Agent が増えてる!
Chat history がない
memory オプションを割愛したからかも知れない。
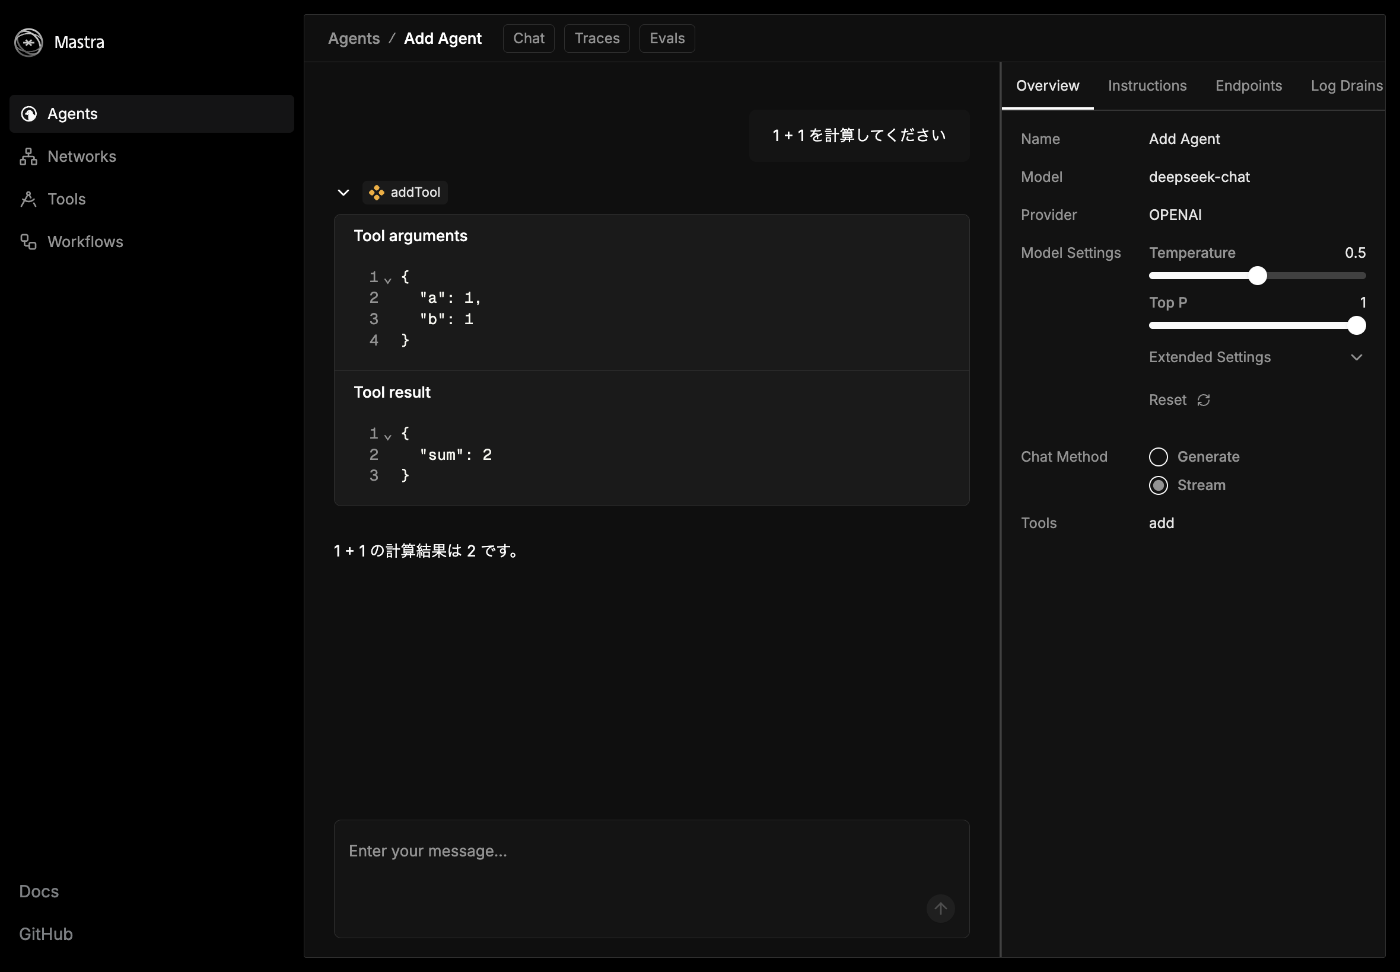
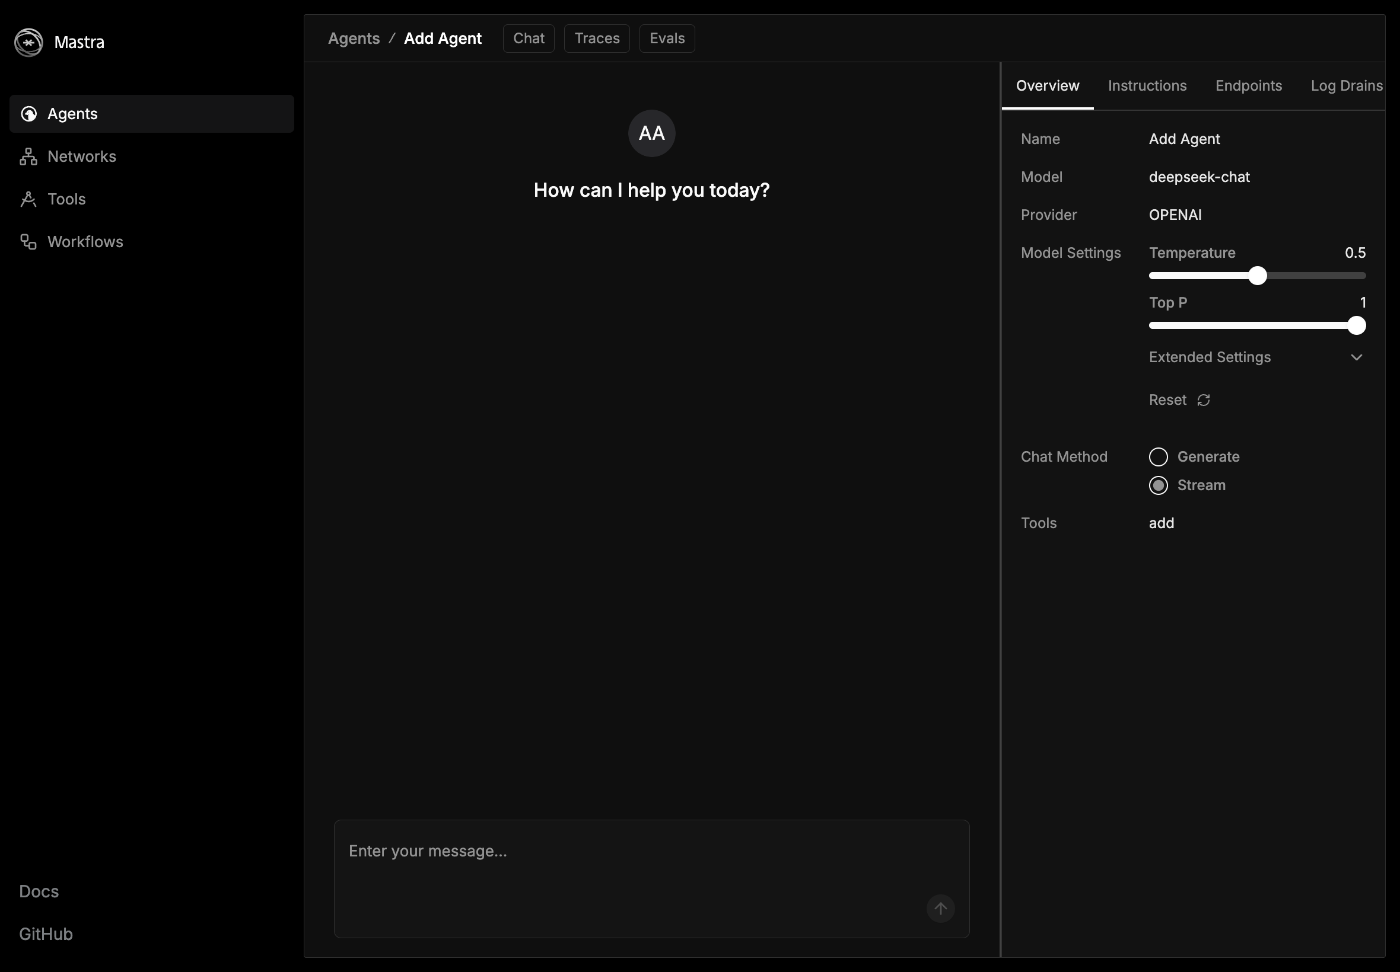
何も指定しなくてもツールを使ってくれた!
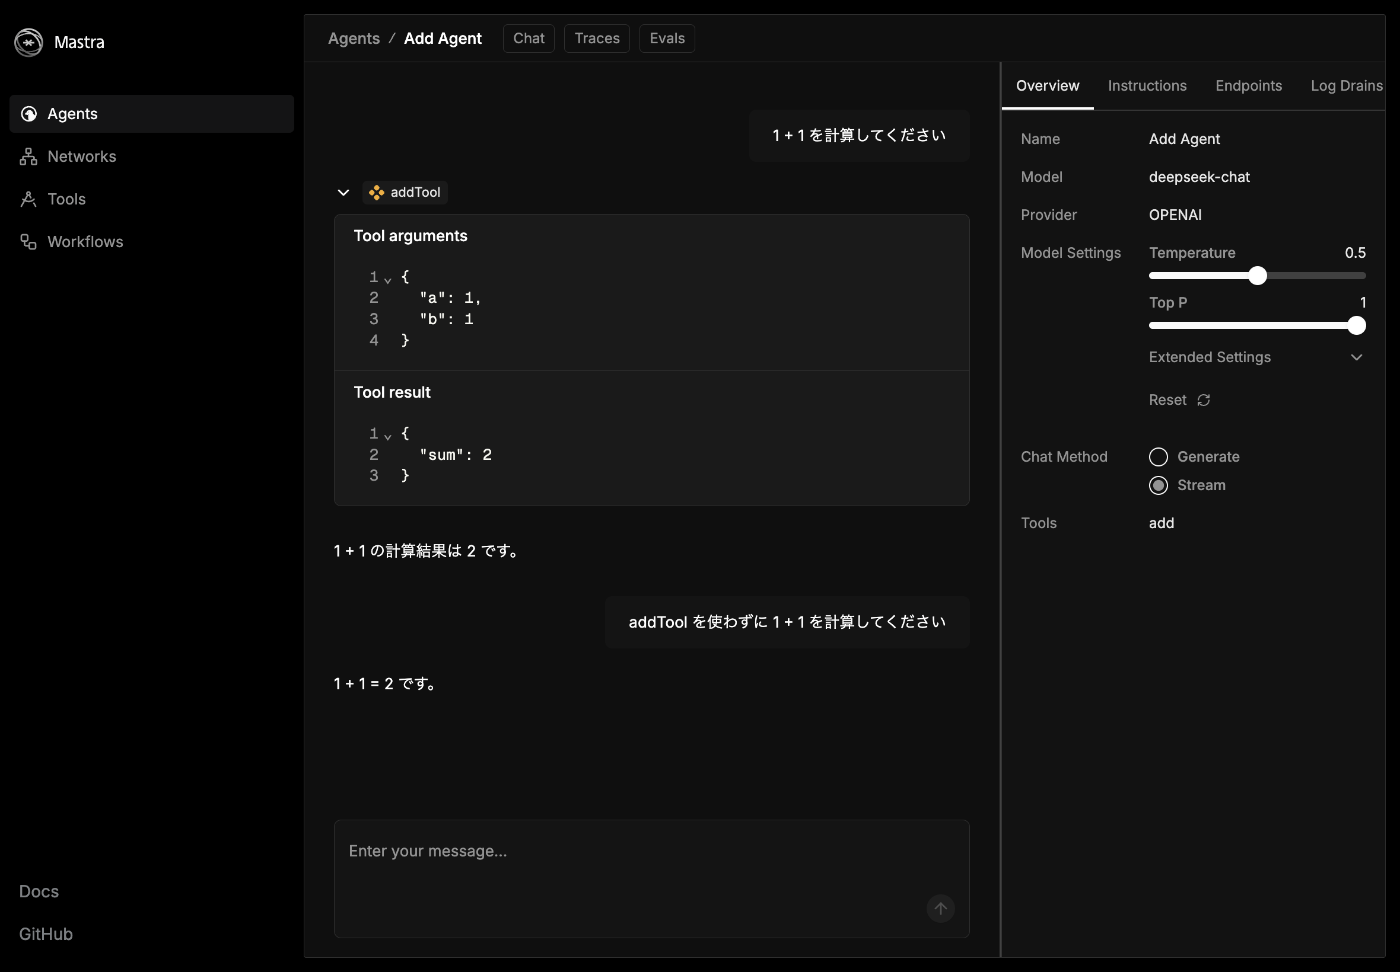
使わなくても計算できた
めちゃくちゃ直感的に使えて良い
まだ簡単なことしかやっていないが、それでも直感的にこうすれば動くだろうというのがわかるのが良い。
MCP サーバーの登録
これを登録しておくと Cline から質問した時に有益な回答をもらえそうだ。
コマンドパレットから Add MCP Server を実行して Command (stdio) として追加する。
npx -y @mastra/mcp-docs-server@latest
Copilot とのチャットで Agent モードを使うことでアクセスできるようになった。
次は何をすれば良いか聞いてみた。
Mastra のチュートリアルが終わって自作のツールとエージェントを追加する練習が終わりました。次は何をすれば良いでしょうか?
1. エージェントのメモリを活用する
エージェントにメモリを追加し、会話の履歴やコンテキストを保持できるようにします。これにより、より高度な対話型エージェントを構築できます。
参考: Agent Memory and Tool Calling
2. RAG(Retrieval-Augmented Generation)の実装
RAGを使用して、エージェントが外部データ(例: ドキュメントやデータベース)を活用して応答を生成できるようにします。これにより、特定の知識に基づいた応答が可能になります。
参考: RAG Overview
3. ワークフローの構築
複数のLLM呼び出しやツールの実行を連携させるワークフローを作成します。これにより、複雑なタスクを効率的に処理できます。
参考: Workflow Graphs
4. エージェントのデプロイ
ローカルで開発したエージェントをデプロイして、実際のアプリケーションやサーバーで動作させます。VercelやCloudflare Workersなどのプラットフォームを利用できます。
参考: Deployment
5. Evalsを使った評価
エージェントの応答を評価するために、Evalsを実装します。これにより、応答の品質や正確性を測定し、改善点を特定できます。
参考: Evals Overview
6. プロジェクトの拡張
他のツールやエージェントを追加して、プロジェクトを拡張します。
外部APIやデータベースとの統合を試みます。
どのステップに進むか迷った場合、具体的な目標や興味に基づいて選択してください。サポートが必要であればお知らせください!
次はメモリで遊んでみよう
Add Agenet はメモリを設定していなかったが、つい先ほどの会話を覚えているのだろうか?

本当に覚えていないようだ
Memory を追加してみよう。
import { createOpenAI } from "@ai-sdk/openai";
import { Agent } from "@mastra/core/agent";
import { Memory } from "@mastra/memory";
import { addTool } from "../tools/add";

const deepseek = createOpenAI({
  baseURL: "https://api.deepseek.com/v1",
  apiKey: process.env.DEEPSEEK_API_KEY,
});

export const addAgent = new Agent({
  name: "Add Agent",
  instructions: `
    You are a helpful assistant that adds two numbers together.
  `,
  model: deepseek("deepseek-chat"),
  tools: {
    addTool,
  },
  memory: new Memory(),
});
警告がけたたましく表示された。
!MEMORY DEPRECATION WARNING!
Warning 1:

Default storage is deprecated in Mastra Memory.
You're using it as an implicit default by not setting a storage adapter.

In the May 20th breaking change the default store will be removed.

Instead of this:
export const agent = new Agent({
  memory: new Memory({
    // your config
  })
})

Do this:
import { LibSQLStore } from '@mastra/libsql';

export const agent = new Agent({
  memory: new Memory({
    // your config
    storage: new LibSQLStore({
      url: 'file:../mastra.db' // relative path from bundled .mastra/output dir
    })
  })
})

Additionally, in the breaking release, Memory will inherit storage from the Mastra instance.
If you plan on using that feature you can prepare by setting the same storage instance on Mastra and Memory.

Ex:
// mastra/storage.ts
export const storage = new LibSQLStore({
  url: 'file:../mastra.db'
})

// mastra/index.ts
import { storage } from "./storage"
export const mastra = new Mastra({
  // your config
  storage
})

// mastra/agents/index.ts
import { storage } from "../storage"
export const yourAgent = new Agent({
  // your config
  storage
})


Warning 2:

Default vector storage is deprecated in Mastra Memory.
You're using it as an implicit default by not setting a vector store.

In the May 20th breaking change the default vector store will be removed.

Instead of this:
export const agent = new Agent({
  memory: new Memory({
    options: { semanticRecall: true }
  })
})

Do this:
import { LibSQLVector } from '@mastra/libsql';

export const agent = new Agent({
  memory: new Memory({
    options: { semanticRecall: true },
    vector: new LibSQLVector({
      connectionUrl: 'file:../mastra.db' // relative path from bundled .mastra/output dir
    })
  })
})


Warning 3:

The default embedder (FastEmbed) is deprecated in Mastra Memory.
You're using it as an implicit default by not configuring an embedder.

On May 20th there will be a breaking change and the default embedder will be removed from @mastra/core.

To continue using FastEmbed, install the dedicated package:
pnpm add @mastra/fastembed

Then configure it in your Memory setup:

import { fastembed } from '@mastra/fastembed';

export const agent = new Agent({
  memory: new Memory({
    embedder: fastembed, // Configure the embedder
    // your other config
  })
})

Alternatively, you can use a different embedder, like OpenAI:
import { openai } from '@ai-sdk/openai';

export const agent = new Agent({
  memory: new Memory({
    embedder: openai.embedding('text-embedding-3-small'),
    // your other config
  })
})

--> This breaking change will be released on May 20th <--


Warning 4:

Your Mastra memory instance has the
following implicit default options:

new Memory({
  options: {
    lastMessages: 40,
    semanticRecall: {
      topK: 2,
      messageRange: {
        before: 2,
        after: 2
      }
    },
    threads: {
      generateTitle: true
    }
  }
})

In the next release these implicit defaults
will be changed to the following default settings:

new Memory({
  options: {
    lastMessages: 10,
    semanticRecall: false,
    threads: {
      generateTitle: false
    }
  }
})

To keep your defaults as they are, add
them directly into your Memory configuration,
otherwise please add the new settings to
your memory config to prepare for the change.

--> This breaking change will be released on May 20th <--

!END MEMORY DEPRECATION WARNING!

チャットに履歴が表示されるようになった

覚えてくれるようになった

スレッドが変わると忘れてくれるようだ、これは期待通り
次にやること
箸休めに Agent をそのまま使ってみよう。
Agent を普通に使う
touch src/use-agent.ts
pnpm i -D tsx
import { addAgent } from "./mastra/agents/add";

async function main() {
  const response = await addAgent.generate(["add 1 and 2"]);
  console.log(response.text);
}

main().catch((err) => {
  console.error(err);
});
pnpm tsx --env-file .env.development src/use-agent.ts
The sum of 1 and 2 is 3.
Structured Output
touch src/use-structured-output.ts
import { z } from "zod";
import { addAgent } from "./mastra/agents/add";

async function main() {
  const schema = z.object({
    name: z.string().describe("氏名"),
    email: z.string().describe("住所"),
  });

  const response = await addAgent.generate(
    [
      `
        下記の文章から必要事項を抜き出して、JSON形式で出力してください。

        氏名: 山田 太郎
        住所: 東京都新宿区西新宿2-8-1
        誕生日: 1990年1月1日
        電話番号: 03-1234-5678
        メールアドレス: taro.yamada@example.com
      `,
    ],
    {
      output: schema,
    },
  );

  console.log(response.object);
}

main().catch((err) => {
  console.error(err);
});
pnpm tsx --env-file .env.development src/use-structured-output.ts
{ name: '山田 太郎', email: 'taro.yamada@example.com' }
メモリの使用
touch src/use-memory.ts
import { addAgent } from "./mastra/agents/add";

async function main() {
  const firstResponse = await addAgent.stream(
    "私が好きな色が青色です、覚えておいてください。",
    {
      resourceId: "user_alice",
      threadId: "thread_123",
    },
  );

  for await (const chunk of firstResponse.textStream) {
    process.stdout.write(chunk);
  }

  const secondResponse = await addAgent.stream(
    "私が好きな色を覚えていますか?",
    {
      resourceId: "user_alice",
      threadId: "thread_123",
    },
  );

  for await (const chunk of secondResponse.textStream) {
    process.stdout.write(chunk);
  }
}

main().catch((err) => {
  console.error(err);
});
pnpm tsx --env-file .env.development src/use-memory.ts
わかりました!あなたの好きな色は青色ですね。覚えておきます。何か他に質問やお手伝いできることがあれば教えてください!はい、覚えていますよ!あなたの好きな色は**青色**です。何か青色に関連することをお手伝いしましょうか?
次は MCP Server を使ってみよう。
それにしても MCP Registry のレジストリとは面白い。
とはいえほとんどのケースではオフィシャルでことが足りそうだ。
MCP Server の使用
touch src/mastra/agents/mcp.ts
pnpm add @mastra/mcp@latest
import { createOpenAI } from "@ai-sdk/openai";
import { Agent } from "@mastra/core/agent";
import { MCPClient } from "@mastra/mcp";

const mcp = new MCPClient({
  servers: {
    puppeteer: {
      command: "npx",
      args: ["-y", "@modelcontextprotocol/server-puppeteer"],
      env: {
        PUPPETEER_LAUNCH_OPTIONS: JSON.stringify({
          headless: false,
          executablePath:
            "/Applications/Google Chrome.app/Contents/MacOS/Google Chrome",
          args: [],
        }),
      },
    },
  },
});

const deepseek = createOpenAI({
  apiKey: process.env.DEEPSEEK_API_KEY,
  baseURL: "https://api.deepseek.com/v1",
});

export const mcpAgent = new Agent({
  name: "Agent with MCP Tools",
  instructions:
    "あなたは MCP サーバーから提供されるツールを使うことができます。",
  model: deepseek("deepseek-chat"),
  tools: await mcp.getTools(),
});
Mastra にエージェントを追加する。
import { createLogger } from "@mastra/core/logger";
import { Mastra } from "@mastra/core/mastra";
import { LibSQLStore } from "@mastra/libsql";

import { weatherAgent } from "./agents";
import { addAgent } from "./agents/add";
import { mcpAgent } from "./agents/mcp";

export const mastra = new Mastra({
  agents: { weatherAgent, addAgent, mcpAgent },
  storage: new LibSQLStore({
    // stores telemetry, evals, ... into memory storage, if it needs to persist, change to file:../mastra.db
    url: ":memory:",
  }),
  logger: createLogger({
    name: "Mastra",
    level: "info",
  }),
});

音声はスキップ
興味深いが早く RAG に進みたい。
ランタイムコンテキスト
こちらを使うとエージェントに環境変数的なものを型安全に渡せるようだ。
アボートシグナル
こちらを使うと途中でやめられそうだ。
静的&動的ツール設定
ツールセットが必要になったら思い出そう。
MCP 関連サービス
mcp.run はレジストリと呼ばれ、ツールをプロファイルという単位にまとめてアクセスできるようにしてくれているようだ。
Google や Notion などへのアクセストークンを良い感じに管理してくれそう。
URL で指定するケースと CLI で指定するケースがある。
HTTP で MCP の文脈では SSE という単語が出てくるが Server-Sent Events の略のようだ。
そして SSE は非推奨のようだが、どこにそんなことが書いてあるのだろう。
動的ツールコンテキスト
これはランタイムコンテキストとは何が違うのだろう。
次はメモリを学ぼう
メモリには 3 種類ある
- ワーキングメモリ/作業記憶
- メッセージ履歴/会話履歴
- セマンティック検索/意味記憶
メモリースレッド
エージェントにメモリを追加するだけでは会話を記憶してくれないので、リソースとスレッドを指定する必要がある。
プレイグラウンドでは自動的に処理されるので、うっかり忘れてしまいそうだ。
それにしてもなぜリソースとスレッドの 2 つが必要なのだろうか?
スレッド 1 つがあれば足りそうな気もするが。
このスレッドが関連付けられている外部リソースの主要識別子。関連するスレッドのグループ化と取得に使用されます。
この点が関係してそうだ。
ストレージプロバイダー
本番環境では PostgreSQL が使えるようだ。
意味記憶
エージェントが会話履歴に含まれないことも覚えておいてくれる機能のようだ。
プロンプトやメッセージから Embeddings を作成し、ベクトルデータとして DB に保存されるようだが、自分でもよく何を言っているのかわかっていない。
公式ドキュメントの図がめちゃくちゃわかりやすい。
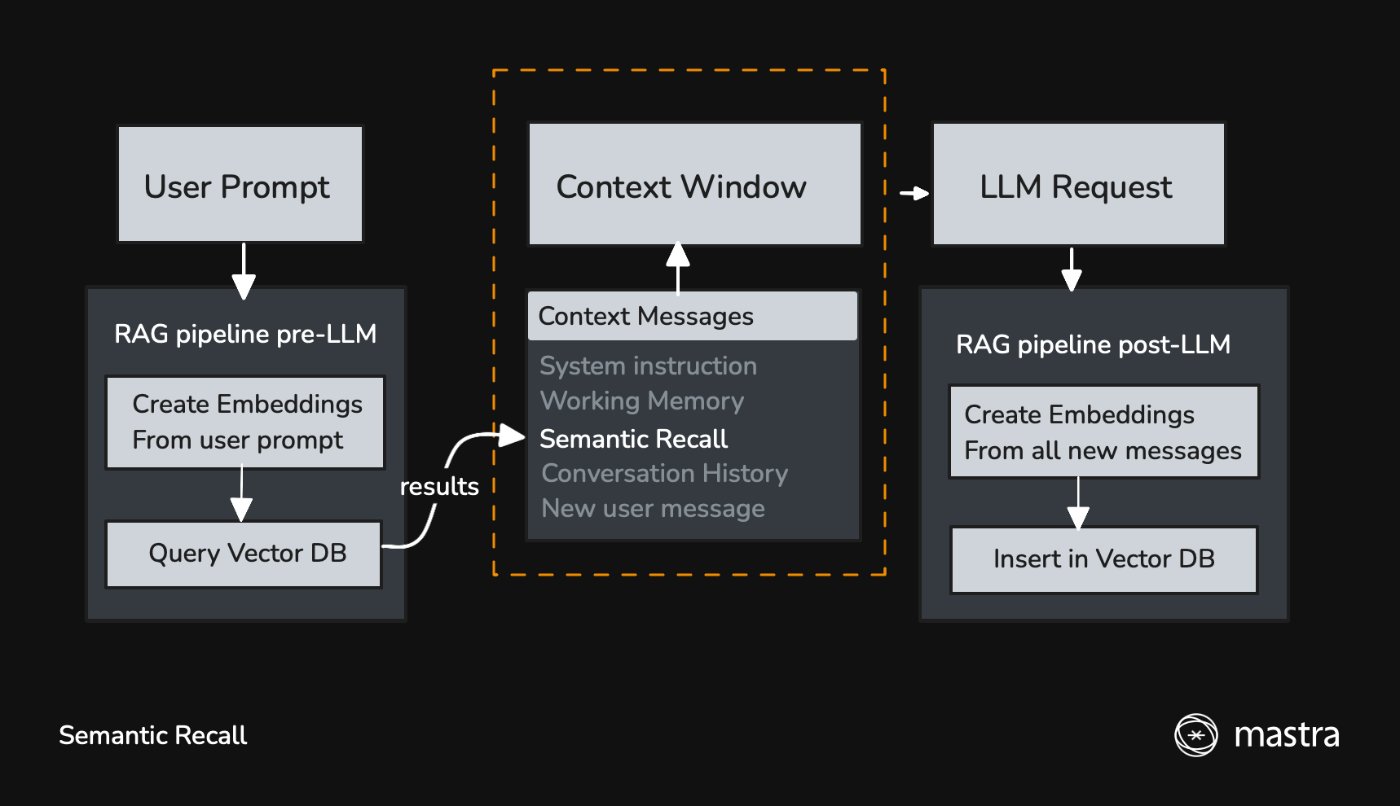
https://mastra.ai/ja/docs/memory/semantic-recall より引用
エージェントに Memory を追加すれば自動的に有効になるので、意味記憶を使うために特に設定は必要ないようだ。
Embedding
FastEmbed というライブラリが使用されているようだ。
有料だが OpenAI などの Embedding サービスを利用することもできる。
作業記憶/ワーキングメモリー
実態としては、記録したい情報のテンプレートを Markdown 形式でまとめたテキストデータのようだ。
デフォルト値は https://github.com/mastra-ai/mastra/blob/main/packages/core/src/memory/memory.ts に書いてある。
const newMemoryDefaultOptions = {
  lastMessages: 10,
  semanticRecall: false,
  threads: {
    generateTitle: false,
  },
  workingMemory: {
    // new
    use: 'tool-call',
    // stays the same
    enabled: false,
    template: `
# User Information
- **First Name**:
- **Last Name**:
- **Location**:
- **Occupation**:
- **Interests**:
- **Goals**:
- **Events**:
- **Facts**:
- **Projects**:
`,
  },
} satisfies MemoryConfig;
tool-call とはワーキングメモリの更新オプションのようで、今後はこちらがデフォルトになるようだ。
tool-call の場合、LLM からの応答にワーキングメモリ更新のツール呼び出しが含まれる場合に更新が行われる。
text-stream の場合は、LLM の応答本文に <working_memory> のようなタグが含まれるようだ。
ワーキングメモリは「会話の中でこれを記録させたい!」と思うものを書いておけば良さそうだ。
メモリプロセッサ
メモリプロセッサを使うことで、メモリから取得されたメッセージのリストを LLM に送信する前に変更することができるようだ。
TokenLimiter を使ってコンテキストウィンドウから溢れないようにすることや、ToolCallFilter を使って特定のツールコールを取り除けるらしい。
ワークフロー
読んだだけなのでよく理解していないかも知れないが、ワークフローを使うことで処理のグラフを宣言的に定義できそうな感じがする。
ワークフローは LLM アプリに固有のものではなく、LLM アプリを使用していないアプリでも使えそうだ。
ChatGPT に聞いてみた。
LangChain にワークフローの機能があると思いますが、
これは LLM を使用したアプリではワークフローが必要な場面が多いからでしょうか?
はい、その通りです。LangChain にワークフローの機能(たとえば LCEL(LangChain Expression Language) や Runnable チェーン の設計)がある理由は、LLM を使用したアプリでは複雑な処理の流れ(ワークフロー)が必要になる場面が非常に多いためです。以下の点が背景になります:
次はいよいよ RAG
これはせっかくなので手を動かしながら学んでみよう。
久々に手を動かす
せっかくなので新しくプロジェクトを作成してみよう。
rm -rf my-mastra-app
pnpm create mastra@latest \
  --components agents,tools \
  --llm openai \
  --example \
  --project-name my-mastra-app
tools オプションが気になったのでコードを調べてみたところ、サンプルコードに weather-tool.ts が含まれるかどうかが決まるようだ。
遂に OpenAI に課金する時が来た
DeepSeek を使いたいが Embedding は未対応のようだ。
ローカルで頑張れば行けそうな気もするが、ここは素直に OpenAI に課金して Embedding もやってもらおう。
ワンチャン OpenRouter で埋め込みできる?
調べた限りはできなそう。
OpenAI に 5 ドル課金完了
.env ファイルに API キーを書いておこう。
OPENAI_API_KEY="sk-xxxx"
pgvector の準備
この Qiita 記事が参考になりそう。
Note: This only adds it to the postgresql@17 and postgresql@14 formulas
PostgreSQL のバージョンは 17 か 14 である必要があるようだ。
export PG_CONFIG="/opt/homebrew/opt/postgresql@17/bin/pg_config"
brew install pgvector
createdb vector_test
psql vector_test
CREATE EXTENSION VECTOR;
PostgreSQL 17 のインストール
brew install postgresql@17
==> postgresql@17
This formula has created a default database cluster with:
  initdb --locale=C -E UTF-8 /opt/homebrew/var/postgresql@17

When uninstalling, some dead symlinks are left behind so you may want to run:
  brew cleanup --prune-prefix

postgresql@17 is keg-only, which means it was not symlinked into /opt/homebrew,
because this is an alternate version of another formula.

If you need to have postgresql@17 first in your PATH, run:
  echo 'export PATH="/opt/homebrew/opt/postgresql@17/bin:$PATH"' >> ~/.zshrc

For compilers to find postgresql@17 you may need to set:
  export LDFLAGS="-L/opt/homebrew/opt/postgresql@17/lib"
  export CPPFLAGS="-I/opt/homebrew/opt/postgresql@17/include"

To start postgresql@17 now and restart at login:
  brew services start postgresql@17
Or, if you don't want/need a background service you can just run:
  LC_ALL="C" /opt/homebrew/opt/postgresql@17/bin/postgres -D /opt/homebrew/var/postgresql@17
PostgreSQL の停止と起動
brew services stop postgresql@13
brew services start postgresql@17
brew services list
Name          Status  User     File
cloudflared   none
postgresql@13 none    root
postgresql@17 started susukida ~/Library/LaunchAgents/homebrew.mxcl.postgresql@17.plist
.zshrc の編集
バージョン 17 の方を使うようにする。
# export PATH="/opt/homebrew/opt/postgresql@13/bin:$PATH
export PATH="/opt/homebrew/opt/postgresql@17/bin:$PATH"
which initdb
17 の方が表示されたら OK
pgvector インストールの再チャレンジ
export PG_CONFIG="/opt/homebrew/opt/postgresql@17/bin/pg_config"
brew install pgvector
createdb vector_test
psql vector_test
CREATE EXTENSION VECTOR;
エラーが表示されず、代わりに CREATE EXTENSION と表示された。
なんか素晴らしい記事を見つけた
ついに RAG 関連のコーディングができる
touch src/embed.ts
pnpm i @mastra/rag @mastra/pg ai
import { openai } from "@ai-sdk/openai";
import { PgVector } from "@mastra/pg";
import { MDocument } from "@mastra/rag";
import { embedMany } from "ai";
import z from "zod";

async function main() {
  const doc = MDocument.fromText("私の名前は薄田達哉です。");
  const chunks = await doc.chunk({
    strategy: "recursive",
    size: 512,
    overlap: 50,
  });

  const { embeddings } = await embedMany({
    values: chunks.map((chunk) => chunk.text),
    model: openai.embedding("text-embedding-3-small"),
  });

  const envSchema = z.object({
    POSTGRES_CONNECTION_STRING: z.string(),
  });

  const env = envSchema.parse(process.env);
  const pgVector = new PgVector({
    connectionString: env.POSTGRES_CONNECTION_STRING,
  });

  await pgVector.upsert({
    indexName: "embeddings",
    vectors: embeddings,
  });
}

main().catch((err) => console.error(err));
実行する前にデータベースの準備をする必要がありそうだ。
Google Cloud で pgvector は使える?
使えそうな雰囲気だ。
データベースの準備
createuser -P mastra
createdb mastra --owner mastra
pnpm i -D tsx
touch src/create-index.ts
psql -U susukida mastra
CREATE EXTENSION VECTOR;
POSTGRES_CONNECTION_STRING="postgresql://mastra:mastra@localhost:5432/mastra"
import { PgVector } from "@mastra/pg";
import z from "zod";

async function main() {
  const envSchema = z.object({
    POSTGRES_CONNECTION_STRING: z.string(),
  });

  const env = envSchema.parse(process.env);
  const pgVector = new PgVector({
    connectionString: env.POSTGRES_CONNECTION_STRING,
  });

  await pgVector.createIndex({
    indexName: "embeddings",
    dimension: 1536,
  });

  await pgVector.disconnect();
}

main().catch((err) => console.error(err));
pnpm tsx --env-file .env src/create-index.ts
作成されたテーブルを見てみる
psql -U mastra mastra
\dt
             リレーション一覧
 スキーマ |    名前    |  タイプ  | 所有者
----------+------------+----------+--------
 public   | embeddings | テーブル | mastra
pg_dump -U mastra mastra -s -t embeddings
CREATE TABLE public.embeddings (
    id integer NOT NULL,
    vector_id text NOT NULL,
    embedding public.vector(1536),
    metadata jsonb DEFAULT '{}'::jsonb
);
次は埋め込みを実行してみよう
はじめて RAG をしようとすると結構色々準備があるんだな。
- OpenAI などの課金(ローカルで行う場合は不要)
- pgvector のインストール(必要に応じて PostgreSQL 14 or 17 インストール)
- ユーザーとデータベースの作成
- vector 拡張機能の有効化
- インデックスの作成
埋め込みの実行
pnpm tsx --env-file .env src/embed.ts
結果の確認
psql -U mastra mastra
SELECT id, vector_id, metadata FROM embeddings;
 id |              vector_id               | metadata
----+--------------------------------------+----------
  1 | 19acab0b-6e58-4d3b-b1bb-4c38f181f857 | {}
(1 行)
問い合わせ
touch src/query.ts
import { openai } from "@ai-sdk/openai";
import { PgVector } from "@mastra/pg";
import { embed } from "ai";
import z from "zod";

async function main() {
  const { embedding } = await embed({
    value: "私の名前は何ですか?",
    model: openai.embedding("text-embedding-3-small"),
  });

  const envSchema = z.object({
    POSTGRES_CONNECTION_STRING: z.string(),
  });

  const env = envSchema.parse(process.env);
  const pgVector = new PgVector({
    connectionString: env.POSTGRES_CONNECTION_STRING,
  });

  const results = await pgVector.query({
    indexName: "embeddings",
    queryVector: embedding,
    topK: 3,
  });

  console.log(results);
}

main().catch((err) => console.error(err));
pnpm tsx --env-file .env src/query.ts
[
  {
    id: '19acab0b-6e58-4d3b-b1bb-4c38f181f857',
    score: 0.5995549796950864,
    metadata: {}
  }
]
質問 value を変えてみると score が変化する。
あまり関係のない質問をすると score が低くなるので面白い。
ストアにあるデータと全く同じ内容にすると score が 1 になる。
embed.ts の再実行
再実行するとどうなるのだろう?データが増えてしまうのか?
pnpm tsx --env-file .env src/embed.ts
データ件数が増えた。
select
	(SELECT embedding FROM embeddings where id = 1) =
	(SELECT embedding FROM embeddings where id = 2);
埋め込みの内容については同一のようだ。
メタデータの追加
import { openai } from "@ai-sdk/openai";
import { PgVector } from "@mastra/pg";
import { MDocument } from "@mastra/rag";
import { embedMany } from "ai";
import z from "zod";

async function main() {
  const doc = MDocument.fromText("私の名前は薄田達哉です。");
  const chunks = await doc.chunk({
    strategy: "recursive",
    size: 512,
    overlap: 50,
  });

  const { embeddings } = await embedMany({
    values: chunks.map((chunk) => chunk.text),
    model: openai.embedding("text-embedding-3-small"),
  });

  const envSchema = z.object({
    POSTGRES_CONNECTION_STRING: z.string(),
  });

  const env = envSchema.parse(process.env);
  const pgVector = new PgVector({
    connectionString: env.POSTGRES_CONNECTION_STRING,
  });

  await pgVector.upsert({
    indexName: "embeddings",
    vectors: embeddings,
    metadata: chunks.map((chunk) => ({
      text: chunk.text,
    })),
  });
}

main().catch((err) => console.error(err));
次はエージェントと組み合わせてみる
RAG システムのしくみ
問い合わせのテキストに関連するチャンクを検索できるだけでもかなり有用だが、せっかくなので、ストアに保存されたデータを使って回答できるエージェントを作りたい。
この場合はチャンク検索機能をツールとしてエージェントに提供し、エージェントが回答を生成するにあたりツールを呼び出すことでストアにアクセスするような形になるようだ。
コーディング
touch src/mastra/agents/rag-agent.ts
import { openai } from "@ai-sdk/openai";
import { Agent } from "@mastra/core";
import { PGVECTOR_PROMPT } from "@mastra/pg";
import { createVectorQueryTool } from "@mastra/rag";

const vectorQueryTool = createVectorQueryTool({
  vectorStoreName: "pgVector",
  indexName: "embeddings",
  model: openai.embedding("text-embedding-3-small"),
});

export const ragAgent = new Agent({
  name: "RAG Agent",
  instructions: `
    Process queries using the provided context. Structure responses to be concise and relevant.
    ${PGVECTOR_PROMPT}
  `,
  model: openai("gpt-4o-mini"),
  tools: { vectorQueryTool },
});
import { Mastra } from "@mastra/core/mastra";
import { LibSQLStore } from "@mastra/libsql";
import { PinoLogger } from "@mastra/loggers";

import { PgVector } from "@mastra/pg";
import z from "zod";
import { ragAgent } from "./agents/rag-agent";
import { weatherAgent } from "./agents/weather-agent";

const envSchema = z.object({
  POSTGRES_CONNECTION_STRING: z.string(),
});

const env = envSchema.parse(process.env);
const pgVector = new PgVector({
  connectionString: env.POSTGRES_CONNECTION_STRING,
});

export const mastra = new Mastra({
  vectors: { pgVector },
  agents: { weatherAgent, ragAgent },
  storage: new LibSQLStore({
    url: ":memory:",
  }),
  logger: new PinoLogger({
    name: "Mastra",
    level: "info",
  }),
});
動作確認
pnpm dev
http://localhost:4111/agents/ragAgent/chat にアクセス。

さすがに「私の名前はわかりますか?」ではダメだった。
ツールコールの中身はこんな感じ。
{
  "queryText": "私の名前",
  "topK": 10
}
{
  "relevantContext": [
    {},
    {},
    {
      "id": "b3af08ab-cb3e-4b7b-93b0-b37937aad078",
      "text": "私の名前は薄田達哉です。"
    },
    {
      "id": "c47f7017-0b63-4338-a23c-f2ebfd20d196",
      "text": "私の名前は薄田達哉です。"
    }
  ],
  "sources": [
    {
      "id": "19acab0b-6e58-4d3b-b1bb-4c38f181f857",
      "vector": [],
      "score": 0.6105680911276717,
      "metadata": {},
      "document": ""
    },
    {
      "id": "ea558718-9010-49c5-97d2-11209feab57f",
      "vector": [],
      "score": 0.6105680911276717,
      "metadata": {},
      "document": ""
    },
    {
      "id": "d7d4ed1d-6fc1-4994-bdbe-ba9399cfae3e",
      "vector": [],
      "score": 0.6105680911276717,
      "metadata": {
        "id": "b3af08ab-cb3e-4b7b-93b0-b37937aad078",
        "text": "私の名前は薄田達哉です。"
      },
      "document": ""
    },
    {
      "id": "afd1e19e-ee12-4079-9125-42f361a56d6d",
      "vector": [],
      "score": 0.6105379957922961,
      "metadata": {
        "id": "c47f7017-0b63-4338-a23c-f2ebfd20d196",
        "text": "私の名前は薄田達哉です。"
      },
      "document": ""
    }
  ]
}
あんま関係ないけど
LibSQL と Sqlite3 って違ったんだ、初めて知った。
おわりに
まだワークフローや評価やデプロイなど学ぶべきことはたくさんあるが一旦これで区切りとしよう。
Mastra を使うと LLM を使ったアプリのプロトタイプを簡単に作れそうなので夢が広がる。
個人的なことだが、Python が苦手なので TypeScript で書けるのもありがたい。
今のところエージェントアプリを開発する予定はないが、何かの時にこのスクラップで学んだ知識を活かせたら嬉しい。
RAG についても言葉は知っていたけど、よく何なのかがわかっていなかったので、実際に自分で手を動かしておおまかな流れを理解することができて良かった。
実際にエージェントを開発するのであれば実績や情報量が多い LangChain を使うのが良いのだろうけど、いきなり LangChain を使うのは覚えることが多くてハードルが高い気がする。
Mastra について学んだことでエージェントのフレームワークとはどんなものかを理解することができて良かった。
もし今後エージェントを開発する時があったら、まずは Mastra でトライしてみてダメだったら LangChain を使ってみることにしよう。