CloudFormation入門② EC2


はじめに
今回はVPC内にEC2を立ち上げます。
目標
以下のような構成を作成します。
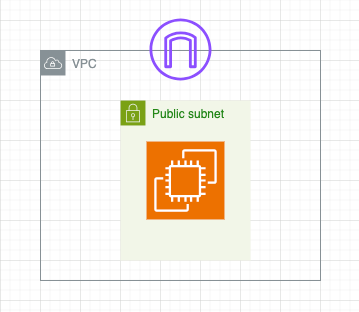
パプリックサブネットの中にEC2がある構成で、パブリックサブネットのルートテーブルでインターネットゲートウェイを指定します。
最終的なコード
先に最終的なコードをお見せします。
AWSTemplateFormatVersion: "2010-09-09"

Parameters:
    KeyName:
        Type: "AWS::EC2::KeyPair::KeyName"
    MyIP:
        Type: String
    ImageId:
        Type: String
    InstanceType:
        Type: String

Resources:
# VPCの作成
    TestVPC:
        Type: AWS::EC2::VPC
        Properties:
            CidrBlock: 10.0.0.0/16
            Tags:
                - Key: Name
                  Value: TestVPC

# インターネットゲートウェイの作成
    TestInternetGateway:
        Type: AWS::EC2::InternetGateway
        Properties:
            Tags:
                - Key: Name
                  Value: TestInternetGateway

# インターネットゲートウェイをVPCにアタッチ
    AttachInternetGateway:
        Type: AWS::EC2::VPCGatewayAttachment
        Properties:
            VpcId: !Ref TestVPC
            InternetGatewayId: !Ref TestInternetGateway

# パブリックサブネットの作成
    TestPublicSubnet:
        Type: AWS::EC2::Subnet
        Properties:
            AvailabilityZone:
                Fn::Select:
                    - 0
                    - Fn::GetAZs: ""
            VpcId: !Ref TestVPC
            CidrBlock: 10.0.10.0/24
            Tags:
                - Key: Name
                  Value: TestPublicSubnet

# ルートテーブルの作成
    RouteTableForPublicSubnet:
        Type: AWS::EC2::RouteTable
        Properties:
            VpcId: !Ref TestVPC
            Tags:
                - Key: Name
                  Value: RouteTableForPublicSubnet

# パブリックサブネットのルーティング
    RoutePublicSubnetToInternetGateway:
        Type: AWS::EC2::Route
        Properties:
            RouteTableId: !Ref RouteTableForPublicSubnet
            GatewayId: !Ref TestInternetGateway
            DestinationCidrBlock: 0.0.0.0/0

# ルートテーブルをサブネットに紐付け
    AssociatePublicSubnetToRouteTable:
        Type: AWS::EC2::SubnetRouteTableAssociation
        Properties:
            SubnetId: !Ref TestPublicSubnet
            RouteTableId: !Ref RouteTableForPublicSubnet

# EC2作成
```yaml
    TestEC2:
        Type: AWS::EC2::Instance
        Properties:
            ImageId: !Ref ImageId
            KeyName: !Ref KeyName
            InstanceType: !Ref InstanceType
            NetworkInterfaces:
                - AssociatePublicIpAddress: "true"
                  DeviceIndex: "0"
                  SubnetId: !Ref TestPublicSubnet
                  GroupSet:
                    - !Ref EC2SecurityGroup
            UserData: !Base64 |
                #!/bin/bash
                sudo yum -y update
            Tags:
                - Key: Name
                  Value: TestEC2

# EC2セキュリティグループ
    EC2SecurityGroup:
        Type: AWS::EC2::SecurityGroup
        Properties:
            GroupName: test-ec2-sg
            GroupDescription: MyIP
            VpcId: !Ref TestVPC
            SecurityGroupIngress:
Parameters:
    KeyName:
        Type: "AWS::EC2::KeyPair::KeyName"
    MyIP:
        Type: String
    ImageId:
        Type: String
    InstanceType:
        Type: String                # HTTP
                - IpProtocol: tcp
                  FromPort: 80
                  ToPort: 80
                  CidrIp: !Ref MyIP
                # SSH
                - IpProtocol: tcp
                  FromPort: 22
                  ToPort: 22
                  CidrIp: !Ref MyIP
解説
ここからいくつかのパートに分けて解説していきます。(以下の私の記事で解説したい内容に関しては省略します)
Parameters
Parameters:
    KeyName:
        Type: "AWS::EC2::KeyPair::KeyName"
    MyIP:
        Type: String
    ImageId:
        Type: String
    InstanceType:
        Type: String
Parametersセクションでは、下記のようにスタック作成時に、パラメーターを渡すことができます。

今回の指定は、以下のようになっています
-
KeyName: 既存のEC2のキーペアをリスト形式で選択可能に -
MYIP: EC2へのアクセスするセキュリティグループのインバウンドルールにIPを追加(例:111.111.111.111/32) -
ImageId: EC2のAMIイメージを記述(例:ami-020283e959651b381) -
InstanceType: インスタンスタイプを指定。(例:t2.micro)
EC2
    TestEC2:
        Type: AWS::EC2::Instance
        Properties:
            ImageId: !Ref ImageId
            KeyName: !Ref KeyName
            InstanceType: !Ref InstanceType
            NetworkInterfaces:
                - AssociatePublicIpAddress: "true"
                  DeviceIndex: "0"
                  SubnetId: !Ref TestPublicSubnet
                  GroupSet:
                    - !Ref EC2SecurityGroup
            UserData: !Base64 |
                #!/bin/bash
                sudo yum -y update
            Tags:
                - Key: Name
                  Value: TestEC2
NetworkInterfacesはENIの設定で、AssociatePublicIpAddressでtrueにすることで自動割り当てパブリックIPが有効になります。DeviceIndexは、設定を行うENIの番号を指しており、最初にアタッチしたものから0,1,2と連番が振られます。
UserDataではインスタンスが初回に実行するスクリプトを設定します。(何も書かないのは寂しいので今回はyumのアップデートをしています。)
ENIとは
https://zenn.dev/rsk_for_dev/articles/001306058f3c58#eni(elastic-network-interface)
EC2セキュリティグループ
    EC2SecurityGroup:
        Type: AWS::EC2::SecurityGroup
        Properties:
            GroupName: test-ec2-sg
            GroupDescription: MyIP
            VpcId: !Ref TestVPC
            SecurityGroupIngress:
                # HTTP
                - IpProtocol: tcp
                  FromPort: 80
                  ToPort: 80
                  CidrIp: !Ref MyIP
                # SSH
                - IpProtocol: tcp
                  FromPort: 22
                  ToPort: 22
                  CidrIp: !Ref MyIP
セキュリティグループを作成する際のタイプはType: AWS::EC2::SecurityGroupで指定します。インバウンドルールはSecurityGroupIngressで、今回は記載していませんがアウトバウンドルールはAWS::EC2::SecurityGroupEgressで指定します。CidrIpでは許可するIPアドレスを指定します。今回はParametersで渡されるIPを!Refで呼び出すことで許可を行っています。
-
AWS::EC2::SecurityGroupIngressについて
https://docs.aws.amazon.com/AWSCloudFormation/latest/UserGuide/aws-resource-ec2-securitygroupingress.html -
AWS::EC2::SecurityGroupEgressについて
https://docs.aws.amazon.com/AWSCloudFormation/latest/UserGuide/aws-resource-ec2-securitygroupegress.html
おわりに
こちらのコードでスタックを作成した結果がこちらです。
VPC/Subnet/Route Table

EC2

EC2セキュリティグループ

想定通りできていそうですね!
Discussion