🐡
Glyphcontrolをgoogle colabで試してみた。
GlyphControlとは
GlyphControlはText-guidedなdiffusion modelであり、画像の中に任意の文字を埋め込むことが可能です。
huggingfaceでデモも公開されているので是非に
リンク
準備
Google Colabを開き、メニューから「ランタイム→ランタイムのタイプを変更」でランタイムを「GPU」に変更します。
環境構築
インストール手順です。
!git clone https://github.com/AIGText/GlyphControl-release.git
%cd GlyphControl-release
!pip install omegaconf tqdm gradio einops pytorch-lightning transformers open_clip_torch ninja triton Levenshtein easyocr xformers==0.0.21.dev541
推論
(1)モデルのダウンロード
!wget https://huggingface.co/spaces/AIGText/GlyphControl/resolve/main/checkpoints/laion10M_epoch_6_model_wo_ema.ckpt -P /content/GlyphControl-release/checkpoints
(2)推論前準備
推論を実行する前に以下の2つのファイルを編集しないとgoogle colab freeでは動かないです。
/content/GlyphControl-release/ldm/models/diffusion/ddpm.py, 20
# from pytorch_lightning.utilities.distributed import rank_zero_only
from pytorch_lightning.utilities.rank_zero import rank_zero_only
/content/GlyphControl-release/scripts/rendertext_tool.py, 24
if ckpt.endswith("model_states.pt"):
  # sd = torch.load(ckpt, map_location='cpu')["module"]
  sd = torch.load(ckpt, map_location='cuda')["module"]
else:
  # sd = load_state_dict(ckpt, location='cpu')
  sd = load_state_dict(ckpt, location='cuda')
(3)推論実行
glyph_instruction.yaml
Instructions:
  rendered_txt_values: ["Pokemon Pikachu"]
  # the width of the OCR box (i.e., the font size)
  width_values: [0.3]
  # the width-height ratio of the OCR box, if the ratio == 0, the ratio will be set as optimal ratio
  ratio_values: [0]
  # the relative coordinates of the top left corner of the OCR box
  top_left_x_values: [0.35]
  top_left_y_values: [0.4]
  # the yaw rotation angle of the OCR box ([-20, 20])
  yaw_values: [0]
  # the number of rows where the text will be placed
  num_rows_values: [1]
%cd /content/GlyphControl-release
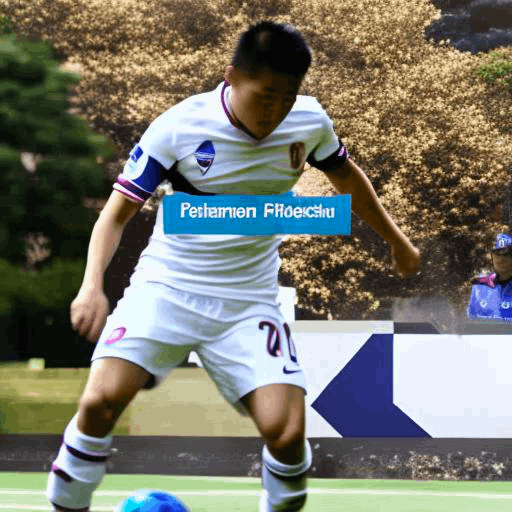
!python inference.py --cfg configs/config.yaml --ckpt checkpoints/laion10M_epoch_6_model_wo_ema.ckpt --save_path generated_images --glyph_instructions glyph_instructions.yaml --prompt "a japanese man who is playing soccer" --num_samples 2
結果の画像です。


まあ、、見えんくはない。
他の描写が入ると微妙になる説があるのでとりあえず文字だけで入れてみます。みた感じImage guidedなmodeはなさそう。
glyph_instruction.yaml
Instructions:
  rendered_txt_values: ["Pokemon Pikachu"]
  # the width of the OCR box (i.e., the font size)
  width_values: [0.3]
  # the width-height ratio of the OCR box, if the ratio == 0, the ratio will be set as optimal ratio
  ratio_values: [0]
  # the relative coordinates of the top left corner of the OCR box
  top_left_x_values: [0.35]
  top_left_y_values: [0.4]
  # the yaw rotation angle of the OCR box ([-20, 20])
  yaw_values: [0]
  # the number of rows where the text will be placed
  num_rows_values: [1]
推論
%cd /content/GlyphControl-release
!python inference.py --cfg configs/config.yaml --ckpt checkpoints/laion10M_epoch_6_model_wo_ema.ckpt --save_path generated_images --glyph_instructions glyph_instructions.yaml --prompt "a sign that says 'Pokemon Pikachu'" --num_samples 2


おーこれはすごい!普通に文字(prompt)の中に画像の雰囲気を埋め込む感じですね!
最後に
今回はTextを埋め込むことが可能なDiffusion modelであるGlyphControlを試してみました。文字の意味合いとは別の画像との組み合わせはまだ難がありそうでしたが、文字の意味合いと合致した画像を生成するのはだいぶできるようになっている。広告とかの生成にも使えそうですね!
今後ともLLM, Diffusion model, Image Analysis, 3Dに関連する試した記事を投稿していく予定なのでよろしくお願いします。


Discussion