ROS2: YDLIDAR G2とJetsonでCartographer SLAMをする
海洋ロボコンをやってた人です。
今回は、YDLIDAR単体をJetsonに接続し、Cartographerで2DSLAMしてみたので、備忘録として手順をまとめます。
YDLIDARをROS2で動かし、SLAMを始めてみたいと思う初学者の方に参考にしていただければと思います。
※2023/03/12追記: 本記事の「ROS2」表記、正しくは「ROS 2」です。
1. ROS2を用いYDLIDARとJetsonでCartographer SLAMをする
この記事を読むことで
のように、YDLIDAR単体でSLAMを体験することができます。
使用する機器および環境は以下です。
- Jetson Nano B01
- OS: Ubuntu20.04 Foxy
- YDLIDAR G2 360°レーザースキャナ
- Laptop PC
- OS: Ubuntu20.04 Foxy

JetsonとYDLIDARはUSB経由で接続し、Laptop PCからSSHでJetsonを操作していきます。
※2023/02/26追記: 本記事の「ROS2」表記、正しくは「ROS 2」です。
1.1 YDLidar-SDK、ros2_driverのインストール
まずはYDLidarに必要なパッケージとして
- YDLidar-SDK
- ydlidar_ros2_driver
をインストールしていきます。
- YDLidar-SDKのインストール
YDLidar-SDKのインストールはこちらの通りに進めてもらえれば問題ありません。
備忘録もかね、コマンドを下記に記載しておきます。
sudo apt install cmake pkg-config
sudo apt-get install python3 swig
sudo apt-get install python3-pip

git clone https://github.com/YDLIDAR/YDLidar-SDK.git
mkdir YDLidar-SDK/build
cd YDLidar-SDK/build
cmake ..
make
sudo make install

cd ~/YDLidar-SDK/
pip3 install .
YDLidar-SDKのインストールが終了したら、ydlidarをインポートできるか確認もしておきましょう。
python3
>>> import ydlidar
>>>
テストプログラムを走らせ、実行できればOKです。
cd ~/YDLidar-SDK/build
./tri_test

- ydlidar_ros2_driver
つづいて、ydlidarのROS2パッケージをインストールしていきます。
基本的に、下記のClone ydlidar_ros2_driver以降を進めてもらえれば問題なく実行までできると思います。
mkdir -p ydlidar_ros2_ws/src
cd ydlidar_ros2_ws/src/
git clone https://github.com/YDLIDAR/ydlidar_ros2_driver.git
cd ..
colcon build --symlink-install

source ./install/setup.bash
echo "source ~/ydlidar_ros2_ws/install/setup.bash" >> ~/.bashrc
source ~/.bashrc

chmod 0777 src/ydlidar_ros2_driver/startup/*
sudo sh src/ydlidar_ros2_driver/startup/initenv.sh
今回はJetsonに接続したYDLidarをLaptop PC側で制御したいので、JetsonとLaptop PC側の両方にこれらのパッケージをインストールしました。
インストール後、以下を実行し動作確認してみましょう。
ros2 launch ydlidar_ros2_driver ydlidar_launch.py
ros2 launch ydlidar_ros2_driver ydlidar_launch_view.py
2DLidarのscanがRvizで確認できればOKです。
1.2 Cartographer SLAMのプログラムとデモ
やっとここからが本題になります。
Cartographerは以下から分かるように、ループ閉じ込みが明示的で、占有格子地図をつくれえるSLAMです。
また、オドメトリがなくても地図作成ができる点が利点かと思います。
他にもFastSLAMベースのgmappingやオドメトリを必要としないhector_slamがあり、環境に応じて向き不向きがあるので、どの環境を想定するかによってどのSLAMを使用するかを選択する必要がありますね。
私は、車輪オドメトリがないことを想定して、Cartorapherを選択しました。(陸上生物を模倣するとか)
まずはパッケージをインストールします。
sudo apt install ros-$ROS_DISTRO-cartographer
続いて、ydlidar_ros2_driver/launch下に以下を作成します。
# https://github.com/jdgalviss/realsense_ros2/blob/979350f8b5c1c70bea1d54182f893e8be6bc5e17/realsense_ros2/launch/cartographer_launch.py

import launch
import launch.actions
import launch.substitutions
import launch_ros.actions

from launch import LaunchDescription
from launch_ros.actions import Node
from launch.substitutions import LaunchConfiguration
from ament_index_python.packages import get_package_share_directory
from launch.actions import DeclareLaunchArgument

import os
def generate_launch_description():
    use_sim_time = LaunchConfiguration('use_sim_time', default='false')
    share_dir = get_package_share_directory('ydlidar_ros2_driver')
    rviz_config_file = os.path.join(share_dir, 'config','ydlidar_cartographer.rviz')
    cartographer_config_dir = LaunchConfiguration('cartographer_config_dir',
                                                    default=os.path.join(share_dir, 'config'))
    configuration_basename = LaunchConfiguration('configuration_basename', default='ydlidar_cartographer.lua')

    resolution = LaunchConfiguration('resolution', default='0.05')
    publish_period_sec = LaunchConfiguration('publish_period_sec', default='1.0')
    return LaunchDescription([

        Node(package='rviz2',
                    executable='rviz2',
                    name='rviz2',
                    arguments=['-d', rviz_config_file],
            ),

        Node(
            ## Configure the TF of the robot to the origin of the map coordinates
            package='tf2_ros',
            executable='static_transform_publisher',
            output='screen',
            arguments=['0.0', '0.0', '0.0', '0.0', '0.0', '0.0', 'base_link', 'laser_frame']
            ),

        Node(
            ## Configure the TF of the robot to the origin of the map coordinates
            # map TF to odom TF
            package='tf2_ros',
            node_executable='static_transform_publisher',
            node_namespace='',
            output='screen',
            arguments=['0.0', '0.0', '0.0', '0.0', '0.0', '0.0', 'map', 'odom']
        ),

        Node(
            ## Configure the TF of the robot to the origin of the map coordinates
            # odom TF to base_footprint
            package='tf2_ros',
            node_executable='static_transform_publisher',
            node_namespace='',
            output='screen',
            arguments=['0.0', '0.0', '0.0', '0.0', '0.0', '0.0', 'odom', 'base_footprint']
        ),

        Node(
            package='cartographer_ros',
            executable='cartographer_node',
            output='log',
            parameters=[{'use_sim_time': use_sim_time}],
            arguments=['-configuration_directory', cartographer_config_dir, '-configuration_basename', configuration_basename],
            remappings=[('odom','rs_t265/odom'),]
            ),
        DeclareLaunchArgument(
            'resolution',
            default_value=resolution,
            description='Resolution of a grid cell in the published occupancy grid'),

        DeclareLaunchArgument(
            'publish_period_sec',
            default_value=publish_period_sec,
            description='OccupancyGrid publishing period'),

        Node(
            package='cartographer_ros',
            executable='occupancy_grid_node',
            name='occupancy_grid_node',
            parameters=[{'use_sim_time': use_sim_time}],
            arguments=['-resolution', resolution, '-publish_period_sec', publish_period_sec])
    ])
cartographer SLAMではパラメータチューニング用にydlidar_ros2_driver/config下に.luaという設定ファイルを使用します。
そのため、こちらも準備します。
include "map_builder.lua"
include "trajectory_builder.lua"

options = {
  map_builder = MAP_BUILDER,
  trajectory_builder = TRAJECTORY_BUILDER,
  map_frame = "map",
  tracking_frame = "laser_frame",
  published_frame = "laser_frame",
  odom_frame = "odom",
  provide_odom_frame = false,
  publish_frame_projected_to_2d = false,
  use_odometry = false,
  use_nav_sat = false,
  use_landmarks = false,
  num_laser_scans = 1,
  num_multi_echo_laser_scans = 0,
  num_subdivisions_per_laser_scan = 1,
  num_point_clouds = 0,
  lookup_transform_timeout_sec = 0.2,
  submap_publish_period_sec = 0.05,
  pose_publish_period_sec = 5e-3,
  trajectory_publish_period_sec = 30e-3,
  rangefinder_sampling_ratio = 1.,
  odometry_sampling_ratio = 1.,
  fixed_frame_pose_sampling_ratio = 1.,
  imu_sampling_ratio = 1.,
  landmarks_sampling_ratio = 1.,
}

MAP_BUILDER.use_trajectory_builder_2d = true

TRAJECTORY_BUILDER_2D.min_range = 0.
TRAJECTORY_BUILDER_2D.max_range = 10.
TRAJECTORY_BUILDER_2D.missing_data_ray_length = 5.
TRAJECTORY_BUILDER_2D.use_imu_data = false
TRAJECTORY_BUILDER_2D.use_online_correlative_scan_matching = false

POSE_GRAPH.constraint_builder.min_score = 0.65
POSE_GRAPH.constraint_builder.global_localization_min_score = 0.7

POSE_GRAPH.optimization_problem.local_slam_pose_translation_weight = 1e5
POSE_GRAPH.optimization_problem.local_slam_pose_rotation_weight = 1e5
POSE_GRAPH.optimization_problem.odometry_translation_weight = 1e5
POSE_GRAPH.optimization_problem.odometry_rotation_weight = 1e5
POSE_GRAPH.optimization_problem.huber_scale = 1e3

TRAJECTORY_BUILDER_2D.ceres_scan_matcher.occupied_space_weight = 10
TRAJECTORY_BUILDER_2D.ceres_scan_matcher.rotation_weight = 40

TRAJECTORY_BUILDER_2D.submaps.num_range_data = 120
TRAJECTORY_BUILDER_2D.motion_filter.max_distance_meters = 0.1
TRAJECTORY_BUILDER_2D.motion_filter.max_angle_radians = math.rad(0.2)

return options
ここでは、.luaファイルのパラメータは適当に設定してあるので、使用環境に応じて必ず変更してください。
パラメータについては、でべさんがまとめてくださっているので下記を熟読ですね!
最後に、ydlidar_ros2_driver/config下の.rvizファイルをcartograper用に新規作成しアレンジします。
*以下はydlidar.rvizに対しての追記分を掲載、odomについては後述
    - Class: rviz_default_plugins/Odometry
      Covariance:
        Orientation:
          Alpha: 0.5
          Color: 255; 255; 127
          Color Style: Unique
          Frame: Local
          Offset: 1
          Scale: 1
          Value: true
        Position:
          Alpha: 0.300
          Color: 204; 51; 204
          Scale: 1
          Value: true
        Value: False
      Enabled: true
      Keep: 1
      Name: Odometry
      Position Tolerance: 0.100
      Angle Tolerance: 0.100
      Shape:
        Color: 255; 25; 0
        Alpha: 1
        Axes Length: 0.4
        Axes Radius: 0.10
        Shaft Length: 0.4
        Shaft Radius: 0.05
        Head Length: 0.300
        Head Radius: 0.100
        Value: Arrow
      Topic: /odom_rf2o
      Unreliable: true
      Value: true

    - Class: rviz_default_plugins/Map
      Color Scheme: map
      Draw Behind: false
      Enabled: true
      Name: Map
      Topic: /map
      Unreliable: true
      Use Timestamp: false
      Value: true

  Enabled: true
  Global Options:
    Background Color: 48; 48; 48
    Fixed Frame: map
    Frame Rate: 30
  Name: root
ここまで記述できたら、実際に試してみましょう。
ros2 launch ydlidar_ros2_driver ydlidar_launch.py
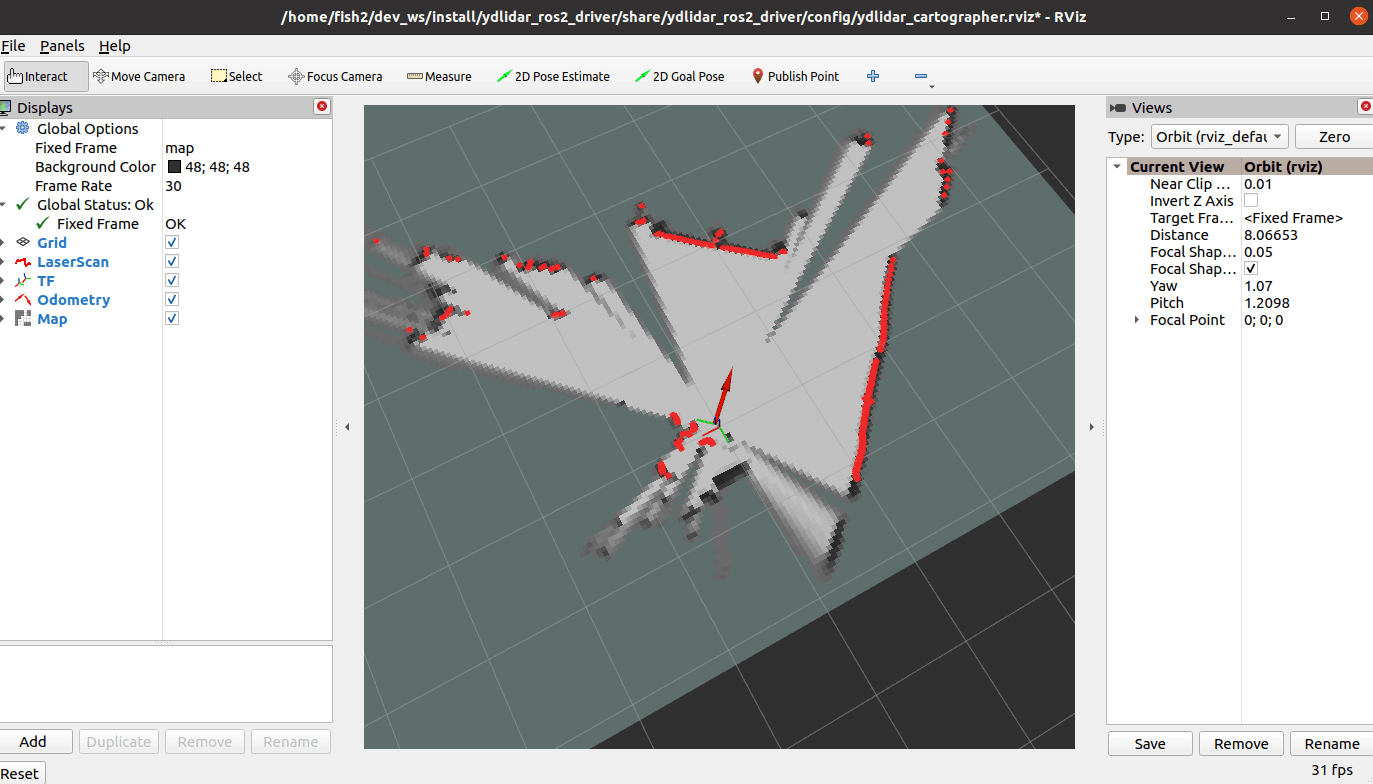
ros2 launch ydlidar_ros2_driver ydlidar_cartographer.launch.py

このようにscan、mapデータが表示され、laser_frameがオドメトリの役割を担っていることが確認できるかと思います。
1.3 YDLIDAR単体からオドメトリを算出するRF2Oを使用する
また、Laser Scanデータから2Dのオドメトリを算出するrf2o_laser_odometryというパッケージがあります。
これのROS2パッケージを使用して、オドメトリもプログラムに組み込んでみます。
cd ~/dev_ws/src
git clone https://github.com/Adlink-ROS/rf2o_laser_odometry.git
cd ~/dev_ws
colcon build --packages-select rf2o_laser_odometry
. install/setup.bash
ROS2パッケージのインストールとビルドができたら、LaptopPC側でノードを起動してCartographerを確認してみましょう。
ros2 launch rf2o_laser_odometry rf2o_laser_odometry.launch.py
オドメトリとして表示されていることが確認できますね。
ただ、Cartographerはパラメータのチューニングを適切に設定しないと

のように、簡単に自己位置を見失います。
そこが難点ですが、Lidar単体で動かせる点は魅力的かと思います。
ここからは余談です。
水中ではPing360スキャニングイメージングソナー − Ping360 Scanning Imaging Sonar
などのソナーがあり(水中で使えるLidar)
ROS2対応のパッケージも公開されているため、CartographerなどのSLAMシステムを組み込むことができます。
このソナーは2021年と比較して、8万くらい値上がりしていますが、Blueprint SubseaのOculusよりは安価だと思うので仕方ないですね(泣)。
以上。
Discussion