Rustのndarrayにtensordotが無いので自分で作った
はじめに
ndarrayクレートはNumpyのRust版のようなものです。Numpyに存在する多くの機能が実装されていますが、記事執筆時点(バージョン0.16.1)ではmoveaxisやtensordotに相当する機能がありません。
そこでこれらに相当する関数を自作しました。
この記事では具体的な実装方法を紹介します。
成果物
本編
moveaxis
moveaxisそれ自体はndarrayに無いのですが、近い機能を提供するpermuted_axes関数があります。
両者の違いは、Numpyのmoveaxisは動かす軸のみ引数として指定するのに対し、ndarrayのpermuted_axesは全ての軸の並びを明示的に指定して引数として渡すという点です。
したがって、自分で実装する必要があるのは一部の軸のみ指定されている引数から全体の軸の並びを決定する部分です。
以下のように使えるmovexis関数を実装します。型定義だけ完成品のものを示しています。ごちゃごちゃしていますが、一旦「対象の配列と、動かす軸の元の位置と、動かした先の位置という3つの引数を取るんだな」とだけ覚えておけば大丈夫です。
let arr = ndarray::Array::range(0., 5040., 1.)
    .into_shape_with_order(ndarray::IxDyn(&[2, 3, 4, 5, 6, 7]))
    .unwrap();

let result = moveaxis(&arr, &[0, 1], &[3, 2]);
assert_eq!(result.shape(), &[4, 5, 3, 2, 6, 7]);
pub fn moveaxis<S, I, const NMOVE: usize>(
    a: ndarray::ArrayBase<S, ndarray::Dim<I>>,
    source: &[usize; NMOVE],
    destination: &[usize; NMOVE],
) -> ndarray::ArrayBase<S, ndarray::Dim<I>>
where
    S: ndarray::Data,
    I: ndarray::IntoDimension<Dim = ndarray::Dim<I>> + TryFrom<Vec<usize>, Error: std::fmt::Debug>,
    ndarray::Dim<I>: ndarray::Dimension,
{
    ...
    a.permuted_axes(axes)
}
permuted_axesに渡す引数axesはa.shape()と同じ長さの配列であり、その中身は以下のようにして決まります。
-
destinationのi d_i sourceのi s_i axesのd_i s_i - 残った箇所は先頭から順に
sourceに含まれない0以上a.ndim()未満の整数を小さい順に埋めていく
まず、1. で
let dst_src = std::collections::BTreeMap::from_iter(std::iter::zip(destination, source));
次に、2. でsourceに含まれない整数を取得するためのイテレータを作成します。
let ndim = a.ndim();
let mut source = *source;
source.sort();
let mut rest = (0..ndim).filter(|&i| source.binary_search(&i).is_err());
これらを用いて、permuted_axesに渡すためのaxesは以下のように用意できます。restイテレータは必ずちょうど使い切るのでunwrap()しても大丈夫です。
let mut axes = Vec::with_capacity(ndim);
for dst in 0..ndim {
    let axis_idx = if let Some(&&src) = dst_src.get(&dst) {
        src
    } else {
        rest.next().unwrap()
    };
    axes.push(axis_idx);
}
さて、軸の並び順がわかったところでちょっとした型パズルを解く必要があります。
ndarrayの配列には次元数を型レベルで管理するものと動的にしてプログラマが責任を持って管理するものがあります。前者としては例えば
let arr_2x3x4x5: ndarray::ArrayBase<
    ndarray::OwnedRepr<f64>,
    ndarray::Dim<[usize; 4]>,
> = ndarray::Array::range(0., (2 * 3 * 4 * 5) as f64, 1.)
    .into_shape_with_order(ndarray::Ix4(2, 3, 4, 5))
    .unwrap();
があり、後者には例えば
let arr_2x3x4x5: ndarray::ArrayBase<
    ndarray::OwnedRepr<f64>,
    ndarray::Dim<ndarray::IxDynImpl>,
> = ndarray::Array::range(0., (2 * 3 * 4 * 5) as f64, 1.)
    .into_shape_with_order(ndarray::IxDyn(&[2, 3, 4, 5]))
    .unwrap();
があります。moveaxis関数はこのどちらも対応できるようにしたいです。問題はpermuted_axesに渡す引数の型です。permuted_axesの型は次のように定義されています。
impl<A, S, D> ArrayBase<S, D>
pub fn permuted_axes<T>(self, axes: T) -> ArrayBase<S, D>
where
    T: IntoDimension<Dim = D>,
    // Bounds from impl:
    S: RawData<Elem = A>,
    D: Dimension,
そのため、Vec<usize>型であるaxesを、固定次元数の場合は例えばIntoDimension<Dim = [usize; 4]>トレイトを、動的次元数の場合はIntoDimension<Dim = ndarray::Dim<ndarray::IxDynImpl>>トレイトを実装した何かに変換する必要があります。
ndarray::IntoDimensionトレイトの実装を眺めているとこんな記述が見つかります。
impl IntoDimension for [Ix; $n] {
    type Dim = Dim<[Ix; $n]>;
    #[inline(always)]
    fn into_dimension(self) -> Self::Dim {
        Dim::new(self)
    }
}
マクロの中身なので$nというプレースホルダが使われていますが、[usize; 4]がIntoDimension<Dim = Dim<[usize; 4]>>を実装していることがわかります。ちなみにIxはusizeのエイリアスです。
また、こんな記述も見つかります。IxDynはndarray::Dim<ndarray::IxDynImpl>のエイリアスです。
impl IntoDimension for IxDynImpl
{
    type Dim = IxDyn;
    #[inline(always)]
    fn into_dimension(self) -> Self::Dim
    {
        Dim::new(self)
    }
}
よって、上述の
固定次元数の場合は例えば
IntoDimension<Dim = [usize; 4]>トレイトを、動的次元数の場合はIntoDimension<Dim = ndarray::Dim<ndarray::IxDynImpl>>トレイトを実装した何か
という部分は、よりシンプルに
固定次元数の場合は例えば
[usize; 4]型、動的次元数の場合はndarray::IxDynImpl型
と言い換えられます。実際前者はimpl<T, A: Allocator, const N: usize> TryFrom<Vec<T, A>> for [T; N]によって、後者はimpl From<Vec<Ix>> for ndarray::IxDynImplによってVec<usize>から変換できます。このことをコンパイラに知らせるためには[usize; 4]やndarray::IxDynImplをIで表すことにして
I: ndarray::IntoDimension<Dim = ndarray::Dim<I>> + TryFrom<Vec<usize>, Error: std::fmt::Debug>
という制約を課せばよいわけです。
以上を踏まえ、moveaxis関数の全体像を以下に示します。
moveaxis関数の全体像
pub fn moveaxis<S, I, const NMOVE: usize>(
    a: ndarray::ArrayBase<S, ndarray::Dim<I>>,
    source: &[usize; NMOVE],
    destination: &[usize; NMOVE],
) -> ndarray::ArrayBase<S, ndarray::Dim<I>>
where
    S: ndarray::Data,
    I: ndarray::IntoDimension<Dim = ndarray::Dim<I>> + TryFrom<Vec<usize>, Error: std::fmt::Debug>,
    ndarray::Dim<I>: ndarray::Dimension,
{
    let ndim = a.ndim();
    let dst_src = std::collections::BTreeMap::from_iter(std::iter::zip(destination, source));
    let mut source = *source;
    source.sort();
    let mut rest = (0..ndim).filter(|&i| source.binary_search(&i).is_err());

    let mut axes = Vec::with_capacity(ndim);
    for dst in 0..ndim {
        let axis_idx = if let Some(&&src) = dst_src.get(&dst) {
            src
        } else {
            rest.next().unwrap()
        };
        axes.push(axis_idx);
    }

    let axes = I::try_from(axes).unwrap();
    a.permuted_axes(axes)
}
この関数は
moveaxis(arr, src, dst);
のように呼び出せばもとの配列の所有権を奪い、
moveaxis(arr.view(), src, dst);
のように呼び出せばもとの配列はそのままでビューを返します。
tensordot
tensordotはそもそもやるべき処理が複雑な代わりに、型パズルは簡単です。まず初めに完成品の型定義を示します。型パラメータ数は多いですが、moveaxisのときほど絡まっていないので落ち着いて読めば大したことはありません。lhsのS1とrhsのS2で型を分けているのは、例えば片方がndarray::OwnedReprでもう片方がndarray::ViewReprであるような場合にも対応するためです。
pub fn tensordot<S1, S2, A, D1, D2, const N: usize>(
    lhs: &ndarray::ArrayBase<S1, D1>,
    rhs: &ndarray::ArrayBase<S2, D2>,
    lhs_axes: &[usize; N],
    rhs_axes: &[usize; N],
) -> std::result::Result<
    ndarray::ArrayBase<ndarray::OwnedRepr<A>, ndarray::IxDyn>,
    ndarray::ShapeError,
>
where
    S1: ndarray::Data<Elem = A>,
    S2: ndarray::Data<Elem = A>,
    A: ndarray::LinalgScalar,
    D1: ndarray::Dimension,
    D2: ndarray::Dimension,
{
    ...
}
実装の方針としては、
-
lhsとrhsのそれぞれを2次元行列に変形する - 2次元行列同士の行列積はndarrayが提供しているので、これを使って積を計算する
- 然るべき形にreshapeする
という流れになります。
最初の変形では、moveaxisで使ったpermuted_axesを再び使います。以下の図はここでの軸の並べ替えや変形を模式的に表したものです。この変形を理解するのがtensordot実装の山場です。
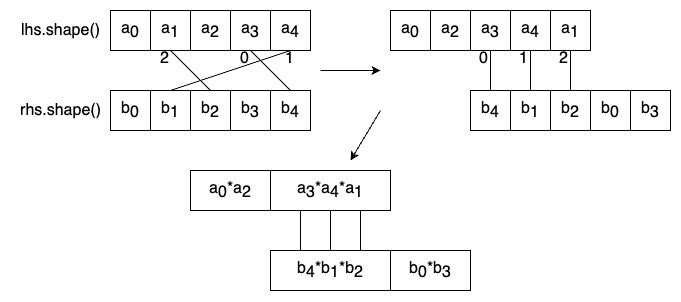
以下に、lhs.permuted_axesやrhs.permuted_axesに渡す引数を用意するコードを示します。
上の図に示した例の場合、lhs_permutationにはvec![0, 2, 3, 4, 1]が、rhs_permutationにはvec![4, 1, 2, 0, 3]が入ります。
let lhs_axes_uniq = std::collections::BTreeSet::from_iter(lhs_axes);
assert_eq!(lhs_axes_uniq.len(), N, "lhs_axes has duplicate entries");
let rhs_axes_uniq = std::collections::BTreeSet::from_iter(rhs_axes);
assert_eq!(rhs_axes_uniq.len(), N, "rhs_axes has duplicate entries");

let lhs_permutation = (0..lhs.ndim())
    .filter(|ax| !lhs_axes_uniq.contains(ax))
    .chain(lhs_axes.iter().copied())
    .collect::<Vec<_>>();
let rhs_permutation = rhs_axes
    .iter()
    .copied()
    .chain((0..rhs.ndim()).filter(|ax| !rhs_axes_uniq.contains(ax)))
    .collect::<Vec<_>>();
次に、これらを用いて変形した各配列から、2次元行列の形や最終結果の形を計算します。これはやるだけなのでいきなりコードを示します。permuted_axesは配列を消費する(i.e. 第一引数が&selfではなくself)ので.view()をかませる必要があります。また、Vec<usize>型の引数を渡せるよう、.into_dyn()で動的次元数の配列にする必要があります。
let lhs_permuted = lhs.view().into_dyn().permuted_axes(lhs_permutation);
let (out_left_shape, dot_shape) = lhs_permuted.shape().split_at(lhs.ndim() - N);
let out_left_size = out_left_shape.iter().product::<usize>();
let dot_size = dot_shape.iter().product::<usize>();

let rhs_permuted = rhs.view().into_dyn().permuted_axes(rhs_permutation);
let (dot_shape, out_right_shape) = rhs_permuted.shape().split_at(N);
assert_eq!(dot_size, dot_shape.iter().product::<usize>());
let out_right_size = out_right_shape.iter().product::<usize>();

let out_shape = out_left_shape.iter().chain(out_right_shape).copied().collect::<Vec<_>>();
最後に、行列積を計算して形を元に戻します。
lhs_permuted
    .to_shape([out_left_size, dot_size])?
    .dot(&rhs_permuted.to_shape([dot_size, out_right_size])?)
    .into_shape_with_order(out_shape)
全体像は以下のようになります。
tensordot関数の全体像
pub fn tensordot<S1, S2, A, D1, D2, const N: usize>(
    lhs: &ndarray::ArrayBase<S1, D1>,
    rhs: &ndarray::ArrayBase<S2, D2>,
    lhs_axes: &[usize; N],
    rhs_axes: &[usize; N],
) -> std::result::Result<
    ndarray::ArrayBase<ndarray::OwnedRepr<A>, ndarray::IxDyn>,
    ndarray::ShapeError,
>
where
    S1: ndarray::Data<Elem = A>,
    S2: ndarray::Data<Elem = A>,
    A: ndarray::LinalgScalar,
    D1: ndarray::Dimension,
    D2: ndarray::Dimension,
{
    let lhs_axes_uniq = std::collections::BTreeSet::from_iter(lhs_axes);
    assert_eq!(lhs_axes_uniq.len(), N, "lhs_axes has duplicate entries");
    let rhs_axes_uniq = std::collections::BTreeSet::from_iter(rhs_axes);
    assert_eq!(rhs_axes_uniq.len(), N, "rhs_axes has duplicate entries");

    let lhs_permutation = (0..lhs.ndim())
        .filter(|ax| !lhs_axes_uniq.contains(ax))
        .chain(lhs_axes.iter().copied())
        .collect::<Vec<_>>();
    let rhs_permutation = rhs_axes
        .iter()
        .copied()
        .chain((0..rhs.ndim()).filter(|ax| !rhs_axes_uniq.contains(ax)))
        .collect::<Vec<_>>();

    let lhs_permuted = lhs.view().permuted_axes(lhs_permutation);
    let (out_left_shape, dot_shape) = lhs_permuted.shape().split_at(lhs.ndim() - N);
    let out_left_size = out_left_shape.iter().product::<usize>();
    let dot_size = dot_shape.iter().product::<usize>();

    let rhs_permuted = rhs.view().permuted_axes(rhs_permutation);
    let (dot_shape, out_right_shape) = rhs_permuted.shape().split_at(N);
    assert_eq!(dot_size, dot_shape.iter().product::<usize>());
    let out_right_size = out_right_shape.iter().product::<usize>();

    let out_shape = out_left_shape.iter().chain(out_right_shape).copied().collect::<Vec<_>>();

    lhs_permuted
        .to_shape([out_left_size, dot_size])?
        .dot(&rhs_permuted.to_shape([dot_size, out_right_size])?)
        .into_shape_with_order(out_shape)
}
この関数は以下のように使えます。
let arr_2x3x4 = ndarray::array![
    [
        [ 1.,  2.,  3.,  4.],
        [ 5.,  6.,  7.,  8.],
        [ 9., 10., 11., 12.]
    ],
    [
        [13., 14., 15., 16.],
        [17., 18., 19., 20.],
        [21., 22., 23., 24.]
    ]
];
let arr_4x2x3 = ndarray::array![
    [[ 1.,  2.,  3.], [ 4.,  5.,  6.]],
    [[ 7.,  8.,  9.], [10., 11., 12.]],
    [[13., 14., 15.], [16., 17., 18.]],
    [[19., 20., 21.], [22., 23., 24.]]
];
let result = tensordot(&arr_2x3x4, &arr_4x2x3, &[0, 2], &[1, 0]);
assert_eq!(
    result.unwrap(),
    ndarray::array![
        [ 914.,  982., 1050.],
        [1282., 1382., 1482.],
        [1650., 1782., 1914.],
    ]
    .into_dyn()
);
まとめ
ndarrayクレートにないmoveaxisやtensordotを、ndarrayが提供する抽象化をなるべく壊さずに自前で実装しました。特にmoveaxisの型パズルは大変でしたが、はまると気持ちいいですね。
Discussion