Closed4
sd-scriptsを使ったLoRA学習(コマンド向け)
ピン留めされたアイテム
この記事の概要
実行手順をコピペでできるよう記載。
すべてコマンドで行い人向け。
実行環境
- Win / Powershell
- RTX3080ti
LoRAで追加学習してStable Diffusionで画像を出力するまでの手順。
Link
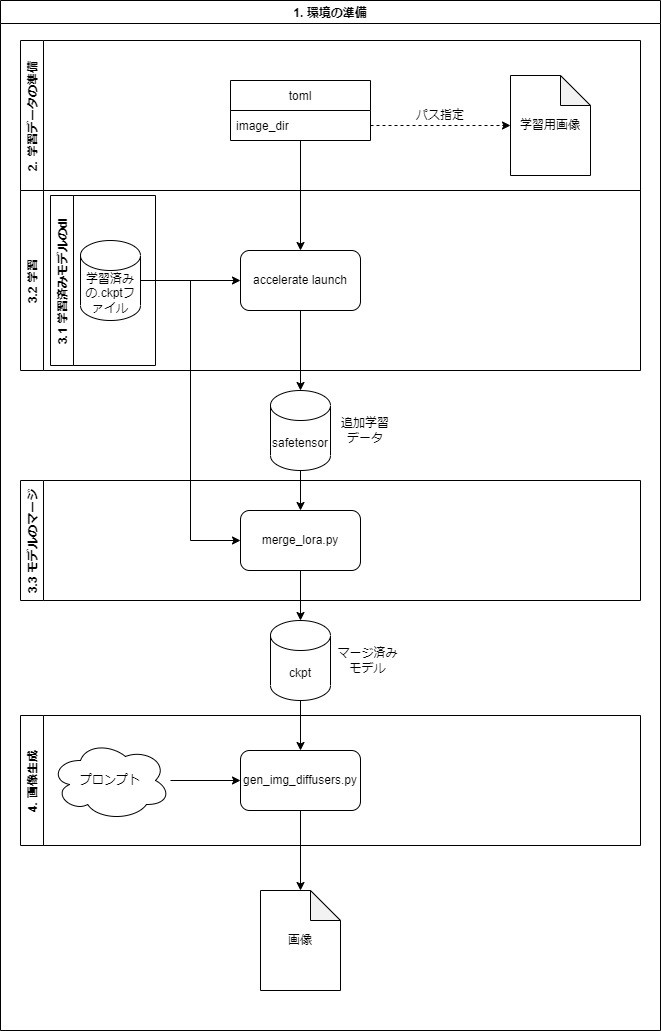
1. 環境の準備
2. 学習データの準備
3. LoRAの学習
3.1 ckptファイルの準備
3.2 学習
3.3 モデルのマージ
4. 画像生成
Powershellを開く
-
Win + xを押す -
iを押す
環境構築
- scoopのインストール
- python, gitのインストール
Set-ExecutionPolicy RemoteSigned -scope CurrentUser
invoke-Expression (New-Object System.Net.WebClient).DownloadString('https://get.scoop.sh')

scoop bucket add versions
scoop install versions/python310
scoop install git
スクリプトの準備
- sd-scriptsのダウンロード
- venvの構築
- pythonのライブラリ群のインストール
- accelerateの設定
git clone https://github.com/kohya-ss/sd-scripts.git
cd sd-scripts

python -m venv venv
.\venv\Scripts\activate

pip install torch==1.12.1+cu116 torchvision==0.13.1+cu116 --extra-index-url https://download.pytorch.org/whl/cu116
pip install --upgrade -r requirements.txt
pip install -U -I --no-deps https://github.com/C43H66N12O12S2/stable-diffusion-webui/releases/download/f/xformers-0.0.14.dev0-cp310-cp310-win_amd64.whl

cp .\bitsandbytes_windows\*.dll .\venv\Lib\site-packages\bitsandbytes\
cp .\bitsandbytes_windows\cextension.py .\venv\Lib\site-packages\bitsandbytes\cextension.py
cp .\bitsandbytes_windows\main.py .\venv\Lib\site-packages\bitsandbytes\cuda_setup\main.py
@'
command_file: null
commands: null
compute_environment: LOCAL_MACHINE
deepspeed_config: {}
distributed_type: 'NO'
downcast_bf16: 'no'
dynamo_backend: 'NO'
fsdp_config: {}
gpu_ids: all
machine_rank: 0
main_process_ip: null
main_process_port: null
main_training_function: main
megatron_lm_config: {}
mixed_precision: fp16
num_machines: 1
num_processes: 1
rdzv_backend: static
same_network: true
tpu_name: null
tpu_zone: null
use_cpu: false
'@ | Set-Content -Path ".\config.yaml"
データセットの準備
- 設定ファイルの準備
New-Item -ItemType Directory -Path "./dataset"
@'
[general]
enable_bucket = true

[[datasets]]
resolution = 512
batch_size = 4

  [[datasets.subsets]]
  image_dir = 'dataset'
  class_tokens = 'shs girl'
  num_repeats = 100

'@ | Set-Content -Path ".\dataset.toml"
画像の準備(手動)
以下のコマンドでディレクトリが開くので画像を手動で追加してください
explorer.exe .\dataset
-
./datasetディレクトリに画像を入れてください。
以下のような構成になります。
./
├── dataset.toml
├── dataset
    ├── 0001.png
ckptファイルのダウンロード
Stable Diffusionモデルをダウンロードして、model.ckptという名前で保存する。
一例) https://huggingface.co/JosephusCheung/ACertainThing/tree/main
$URI = "https://huggingface.co/JosephusCheung/ACertainThing/resolve/main/ACertainThing.ckpt"
Invoke-WebRequest -Uri $URI -OutFile ".\model.ckpt"
学習の実行
.\venv\Scripts\activate
New-Item -ItemType Directory -Path ".\outputs" -Force
accelerate launch --config_file=".\config.yaml" train_network.py `
    --pretrained_model_name_or_path=".\model.ckpt"  `
    --dataset_config=".\dataset.toml"  `
    --output_dir=".\outputs"    `
    --output_name=rolaoutput  `
    --save_model_as=safetensors  `
    --prior_loss_weight=1.0  `
    --max_train_steps=400  `
    --learning_rate=1e-4  `
    --optimizer_type="AdamW8bit"  `
    --xformers  `
    --mixed_precision="fp16"  `
    --cache_latents  `
    --gradient_checkpointing `
    --save_every_n_epochs=10  `
    --network_module=networks.lora
モデルのマージ
.\venv\Scripts\activate
python .\networks\merge_lora.py --sd_model .\model.ckpt --models .\outputs\rolaoutput.safetensors --save_to .\model-merged.ckpt --ratios 0.5
画像の生成
- スクリプトのダウンロード
$downloadFilePath = ".\gen_img_diffusers.zip"
$url = "https://note.com/api/v2/attachments/download/220cb6eb7f1d93f675794dd0f946775a"
Invoke-WebRequest -Uri $url -OutFile $downloadFilePath
$extractPath = ".\gen_img_diffusers"
Expand-Archive -Path $downloadFilePath -DestinationPath $extractPath

New-Item -ItemType Directory -Path ".\generatedimg"
- スクリプトの実行
.\venv\Scripts\activate
python .\gen_img_diffusers\gen_img_diffusers.py `
--ckpt .\model-merged.ckpt  `
--outdir .\generatedimg `
--xformers  `
--fp16  `
--images_per_prompt 8  `
--prompt "shs girl"
全体の作業イメージ
このスクラップは2023/06/15にクローズされました