VPSとDockerとPostfixとDovecotで作るメールサーバ
背景
今日日、メールアドレスの取得はとても簡単で、例えば Google アカウントを作成すれば、アドレスをもらえます。会社に関しても同様なサービスを利用すれば簡単にメールアドレスが手に入るところですが、セキュリティ面の考慮と勉強も兼ねて、自前で用意してみる事にしました。
構成図
適当な VPS に Ubuntu をインストールし、Docker Container 内にメールサービス( Postfix & Dovecot )を構築します。
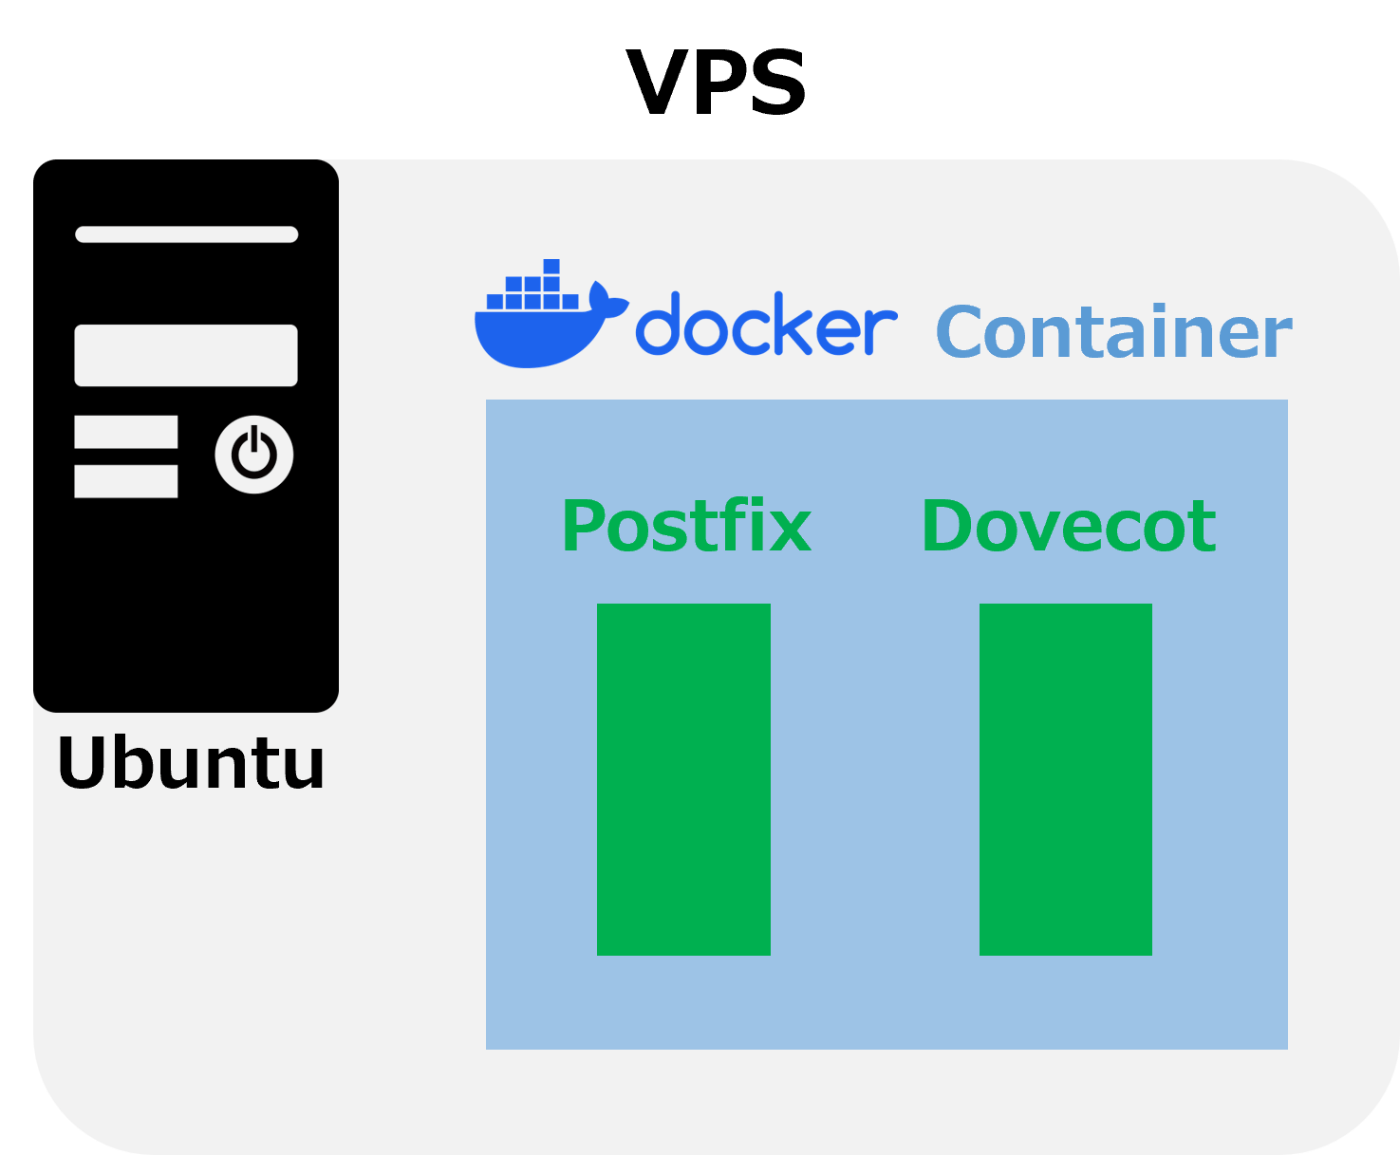
Postfix 及び Dovecot は SSL 前提で構築します。そして、初めに Postfix のみをインストールし、メールの送受信がサーバだけで完了できる事を確認し、その後 Dovecot をインストールしてクライアントを使ってテストします。
Postfix
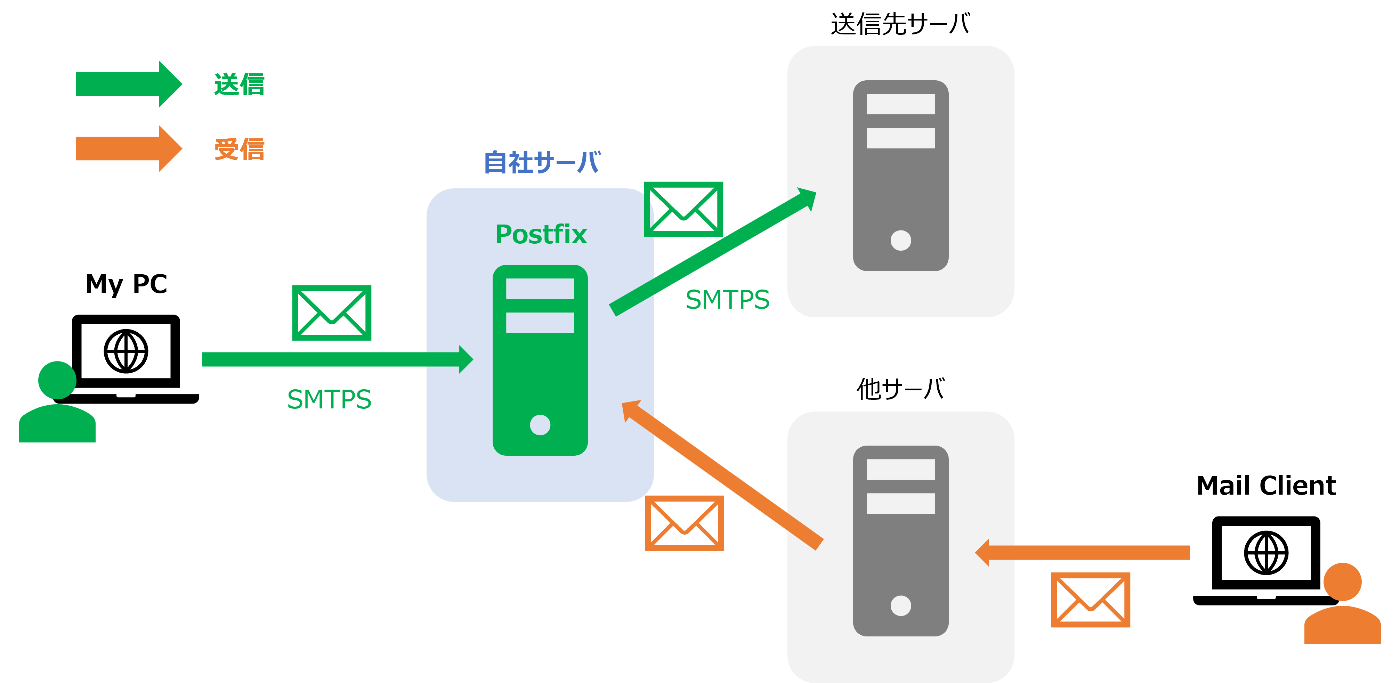
Postfix はメールの送受信を行うサービスです。後述する Dovecot が担うメールの配信とは異なりますので、注意してください。参考
Dovecot
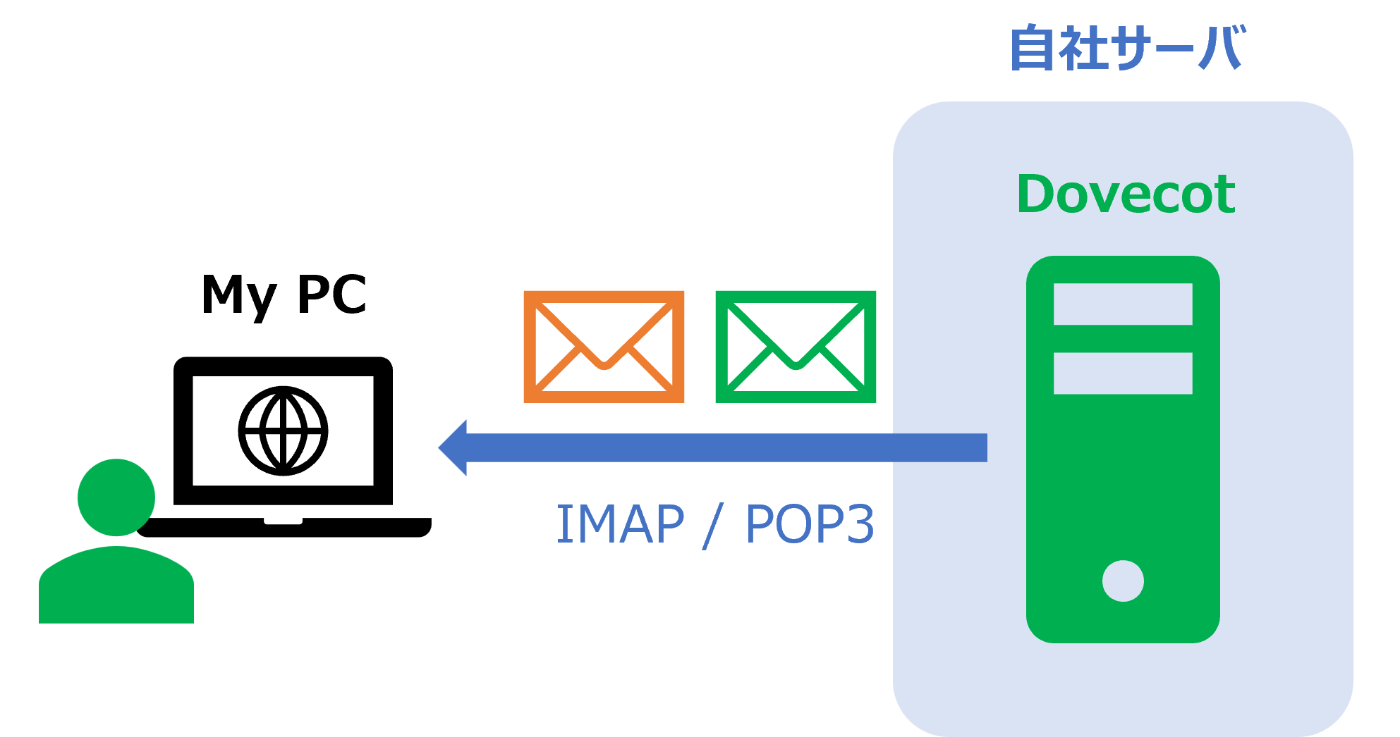
Dovecot はサーバに保管されたメールをメールクライアントに配信するサービスです。基本的にはサーバのみでメールの送受信はできますが、クライアントから送受信できた方が便利です。そのため Dovecot は Postfix とセットで使用される事が多いです。
事前準備
前回記事参照
前提となるサーバーやソフトウェアについては前回記事と同様ですので、そちらを参照してください。
SSL証明書
Webサーバーと同様、SSL証明書が必要です。前回を参考に、同様の証明書を用意しましょう。
もし、同じ証明書かつサブドメインを作成しドメインを分けるのであれば、次のようにドメインを追加して証明書を発行してください。セカンドレベルドメインが tanukinet.jp でメールサービスに利用するサブドメインが mail.tanukinet.jp です。
certbot certonly --webroot -w /var/www/html -d tanukinet.jp -d mail.tanukinet.jp
作成手順
Docker Image
Docker container を作るための image を download します。ここで使用する iamge は Ubuntu 22.04 とします。
sudo docker pull ubuntu:22.04
Container Run
次のコマンドで container を起動します。/home/share はファイルをHost / Container 間で共有するための適当なディレクトリです。任意に変更してください。
sudo docker run -itd --name mail -p 25:25 -p 465:465 -p 587:587 -p XXXXX:993 -v /home/share:/home/share ubuntu:22.04 /bin/bash --login
sudo docker exec -it mail /bin/bash
Postfix ( & other modules ) install
apt update
apt -y install postfix sasl2-bin vim less tzdata rsyslog libsasl2-dev
途中出てくる Postfix の config 設定は No configuration を選択してください。
Postfix Configuration
---------------------

Please select the mail server configuration type that best meets your needs.

 No configuration:
  Should be chosen to leave the current configuration unchanged.
 Internet site:
  Mail is sent and received directly using SMTP.
 Internet with smarthost:
  Mail is received directly using SMTP or by running a utility such
  as fetchmail. Outgoing mail is sent using a smarthost.
 Satellite system:
  All mail is sent to another machine, called a 'smarthost', for
  delivery.
 Local only:
  The only delivered mail is the mail for local users. There is no
  network.

  1. No configuration  2. Internet Site  3. Internet with smarthost  4. Satellite system  5. Local only
General mail configuration type: 1
適切なタイムゾーンをしてください。本記事では Tokyo とします。
Configuring tzdata
------------------

Please select the geographic area in which you live. Subsequent configuration questions will narrow this down by presenting a list of cities, representing
the time zones in which they are located.

  1. Africa  2. America  3. Antarctica  4. Australia  5. Arctic  6. Asia  7. Atlantic  8. Europe  9. Indian  10. Pacific  11. US  12. Etc
Geographic area: 6

Please select the city or region corresponding to your time zone.

  1. Aden      11. Baku        21. Damascus     31. Hong_Kong  41. Kashgar       51. Makassar      61. Pyongyang  71. Singapore      81. Ujung_Pandang
  2. Almaty    12. Bangkok     22. Dhaka        32. Hovd       42. Kathmandu     52. Manila        62. Qatar      72. Srednekolymsk  82. Ulaanbaatar
  3. Amman     13. Barnaul     23. Dili         33. Irkutsk    43. Khandyga      53. Muscat        63. Qostanay   73. Taipei         83. Urumqi
  4. Anadyr    14. Beirut      24. Dubai        34. Istanbul   44. Kolkata       54. Nicosia       64. Qyzylorda  74. Tashkent       84. Ust-Nera
  5. Aqtau     15. Bishkek     25. Dushanbe     35. Jakarta    45. Krasnoyarsk   55. Novokuznetsk  65. Rangoon    75. Tbilisi        85. Vientiane
  6. Aqtobe    16. Brunei      26. Famagusta    36. Jayapura   46. Kuala_Lumpur  56. Novosibirsk   66. Riyadh     76. Tehran         86. Vladivostok
  7. Ashgabat  17. Chita       27. Gaza         37. Jerusalem  47. Kuching       57. Omsk          67. Sakhalin   77. Tel_Aviv       87. Yakutsk
  8. Atyrau    18. Choibalsan  28. Harbin       38. Kabul      48. Kuwait        58. Oral          68. Samarkand  78. Thimphu        88. Yangon
  9. Baghdad   19. Chongqing   29. Hebron       39. Kamchatka  49. Macau         59. Phnom_Penh    69. Seoul      79. Tokyo          89. Yekaterinburg
  10. Bahrain  20. Colombo     30. Ho_Chi_Minh  40. Karachi    50. Magadan       60. Pontianak     70. Shanghai   80. Tomsk          90. Yerevan
Time zone: 79


Current default time zone: 'Asia/Tokyo'
Local time is now:      Wed Nov 22 14:01:31 JST 2023.
Universal Time is now:  Wed Nov 22 05:01:31 UTC 2023.
Postfix config
Postfix の config を設定します。まずは設定の元となる config をコピーします。
cp /usr/share/postfix/main.cf.dist /etc/postfix/main.cf
予め重複する設定をコメントアウトしてから編集します。
sed -i 's/^mynetworks =/#&/g'        /etc/postfix/main.cf
sed -i 's/^smtpd_banner =/#&/g'      /etc/postfix/main.cf
sed -i 's/^sendmail_path =/#&/g'     /etc/postfix/main.cf
sed -i 's/^newaliases_path =/#&/g'   /etc/postfix/main.cf
sed -i 's/^mailq_path =/#&/g'        /etc/postfix/main.cf
sed -i 's/^setgid_group =/#&/g'      /etc/postfix/main.cf
sed -i 's/^html_directory =/#&/g'    /etc/postfix/main.cf
sed -i 's/^manpage_directory =/#&/g' /etc/postfix/main.cf
sed -i 's/^sample_directory =/#&/g'  /etc/postfix/main.cf
sed -i 's/^readme_directory =/#&/g'  /etc/postfix/main.cf
sed -i 's/^inet_protocols =/#&/g'    /etc/postfix/main.cf
vi /etc/postfix/main.cf
次の設定値はあらかじめ見直してください。
| Key | Value | 補足 |
|---|---|---|
| myhostname | mail.tanukinet.jp | サブドメイン名 |
| mydomain | mail.tanukinet.jp | サブドメイン名 |
| smtpd_tls_cert_file | /home/share/tanukinet.jp/fullchain1.pem | SSL証明書 |
| smtpd_tls_key_file | /home/share/tanukinet.jp/privkey1.pem | SSL証明書 |
myhostname と mydomain にはメールアドレスに使う「@」以降のサブドメイン名を入力してください。
## Additional config
mail_owner = postfix
myhostname = mail.tanukinet.jp
mydomain = mail.tanukinet.jp
myorigin = $mydomain
inet_interfaces = all
mydestination = $myhostname, localhost.$mydomain, localhost, $mydomain
local_recipient_maps = unix:passwd.byname $alias_maps
mynetworks_style = subnet
mynetworks = 127.0.0.0/8
alias_maps = hash:/etc/aliases
alias_database = hash:/etc/aliases
home_mailbox = Maildir/
smtpd_banner = $myhostname ESMTP
sendmail_path = /usr/sbin/postfix
newaliases_path = /usr/bin/newaliases
mailq_path = /usr/bin/mailq
setgid_group = postdrop
inet_protocols = ipv4
disable_vrfy_command = yes
smtpd_helo_required = yes
message_size_limit = 10240000
smtpd_sasl_path = smtpd
smtpd_sasl_auth_enable = yes
smtpd_sasl_security_options = noanonymous
smtpd_sasl_local_domain = $myhostname
smtpd_recipient_restrictions = permit_mynetworks, permit_auth_destination, permit_sasl_authenticated, reject
smtpd_use_tls = yes
smtp_tls_mandatory_protocols = !SSLv2, !SSLv3
smtpd_tls_mandatory_protocols = !SSLv2, !SSLv3
smtpd_tls_cert_file = /home/share/tanukinet.jp/fullchain1.pem
smtpd_tls_key_file = /home/share/tanukinet.jp/privkey1.pem
smtpd_tls_session_cache_database = btree:/var/lib/postfix/smtpd_scache
smtp_tls_security_level = may
smtpd_tls_security_level = may
smtpd_tls_protocols = >=TLSv1.2
smtpd_tls_received_header = yes
smtpd_tls_loglevel = 1
プロトコルの設定を編集します。
vi /etc/postfix/master.cf
# 19 - 22 lines
-#submission inet n       -       y       -       -       smtpd
-#  -o syslog_name=postfix/submission
-#  -o smtpd_tls_security_level=encrypt
-#  -o smtpd_sasl_auth_enable=yes
+submission inet n       -       y       -       -       smtpd
+  -o syslog_name=postfix/submission
+#  -o smtpd_tls_security_level=encrypt
+  -o smtpd_sasl_auth_enable=yes

...

# 33 - 36 lines
-#smtps     inet  n       -       y       -       -       smtpd
-#  -o syslog_name=postfix/smtps
-#  -o smtpd_tls_wrappermode=yes
-#  -o smtpd_sasl_auth_enable=yes
+smtps     inet  n       -       y       -       -       smtpd
+  -o syslog_name=postfix/smtps
+  -o smtpd_tls_wrappermode=yes
+  -o smtpd_sasl_auth_enable=yes
設定を反映します。
newaliases
/etc/init.d/postfix restart
log
このままでは mail log が書き出されないので、rsyslog を起動します。
rsyslogd # To enable to write mail log.
/etc/init.d/postfix restart
Mail User
メールアドレスの「@」以前を示すユーザーを追加します。
apt update
apt -y install mailutils
echo 'export MAIL=$HOME/Maildir/' >> /etc/profile.d/mail.sh
adduser test
adduser test では、パスワードを入力します。その他情報は空白で問題ありません。
root@744a367ce080:/# adduser test
Adding user `test' ...
Adding new group `test' (1000) ...
Adding new user `test' (1000) with group `test' ...
Creating home directory `/home/test' ...
Copying files from `/etc/skel' ...
New password:
Retype new password:
passwd: password updated successfully
Changing the user information for test
Enter the new value, or press ENTER for the default
        Full Name []:
        Room Number []:
        Work Phone []:
        Home Phone []:
        Other []:
Is the information correct? [Y/n] Y
su test
cd
echo 'export MAIL=$HOME/Maildir/' >> ~/.bashrc
source ~/.bashrc
念のため、サービスを再起動しておきます。
exit
/etc/init.d/postfix restart
DNSレコード設定
次の DNS レコードを追加設定してください。設定箇所は、お使いのサービスに依存します。「mail」は tanukinet.jp の前に付くサブドメイン名です。XXX.XXX.XXX.XXX はメールサーバの IP アドレスを入力します。TXT レコードで設定しているのは、SPFレコードと呼ばれ、なりすまし防止のためのDNS側の設定です。
| HOST | TYPE | VALUE |
|---|---|---|
| A | XXX.XXX.XXX.XXX | |
| TXT | v=spf1 ip4:XXX.XXX.XXX.XXX -all |
テスト( Postfix )
Postfix のみでメール送受信のテストを行います。
受信
Gmail から test@mail.tanukinet.jp に送信します。次の操作で、正常に受信が完了したことを確認します。
su test
cd ~
ll
受信できていると、以下のように Maildir が作成されています。
test@3725da07bb1c:~$ ll
total 40
drwxr-x--- 1 test test 4096 Nov 22 19:25 ./
drwxr-xr-x 1 root root 4096 Nov 22 19:14 ../
-rw------- 1 test test  102 Nov 22 19:31 .bash_history
-rw-r--r-- 1 test test  220 Nov 22 19:14 .bash_logout
-rw-r--r-- 1 test test 3798 Nov 22 19:14 .bashrc
-rw-r--r-- 1 test test  807 Nov 22 19:14 .profile
drwx------ 5 test test 4096 Nov 22 19:25 Maildir/
-rw------- 1 test test 3358 Nov 22 19:25 mbox
さらに mail コマンドでメールの内容を確認します。以下のような表示があれば(日本語のタイトルなので、デコードされていません)、「1」を入力してメールを表示し、「q」ボタンで終了します。
test@3725da07bb1c:~$ mail
"/home/test/Maildir/": 1 message 1 new
>N   1 =?UTF-8?B?44GL44Ga Wed Nov 22 10:25  58/3233  =?UTF-8?B?44GC44GC44GC44GC44GC44GC44GC44GC44GC?=
? 1
送信
gmail に向けてテスト送信します。「someone@gmail.com」はテスト送信したい対象のアドレスに変えてください。ほぼ確実に迷惑メール扱いとなるので、そのフォルダも含めてメールの受信を確認します。
mail -s "test mail from docker" -a "From: test@mail.tanukinet.jp" someone@gmail.com
Dovecot install
Dovecot の module を install します。
apt update
apt -y install dovecot-core dovecot-pop3d dovecot-imapd
Dovecot config
先に、Dovecot install に伴う、Postfix 側の config を変更しておきます。
vi /etc/postfix/main.cf
+smtpd_sasl_type = dovecot
-smtpd_sasl_path = smtpd
+smtpd_sasl_path = private/auth
Dovecot の config を編集します。ちなみに、mail_location = maildir という設定は、1 メール : 1 ファイルというフォーマット設定を表しています。
sed -i 's/^[#]*listen =.*/listen = \*, ::/g' /etc/dovecot/dovecot.conf
sed -i 's/^auth_mechanisms =/#&/g' /etc/dovecot/conf.d/10-auth.conf
echo "disable_plaintext_auth = no"   >> /etc/dovecot/conf.d/10-auth.conf
echo "auth_mechanisms = plain login" >> /etc/dovecot/conf.d/10-auth.conf
sed -i 's/^mail_location = /#&/g' /etc/dovecot/conf.d/10-mail.conf
echo "mail_location = maildir:~/Maildir" >> /etc/dovecot/conf.d/10-mail.conf
次の設定では、SSLを使わないプロトコルを無効にし、強制的に SSL を使用するプロトコルだけを使うように設定しています。
vi /etc/dovecot/conf.d/10-master.conf
  # Postfix smtp-auth
-  #unix_listener /var/spool/postfix/private/auth {
-  #  mode = 0666
-  #}
+  unix_listener /var/spool/postfix/private/auth {
+    mode = 0666
+    user = postfix
+    group = postfix
+  }

...

  inet_listener imap {
    #port = 143
+    port = 0
  }
  inet_listener imaps {
-    #port = 993
-    #ssl = yes
+    port = 993
+    ssl = yes
  }

...

  inet_listener pop3 {
    #port = 110
+    port = 0
  }
  inet_listener pop3s {
-    #port = 995
-    #ssl = yes
    port = 995
    ssl = yes
  }
SSL 証明書の設定を行います。Postfix で設定したのと同様に ssl_cert と ssl_key に SSL 証明書の path を設定し、また ssl = yes となっている事を確認してください。
vi /etc/dovecot/conf.d/10-ssl.conf
ssl = yes
ssl_cert = </home/share/tanukinet.jp/fullchain1.pem
ssl_key = </home/share/tanukinet.jp/privkey1.pem
メールボックスの設定を変更します。
vi /etc/dovecot/conf.d/15-mailboxes.conf
namespace inbox {
  # These mailboxes are widely used and could perhaps be created automatically:
  mailbox Drafts {
    special_use = \Drafts
+    auto = subscribe
  }
  mailbox Junk {
    special_use = \Junk
+    auto = subscribe
  }
  mailbox Trash {
    special_use = \Trash
+    auto = subscribe
  }

  # For \Sent mailboxes there are two widely used names. We'll mark both of
  # them as \Sent. User typically deletes one of them if duplicates are created.
  mailbox Sent {
    special_use = \Sent
+    auto = subscribe
  }
  mailbox "Sent Messages" {
    special_use = \Sent
+    auto = subscribe
  }
サービスを再起動します。
/etc/init.d/postfix restart
/etc/init.d/dovecot restart
メールクライアント設定
メールクライアント(ここでは Thunderbird )を使ってメール送受信のテストを行います。
言語設定
英語にしておかないと、サーバ側でメールボックス内のディレクトリ名と整合性がとれないため、英語推奨です。

アカウント
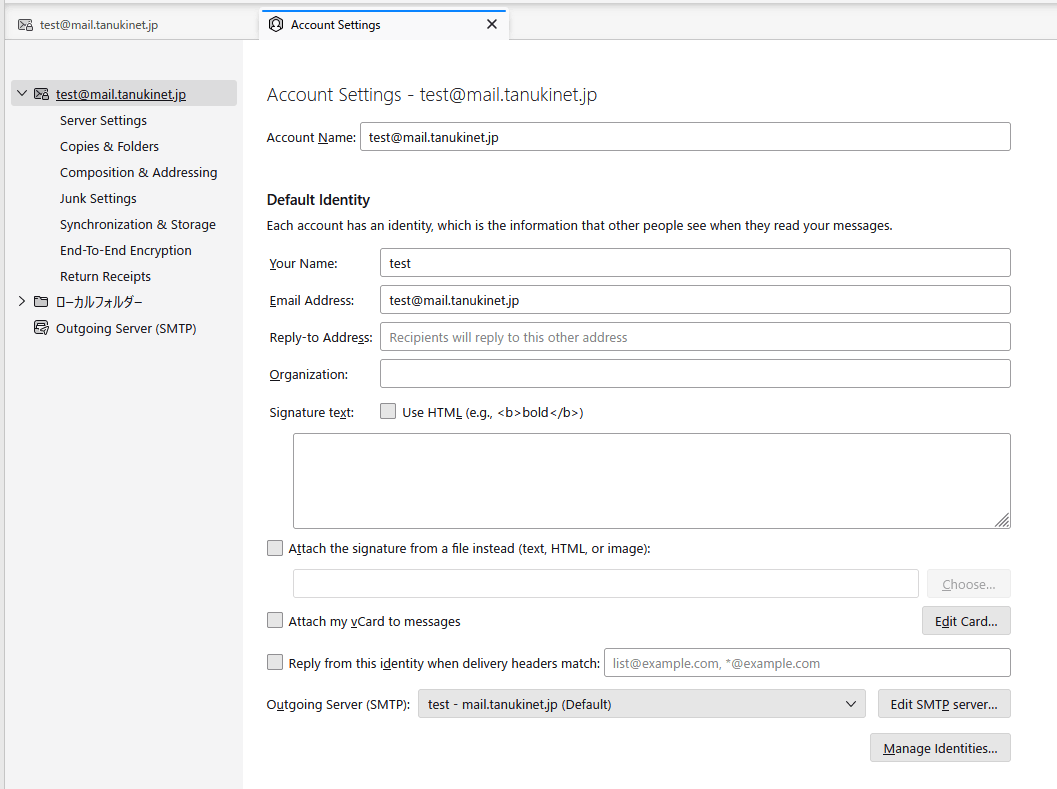
先ほど作った「test」ユーザーのアカウント設定を行います。
SMTP
上画面の「Edit SMTP server」ボタンから設定します。

サーバー設定
メールを同期するための IMAPS の設定です。Port 番号には、container run する際に設定した port 番号を入力してください。
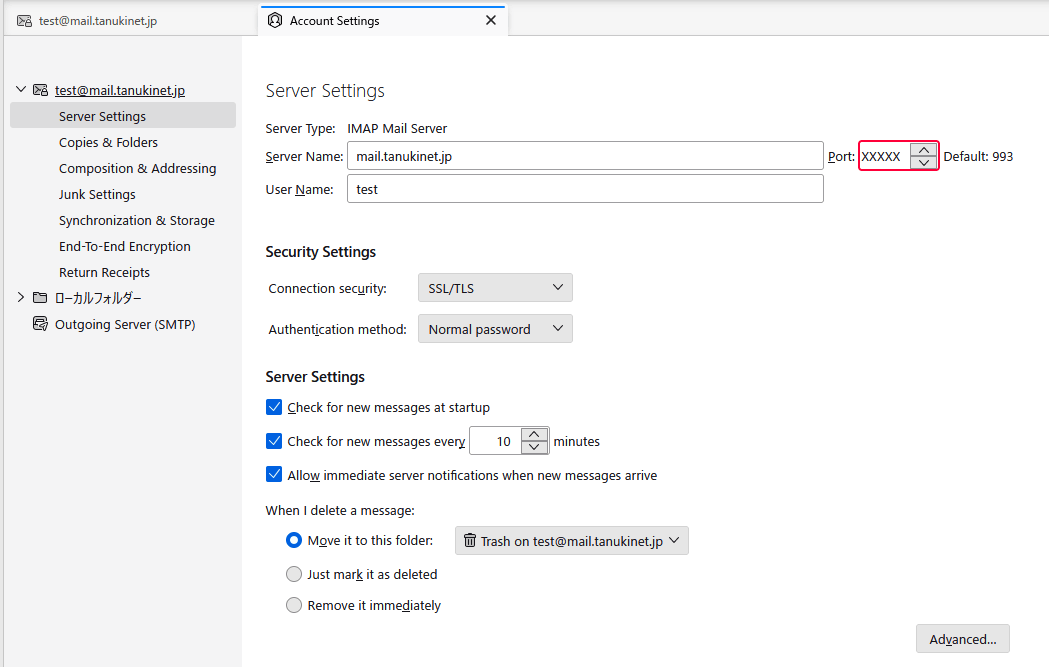
メールボックス設定

テスト( Dovecot )
メールの送受信がクライアント経由で完了し、送受信したメールがクライアントで同期できれば完了です。
ちなみにサーバーの Maildir 内は以下のようになります。
test@ddb8a18c0883:~/Maildir$ ll
total 72
drwx------ 10 test test 4096 Nov 23 11:17  ./
drwxr-x---  3 test test 4096 Nov 23 02:43  ../
drwx------  5 test test 4096 Nov 23 11:17  .Drafts/
drwx------  5 test test 4096 Nov 23 11:17  .Junk/
drwx------  5 test test 4096 Nov 23 11:17  .Sent/
drwx------  5 test test 4096 Nov 23 11:17 '.Sent Messages'/
drwx------  5 test test 4096 Nov 23 11:17  .Trash/
-rw-------  1 test test   26 Nov 23 02:51  .mu-prop
drwx------  2 test test 4096 Nov 23 02:52  cur/
-rw-------  1 test test   96 Nov 23 02:52  dovecot-uidlist
-rw-------  1 test test    8 Nov 23 11:17  dovecot-uidvalidity
-r--r--r--  1 test test    0 Nov 23 02:43  dovecot-uidvalidity.655e3daa
-rw-------  1 test test 1364 Nov 23 02:52  dovecot.index.cache
-rw-------  1 test test  844 Nov 23 02:52  dovecot.index.log
-rw-------  1 test test 3800 Nov 23 11:17  dovecot.list.index.log
-rw-------  1 test test  120 Nov 23 11:17  dovecot.mailbox.log
drwx------  2 test test 4096 Nov 23 02:52  new/
-rw-------  1 test test   42 Nov 23 11:17  subscriptions
drwx------  2 test test 4096 Nov 23 02:52  tmp/
受信メール
test@ddb8a18c0883:~/Maildir$ ll cur/
total 16
drwx------  2 test test 4096 Nov 23 02:52 ./
drwx------ 10 test test 4096 Nov 23 11:17 ../
-rw-------  1 test test 4195 Nov 23 02:52 1700675563.V48I163a1cM268068.ddb8a18c0883:2,S
送信メール
test@ddb8a18c0883:~/Maildir$ ll .Sent/cur/
total 16
drwx------ 2 test test 4096 Nov 23 11:17  ./
drwx------ 5 test test 4096 Nov 23 11:17  ../
-rw------- 1 test test  439 Nov 23 03:15 '1700676958.M386096P8855.ddb8a18c0883,S=439,W=454:2,S'
-rw------- 1 test test  428 Nov 23 11:17 '1700705867.M209812P9395.ddb8a18c0883,S=428,W=441:2,S'
Discussion