[note] typescript

概要
typescriptとは
jsに型システムを組み込んだもの
意図した型出ない値を変数に入れると、エラーを出力してくれる
ビルドの仕組み
tsがjsコンパイル
jsをバンドルしブラウザに表示させる
環境構築
tsconfig
tsc initで初期状態のtsconfigを作成
必要に応じて設定をカスタマイズ
Webpack
npm run start
tsファイルをローカルでうごかせるようになる
npm run build
webpackがtsローダーを使って、本番でtsファイルをうごかせるようになる
ソースコードの品質をさらに高める
最近では以下2つえお一緒に使うことが多い
npm run lint-fix
ESLint
JavaScript のための静的検証ツール
コードを実行する前に明らかなバグを見つけたり、括弧やスペースの使い方などのスタイルを統一したりするのに役立ち
.eslintrc.js(json yml demo ok)
module.exports = {
  env: {
    browser: true,
    es6: true
  },
  extends: [
    "eslint:recommended",
    "plugin:@typescript-eslint/recommended", // TypeScriptでチェックされる項目をLintから除外する設定
    "prettier", // prettierのextendsは他のextendsより後に記述する
    "prettier/@typescript-eslint",
  ],
  plugins: ["@typescript-eslint"],
  parser: "@typescript-eslint/parser",
  parserOptions: {
    "sourceType": "module",
    "project": "./tsconfig.json" // TypeScriptのLint時に参照するconfigファイルを指定
  },
  root: true, // 上位ディレクトリにある他のeslintrcを参照しないようにする
  rules: {}
}
Prettier
コードフォーマッター(ソースコードを整形してくれるツール)のこと。読み方はプリティア。
pjごとに設定ファイルを作ることでチームでフォーマッットを統一できる
保存した時に整形される設定かgitにコミット時にされる主に種類の設定
.prettierrc
{
  "printWidth": 120,
  "singleQuote": true,
  "semi": false
}
上記2つをciで実行
流れ

基本の型定義とアノテーション(明示的)
型推論とアノテーション
型推論
const name = "test"
アノテーション
明示的に型指定した方が分かりやすいとき
- 関数の返り値
- 関数の引数
- オブジェクトのプロパティなど
const name: string = "test"
アノテーション
プリミティブ型
string
const name: string = "test"
number
const age: number = 24
boolean
let isDone: boolean = false;
存在しないことを表現する型
途中
null
オブジェクトとして判断される仕様
undefined
まだ来ていない時
any unknown
any
どんな型でも許容する = 安全ではない
unknown
どんな形になるのか不明
一度値がは一った時に、その値になると設定される
使い所
後から型定義したい時
関数のオーバーロードの時引数に
関数のパラメーターと戻り値に型をつける
戻り値に型
jsは他の言語がクラスを使うのに対して関数が多いなのでこれ大事
- 関数のパラメータ(仮引数)
- 戻り値
void
return文を持たない関数の戻り値
例としてconsole.logなど
// アロー関数
export const logMessage = (message: string): void => {
  console.log('Function basic sample 1:', message)
}
never
決して戻ることのない関数の戻り値
例外スローなど
while
export const alwaysThrowError = (message: string): never => {
  throw new Error(message)
}
パラメーターに型
オプションパラメーターとデフォルトパラメーター
オプションパラメーター
// オプションパラメーターを持つ関数の例
export const isUserSignedIn = (userId: string, username?: string): boolean => {
  if (userId === 'ABC') {
    console.log('Function parameters sample 1: User is signed in! Username is', username)
    return true
  } else {
    console.log('Function parameters sample 2: User is not signed in')
    return false
  }
}
デフォルトパラメーター
export const isUserSignedIn2 = (userId: string, username = 'NO NAME'): boolean => {
  if (userId === 'ABC') {
    console.log('Function parameters sample 3: User is signed in! Username is', username)
    return true
  } else {
    console.log('Function parameters sample 4: User is not signed in')
    return false
  }
}
レストパラメーターの使い方
可変長引数
関数を呼び出す時に引数をいくつ渡してもOK = 内部的にはanyとして型推論されてしまうので安全じゃない
そこで使うのがレストパラメーター
※最後の仮引数にだけ指定できる
// レストパラメーターを持つ関数の例
export const sumProductsPrice = (...productsPrice: number[]): number => {
  return productsPrice.reduce((prevTotal, productPrice) => {
    return prevTotal + productPrice
  }, 0)
}
呼び出しシグネチャ
関数に対して型定義をする
クラスのように定義して
これを作って別で呼び出す関数に対して指定しておけばパラメーターと戻り値に対して毎回アノテーションする必要がなくなる
// 呼び出しシグネチャ(省略記法)
type LogMessage = (message: string) => void
export const logMessage5: LogMessage = (message) => {
  console.log('Function basic sample 5:', message)
}

// 完全な呼び出しシグネチャ
type FullLogMessage = {
  (message: string): void
}
export const logMessage6: FullLogMessage = (message) => {
  console.log('Function basic sample 6:', message)
}
型エイリアス = データ型に別名をつける(type)でオブジェクトの型定義
構造の型定義
tsの醍醐味
オブジェクトの型定義
いちいちこのオブジェクトはこの型のプロパティを持っている等覚えなくて済む
オブジェクト型自体には意味がなくてオブジェクトの構造自体を定義なければ、プロパティ等が呼び出せない
  // オブジェクトリテラル記法による型定義
  let country: {
    language: string
    name: string
  } = {
    language: 'Japanese',
    name: 'Japan',
  }

  console.log('Object object sample 2:', country)

  // 同じ構造のオブジェクトであれば再代入できる
  country = {
    language: 'English',
    name: 'United States of America',
  }
オプショナル(?)とreadonly(readonly)
  // オプショナル(?)なプロパティと読み取り専用(readonly)プロパティ
  const torahack: {
    age: number
    lastName: string
    readonly firstName: string
    gender?: string
  } = {
    age: 28,
    lastName: 'Yamada',
    firstName: 'Tarou',
  }
  torahack.lastName = 'Kamado'
  // torahack.firstName = 'Tanjiro' // firstNameプロパティはreadonlyなので再代入不可
  torahack.gender = 'male' // genderプロパティはオプショナルなので後から追加できる

  console.log('Object object sample 4:', torahack)
インデックスシグネチャ
キーとバリューに対して肩を定義してそこからエイリアスを作成することでいちいち定義しなくて良くなる
  // インデックスシグネチャ
  const capitals: {
    [countryName: string]: string
  } = {
    Japan: 'Tokyo',
    Korea: 'Seoul',
  }
  capitals.China = 'Beijing'
  capitals.Canada = 'Ottawa'

  console.log('Object object sample 5:', capitals)
}
型エイリアスの基本的な使 い方
変数に名前をつけて、値を代入できるのと同様に、TypeScriptでは型に名前をつけて宣言することができる
  // 型エイリアス(type)
  type Country = {
    capital: string
    language: string
    name: string
  }

  const japan: Country = {
    capital: 'Tokyo',
    language: 'Japanese',
    name: 'Japan',
  }
  console.log('Object alias sample 1:', japan)

  const america: Country = {
    capital: 'Washington, D.C.',
    language: 'English',
    name: 'United States of America',
  }
  console.log('Object alias sample 2:', america)
合併型(union)と交差型(intersection)
  // 合併型(union)と交差型(intersection)
  type Knight = {
    hp: number
    sp: number
    weapon: string
    swordSkill: string
  }

  type Wizard = {
    hp: number
    mp: number
    weapon: string
    magicSkill: string
  }

  type Adventurer = Knight | Wizard // 合併型: KnightとWizardどちらかの型を持つ
  type Paladin = Knight & Wizard // 交差型: KnightとWizardが持つ型を全て持っている

  // Knightの型を持つadventurer2
  const adventurer1: Adventurer = {
    hp: 100,
    sp: 30,
    weapon: '木の剣',
    swordSkill: '三連斬り',
  }

  console.log('Object alias sample 3:', adventurer1)

  // Wizardの型を持つadventurer2
  const adventurer2: Adventurer = {
    hp: 100,
    mp: 30,
    weapon: '木の杖',
    magicSkill: 'ファイヤボール',
  }

  console.log('Object alias sample 4:', adventurer2)

  // KnightとWizard両方の型を持つpaladin
  const paladin: Paladin = {
    hp: 300,
    sp: 100,
    mp: 100,
    weapon: '銀の剣',
    swordSkill: '三連斬り',
    magicSkill: 'ファイヤボール',
  }

  console.log('Object alias sample 5:', paladin)
}
積極的に使いたい配列・タプルの型定義
書き方
いかに種
  // シンプルな配列の型定義
  const colors: string[] = ['red', 'blue']
  colors.push('yellow') // OK
  // colors.push(123) // NG
  console.log('Array array sample 1:', colors)

  const even: Array<number> = [2, 4, 6]
  even.push(8) // OK
  // even.push("10") // NG
  console.log('Array array sample 2:', even)
オブジェクトでやった合併型も使える
あまり使わない方がいい、分けれるなら配列を分ける
配列から取り出した時どちらの方かチェックする工数が出てくるため
  // 合併型を用いた配列の型定義
  const ids: (string | number)[] = ['ABC', 123]
  ids.push('DEF') // OK
  ids.push(456) // OK
  console.log('Array array sample 3:', ids)
配列の型推論
  // 型推論された配列の生成
  const generateSomeArray = () => {
    const _someArray = [] // any[]
    _someArray.push(123) // number[]として推論される
    _someArray.push('ABC') // (string | number)[]として推論される
    return _someArray
  }

  const someArray = generateSomeArray()
  // someArray.push(true) // generateSomeArray()は(string | number)[]の配列を返すと推論されるので、booleanは追加されない
  console.log('Array array sample 4:', someArray)
タプルは厳格な配列(タプル)
配列の縛りが必要な時に使用
配列の要素の型、数も指定
  // 一般的なタプルの型定義
  const response: [number, string] = [200, 'OK']
  // response = [400, "Bad Request", "Email parameter is missing"] // 定義された要素数と合わない
  // response = ["400", "Bad Request"] // numberにstringを代入できない
  console.log('Array tuple sample 1:', response)
※レストパラメーターが使える
  // 可変長引数を使ったタプル
  const girlfriends: [string, ...string[]] = ['Kana', 'Miku', 'Keiko']
  console.log('Array tuple sample 2:', girlfriends)
イミュータブルな配列を作ろう
readonly修飾子かReadonlyArray<型名>を使用
ミュータブル(書き換え可)
イミュータブル(書き換え不可)
  // 読み取り専用の配列
  const commands: readonly string[] = ['git add', 'git commit', 'git push']
  // commands.push("git fetch") // 追加不可
  // commands[2] = "git pull" // 代入不可
  console.log('Array array sample 5:', commands)

  // 読み取り専用の定義方法
  const immutableNumbers: ReadonlyArray<number> = [1, 2, 3]
  // immutableNumbers.push(4) // NG
  console.log('Array array sample 6:', immutableNumbers)

  const immutableNames: Readonly<string[]> = ['Tarou', 'Kazu', 'Yuto']
  // immutableNames.push("Takashi") // NG
  console.log('Array array sample 7:', immutableNames)
ここまでで基礎は終わり
ジェネリック型を使いながらポリモーフィズムを理解する
同じような型の構造を持ち、型の種類だけ違うというものを共通化することができる
Reduceを使って肩を定義
  // 型エイリアスを作るとしたら...?
  type Reduce = {
    (array: string[], initialValue: string): string
    (array: number[], initialValue: number): number
  }
いろんな方が出てきた時に冗長になってしまう
⬇︎
gereric型を定義し、関数や変数を定義する
肩を定義する時に具体的な肩を渡す
  // ジェネリック型でまとめる
  type GenericReduce<T> = {
    (array: T[], initialValue: T): T
  }

  // ジェネリック型を使った呼び出し
  const genericStringReduce: GenericReduce<string> = (array, initialValue) => {
    let result = initialValue
    for (let i = 0; i < array.length; i++) {
      const item = array[i]
      result += item
    }
    return result
  }
  console.log('Generics basic sample 3:', genericStringReduce(['MAKE ', 'TYPESCRIPT ', 'GREAT ', 'AGAIN'], ''))

  const genericNumberReduce: GenericReduce<number> = (array, initialValue) => {
    let result = initialValue
    for (let i = 0; i < array.length; i++) {
      const item = array[i]
      result += item
    }
    return result
  }
  console.log('Generics basic sample 4:', numberReduce([-100, -200, -300], 1000))
ジェネリックスの宣言方法
呼び出し方は後で見る
  // いろいろなジェネリック型の定義方法
  // 完全な呼び出しシグネチャ(シグネチャ全体にジェネリック型を割り当てる)
  type GenericReduce<T> = {
    (array: T[], initialValue: T): T
  }
  // 完全な呼び出しシグネチャ(個々のシグネチャにジェネリック型を割り当てる)
  type GenericReduce2 = {
    <T>(array: T[], initialValue: T): T
    <U>(array: U[], initialValue: U): U
  }
  // 呼び出しシグネチャの省略記法
  type GenericReduce3<T> = (array: T[], initialValue: T) => T
  type GenericReduce4 = <T>(array: T[], initialValue: T) => T
}
2つ以上のジェネリック型パラメーターを扱う
map関数を使用
ジェネリックパラーメタ2つ使える
  // map関数のシグネチャ
  type Map<T, U> = (array: T[], fn: (item: T) => U) => U[]

  const mapStringsToNumbers: Map<string, number> = (array, fn) => {
    const result = []
    for (let i = 0; i < array.length; i++) {
      result[i] = fn(array[i])
    }
    return result
  }

  const numbers = mapStringsToNumbers(['123', '456', '001'], (item) => Number(item))
  console.log('Generics advanced sample 1:', numbers)
ポリモーフィズムは呼び出し側の共通化
肩をまとめるて呼び出す仕様にすることで
ジェネリック型の修正やテストさえしてしまえば呼び出し後の結果が担保されるため保守性があがる
呼び出し時に色々な形に変化できる

TypeScriptで学ぶオブジェクト指向開発
より少ないコード量でより豊かなプログラム
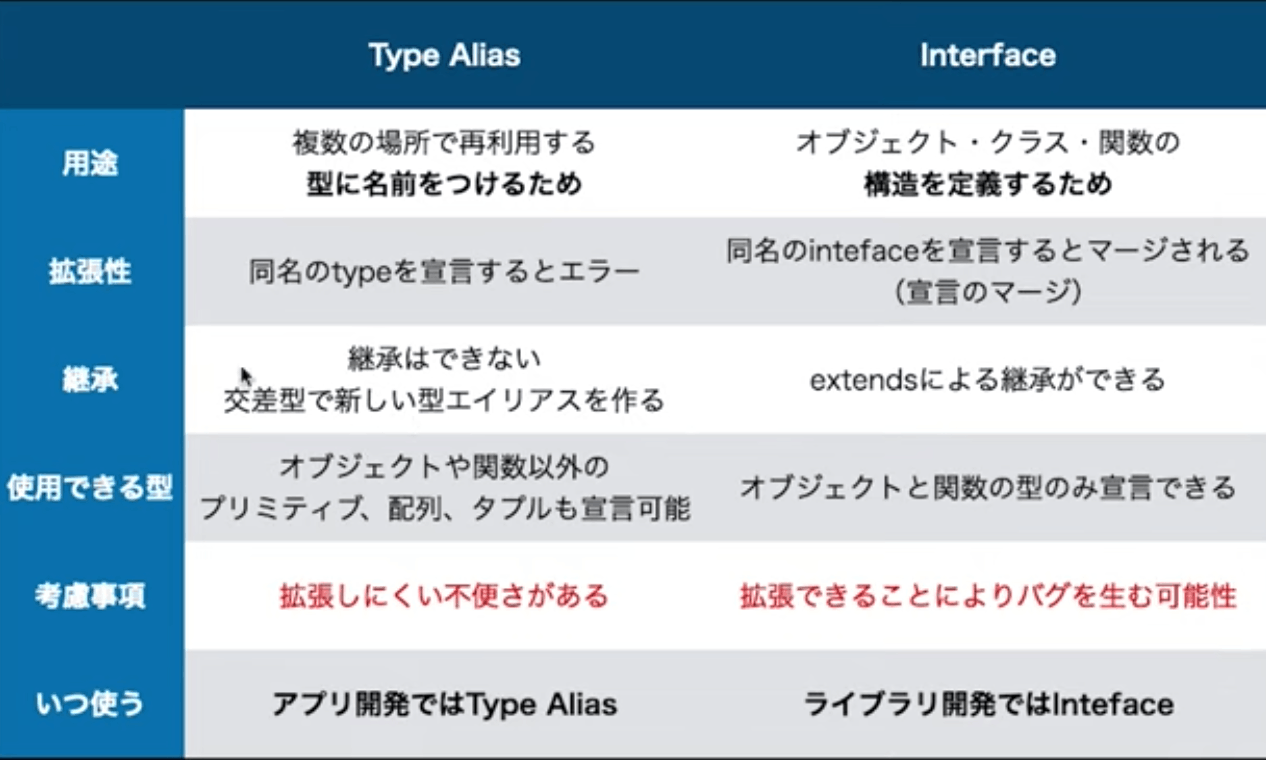
InterfaceとType Aliasの違い
方を宣言する方法として以下2種類がある
- Interface
- Type Alias
どちらが良いのか
ts開発元のmsは、以下理由からできるだけInterfaceを使うべきだと言っている
- jsオブジェクトのように拡張性がある(宣言の仕方もクラスくさい)
勘違いされやすい点
- Type Aliasの方が機能が少ない→2021時点で大差なし
- 全てのソフトウェアは拡張性があった方が良い
- →ライブラリ開発ではInterface
- →アプリケーション開発では拡張性があるとバグを生みやすくなるため、Type Alias?
Interfaceの基本的な使い方と宣言のマージ
宣言
Interface
Type Aliasと違い「=」は不要
interface Bread {
  calories: number
}
Type Alias
変数に代入するような形
type MaboDofu = {
  calories: number
  spicyLevel: number
}
宣言のマージ
interface Bread {
  calories: number
}

interface Bread {
  type: string
}

// ここでBreadの方が持つプロパティが足りていないとエラーになる
const francePan: Bread = {
  calories: 350,
  type: 'hard',
}
Type Aliasで宣言のまーじを再現するには 交差型(union)を使う
// 型エイリアスの場合
type MaboDofu = {
  calories: number
  spicyLevel: number
}

type Rice = {
  calories: number
  gram: number
}

type MaboDon = MaboDofu & Rice // 交差型(union)を使う

// MaboDofuとRice両方の型を持つ変数を定義
const maboDon: MaboDon = {
  calories: 500,
  gram: 100,
  spicyLevel: 5,
}
継承でInterfaceを拡張しよう
// インターフェースの拡張
interface Book {
  page: number
  title: string
}

interface Magazine extends Book {
  cycle: 'daily' | 'weekly' | 'monthly' | 'yearly'
}

const jump: Magazine = {
  cycle: 'weekly', // Magazine
  page: 300, // Book
  title: '週間少年ジャンプ', // Book
}
インターフェースは型エイリアスも拡張できる
// インターフェースは型エイリアスも拡張できる
type BookType = {
  page: number
  title: string
}

interface HandBook extends BookType {
  theme: string
}

const cotrip: HandBook = {
  page: 120,
  theme: '旅行',
  title: 'ことりっぷ',
}
Interfaceでクラスに型定義できる
Bookインターフェースを実装するComicというクラスを作る
// Bookのインターフェースを定義
interface Book {
  page: number
  title: string
}

// インターフェースでクラスに型を定義する
class Comic implements Book {
  page: number
  title: string

  // constructorで受けったpage titleをComicクラスのpage titleに代入
  constructor(page: number, title: string, private publishYear: string) {
    this.page = page
    this.title = title
  }

  getPublishYear() {
    return this.title + 'が発売されたのは' + this.publishYear + '年です。'
  }
}

const popularComic = new Comic(200, '鬼滅の刃', '2016')
console.log(popularComic.getPublishYear()) // 鬼滅の刃が発売されたのは2016年です。
Type AliasとInterfaceの違い
Interfaceの宣言のマージ
こちらに関して同様の名前でインターフェースを作ると勝手に拡張されてしまうので、なぜこのインターフェース にこのプロパティが在るんだろうのような自体になりかねない
非同期処理にも型定義 APIから安全にデータを取得
非同期処理は一長一短
処理が実行中なのか完了したのかトレースしにくい
→Promise async/awaitで非同期処理を同期的処理の見通しを良く
→tsで肩をつけて分かりやすく
Promise型で非同期処理の返す値を定義
  const url = 'https://api.github.com/users/deatiger'

  type Profile = {
    login: string
    id: number
  }

  type FetchProfile = () => Promise<Profile | null> // 非同期処理であるとなる

  const fetchProfilePromise: FetchProfile = () => {
     //非同期処理 最終的にProfileかnullを返す
  }
async/awaitで非同期処理のコードの見通しを良く
ネストが深くならない
export default async function asyncAwaitSample() {
  const url = 'https://api.github.com/users/deatiger'

  type Profile = {
    login: string
    id: number
  }

  type FetchProfile = () => Promise<Profile | null>

  // async/awaitでコールバック関数を同期的な処理に置き換える
  const fetchProfile: FetchProfile = async () => {
    const response = await fetch(url)
      .then((response) => response)
      .catch((error) => {
        console.error(error)
        return null
      })

    // responseがnullならfetchに失敗している
    if (!response) {
      return null
    }

    const json = await response
      .json()
      .then((json: Profile) => {
        console.log('Asynchronous Promise Sample 1:', json)
        return json
      })
      .catch((error) => {
        console.error(error)
        return null
      })

    // jsonがnullならレスポンスBodyの読み取りに失敗している
    if (!json) {
      return null
    }

    return json
  }

  // fetchProfile().then((profile: Profile | null) => {
  //   if (profile) {
  //     console.log('Asynchronous Promise Sample 2:', profile)
  //   }
  // })
 ⬇︎
  // func自体にasyncをつけることでさらに同期的な処理にする
  const profile = await fetchProfile()
  if (profile) {
    console.log('Asynchronous Promise Sample 3:', profile)
  }
}
Discussion