Nextjs v13 (app router) に Supabase Auth を導入して認証から認可まで
既存の Nextjs v13 (app router/TS) プロジェクトに Supabase Auth を導入します
新規プロジェクトの場合は
npx create-next-app -e with-supabase
で簡単に準備できます
app router 下では, getServerSideProps は使えないので async/await で取得するようになり, 自然に書けるものの, これまでとは大きく変わったため, 情報が少なかったり, 混在しているような状態です.
以下の公式マニュアルを参考に行いますが, マニュアルは Typescript の場合にだいぶ端折っている部分も多いので, することが一覧になっているようなフローを作ることをこの記事では目指します.
Supabase Auth with the Next.js App Router | Supabase Docs
環境は以下の通り
- Nextjs v13
- Typescript
- app router
- src/app
0. Supabase プロジェクトの作成
Supabase | The Open Source Firebase Alternative
新しいプロジェクトを作成します
余談ですが API のエンドポイントや OAuth のコールバック時に表示される URL を自分のドメインにするには Pro プラン + $10/month が必要でした (DNS へのレコード追加がちょっとフローが長い)
Auth に使うテーブルは予めマイグレートされています
1. Nextjs 側でパッケージを追加
yarn add @supabase/auth-helpers-nextjs @supabase/supabase-js
yarn を使う場合です
2. 接続の設定
次にダッシュボードの各プロジェクトの settings/api ページから API のエンドポイントと anon_key を取得し, それを .env.local に追加します. .gitignore を忘れずに.
.enx.local
NEXT_PUBLIC_SUPABASE_URL=your-supabase-url
NEXT_PUBLIC_SUPABASE_ANON_KEY=your-supabase-anon-key
3. middleware の設定
認可 middleware を作成します
middleware は, getServerSideProps やレンダリングなどのサービスの具体的な処理が行われるよりも前にサーバ上で実行される処理です
Varcel で Nextjs をデプロイした場合, これらの処理はオリジンサーバではなく, エッジサーバで行われる最適化ぶりです
公式チュートリアルでも, Cookie への書き込みが可能というのが説明されています
When using the Supabase client on the server, you must perform extra steps to ensure the user's auth session remains active. Since the user's session is tracked in a cookie, we need to read this cookie and update it if necessary.
Next.js Server Components allow you to read a cookie but not write back to it. Middleware on the other hand allow you to both read and write to cookies.
(簡訳)
サーバ上で Supabase クライアントを使用する場合は、ユーザの認証セッションがアクティブなままであることを確認するために追加の手順を実行する必要があります。ユーザのセッションは Cookie で追跡されるため、この Cookie を読み取り、必要に応じて更新する必要があります。 Next.js サーバコンポーネントを使用すると、Cookie を読み取ることはできますが、書き戻すことはできません。一方、ミドルウェアを使用すると、Cookie の読み取りと書き込みの両方が可能になります。
middleware.ts をルート直下に作成し, 以下の内容を記述します
middleware.ts
import { createMiddlewareClient } from "@supabase/auth-helpers-nextjs";
import { NextResponse } from "next/server";

import type { NextRequest } from "next/server";
import type { Database } from "@/lib/database.types";

export async function middleware(req: NextRequest) {
  const res = NextResponse.next();
  const supabase = createMiddlewareClient<Database>({ req, res });
  await supabase.auth.getSession();
  return res;
}
ここで, Typescript の場合, Database の型が必要になるのですが, これは Supabase CLI を用いて生成する必要があります
ダッシュボードでも取得可能とマニュアルには書いてあるのですが, 現時点ではリンク切れになっていました
なので以下, Supabase CLI の導入の仕方を行います. そんなに大変じゃないです.
公式リファレンスは以下
3-1. Supabase CLI の導入
Nodejs 環境で以下を実行します
Nextjs のアプリケーションを作っているのと同じリポジトリでも別のリポジトリを作っても大丈夫です
yarn add supabase --dev
続いて以下のコマンドを順に実行します
yarn supabase init
yarn supabase login
login では, access token を求められます
以下で取得できます
3-2. database.types.ts の取得
無事ログインできたら, database.types.ts を取得します
各プロジェクトの settings/general にのっているプロジェクトの Reference ID を用いて以下を実行します
yarn supabase gen types typescript --project-id [Reference ID] > database.types.ts
これで実行したディレクトリの直下に database.types.ts が生成されるので, これを
import type { Database } from "@/lib/database.types";
と合わせて, お好みの場所に移動させます
tsconfig.ts の環境によりますが, 自分の場合はファイルを,
src/lib/db/database.types.ts
にした上で,
import type { Database } from "lib/db/database.types";
としました
4. コールバック用の Route Handler の作成
続いて, コールバック用の Route Handler を作成します
src/app/auth/callback/route.ts
import { createRouteHandlerClient } from "@supabase/auth-helpers-nextjs";
import { cookies } from "next/headers";
import { NextResponse } from "next/server";

import type { NextRequest } from "next/server";
import type { Database } from "lib/db/database.types";

export async function GET(request: NextRequest) {
  const requestUrl = new URL(request.url);
  const code = requestUrl.searchParams.get("code");

  if (code) {
    const cookieStore = cookies();
    const supabase = createRouteHandlerClient<Database>({
      cookies: () => cookieStore,
    });
    await supabase.auth.exchangeCodeForSession(code);
  }

  // URL to redirect to after sign in process completes
  return NextResponse.redirect(requestUrl.origin);
}
5. ログイン, ログアウト, サインアップ
続いて, ログイン, ログアウト, サインアップを記述します.
今回のプロジェクトでは, MUI を利用していたため以下に MUI で記述してみます.
とりあえず, すべてを 1 つのページに実装した例です.
Tailwindcss を利用した例は, 公式チュートリアルにあります.
もし, それ以外の場合でも, ChatGPT にコードを投げて, 「 XXX を利用したコードに書き換えて」と言えばほぼ完璧に書き換えてくれます.
ただし, 現時点での知見として, ChatGPT は Nextjs v13 になってからの学習データが比較的乏しいのか, “app directory” や “v13” と繰り返し伝えても, コードに page directory 時代の記述が混じることがよくあります. 特に, 'next/navigation' ではなく, 'next/route' が import されることが多いので注意が必要です.
src/app/login/page.tsx
"use client";
import React, { useState } from "react";
import { useRouter } from "next/navigation";
import { createClientComponentClient } from "@supabase/auth-helpers-nextjs";
import TextField from "@mui/material/TextField";
import Button from "@mui/material/Button";
import Container from "@mui/material/Container";
import Box from "@mui/material/Box";

import type { Database } from "lib/db/database.types";

// Login
export default function Login() {
  const [email, setEmail] = useState("");
  const [password, setPassword] = useState("");
  const router = useRouter();
  const supabase = createClientComponentClient<Database>();

  // signup
  const handleSignUp = async () => {
    await supabase.auth.signUp({
      email,
      password,
      options: {
        emailRedirectTo: `${location.origin}/auth/callback`,
      },
    });
    router.refresh();
  };

  // login
  const handleSignIn = async () => {
    await supabase.auth.signInWithPassword({
      email,
      password,
    });
    router.refresh();
  };

  // signout
  const handleSignOut = async () => {
    await supabase.auth.signOut();
    router.refresh();
  };

  // UI
  return (
    <Container component="main" maxWidth="xs">
      <Box
        sx={{
          display: "flex",
          flexDirection: "column",
          alignItems: "left",
        }}
      >
        <TextField
          margin="normal"
          required
          fullWidth
          id="email"
          label="メールアドレス"
          name="email"
          autoComplete="email"
          autoFocus
          onChange={(e) => setEmail(e.target.value)}
          value={email}
          variant="outlined"
          sx={{ mb: 2 }}
        />
        <TextField
          margin="normal"
          required
          fullWidth
          name="password"
          label="パスワード"
          type="password"
          id="password"
          autoComplete="current-password"
          onChange={(e) => setPassword(e.target.value)}
          value={password}
          variant="outlined"
        />
        <Button
          type="button"
          fullWidth
          variant="contained"
          sx={{ mt: 3, mb: 2 }}
          onClick={handleSignUp}
        >
          アカウント登録
        </Button>
        <Button
          type="button"
          fullWidth
          variant="contained"
          sx={{ mb: 2 }}
          onClick={handleSignIn}
        >
          ログイン
        </Button>
        <Button
          type="button"
          fullWidth
          variant="outlined"
          onClick={handleSignOut}
        >
          ログアウト
        </Button>
      </Box>
    </Container>
  );
}
6. 認可
認可は基本的に, アプリケーション側ではなく, DB 側 (RLS: Row Level Security) で行うのが安全です.
各レコードにポリシーを定義しアクセスを制限することで, anon_key を使ったアクセスでは, そのレコードに対して適切な token をもったユーザしかアクセスできません.
ただし, 「ログインしていない場合にリダイレクト」などアプリケーション側で, (DB への SELECT 等での問い合わせ結果を使うのではなく, それより先に)分岐させたい場合もあると思います.
この場合の例は, 公式チュートリアルサイトには載っていないですが, 以下の公式の example リポジトリに実装があります.
src: https://github.com/supabase/supabase/blob/master/examples/auth/nextjs/app/%5Bid%5D/page.tsx
// src: https://github.com/supabase/supabase/blob/master/examples/auth/nextjs/app/%5Bid%5D/page.tsx
import { createServerComponentClient } from "@supabase/auth-helpers-nextjs";
import { notFound, redirect } from "next/navigation";
import RealtimePost from "./realtime-post";
import { cookies } from "next/headers";

import type { Database } from "@/lib/database.types";

export default async function Post({
  params: { id },
}: {
  params: { id: string };
}) {
  const supabase = createServerComponentClient<Database>({
    cookies,
  });

  const {
    data: { session },
  } = await supabase.auth.getSession();

  if (!session) {
    // this is a protected route - only users who are signed in can view this route
    redirect("/");
  }

  const { data: post } = await supabase
    .from("posts")
    .select()
    .match({ id })
    .single();

  if (!post) {
    notFound();
  }

  return <RealtimePost serverPost={post} />;
}
ポイントは, 以下です.
import createClientComponentClient from "@supabase/auth-helpers-nextjs";
import createServerComponentClient from "@supabase/auth-helpers-nextjs";
Client 側と Server 側それぞれに, パッケージが用意されているので, 使用箇所に応じて適切に import して使います.
ここでは, /login にアクセスした時に, ログイン済みのユーザであれば /mypage にリダイレクトされるように, 先ほどのプログラムを書き換えてみます.
app router では, Server 側で実行する部分か, Client 側で実行する部分かを明確にすることが重要なので, 構成のデザインパターンとして, ここでは, Page 単位を Server で担い, ClientComponent を import するような構成を採用します.
src/app/login
- page.tsx : LoginPage ('use server')
- Login.tsx : Login ('use client')
createServerComponentClient を用いて, session が存在するかを確認します.
src/app/login/page.tsxs
import React from "react";
import { redirect } from "next/navigation";
import { createServerComponentClient } from "@supabase/auth-helpers-nextjs";

import type { Database } from "lib/db/database.types";
import { cookies } from "next/headers";
import Login from "./Login";

// LoginPage
export default async function LoginPage() {
  const supabaseServer = createServerComponentClient<Database>({
    cookies,
  }); // Server 側用へルパ

  const {
    data: { session },
  } = await supabaseServer.auth.getSession();

  if (session) {
    redirect("/mypage"); // ログイン済の場合は `/mypage` へリダイレクト
  }

  // UI
  return <Login />;
}
src/app/login/Login.tsx
"use client";
import React, { useState } from "react";
import { useRouter, useSearchParams } from "next/navigation";
import { createClientComponentClient } from "@supabase/auth-helpers-nextjs";
import { TextField, Button, Container, Box } from "@mui/material";

import type { Database } from "lib/db/database.types";

// Login ClientComponent
export default function Login() {
  const [email, setEmail] = useState("");
  const [password, setPassword] = useState("");
  const router = useRouter();
  const supabase = createClientComponentClient<Database>(); // Client 側用ヘルパ

  // クエリパラメータの取得
  const searchParams = useSearchParams();
  const qpsignup = searchParams.get("signup");
  const qperror = searchParams.get("error");

  // signup
  const handleSignUp = async () => {
    const { error } = await supabase.auth.signUp({
      email,
      password,
      options: {
        emailRedirectTo: `${location.origin}/auth/callback`,
      },
    });
    if (error) {
      router.push("/login?error=" + error.message);
    }
    router.push("/login?signup=true"); // signup を完了するために Confirmation Mail を確認するように促すメッセージ
  };

  // login
  const handleSignIn = async () => {
    const {
      data: { session },
      error,
    } = await supabase.auth.signInWithPassword({
      email,
      password,
    });
    if (error) {
      router.push("/login?error=" + error.message);
    } else if (session) {
      router.push("/"); // ログイン後リダイレクト
    }
  };

  // UI
  return (
    <Container component="main" maxWidth="xs">
      <Box
        sx={{
          display: "flex",
          flexDirection: "column",
          alignItems: "left",
        }}
      >
        {qperror && (
          <Box sx={{ color: "red" }}>
            <p>{qperror}</p>
          </Box>
        )}
        {qpsignup && (
          <Box sx={{ color: "blue" }}>
            <p>
              アカウントの登録ありがとうございます。入力していただいたメールアドレス宛に確認メールをお送りしました。メール内のリンクをクリックした後、ログインしてください。
            </p>
          </Box>
        )}
        <p>メールアドレス</p>
        <TextField
          margin="normal"
          required
          fullWidth
          id="email"
          label=""
          name="email"
          autoComplete="email"
          autoFocus
          onChange={(e) => setEmail(e.target.value)}
          value={email}
          variant="outlined"
          sx={{ mb: 2 }}
        />
        <p>パスワード</p>
        <TextField
          margin="normal"
          required
          fullWidth
          name="password"
          label=""
          type="password"
          id="password"
          autoComplete="current-password"
          onChange={(e) => setPassword(e.target.value)}
          value={password}
          variant="outlined"
        />
        <Button
          type="button"
          fullWidth
          variant="contained"
          sx={{ mt: 3, mb: 2 }}
          onClick={handleSignUp}
        >
          アカウント登録
        </Button>
        <Button
          type="button"
          fullWidth
          variant="contained"
          sx={{ mb: 2 }}
          onClick={handleSignIn}
        >
          ログイン
        </Button>
      </Box>
    </Container>
  );
}
なお, サインアップは Confirmation Mail のリンクをクリック後に完了するようになっているため, ユーザにメールを確認するように促す必要があります.
これで以下のような UI が完成し, 無事動作していることが確認できました.
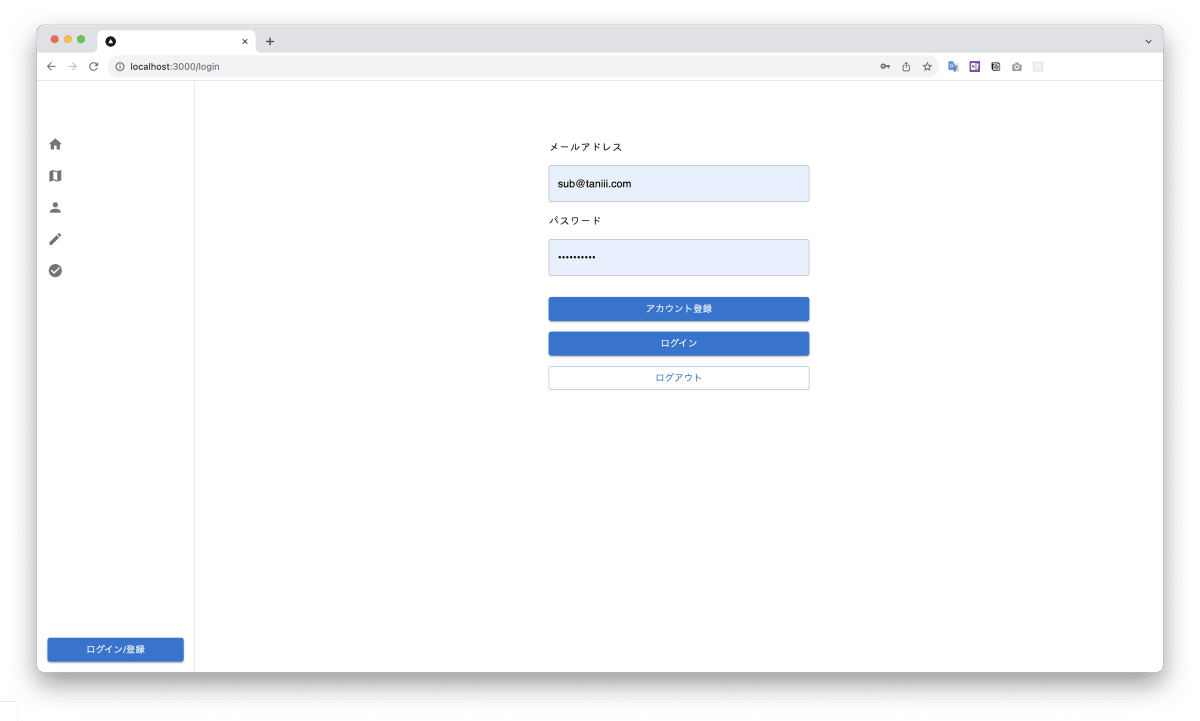
あとは, /mypage に「ログアウト」などを実装すれば完璧です.
繰り返しですが, 認可自体は, 基本的に DB 側で行うことで Supabase Auth を使うメリットを最大限享受することできます. RLS のポリシーは忘れずに適切に設定する必要があります.
epilogue
今は, 旅に関するアプリを開発しています.
個人的には, 技術の進化は, 「パフォーマンスが向上する」というのももちろんそうですが, ソフトウェア構成論やソフトウェア設計論といった, より人が親やすくて分かりやすく複雑なものを創り上げていくにはどうすればいいかという工夫が生まれていくのが面白いですね.
Discussion