C++ で React みたいな心地で関数型で TUI(ターミナル CUI) を構築できる FTXUI を使ってみた
大学のネットワークプロトコルの授業で, cpp を用いてソケット通信で掲示板を server, client それぞれ作る課題が出たので, ただ要件に従って実装するのもつまらないので, ターミナル上での操作を TUI でメニュー選択や入力をできるようにしたいなと思って, github topics を漁ってたら, gif アニメーションで良さそうな UI が目に留まった, FTXUI を見つけたので使ってみます.
FTXUI は, 現在 Star 数 5.7k ですが, 日本語の情報はほぼなさそうなので, 残しておきます.
React にインスピレーションを受けたと公式に書かれているほど, 関数型で Component の扱い方がすごく似ているので, React を使ったことがあれば, 同じ感覚で UI を構築できて, かなり良いです.
私自身ふだんは, Web 系のことをしているので, リッチな TUI を作る機会はあまりなかったのですが, 設計思想がすごく似ているので, すぐに UI を作ることができました.
この記事では, 最初に CMake の準備をして, メニュー選択やテキストボックスの選択などのコンポーネントを利用して UI 配置したり, 入力を受け取ったりしてみます.
↓ 実装例はこちら
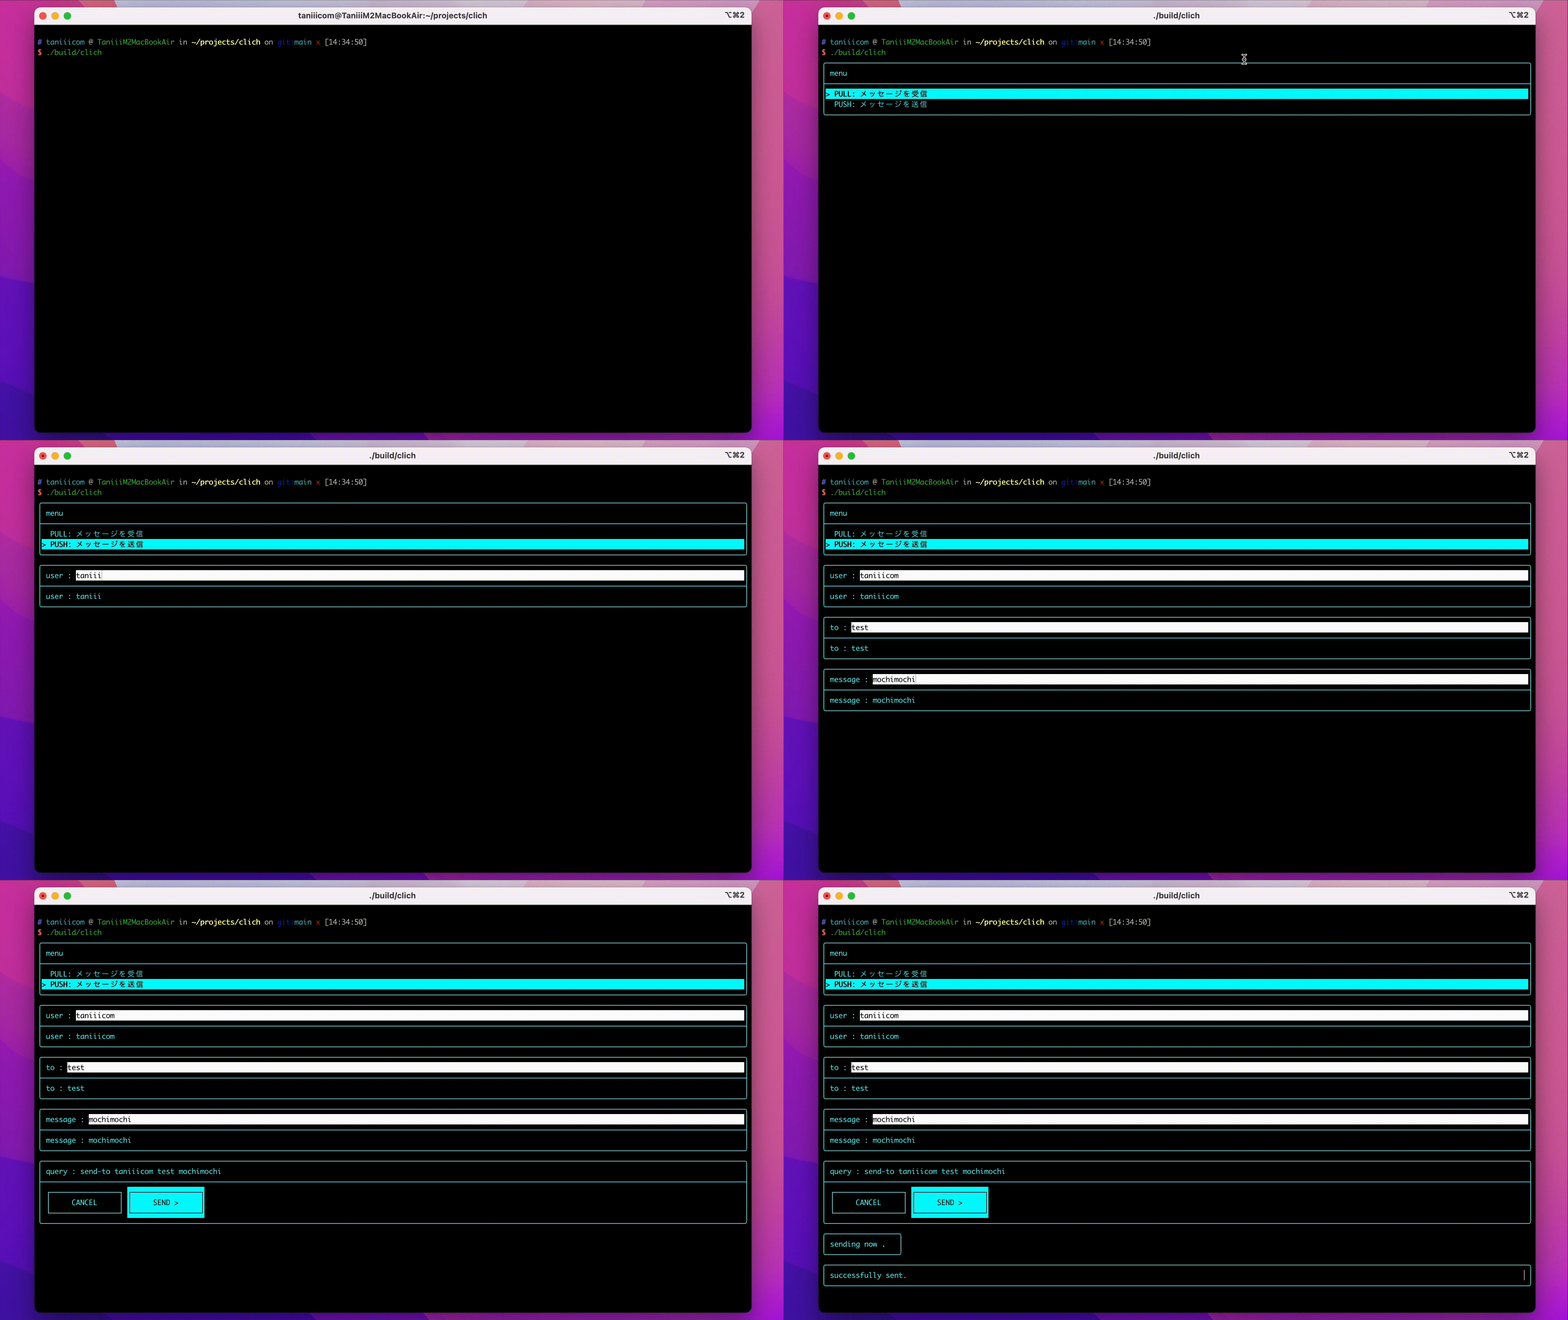
↓ こんな感じです

FTXUI とは…
まずは言葉の説明から
FTXUI
cpp 向けのクロスプラットフォームの TUI (terminal based user interfaces) ライブラリ
Linux, WebAssembly, Windows に対応しています
TextBox, RadioButton, Button … といった UI やアニメーションが用意されています
最大の特徴は, 関数型で UI を構築できることで, Component の扱いなどが, React にとても似ています
TUI
= text user interface / terminal based user interface
ターミナルを使って, テキストベースではあるが, 単なるコマンドラインではなく, GUI のようにインタラクティブなアクションやアニメーションを実装したもの
使ってみる
では, 実際に使ってみます.
0. CMake の準備
FTXUI では, CMake の使用が推奨されています.
まずは, 自分のプロジェクトで FTXUI を外部パッケージとして #inculde できるようにします.
プロジェクト直下に CMakeLists.txt を作成します.
/CMakeLists.txt
cmake_minimum_required(VERSION 3.14)
project(PROJECT_NAME)

include(FetchContent)

FetchContent_Declare(ftxui
  GIT_REPOSITORY https://github.com/ArthurSonzogni/ftxui
  GIT_TAG v5.0.0
)

FetchContent_GetProperties(ftxui)
if(NOT ftxui_POPULATED)
  FetchContent_Populate(ftxui)
  add_subdirectory(${ftxui_SOURCE_DIR} ${ftxui_BINARY_DIR} EXCLUDE_FROM_ALL)
endif()

# 出力ファイルを指定
add_executable(OUT_NAME FILE_NAME)
target_link_libraries(OUT_NAME PRIVATE ftxui::component)
PROJECT_NAME , FILE_NAME , OUT_NAME は適宜変更してください.
FILE_NAME : コンパイル対象とする cpp ファイル
OUT_NAME : コンパイル後の実行ファイルの名前
もし, CMake をまだインストールしていなければあらかじめインストールしておいてください.
以下のコマンドで (少し古いバージョンになりますが) 簡単にインストールできます.
// mac
$ brew install cmake

// ubuntu
$ sudo apt install cmake

// windows
$ choco install cmake --pre
今回は build 後の生成物を /build 以下に入れるようにしましょう.
-B オプションで, ビルドツリーを指定します.
$ cmake -B build
build は, 以下のコマンドで行います.
$ cmake --build build
ここで -B と --build は別物なので注意です.
1. メニュー選択 UI を実装
ではさっそく, 使ってみましょう.
各コンポーネントの仕様や種類は, 公式のドキュメントが充実しているので, 基本的にはそこから欲しい UI をさがすのが一番速いかなと思います.
↓ 公式の README.md の Short gallery に, 主要な Component が載っており, そこからドキュメントに飛ぶことで実装を確認できます.
↓ 公式ドキュメントはこちら
今回は, clich.cpp というファイル名にしています.
課題の要件に,
- ユーザに送信か受信かを指定するように画面へ指示を表示したのち,ユーザの入力を標準入力より読み取る.
とあったので,
まずは, 「送信」か「受信」かを選べるメニュー選択 UI を作ります.
/clich.cpp
#include <ftxui/component/captured_mouse.hpp>  // for ftxui
#include <ftxui/component/component.hpp>       // For component

class Mode {
 private:
  int mode = 0;

 public:
  explicit Mode() { selectMode(); }

  int getMode() const { return mode; }

  void selectMode() {
    using namespace ftxui;
    auto screen = ScreenInteractive::TerminalOutput();

    std::vector<std::string> entries = {
        "PULL: 受信",
        "PUSH: 送信",
    };
    int selected = 0;

    MenuOption option;
    option.on_enter = screen.ExitLoopClosure();
    auto menu = Menu(&entries, &selected, option);

    screen.Loop(menu);

    std::cout << "mode = " << selected << std::endl;

    mode = selected;

    return;
  }
};

int main() {
  // モード選択を取得
  Mode m{};

  if (m.getMode() == 0) {
    // PULL モード

  } else {
    // PUSH モード
  }

  return 0;
}
コードの中身を解説します.
まず, screen を初期化します.
auto screen = ScreenInteractive::TerminalOutput();
次に, entries , selected , option をそれぞれ用意します
option.on_enter = screen.ExitLoopClosure(); とすることで, ユーザの enter によって, 次の処理に進むことができます.
std::vector<std::string> entries = {
    "PULL: 受信",
    "PUSH: 送信",
};
int selected = 0;

MenuOption option;
option.on_enter = screen.ExitLoopClosure();
次に, それらを使って, menu コンポーネントを初期化します.
auto menu = Menu(&entries, &selected, option);
最後に, 以下でスクリーンにコンポーネントを表示することが可能です.
選択された値は, selected で受け取ることが可能です.
screen.Loop(menu);
では, この状態で, build して, 実行してみましょう.
$ cmake --build build
$ ./build/clich
こんな風なメニュー選択 UI が完成します.

2. TextBox を実装
次に, TextBox を使った入力を作ってみます.
Input Component を使ってみます.
新たに User クラスを定義し, fetchName メソッドで, 先ほどと同様に, UI を作成しています.
/clich.cpp
#include <ftxui/component/captured_mouse.hpp>  // for ftxui
#include <ftxui/component/component.hpp>       // For component
#include <ftxui/component/component.hpp>       // for Input, Renderer, Vertical
#include <ftxui/component/component_base.hpp>  // for ComponentBase
#include <ftxui/component/component_options.hpp>   // for InputOption
#include <ftxui/component/screen_interactive.hpp>  // For ScreenInteractive
#include <ftxui/component/screen_interactive.hpp>  // for Component, ScreenInteractive
#include <ftxui/dom/elements.hpp>  // for text, hbox, separator, Element, operator|, vbox, border
#include <ftxui/util/ref.hpp>  // for Ref

class Mode {
	// ...
};

class User {
 private:
  std::string name;

 public:
  explicit User(const std::string key) { fetchName(key); }

  void fetchName(std::string key) {
    using namespace ftxui;

    auto screen = ScreenInteractive::TerminalOutput();

    InputOption option;
    option.on_enter = screen.ExitLoopClosure();
    option.multiline = false;

    // The basic input components:
    Component input_name = Input(&name, key, option);
    Component button = Button("   NEXT >   ", [&] {
      // ここにボタンが押された時の処理を書く
      screen.Exit();
    });

    // The component tree:
    auto component = Container::Vertical({
        input_name,
        button,
    });

    // Tweak how the component tree is rendered:
    auto renderer = Renderer(component, [&] {
      return vbox({
                 hbox(text(" " + key + " : "), input_name->Render()),
                 separator(),
                 text(" " + key + " : " + name),
                 separator(),
                 hbox(text("   "), button->Render()),
             }) |
             border;
    });

    screen.Loop(renderer);

    return;
  }
};

int main() {
  // モード選択を取得
  Mode m{};

  // ユーザ情報を取得
  User user("user");

  // 送信先を取得
  User to("to");

  if (m.getMode() == 0) {
    // PULL モード

  } else {
    // PUSH モード
  }

  return 0;
}
ここで, 情報が少なくて困ったのが,
- Input に選択がいっていて, キー入力が吸われているときに, 次の処理に進む方法
- Input で改行を許可しない (one line) 方法
の 2 点ですが, どちらも, screen , component , option あたりのもっているメソッドをインテリセンスのサジェストの中から適当に眺めてたら, それらしいメソッドがあったので, 試してみたら上手くいきました. 以下のような感じです.
InputOption option;
option.on_enter = screen.ExitLoopClosure();
option.multiline = false;
これで, 以下のような UI が完成しました.

他にもいろいろなコンポーネントやレイアウト, スタイルがあるので, ぜひ遊んでみてください.
日本語の情報は, 調べた限りなかったので, ほぼゼロだと思いますが, ドキュメントが充実しているので困ることはそんなに多くないかなと思います.

epilogue
今回は, C++ で React みたい心地で TUI を作れる, FTXUI を使ってみました.
面倒なことも, ちょっとした遊び心をひとつまみ加えることで, 前向きに楽しんで取り組めるようになったらいいなと思います (自戒)
links
実装例
cf.
Discussion