vim沼: NeovimのReact、TypeScript、Tailwind CSS用セットアップ
元記事(英語): My Neovim setup for React, TypeScript, Tailwind CSS, etc
こんにちは、個人アプリ作家のTakuyaです。
Vim歴はかれこれ10年以上です。
僕はInkdropというMarkdownノートアプリを独りで開発しています。
このアプリはElectronやReact Nativeで組まれており、マルチプラットフォームで動作します。
それらはいつもNeovimを使って開発しています。
約2年前に自分のNeovimで使用しているプラグインについて紹介しました。
あれから結構アップデートしたので改めてまた書きます。
主な違いは設定がLuaで書かれている点です。
また、vim-plugからPackerに移行しました。
ちなみにYouTubeでM2 MacBook AirにNeovimをセットアップする動画を投稿しましたので、併せてご覧ください。
I hope you enjoy it!
セットアップ材料
以下が本セットアップのクイックサマリーです:
- Neovim >= 0.7
- wbthomason/packer.nvim - Neovimのプラグインマネージャ
- svrana/neosolarized.nvim - Truecolorの「Solarized dark」カラースキーム
- nvim-lualine/lualine.nvim - ブレイジングファストで簡単なStatusline
- onsails/lspkind-nvim - VSCodeライクなピクトグラムをUIに追加
- L3MON4D3/LuaSnip - スニペットエンジンの一つ
- hrsh7th/cmp-nvim-lsp - nvim-cmp用LSPソース
- hrsh7th/cmp-buffer - nvim-cmp用バッファwordsのソース
- hrsh7th/nvim-cmp - コンプリーションエンジン
- neovim/nvim-lspconfig - NeovimのLSPを簡単に使うための設定コレクション
- jose-elias-alvarez/null-ls.nvim - NeovimをLanguage Serverとして使う
- MunifTanjim/prettier.nvim - LSPでPrettierを扱う
- williamboman/mason.nvim - ポータブルなパッケージマネージャ for LSP servers, DAP servers, linters, and formatters
- williamboman/mason-lspconfig.nvim - mason.nvim用のlspconfig拡張
- glepnir/lspsaga.nvim - 軽量でパフォーマントなLSPのUIを提供する
- nvim-treesitter/nvim-treesitter - Treesitterを使えるようにする
- kyazdani42/nvim-web-devicons - vim-web-deviconsのLua fork
- nvim-telescope/telescope.nvim - 高拡張可能性を持つfuzzy finder
- nvim-telescope/telescope-file-browser.nvim - telescopeをファイラとして使う
- windwp/nvim-autopairs - Autopairs
- windwp/nvim-ts-autotag - Treesitterを使ってHTMLタグを自動で閉じたりリネームする
- norcalli/nvim-colorizer.lua - ハイパフィーマンスなカラーコード色付け屋さん
- akinsho/nvim-bufferline.lua - スナッジーなbufferline
- lewis6991/gitsigns.nvim - バッファ用Gitインテグレーション
- dinhhuy258/git.nvim - vim-fugitiveのシンプルクローン
こちらが僕のDotfilesのリポジトリです:
YouTubeのチュートリアル:
事前要件: iTerm2 と Nerd Font
iTerm2はmacOS用のターミナルエミュレータです。
Nerd Fontsから好きなものを一つインストールしてください。ファンシーなグリフやアイコンをターミナル上で表示するために必要です。
僕の現在のチョイスはHackです。
iTerm2上での設定は:
Neovim を Homebrew でインストール
brew install neovim
ディレクトリ構造
Neovim は XDG Base Directory の構造に倣います。僕の場合は以下のような構造です:
📂 ~/.config/nvim
├── 📁 after
│  └── 📁 plugin
├── 📂 lua
│  └── 🌑 base.lua
├── 📁 plugin
└── 🇻 init.lua
Neovim は $HOME/.config/nvim/init.vim もしくは init.lua を $HOME/.vimrc の代わりにロードします。
Neovimの詳しい設定方法は以下のクイックスタートガイドを参照してください:
プラグインマネージャ: Packer
以下のコマンドでPackerをインストールします:
git clone --depth 1 https://github.com/wbthomason/packer.nvim \
 ~/.local/share/nvim/site/pack/packer/start/packer.nvim
次に ./.config/nvim/lua/plugins.lua ファイルを作成します:
local status, packer = pcall(require, "packer")
if (not status) then
  print("Packer is not installed")
  return
end

vim.cmd [[packadd packer.nvim]]

packer.startup(function(use)
  use 'wbthomason/packer.nvim'
  -- Your plugins go here
end)
そして init.lua から以下のように読み込みます。
require('plugins')
カラースキーム: Neosolarized

僕はsvrana/neosolarized.nvimをいくらかカスタマイズして使用しています。
local status, n = pcall(require, "neosolarized")
if (not status) then return end

n.setup({
  comment_italics = true,
})

local cb = require('colorbuddy.init')
local Color = cb.Color
local colors = cb.colors
local Group = cb.Group
local groups = cb.groups
local styles = cb.styles

Color.new('black', '#000000')
Group.new('CursorLine', colors.none, colors.base03, styles.NONE, colors.base1)
Group.new('CursorLineNr', colors.yellow, colors.black, styles.NONE, colors.base1)
Group.new('Visual', colors.none, colors.base03, styles.reverse)

local cError = groups.Error.fg
local cInfo = groups.Information.fg
local cWarn = groups.Warning.fg
local cHint = groups.Hint.fg

Group.new("DiagnosticVirtualTextError", cError, cError:dark():dark():dark():dark(), styles.NONE)
Group.new("DiagnosticVirtualTextInfo", cInfo, cInfo:dark():dark():dark(), styles.NONE)
Group.new("DiagnosticVirtualTextWarn", cWarn, cWarn:dark():dark():dark(), styles.NONE)
Group.new("DiagnosticVirtualTextHint", cHint, cHint:dark():dark():dark(), styles.NONE)
Group.new("DiagnosticUnderlineError", colors.none, colors.none, styles.undercurl, cError)
Group.new("DiagnosticUnderlineWarn", colors.none, colors.none, styles.undercurl, cWarn)
Group.new("DiagnosticUnderlineInfo", colors.none, colors.none, styles.undercurl, cInfo)
Group.new("DiagnosticUnderlineHint", colors.none, colors.none, styles.undercurl, cHint)
ステータスライン: Lualine

nvim-lualine/lualine.nvim は柔軟にステータスラインを設定する方法を提供します。
local status, lualine = pcall(require, "lualine")
if (not status) then return end
lualine.setup {
options = {
icons_enabled = true,
theme = 'solarized_dark',
section_separators = { left = '', right = '' },
component_separators = { left = '', right = '' },
disabled_filetypes = {}
},
sections = {
lualine_a = { 'mode' },
lualine_b = { 'branch' },
lualine_c = { {
'filename',
file_status = true, -- displays file status (readonly status, modified status)
path = 0 -- 0 = just filename, 1 = relative path, 2 = absolute path
} },
lualine_x = {
{ 'diagnostics', sources = { "nvim_diagnostic" }, symbols = { error = ' ', warn = ' ', info = ' ',
hint = ' ' } },
'encoding',
'filetype'
},
lualine_y = { 'progress' },
lualine_z = { 'location' }
},
inactive_sections = {
lualine_a = {},
lualine_b = {},
lualine_c = { {
'filename',
file_status = true, -- displays file status (readonly status, modified status)
path = 1 -- 0 = just filename, 1 = relative path, 2 = absolute path
} },
lualine_x = { 'location' },
lualine_y = {},
lualine_z = {}
},
tabline = {},
extensions = { 'fugitive' }
}
Lspconfig
NeovimはビルトインでLSPをサポートしています。
neovim/nvim-lspconfigを使う事で簡単に使えます。
例えば、TypeScriptのLanguage Serverを使うには:
local status, nvim_lsp = pcall(require, "lspconfig")
if (not status) then return end

local protocol = require('vim.lsp.protocol')

local on_attach = function(client, bufnr)
  -- format on save
  if client.server_capabilities.documentFormattingProvider then
    vim.api.nvim_create_autocmd("BufWritePre", {
      group = vim.api.nvim_create_augroup("Format", { clear = true }),
      buffer = bufnr,
      callback = function() vim.lsp.buf.formatting_seq_sync() end
    })
  end
end

-- TypeScript
nvim_lsp.tsserver.setup {
  on_attach = on_attach,
  filetypes = { "typescript", "typescriptreact", "typescript.tsx" },
  cmd = { "typescript-language-server", "--stdio" }
}
TypeScript Language Serverのインストールを忘れないでください:
npm i -g typescript-language-server
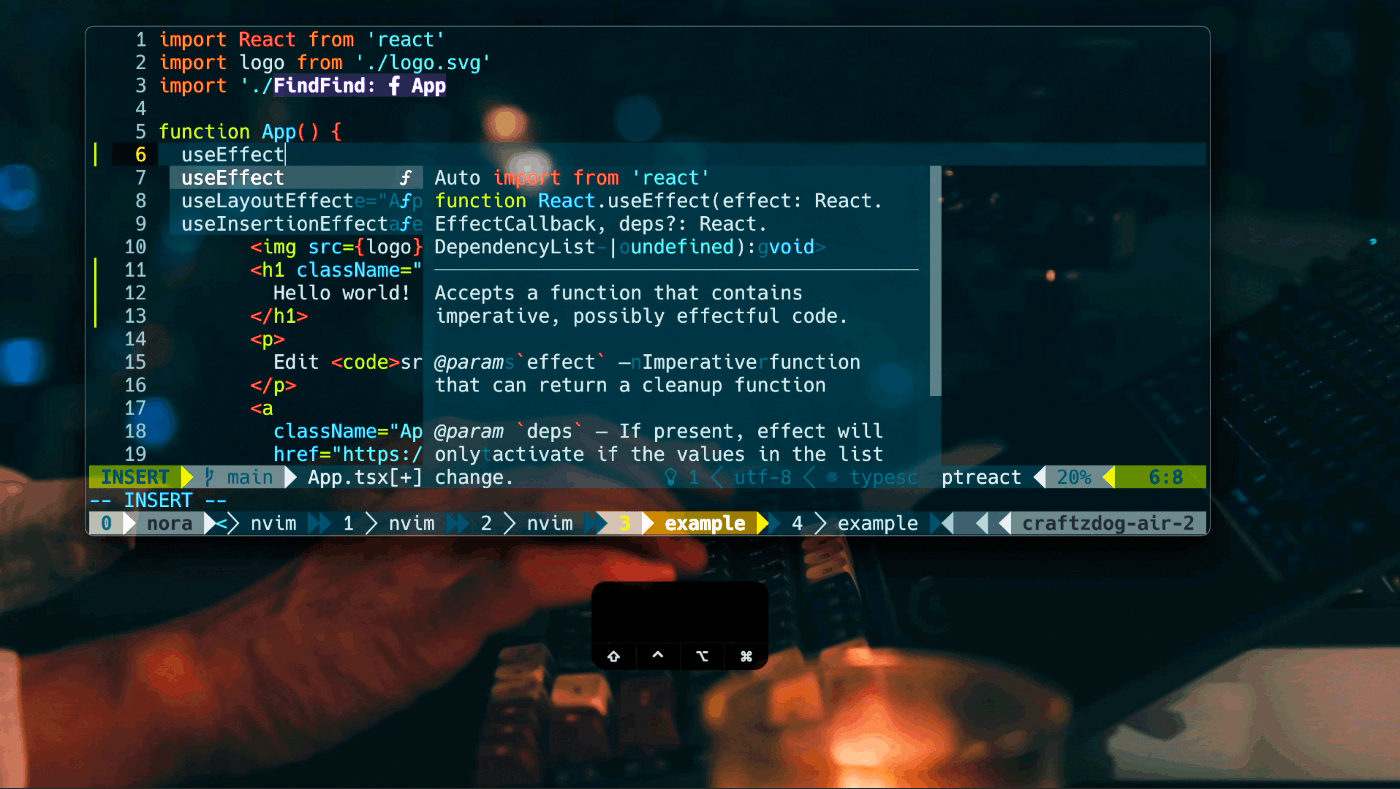
自動補完: Lspkind and cmp

LSPアウェアな自動補完をファンシーなピクトグラムと共に得るには以下のプラグインを使用します:
- onsails/lspkind-nvim - VSCode-like pictograms
- L3MON4D3/LuaSnip - Snippet engine
- hrsh7th/cmp-nvim-lsp - nvim-cmp source for neovim's built-in LSP
- hrsh7th/cmp-buffer - nvim-cmp source for buffer words
- hrsh7th/nvim-cmp - A completion engine plugin for neovim
以下のように設定します:
local status, cmp = pcall(require, "cmp")
if (not status) then return end
local lspkind = require 'lspkind'

cmp.setup({
  snippet = {
    expand = function(args)
      require('luasnip').lsp_expand(args.body)
    end,
  },
  mapping = cmp.mapping.preset.insert({
    ['<C-d>'] = cmp.mapping.scroll_docs(-4),
    ['<C-f>'] = cmp.mapping.scroll_docs(4),
    ['<C-Space>'] = cmp.mapping.complete(),
    ['<C-e>'] = cmp.mapping.close(),
    ['<CR>'] = cmp.mapping.confirm({
      behavior = cmp.ConfirmBehavior.Replace,
      select = true
    }),
  }),
  sources = cmp.config.sources({
    { name = 'nvim_lsp' },
    { name = 'buffer' },
  }),
  formatting = {
    format = lspkind.cmp_format({ with_text = false, maxwidth = 50 })
  }
})

vim.cmd [[
  set completeopt=menuone,noinsert,noselect
  highlight! default link CmpItemKind CmpItemMenuDefault
]]
構文ハイライト: Treesitter

Treesitterはポピュラーな言語パーサで構文ハイライトに多く使われます。
初めにインストールします:
brew install tree-sitter
nvim-treesitter/nvim-treesitterをPackerでインストールし、次のように設定します:
local status, ts = pcall(require, "nvim-treesitter.configs")
if (not status) then return end

ts.setup {
  highlight = {
    enable = true,
    disable = {},
  },
  indent = {
    enable = true,
    disable = {},
  },
  ensure_installed = {
    "tsx",
    "toml",
    "fish",
    "php",
    "json",
    "yaml",
    "swift",
    "css",
    "html",
    "lua"
  },
  autotag = {
    enable = true,
  },
}

local parser_config = require "nvim-treesitter.parsers".get_parser_configs()
parser_config.tsx.filetype_to_parsername = { "javascript", "typescript.tsx" }
Autotag と Autopair
Reactを使うにあたり、タグを素早く閉じたい事があるでしょう。
windwp/nvim-ts-autotag はまさにあなたが求めるものです。
local status, autotag = pcall(require, "nvim-ts-autotag")
if (not status) then return end

autotag.setup({})
windwp/nvim-autopairsはブラケットを閉じるのに使います。
local status, autopairs = pcall(require, "nvim-autopairs")
if (not status) then return end

autopairs.setup({
  disable_filetype = { "TelescopePrompt" , "vim" },
})
Fuzzy finder: Telescope
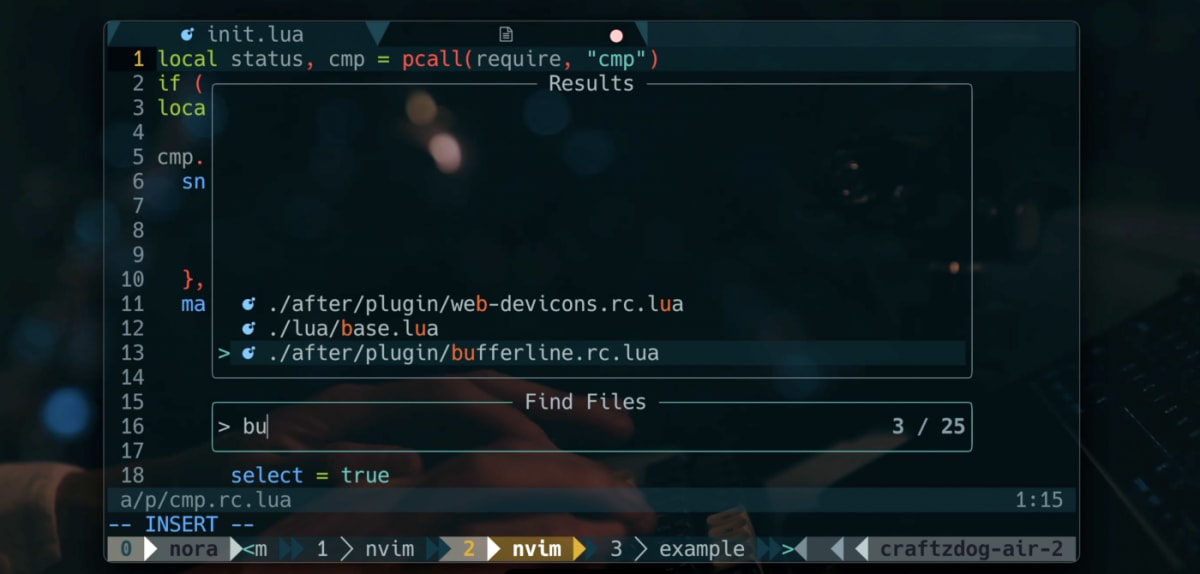
telescope.nvim はリストのインタラクティブなfuzzy finderを提供します。
更にtelescope-file-browser.nvimでTelescopeをファイラとしても使います。
僕はこのプラグインをとても気に入っています。なぜならファイルのプレビュー機能も備えていて、いちいち開いて回らなくても目的のファイルを見つけられるからです。また、いくつものソースに対応しており、Vim、files、Git、LSP、Treesitterなど何でもファジーに検索できます。ショーケースをぜひチェックしてみてください。
kyazdani42/nvim-web-deviconsをインストールすればファイル名の横にアイコンを出せます。
設定は以下のような感じです:
local status, telescope = pcall(require, "telescope")
if (not status) then return end
local actions = require('telescope.actions')
local builtin = require("telescope.builtin")

local function telescope_buffer_dir()
  return vim.fn.expand('%:p:h')
end

local fb_actions = require "telescope".extensions.file_browser.actions

telescope.setup {
  defaults = {
    mappings = {
      n = {
        ["q"] = actions.close
      },
    },
  },
}

-- keymaps
vim.keymap.set('n', ';f',
  function()
    builtin.find_files({
      no_ignore = false,
      hidden = true
    })
  end)
vim.keymap.set('n', ';r', function()
  builtin.live_grep()
end)
vim.keymap.set('n', '\\\\', function()
  builtin.buffers()
end)
vim.keymap.set('n', ';t', function()
  builtin.help_tags()
end)
vim.keymap.set('n', ';;', function()
  builtin.resume()
end)
vim.keymap.set('n', ';e', function()
  builtin.diagnostics()
end)

ファイルブラウザ拡張の使い方:
telescope.setup {
  defaults = {
    mappings = {
      n = {
        ["q"] = actions.close
      },
    },
  },
  extensions = {
    file_browser = {
      theme = "dropdown",
      -- disables netrw and use telescope-file-browser in its place
      hijack_netrw = true,
      mappings = {
        -- your custom insert mode mappings
        ["i"] = {
          ["<C-w>"] = function() vim.cmd('normal vbd') end,
        },
        ["n"] = {
          -- your custom normal mode mappings
          ["N"] = fb_actions.create,
          ["h"] = fb_actions.goto_parent_dir,
          ["/"] = function()
            vim.cmd('startinsert')
          end
        },
      },
    },
  },
}
telescope.load_extension("file_browser")

vim.keymap.set("n", "sf", function()
  telescope.extensions.file_browser.file_browser({
    path = "%:p:h",
    cwd = telescope_buffer_dir(),
    respect_gitignore = false,
    hidden = true,
    grouped = true,
    previewer = false,
    initial_mode = "normal",
    layout_config = { height = 40 }
  })
end)
タブ: Bufferline

akinsho/nvim-bufferline.luaを使ってタブをいい感じにします.
Solarizedのテーマに合うように少しカスタマイズしています。
local status, bufferline = pcall(require, "bufferline")
if (not status) then return end

bufferline.setup({
  options = {
    mode = "tabs",
    separator_style = 'slant',
    always_show_bufferline = false,
    show_buffer_close_icons = false,
    show_close_icon = false,
    color_icons = true
  },
  highlights = {
    separator = {
      guifg = '#073642',
      guibg = '#002b36',
    },
    separator_selected = {
      guifg = '#073642',
    },
    background = {
      guifg = '#657b83',
      guibg = '#002b36'
    },
    buffer_selected = {
      guifg = '#fdf6e3',
      gui = "bold",
    },
    fill = {
      guibg = '#073642'
    }
  },
})

vim.keymap.set('n', '<Tab>', '<Cmd>BufferLineCycleNext<CR>', {})
vim.keymap.set('n', '<S-Tab>', '<Cmd>BufferLineCyclePrev<CR>', {})
LSP Uls: Lspsaga


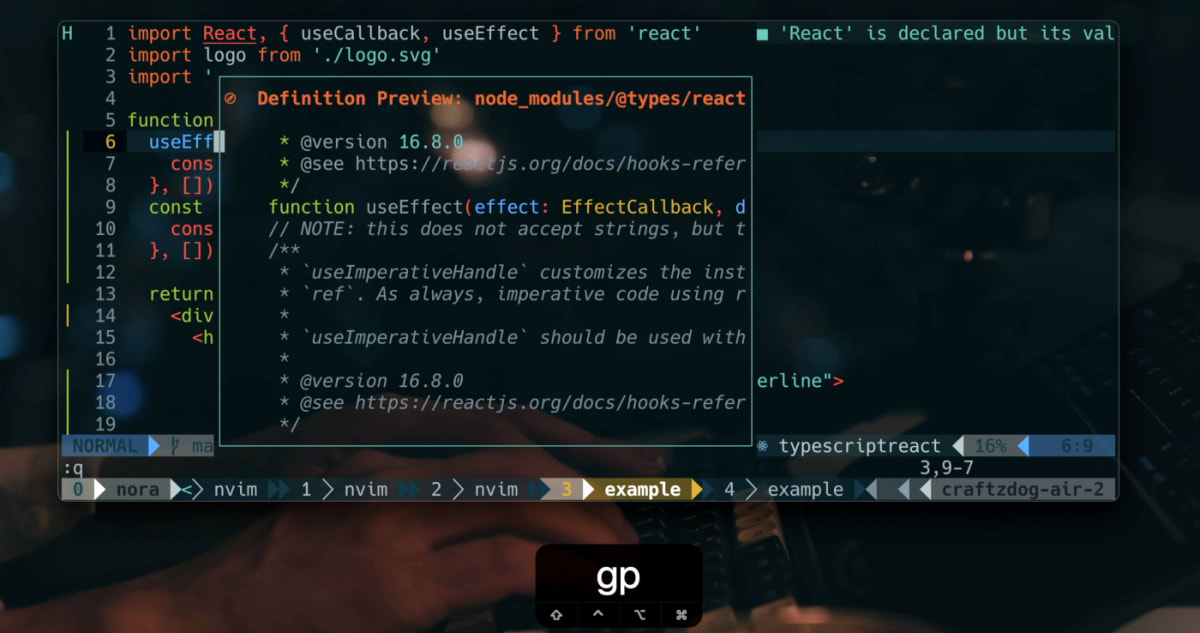
glepnir/lspsaga.nvim はLSP関連で好きなプラグインの一つです。
これはHover docや定義プレビュー、リネームアクションといったLSP関連の機能を綺麗なUIで使えるようにします。
僕の設定はシンプルです:
local status, saga = pcall(require, "lspsaga")
if (not status) then return end

saga.init_lsp_saga {
  server_filetype_map = {
    typescript = 'typescript'
  }
}

local opts = { noremap = true, silent = true }
vim.keymap.set('n', '<C-j>', '<Cmd>Lspsaga diagnostic_jump_next<CR>', opts)
vim.keymap.set('n', 'K', '<Cmd>Lspsaga hover_doc<CR>', opts)
vim.keymap.set('n', 'gd', '<Cmd>Lspsaga lsp_finder<CR>', opts)
vim.keymap.set('i', '<C-k>', '<Cmd>Lspsaga signature_help<CR>', opts)
vim.keymap.set('n', 'gp', '<Cmd>Lspsaga preview_definition<CR>', opts)
vim.keymap.set('n', 'gr', '<Cmd>Lspsaga rename<CR>', opts)
コードのフォーマッタ: Prettier and null-ls
TypeScript/JavaScript/CSSの整形においてはPrettierを使用しています。
jose-elias-alvarez/null-ls.nvim と MunifTanjim/prettier.nvim を組み合わせて実現します。
最初に prettierd をインストールしましょう:
brew install prettierd
次にnull-lsを以下のように設定します:
local status, null_ls = pcall(require, "null-ls")
if (not status) then return end

null_ls.setup({
  sources = {
    null_ls.builtins.diagnostics.eslint_d.with({
      diagnostics_format = '[eslint] #{m}\n(#{c})'
    }),
    null_ls.builtins.diagnostics.fish
  }
})
Prettier:
local status, prettier = pcall(require, "prettier")
if (not status) then return end

prettier.setup {
  bin = 'prettierd',
  filetypes = {
    "css",
    "javascript",
    "javascriptreact",
    "typescript",
    "typescriptreact",
    "json",
    "scss",
    "less"
  }
}
Gitマーカー: gitsigns

lewis6991/gitsigns.nvimは現在のバッファにGitのデコレーションを加えます。
これでどの行が変更されたかひと目で把握できます。
Out of the box(そのまんま)で動作します。
require('gitsigns').setup {}
git

僕はOSSのコードを読む時、GitHubでよくコードを参照します。
dinhhuy258/git.nvimはNeovimからGitHubの該当ファイルと行をクイックに開くようにでき、また git blame をスプリットビューで開くようにできます。めっちゃ便利です。
local status, git = pcall(require, "git")
if (not status) then return end

git.setup({
  keymaps = {
    -- Open blame window
    blame = "<Leader>gb",
    -- Open file/folder in git repository
    browse = "<Leader>go",
  }
})
LSP ツール: mason

もしLSPを特定のライブラリでも使いたいという場合、williamboman/mason.nvim と williamboman/mason-lspconfig.nvimが必要でしょう。
自分の場合はTailwind CSS language serverを動かすのに使用しています。
local status, mason = pcall(require, "mason")
if (not status) then return end
local status2, lspconfig = pcall(require, "mason-lspconfig")
if (not status2) then return end

mason.setup({

})

lspconfig.setup {
  ensure_installed = { "sumneko_lua", "tailwindcss" },
}
lspconfigを追加:
local nvim_lsp = require "lspconfig"
nvim_lsp.tailwindcss.setup {}
That’s pretty much it! 参考になれば幸いです。
フォローしてね
- 拙作アプリ Inkdrop — A Markdown note-taking app
- Twitter https://twitter.com/craftzdog
- Blog https://blog.craftz.dog/
- YouTube https://www.youtube.com/devaslife
- Instagram https://instagram.com/craftzdog
Discussion