📘
【Flutter】ナビゲーション(AppBarとBottomNavigationBar)
Widgetのナビゲーションを実装できるAppBarとBottomNavigationBarについてそれぞれ簡単な実装例ともに紹介しています。
参考
- 公式サイト
- AppBar class
- BottomNavigationBar class
AppBar
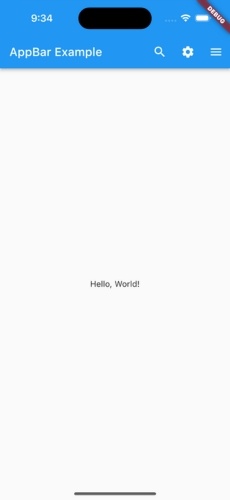
AppBarは、アプリケーションの上部に配置される一般的なナビゲーションバーです。通常、タイトル、アクションアイコン、ハンバーガーメニューなどの要素を含めることができます。
import 'package:flutter/material.dart';
void main() {
runApp(MyApp());
}
class MyApp extends StatelessWidget {
Widget build(BuildContext context) {
return MaterialApp(
home: Scaffold(
appBar: AppBar(
title: Text('AppBar Example'),
actions: [
IconButton(
icon: Icon(Icons.search),
onPressed: () {
// Search action
},
),
IconButton(
icon: Icon(Icons.settings),
onPressed: () {
// Settings action
},
),
],
),
body: Center(child: Text('Hello, World!')),
),
);
}
}

BottomNavigationBar
BottomNavigationBarは、アプリケーションの下部に表示されるタブバーで、ユーザーがアプリ内の主要なセクションを素早く切り替えるために使用されます。BottomNavigationBarを使用するには、以下のようにコードを記述します。
import 'package:flutter/material.dart';
void main() {
runApp(MyApp());
}
class MyApp extends StatefulWidget {
_MyAppState createState() => _MyAppState();
}
class _MyAppState extends State<MyApp> {
int _selectedIndex = 0;
void _onItemTapped(int index) {
setState(() {
_selectedIndex = index;
});
}
Widget build(BuildContext context) {
return MaterialApp(
home: Scaffold(
appBar: AppBar(
title: Text('My App'),
),
body: Center(
child: Text('Hello World'),
),
bottomNavigationBar: BottomNavigationBar(
items: const [
BottomNavigationBarItem(
icon: Icon(Icons.home),
label: 'Home',
),
BottomNavigationBarItem(
icon: Icon(Icons.search),
label: 'Search',
),
BottomNavigationBarItem(
icon: Icon(Icons.person),
label: 'Profile',
),
],
currentIndex: _selectedIndex,
onTap: _onItemTapped,
),
),
);
}
}

Discussion