Closed5
Blazor で Fluent UI を導入してみる
ためしてみよう
とりあえず公式通り進めて、もし詰まったらメモしていく形で
とりあえずプロジェクトを作る
dotnet new blazorwasm -o <hoge>
パッケージ導入
dotnet add package Microsoft.Fast.Components.FluentUI
VSCode でプロジェクトを開いて wwwroot の index.html にスクリプト追記
<script type="module" src="https://cdn.jsdelivr.net/npm/@fluentui/web-components/dist/web-components.min.js"></script>
スタイルシートを追記。。と思ったら自動的に挿入されてた。多分パッケージ導入したときに自動的に反映されたのかも。
Rebootのスタイルシートを追記。なんかあるといいみたい。
<link href="_content/Microsoft.Fast.Components.FluentUI/css/reboot.css" rel="stylesheet" />
Program.cs に下記を追記
using Microsoft.Fast.Components.FluentUI;

builder.Services.AddFluentUIComponents();
サンプルを書いてみる
@using Microsoft.Fast.Components.FluentUI

<FluentCard>
    <h2>Hello World!</h2>
    <FluentButton Appearance="@Appearance.Accent">Click Me</FluentButton>
</FluentCard>
コンポーネントの例が書いてあるサイトを参考に、ちょっと作ってみた。
@page "/"
@using Microsoft.Fast.Components.FluentUI
<FluentCard>
<h2>Hello World!</h2>
<FluentButton Appearance="@Appearance.Accent">1番目のボタン</FluentButton>
<FluentButton Appearance="@Appearance.Neutral">2番目のボタン</FluentButton>
<FluentButton Appearance="@Appearance.Outline">3番目のボタン</FluentButton>
<FluentButton Appearance="@Appearance.Filled">4番目のボタン</FluentButton>
</FluentCard>
<div style="margin-bottom: 60px;">
<FluentButton style="width: 90px; margin: 10px;" @onclick="() => orientation = (orientation == Orientation.Vertical) ? Orientation.Horizontal : Orientation.Vertical">Toggle orientation</FluentButton>
<FluentSlider Orientation="@orientation" Min="0" Max="100" Step="1" @bind-Value=initValue>
<FluentSliderLabel Position="0">0℃</FluentSliderLabel>
<FluentSliderLabel Position="10">10℃</FluentSliderLabel>
<FluentSliderLabel Position="90">90℃</FluentSliderLabel>
<FluentSliderLabel Position="100">100℃</FluentSliderLabel>
</FluentSlider>
</div>
<div style="display: flex; flex-direction: column; gap: 0.5rem;">
<FluentSwitch @bind-Value=value1>
何かのトグルスイッチ
</FluentSwitch>
<FluentSwitch @bind-Value=value2>
右側に表示されるスイッチ
<span slot="checked-message">カメラON</span>
<span slot="unchecked-message">カメラOFF</span>
</FluentSwitch>
<FluentSwitch @bind-Value=value3>
あなたはどちら派?
<span slot="checked-message">きのこの山</span>
<span slot="unchecked-message">たけのこの里</span>
</FluentSwitch>
</div>
<h4 class="mt-3">何か読み込むとき</h4>
<div style="width: 300px; display: grid; grid-gap: 12px; grid-auto-flow: column;">
<FluentProgress></FluentProgress>
</div>
@code {
Orientation orientation = Orientation.Horizontal;
int initValue = 20;
bool value1, value2, value3 = false;
}
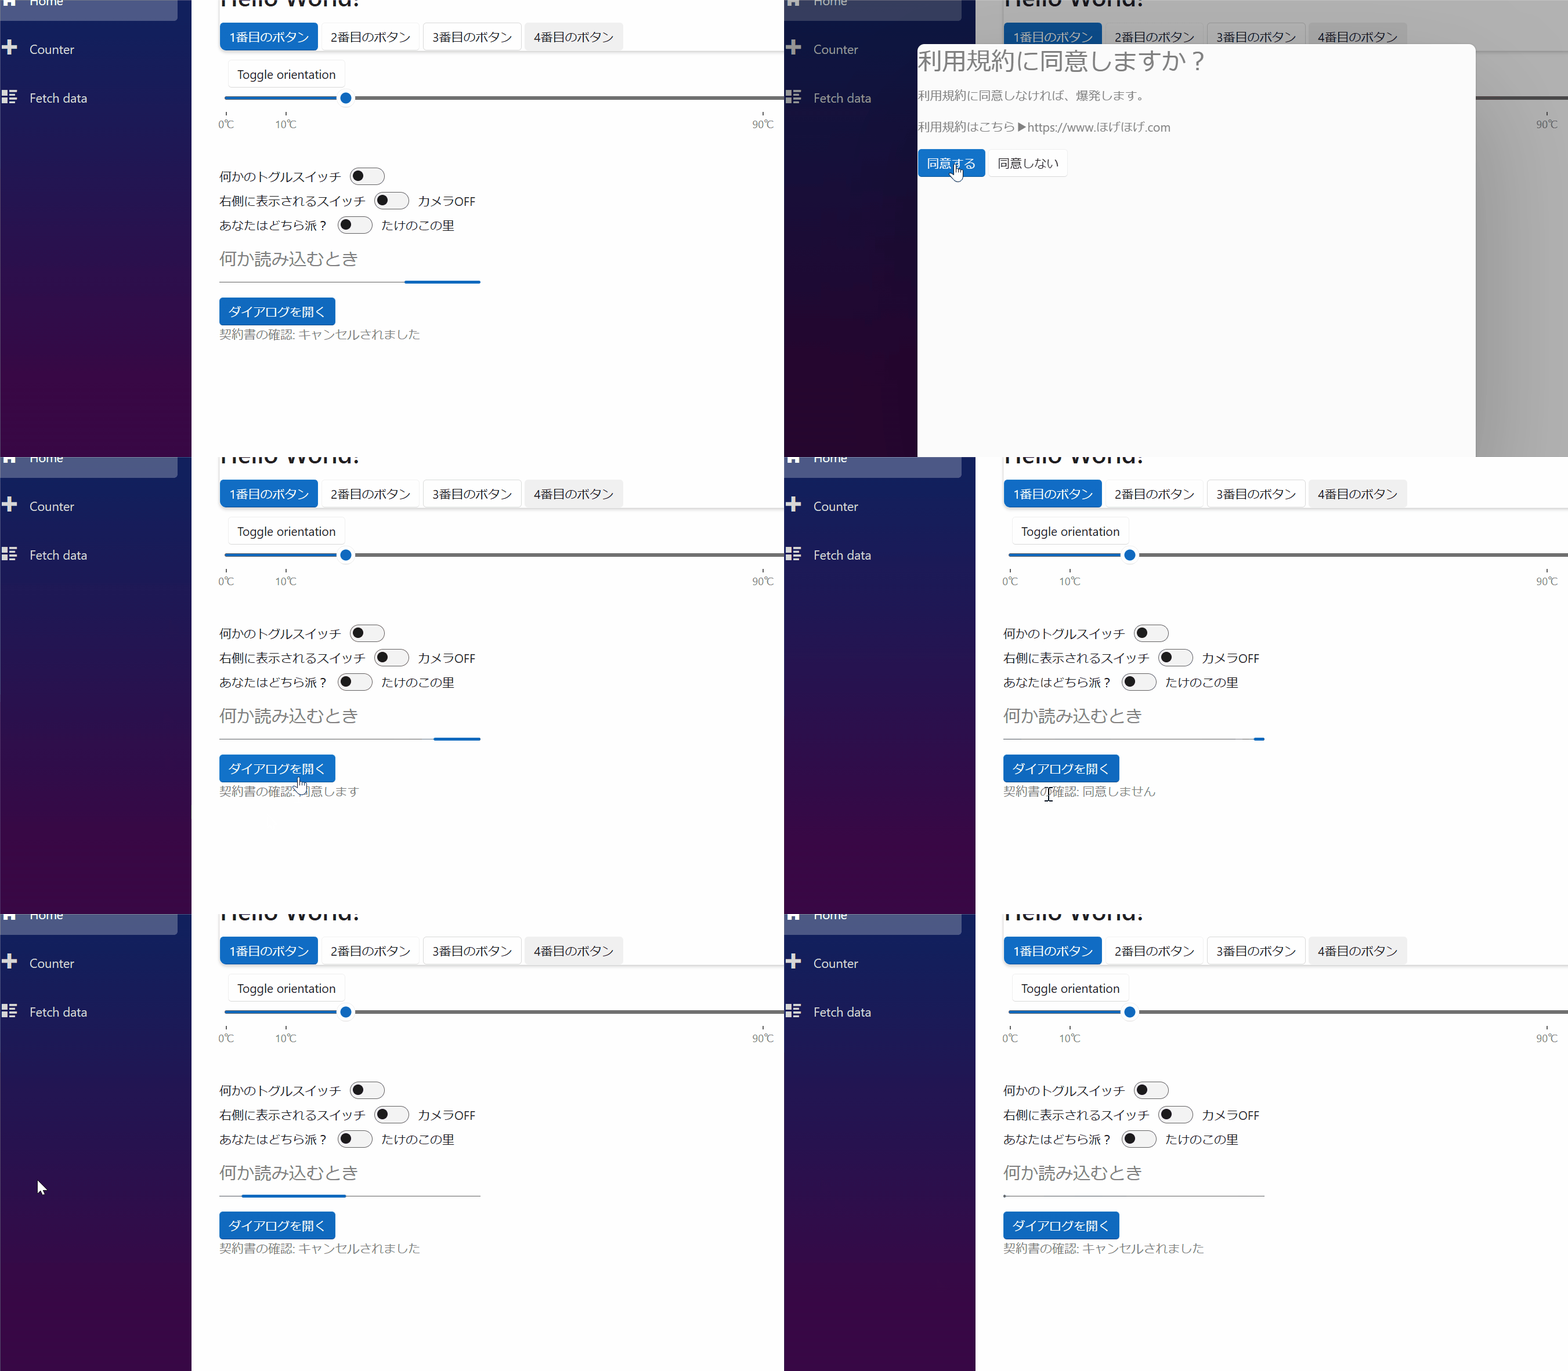
↓実行結果

ということで、案外あっさり導入できて嬉しかったw
なんか面白そうだったので、ダイアログも作ってみた。
- ダイアログの中身を定義するコンポーネント
FluentDialog - ダイアログを表示させるためのボタンとメソッド
- 値確認用の変数
これもテンプレートに従って定義していく。
<div class="mt-3">
    <FluentDialog @ref="MyFluentDialog" aria-label="Simple dialog" Modal=@Modal TrapFocus=@TrapFocus @ondialogdismiss=OnDismiss>
        <h2>利用規約に同意しますか?</h2>
        <p>利用規約に同意しなければ、爆発します。</p>
        <p>利用規約はこちら▶<a>https://www.ほげほげ.com</a></p>
        <FluentButton Appearance="Appearance.Accent" Autofocus="true" @onclick="Agree">同意する</FluentButton>
        <FluentButton @onclick="Disagree">同意しない</FluentButton>
    </FluentDialog>
</div>

<FluentButton Appearance=Appearance.Accent @onclick="OnOpen">ダイアログを開く</FluentButton>

<p>契約書の確認: @status</p>

@code {
    private FluentDialog? MyFluentDialog;
    public bool TrapFocus = true;
    public bool Modal = true;
    private string? status;

     protected override void OnAfterRender(bool firstRender)
    {
        if (firstRender)
            MyFluentDialog!.Hide();
    }

    private void OnOpen()
    {
        MyFluentDialog!.Show();
    }

    private void Agree()
    {
        status = $"同意します";
        MyFluentDialog!.Hide();

    }

    private void Disagree()
    {
        status = $"同意しません";
        MyFluentDialog!.Hide();

    }

    private void OnDismiss(DialogEventArgs args)
    {
        if (args is not null && args.Reason is not null && args.Reason == "dismiss")
        {
            status = $"キャンセルされました";
            MyFluentDialog!.Hide();
        }
    }
}
↓実行結果

た の し か っ た で す。
このスクラップは2023/05/27にクローズされました