地上天気図画像内の数字をマーキングする試み
自己紹介
情報系の学部の大学3年生のtakumi0616と申します!
フロントエンド、機械学習、生成AIに興味があり、大学で絶賛勉強中です!
ポートフォリオ↓
はじめに
現在、自分の研究内容として地上天気図を使用してます。
詳しいことはここでは省略させていただきますが、今回、地上天気図内の気圧の数字をマーキングするタスクについて試行錯誤してみたので、その知見を共有させていただきます。
自分は画像処理などは初心者なのですが、むちゃくちゃ難しいなと、やっていながら思いました。
なにかアドバイスなどあればぜひ、教えて欲しいです。
内容
環境
pythonを用いて、colab proで動かしています。
プログラムはchatGPTを用いている部分があります。
地上天気図とは?

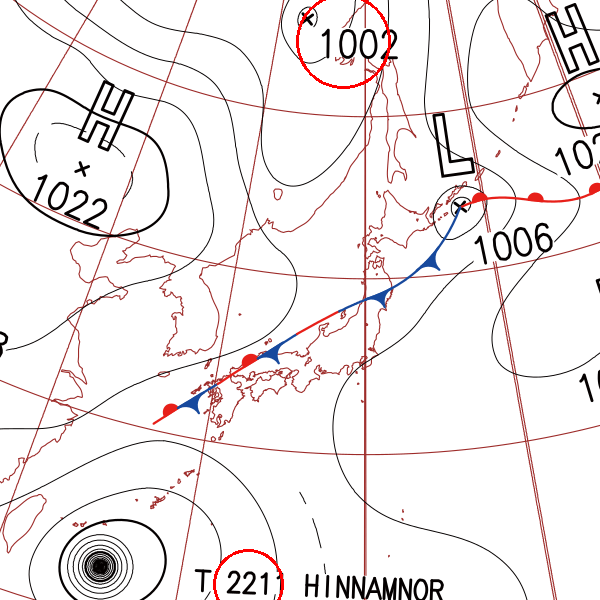
まず、地上天気図とは上記のような画像になります。皆さんも1度は見たことあると思いますが、気圧や前線、等圧線の情報を1つの画像にまとめたものになります。
天気図にも2種類あり、高層天気図と地上天気図があります。
大体の場合地上天気図を見ることで地域の天候をなんとなく予想することができるものです。
地上天気図内の数字の特徴を以下に示します。
- 大きさは一定
- 線の太さは一定
- 角度はランダム(水平でない場合が多く、複数あっても一定ではない)
- 数字の桁数は4桁、もしくは3桁である
今回はそのような数字の認識、マーキングに挑戦しました。
最終ゴール
地上天気図内の4桁、3桁の数字を1つの赤い円でマーキングする
1. まずはOCRで認識を試みる
画像からテキスト等を検出する技術として、まず自分が思いついたものがOCR(Optical Character Recognition/Reader, 光学的文字認識)でした。
colabで動くOCR技術のライブラリとして、「tesseract-ocr」というものがあるらしく、それをまずは試してみました。
tesseract-ocrとは?
画像内のテキストを認識してデジタルテキスト形式に変換する、オープンソースの光学文字認識(OCR)エンジンで、Googleが開発をサポートしているため、精度と機能性が高いことで知られています。
Tesseractは、多くの言語をサポートしており、その中には日本語も含まれます。また、オープンソースであるため、無料で利用することができます。
Tesseractの主な特徴は以下の通りです:
- 高い認識精度と多言語サポート。
- 訓練済みの言語モデルを使用して新たな言語をサポート。
- 複数の画像フォーマットのサポート。
- プログラマブルなAPIを通じた拡張性と柔軟性。
tesseract-ocrを使ったプログラムを載せておきます。
軽く使いながら調べたのですが、やはりtesseract-ocrは数字や角度の違うテキストの読み取り精度が悪いらしく、あまり詳しくは深掘りしてないので解説はできませんでした。
def process_image(image_path, save_path):
    image = cv2.imread(image_path)
    gray = cv2.cvtColor(image, cv2.COLOR_BGR2GRAY)

    blur = cv2.GaussianBlur(gray, (5,5), 0)
    _, thresh = cv2.threshold(blur, 0, 255, cv2.THRESH_BINARY + cv2.THRESH_OTSU)

    custom_config = r'--oem 3 --psm 6 outputbase digits'
    ocr_result = pytesseract.image_to_data(thresh, config=custom_config, output_type=pytesseract.Output.DICT)

    circled_image = image.copy()

    n_boxes = len(ocr_result['text'])
    for i in range(n_boxes):
        text = ocr_result['text'][i].strip()
        if len(text) in [3, 4] and text.isdigit():
            (x, y, w, h) = (ocr_result['left'][i], ocr_result['top'][i], ocr_result['width'][i], ocr_result['height'][i])
            center = (x + w//2, y + h//2)
            radius = max(w, h) // 2
            cv2.circle(circled_image, center, radius, (0, 0, 255), 2)

    save_image_path = os.path.join(save_path, os.path.basename(image_path))
    cv2.imwrite(save_image_path, circled_image)
tesseract-ocrでできた画像が以下になります。
複数の地上天気図画像で試した結果の1番良い結果になります。
ほとんどは1つも赤い丸をつけることができませんでした。

触っていた感じの感触が悪かった(ライブラリ頼りなので大幅な変更ができない)ので、別のアプローチをすぐに試しました。
2. 画像処理技術で直接検出する
地上天気図を特徴以下のように解決すればプログラムを1から書いても検出できるのではと思いました。
- 数字の大きさは一定 → 検出のパラメータが決めやすい
- 線の太さは一定 → 数字以外の線が細いので、細い線の収縮を行なって絞る
- 角度はランダム(水平でない場合が多く、複数あっても一定ではない) → エッジの検出を行う
- 数字の桁数は4桁、もしくは3桁である → 数字を1ずつ認識して密集しているところでグループ化
上記の解決法を実装したプログラムが以下になります。
def group_centers(centers, threshold):
    distances = cdist(centers, centers, 'euclidean')
    connected = distances <= threshold
    np.fill_diagonal(connected, 0)
    num_components, component_list = connected_components(csr_matrix(connected))
    groups = [[] for _ in range(num_components)]
    for i, component in enumerate(component_list):
        groups[component].append(centers[i])

    return [group for group in groups if len(group) > 1]

def draw_enclosing_circles(image, groups):
    for group in groups:
        (x, y), radius = cv2.minEnclosingCircle(np.array(group))
        cv2.circle(image, (int(x), int(y)), int(radius), (0, 0, 255), 2)
    return image

def detect_edges(image):
    return cv2.Canny(image, 100, 200)

def find_contours(edges):
    contours, hierarchy = cv2.findContours(edges, cv2.RETR_TREE, cv2.CHAIN_APPROX_SIMPLE)
    return contours, hierarchy[0]

def filter_contours_for_numbers(contours, hierarchy, image, area_min, area_max, solidity_min, aspect_ratio_min, aspect_ratio_max):
    number_contours = []
    for i, contour in enumerate(contours):
        if hierarchy[i][3] != -1:
            continue
        area = cv2.contourArea(contour)
        if area < area_min or area > area_max:
            continue
        hull = cv2.convexHull(contour)
        hull_area = cv2.contourArea(hull)
        if hull_area == 0:
            continue
        solidity = area / float(hull_area)
        if solidity < solidity_min:
            continue
        x, y, w, h = cv2.boundingRect(contour)
        aspect_ratio = float(w) / h
        if aspect_ratio < aspect_ratio_min or aspect_ratio > aspect_ratio_max:
            continue
        number_contours.append(contour)
    return number_contours

def draw_circles(original_image, image, contours):
    centers = []
    for contour in contours:
        M = cv2.moments(contour)
        if M["m00"] != 0:
            cX = int(M["m10"] / M["m00"])
            cY = int(M["m01"] / M["m00"])
            centers.append((cX, cY))

    if centers:
        overlapping_groups = group_centers(centers, threshold=50)
        if overlapping_groups:
            original_image = draw_enclosing_circles(original_image, overlapping_groups)
    return original_image

def load_image(image_path):
    return cv2.imread(image_path)

def preprocess_image_for_thick_lines(image):
    gray_image = cv2.cvtColor(image, cv2.COLOR_BGR2GRAY)
    blurred = cv2.GaussianBlur(gray_image, (5, 5), 0)
    _, thresh = cv2.threshold(blurred, 0, 255, cv2.THRESH_BINARY_INV + cv2.THRESH_OTSU)
    kernel = cv2.getStructuringElement(cv2.MORPH_RECT, (2, 2))
    dilated = cv2.dilate(thresh, kernel, iterations=1)
    eroded = cv2.erode(dilated, kernel, iterations=1)
    return eroded

def process_images_with_params(drive_path, save_path, area_min, area_max, solidity_min, aspect_ratio_min, aspect_ratio_max):
    for filename in os.listdir(drive_path):
        if filename.lower().endswith(('.png', '.jpg', '.jpeg')):
            image_path = os.path.join(drive_path, filename)
            original_image = load_image(image_path)
            preprocessed_image = preprocess_image_for_thick_lines(original_image)
            edges = detect_edges(preprocessed_image)
            contours, hierarchy = find_contours(edges)
            number_contours = filter_contours_for_numbers(contours, hierarchy, preprocessed_image, area_min, area_max, solidity_min, aspect_ratio_min, aspect_ratio_max)
            marked_image = draw_circles(original_image, preprocessed_image, number_contours)
            params_str = f"{area_min}_{area_max}_{solidity_min}_{aspect_ratio_min}_{aspect_ratio_max}"
            save_image_path = os.path.join(save_path, f"marked_{params_str}_{filename}")
            print(f"Image: {filename} with params {params_str}")
            cv2_imshow(marked_image)
            cv2.imwrite(save_image_path, marked_image)
            print(f"Processed with params {params_str} and saved: {save_image_path}")

if __name__ == "__main__":
    area_mins = [80]
    area_maxs = [500]
    solidity_mins = [0.1]
    aspect_ratio_mins = [0.1]
    aspect_ratio_maxs = [1.0]

    for area_min in area_mins:
        for area_max in area_maxs:
            for solidity_min in solidity_mins:
                for aspect_ratio_min in aspect_ratio_mins:
                    for aspect_ratio_max in aspect_ratio_maxs:
                        process_images_with_params(drive_path, save_path, area_min, area_max, solidity_min, aspect_ratio_min, aspect_ratio_max)
3. easyOCRを使用する
reader = easyocr.Reader(['en'], gpu=True)
for image_file in Path(drive_path).glob('*.png'):
    print(f"Processing image: {image_file.name}")
    image = cv2.imread(str(image_file))
    results = reader.readtext(image, allowlist='0123456789')
    for (bbox, text, prob) in results:
        if len(text) >= 3:
            top_left = (int(bbox[0][0]), int(bbox[0][1]))
            bottom_right = (int(bbox[2][0]), int(bbox[2][1]))
            position = f"Top left: {top_left}, Bottom right: {bottom_right}"
            print(f"Detected text: {text}, Confidence: {prob:.4f}, Position: {position}")
            margin = 3
            top_left_margin = (top_left[0] - margin, top_left[1] - margin)
            bottom_right_margin = (bottom_right[0] + margin, bottom_right[1] + margin)
            image = cv2.rectangle(image, top_left_margin, bottom_right_margin, (0, 255, 0), 2)

    save_image_path = os.path.join(save_path, image_file.name)
    cv2.imwrite(save_image_path, image)
    cv2_imshow(image)
    print("\n")
今後の課題
けっか
自分は画像処理技術や検出技術は初めて本格的に触るので、知見を深めたいです!
追記
よかったら他の記事も見てみてくださいね!
Discussion