Android:ML Kitをつかって顔検出を行うインタフェースをつくる
はじめに
Retail AI Adventurers Advent Calendar 2023の23日目の投稿です。
昨日は@k-yoshigaiの「Goゴルーチンの実例探し」でした。
本題
Googleが提供しているモバイルデベロッパー向けの機械学習ライブラリ「MLkit」をつかうことがありました。MLkitをつかうと、
- テキスト認識
- バーコードスキャン
- 顔検出
など、様々なことができます。
こちらをつかって、下記のようにある領域内で顔があるとき処理を行うインターフェースを作ってみました。
ソースコード
実装について
MLkitの導入
導入方法は公式ドキュメントが参考になります。
カメラの起動・プレビューの表示
かいつまんで重要なところを説明します。
MainActivityがonCreateされたとき、カメラを起動し、プレビューを表示させます。
該当コードの抜粋
    override fun onCreate(savedInstanceState: Bundle?) {
        /* ...省略... */

        // カメラ起動、画面に表示
        bindCameraUseCases(this, binding.previewViewFaceDetection.surfaceProvider, this)

	/* ...省略... */
    }
    private fun bindCameraUseCases(context: Context, surfaceProvider: Preview.SurfaceProvider, lifecycleOwner: LifecycleOwner){
        // スレッドを生成
        val cameraExecutors = Executors.newSingleThreadExecutor()
        val cameraProviderFuture = ProcessCameraProvider.getInstance(context)
        val cameraProvider = cameraProviderFuture.get()
        val previewUseCase = Preview.Builder()
            .build()
            .also {
                it.setSurfaceProvider(surfaceProvider)
            }
        val imageCapture = ImageCapture.Builder()
            .setCaptureMode(ImageCapture.CAPTURE_MODE_MINIMIZE_LATENCY)
            .build()

	// 背面カメラの場合
        // val cameraSelector = CameraSelector.DEFAULT_BACK_CAMERA
	// 全面カメラの場合
        val cameraSelector = CameraSelector.DEFAULT_FRONT_CAMERA

        cameraProviderFuture.addListener({
            try {
                faceDetector = FaceDetection.getClient()
                val analysisUseCase = ImageAnalysis.Builder().build()
                analysisUseCase.setAnalyzer(cameraExecutors)
                { imageProxy ->
                    processImageProxy(faceDetector, imageProxy)
                }

                cameraProvider.bindToLifecycle(
                    lifecycleOwner,
                    cameraSelector,
                    previewUseCase,
                    imageCapture,
                    analysisUseCase)

            } catch (illegalStateException: IllegalStateException) {
                Log.e(TAG, illegalStateException.message.orEmpty())
            } catch (illegalArgumentException: IllegalArgumentException) {
                Log.e(TAG, illegalArgumentException.message.orEmpty())
            }

        }, ContextCompat.getMainExecutor(context))
    }
<!-- 省略 -->
<androidx.camera.view.PreviewView
  android:id="@+id/previewViewFaceDetection"
  android:layout_width="match_parent"
  android:layout_height="match_parent" />
<!-- 省略 -->
cameraProviderFuture.addListenerでProcessCameraProvider(カメラのライフサイクルを管理、カメラの使用を開始・停止を行う)が利用可能になったときのリスナーを設定します。さらに、analysisUseCase.setAnalyzerで分析アナライザーを設定し画像を処理するためprocessImageProxy関数に画像フレームを渡します。このとき、今回は顔検出を行うため、ML Kitの顔検出クライアントも渡します。そして、cameraProvider.bindToLifecycleで、カメラの使用ケース(プレビュー、画像キャプチャ、画像分析)をバインドします。
/* 省略 */
// スレッドを生成
val cameraExecutors = Executors.newSingleThreadExecutor()
// ML Kitの顔検出クライアント
faceDetector = FaceDetection.getClient()
/* 省略 */
analysisUseCase.setAnalyzer(cameraExecutors)
{ imageProxy -> processImageProxy(faceDetector, imageProxy) }
cameraProvider.bindToLifecycle(
  lifecycleOwner,
   cameraSelector,
   previewUseCase,
   imageCapture,
   analysisUseCase)
/* 省略 */
顔検出されたときの処理
さきほどの分析アナライザーで指定されたprocessImageProxy関数について説明します。
該当コードの抜粋(processImageProxy関数)
    private fun processImageProxy(faceDetector: FaceDetector, imageProxy: ImageProxy, ) {
        imageProxy.image?.let { image ->
            val inputImage =
                InputImage.fromMediaImage(
                    image,
                    imageProxy.imageInfo.rotationDegrees
                )

            faceDetector.process(inputImage)
                .addOnSuccessListener { faces ->
                    // 1つ前に描画された顔領域フレームを削除
                    binding.FaceDetectionLayout.removeView(previousDetectedFaceFrame)

                    for(face in faces){
                        val previewWidth = binding.previewViewFaceDetection.width
                        val previewHeight = binding.previewViewFaceDetection.height
                        // 顔の検出領域の微修正
                        val convertRect = convertRectArea(face.boundingBox, previewWidth.toFloat(), previewHeight.toFloat())
                        val currentDetectedFaceFrame = DetectionArea(this, convertRect, previewWidth.toFloat(), previewHeight.toFloat())
                        binding.FaceDetectionLayout.addView(currentDetectedFaceFrame)
                        previousDetectedFaceFrame = currentDetectedFaceFrame

                        // エリア内にいるか判定
                        val areaBoolean = isRectContaining(convertRect , RectF(510.0F, 94.0F, 1410.0F, 994.0F))
                        if (areaBoolean){
                            if(!isFaceInsideRegion){
                                binding.FaceDetectionLayout.removeView(faceDetectionFrame)
                                faceDetectionFrame = GenerateFrame(this, "put your face in the frame", 450F, 450F, 255, 0, 0) //文字色変更
                                binding.FaceDetectionLayout.addView(faceDetectionFrame)
                                // カウントダウン
                                countDown()
                            }
                        }else{
                            binding.FaceDetectionLayout.removeView(faceDetectionFrame)
                            faceDetectionFrame = GenerateFrame(this, "put your face in the frame", 450F, 450F, 255, 255, 255) //文字色変更
                            binding.FaceDetectionLayout.addView(faceDetectionFrame)
                            binding.textCountDown.text = ""
                            // カウントダウンをキャンセル
                            cancelCountDown()
                        }

                    }
                }
                .addOnFailureListener {
                    Log.e(TAG, it.message.orEmpty())
                }.addOnCompleteListener {
                    imageProxy.image?.close()
                    imageProxy.close()
                }
        }
    }
imageProxy.image?.let { image -> /* 省略 */ } でカメラからの画像フレームを取得し、inputImageオブジェクトに変換し、faceDetector.process(inputImage)に渡して、ML Kitの顔検出機能で画像内の顔を検出します。
検出に成功した場合、addOnSuccessListener { faces -> /* 省略 */ }内で下記の処理を行っています。
- 以前に描画された顔領域フレーム(※顔検出時、顔領域に表示される白い枠)を削除
- 新しい顔領域フレームを作成しレイアウトに追加
- 顔が特定の領域内にあるかどうかを判定
a. 顔が特定のエリア内にある場合:カウントダウンを開始
b. 顔が特定のエリア内にない場合:カウントダウンをキャンセル
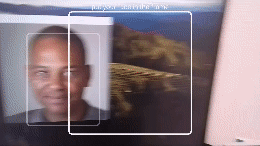
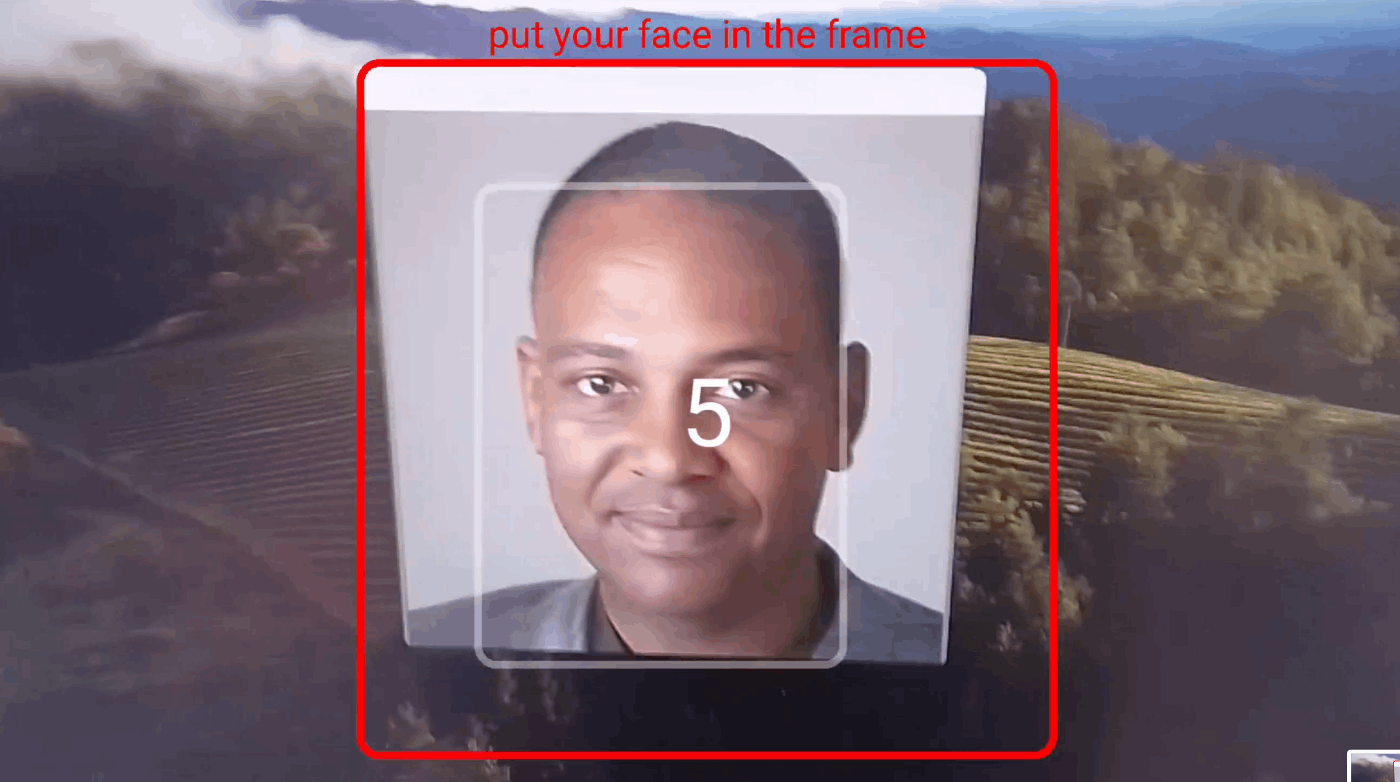 検出領域内に顔が存在する時のインターフェース例
検出領域内に顔領域が含まれているかどうかの判定はisRectContaining関数で下記ように行っています。kotlinのcontainsメソッド便利ですね。
    private fun isRectContaining(faceRect: RectF, targetRect: RectF):Boolean{
        return targetRect.contains(faceRect)
    }
カウントダウンの処理
今回のサンプルではカウントダウン終了後、インターフェースの表示が変わるだけです。
写真を撮るといったカウントダウン後の処理を記述するには、coutDown関数内のfinally { /* 省略 */ }内に記述すると良いです。
該当コードの抜粋(countDown関数)
    private fun countDown(){
        isFaceInsideRegion = true
        val scope = CoroutineScope(Dispatchers.Default)
        val handler = Handler(Looper.getMainLooper())
        job = scope.launch {
            try {
                handler.post(
                    kotlinx.coroutines.Runnable { binding.textCountDown.text = countdownTime.toString() }
                )
                repeat(countdownTime) { i ->
                    delay(1000L)
                    val times = i+1
                    handler.post(
                        kotlinx.coroutines.Runnable { binding.textCountDown.text = (countdownTime - times).toString() }
                    )
                }
            } finally {
                if(job.isActive){
		    // カウントダウン後の処理を記述
                    isFaceInsideRegion = false
                    handler.post(
                        kotlinx.coroutines.Runnable {
                            binding.textCountDown.text = "Face is detected ...!"
                            binding.FaceDetectionLayout.removeView(faceDetectionFrame)
                            binding.FaceDetectionLayout.removeView(previousDetectedFaceFrame)
                        }
                    )
                    stopPreview()
                    scope.cancel()
                }else{
                    isFaceInsideRegion = false
                }
            }
        }
    }
おわりに
ML Kitをつかって顔検出を行い、カウントダウンを行うインターフェースをつくってみました。
ML kitをつかうとかなりお手軽にできますね。今回紹介したサンプルコードでは、顔領域フレームやレイアウト更新の処理は似た処理が続いているので整理するとシンプルな記述になるでしょう。
では、明日は @daisuke-yamamotoさんの記事になります。ぜひご覧ください!
Discussion