[Kuberntes] 汎用OAuth2 Proxyをサービスの手前に置く:準備編
やりたいこと
サービス毎に認証の設定をするんじゃなくて、手前のReverse Proxyレイヤーで一元管理することで、認証の設定をテナント側から隠しつつ運用コストを減らしたい。
前提条件
自分たちはKubernetesのSystem Adminで、複数のテナントが1つのKubernetes Clusterを共用で使ういわゆるマルチテナント方式でサービスを提供している。
別にJenkins等のDocker imageを各テナントが自分でデプロイしても良いが、なるべくテナント側の構築/運用コストを減らしたい。マネージャー曰く「アプリエンジニアには、アプリの開発に専念してもらいたい。」
わかります。。
ひとまず、手元のMacbookで検証中。
本日のゴール
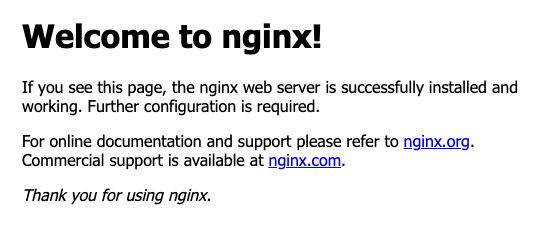
ブラウザからテスト用にあげたNginxのトップページが見える。
認証はまだ無しです。
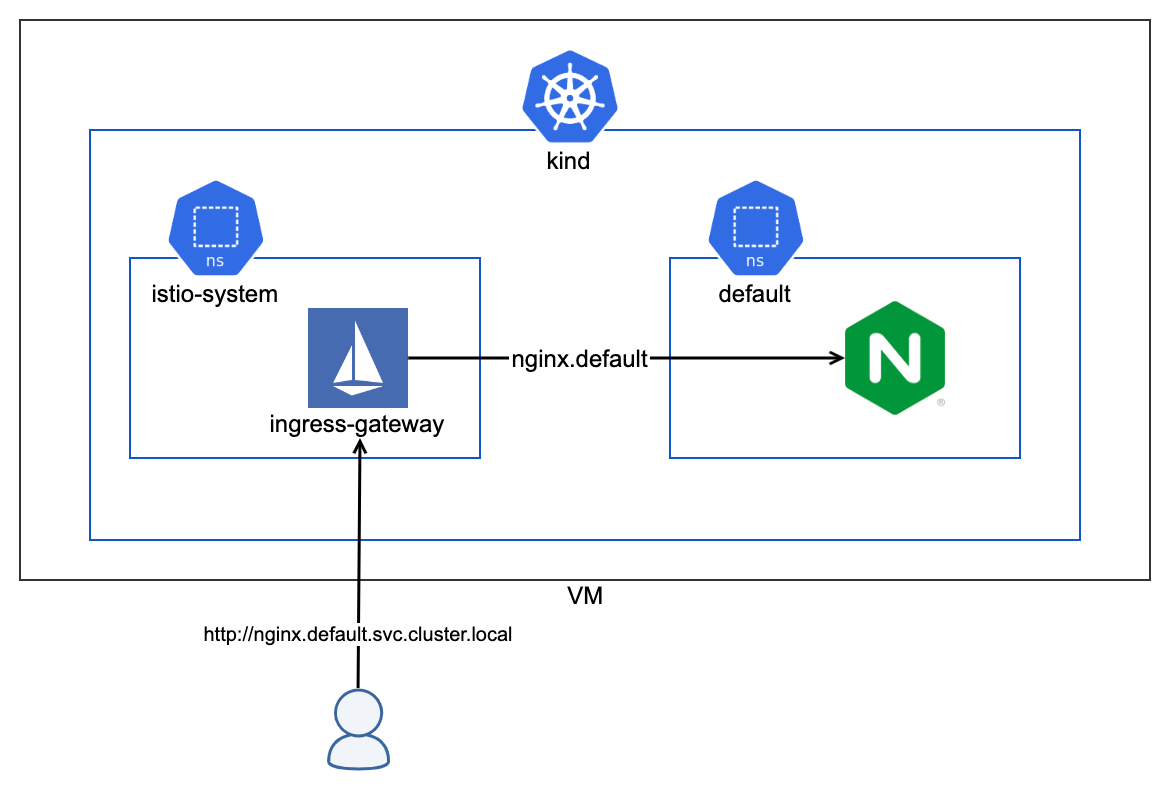
システムアーキテクチャ図
ローカル環境構築
Tools
lima
Exampleを参考にDocker環境を構築。
なお、docker CLI Toolは別途インストールしておいて下さい。
おそらく、メモリー不足になるので
メモリーを増やせる範囲で増やしておきましょう。
# default mem size is 4GiB
memory: 8GiB
Docker用のVM作成
$ limactl start ./docker.yaml
$ export DOCKER_HOST=$(limactl list docker --format 'unix://{{.Dir}}/sock/docker.sock')
kind
ブラウザから動作確認したいので http://localhost でアクセスしたら、kindのnodePort: 30080にマップする。このポートは後ほどIstio Ingress GatewayのnodePortにもマップする。
localhost:80 -> kind host:30080 -> Istio Ingress Gateway
Configrationを参考に、設定ファイルを作って、k8sクラスタ作成時にconfigとして指定する。
kind: Cluster
apiVersion: kind.x-k8s.io/v1alpha4
nodes:
- role: control-plane
  extraPortMappings:
  - containerPort: 30080
    hostPort: 80
    protocol: TCP
networking:
  # WARNING: It is _strongly_ recommended that you keep this the default
  # (127.0.0.1) for security reasons. However it is possible to change this.
  apiServerAddress: "0.0.0.0"
$ kind create cluster --config /path/to/config.yaml
Istio
Ingress Gatewayの設定
公式の手順に沿って、istioctl installまで進める。
$ istioctl install --set profile=demo -y
Ingress GatewayのnodePortを変更する。
$ kubectl get svc -n istio-system istio-ingressgateway -o yaml > ingress-gateway.yaml
  - name: http2
    nodePort: 30080 # Change this port to 30080
    port: 80
    protocol: TCP
    targetPort: 8080
$ kubectl apply -f ingress-gateway.yaml
Gateway作る
---
apiVersion: networking.istio.io/v1alpha3
kind: Gateway
metadata:
  name: default-gateway
  namespace: default
spec:
  selector:
    istio: ingressgateway # use istio default controller
  servers:
  - port:
      number: 80
      name: http
      protocol: HTTP
    hosts:
    - nginx.default.svc.macbook.local
確認用にNginxをデプロイしてみる
apiVersion: apps/v1
kind: Deployment
metadata:
  labels:
    app: nginx
  name: nginx
  namespace: default
spec:
  replicas: 1
  selector:
    matchLabels:
      app: nginx
  template:
    metadata:
      labels:
        app: nginx
    spec:
      containers:
      - image: nginxinc/nginx-unprivileged:1.20-alpine
        name: nginx
---
apiVersion: v1
kind: Service
metadata:
  labels:
    app: nginx
  name: nginx
  namespace: default
spec:
  ports:
  - name: http
    port: 80
    protocol: TCP
    targetPort: 8080
  selector:
    app: nginx
  type: ClusterIP
---
apiVersion: networking.istio.io/v1alpha3
kind: VirtualService
metadata:
  name: nginx
  namespace: default
spec:
  hosts:
  - nginx.default.svc.macbook.local
  gateways:
  - default-gateway
  http:
  - route:
    - destination:
        host: nginx
        port:
          number: 80
localhostでアクセスしても良いですが、後でDomain Virtualで複数のサービスを分けたいので、ローカルマシンのhostファイルにNginxのドメインを登録する。ちなみに、VirtualServiceに登録したHost名と整合性が取れていれば何でも良いです。
127.0.0.1 nginx.default.svc.macbook.local
ブラウザでアクセスできるか確認
http://nginx.default.svc.macbook.local
設定が全て完了していれば、Nginxのトップページが見えるはずです。
トラブルシューティング
名前解決ができていない場合は、hostファイル
名前解決はできているけど繋がらない場合は、kindもしくはIstio Ingress GatewayのnodePortの設定
404 Not Foundが返ってくる場合は、Istioに設定したHost名とブラウザに入力したHost名がマッチしているか
500系のエラーが返ってくる場合は、Nginx Podが正しく起動しているか
それぞれ確認してみてください。
Discussion