ゼロから始めるPythonとIfcOpenShellでのBIM/3D建築モデル作成入門 建築編 🏗️
こんにちは。竹本です。
プログラミングで3Dの建物モデルを作ってみたいと考えたことはありませんか?IfcOpenShellというライブラリを使うことで、Pythonで3D建物モデルを作成することが可能です。
IfcOpenShellは非常に強力なライブラリですが、ドキュメントが少なく、特に日本語の情報は限られています。この記事では、何もない状態からIFCファイルを作成し、床、壁、ドア、窓のある簡単な建物を構築するまでの一連の流れを解説します。
対象読者
- プログラミングで建築モデルを作ってみたい方
- IfcOpenShellやBIMの初学者
- Pythonの基本的な文法を理解している方
1. BIMとIFC、IfcOpenShellってなに?
まずは、今回登場する主要なキーワードを簡単に説明します。
-
BIM (Building Information Modeling)
- コンピュータ上に建物の3Dモデルを作成し、コストや仕上げ、部材の仕様といった様々な「情報」を統合して活用する仕組みのことです。単なる3Dモデルではなく、情報の塊(データベース)として建物を扱うのが特徴です。
-
IFC (Industry Foundation Classes)
- BIMデータを異なるソフトウェア間で交換・共有するために定められた、国際標準のファイルフォーマットです。
.ifcという拡張子が付きます。建築界のPDFのようなものだとイメージしてください。
- BIMデータを異なるソフトウェア間で交換・共有するために定められた、国際標準のファイルフォーマットです。
-
IfcOpenShell
- このIFCファイルをPythonで自由に読み書き、作成、編集できるようにするためのオープンソースライブラリです。IfcOpenShellを使えば、プログラムでBIMデータを自動生成したり、特定の情報を抽出したりといったことが可能になります。
-
エンティティ (Entity)
- エンティティはPythonでいうところのclassです。例えば、
IfcWall(壁)、IfcDoor(ドア)、IfcProject(プロジェクト情報)など、具体的な部材から抽象的な概念まで、すべてがエンティティとして定義されます。この記事では、このエンティティをプログラムで一つずつ作成していくことになります。
- エンティティはPythonでいうところのclassです。例えば、
2. IFCのエンティティ作成の基本
IfcOpenShellを使いこなす上で非常に重要なポイントが2つあります。これを知っているだけで、楽に開発を進められるようになると思います。私はこのことに気がつくまでかなり四苦八苦しました……
IFCの仕様に困ったらbuildingSMARTのサイトを確認しよう
IFCのルール(どのエンティティにどんな情報を、どういう構造で持たせるか)は、buildingSMART という団体が定めているようです。IfcOpenShellは、この仕様に沿ってIFCファイルを操作するツールに過ぎません。
そのため、「このエンティティの作り方が分からない」とIfcOpenShellのドキュメントで悩むよりも、buildingSMARTの公式ドキュメントを見た方が、はるかに早く正確な情報にたどり着けます。

buildingSMARTのサイトでは、各エンティティの属性や関係性が図で分かりやすく解説されています。
関係図を見てもかなり複雑ですが、あるだけでも理解度がかなり違うと思います(^_^;)
create_entityメソッドを使いこなす
IfcOpenShellでIFCの要素(エンティティ)を作成する基本的なメソッドは ifcopenshell.file.create_entity() です。
このメソッドの素晴らしい点は、buildingSMARTの仕様通りであれば、どんなエンティティでも作成できることです。引数の渡し方も柔軟で、仕様書に書かれている引数名をそのままキーワード引数として渡すことができます。
例えば、IfcWall という壁のエンティティを作成したい場合、buildingSMARTの仕様書で定められた引数を調べるだけで、以下のように作成することができます。
# buildingSMARTの仕様に合わせて引数を指定
wall = ifc_file.create_entity(
    "IfcWall", # 第一引数がエンティティ名
    GlobalId=create_guid(),
    OwnerHistory=owner_history,
    Name="サンプル壁",
    # ... その他の引数
)
この2点を押さえておけば、未知のエンティティでも恐れることなく作成にチャレンジできます٩(๑❛ᴗ❛๑)۶
3. ゼロから建物を建てる
それでは、実際に何もない状態からIFCファイルを作成し、簡単な建物を構築していきましょう。
まずはIfcOpenShellをインストールしましょう!
pip install ifcopenshell
3.1. プロジェクトの骨格を作る (IfcProject, IfcBuilding)
まず、IFCファイルの「器」となるプロジェクト情報や建物情報、座標系を定義します。これは、どんなモデルを作る上でも必須の準備運動です。
-
IfcProject: プロジェクト全体を定義します。プロジェクト名などを入れます。 -
IfcBuilding: 建物を定義します。 -
IfcBuildingStorey: 建物の階層(1階、2階など)を定義します。 -
IfcGeometricRepresentationContext/SubContext: 3Dモデルの座標系や表現方法(モデルビュー、プランビューなど)を定義します。
建物の各階の原点をIfcLocalPlacementを使って定義します。IfcLocalPlacementを定義するために複数のエンティティを用いる必要があるため、以下のcreate_local_placement関数を使います。
create_local_placement関数
import ifcopenshell

def create_local_placement(
    ifc_file:ifcopenshell.file,
    rel_to:ifcopenshell.entity_instance|None=None,
    origin:list[float]=[0.,0.,0.]):
    """相対座標系を作成する"""

    # 原点の作成
    location = ifc_file.create_entity(
        'IfcCartesianPoint',
        Coordinates=origin
    )

    # 3D座標系の作成
    relative_placement = ifc_file.create_entity(
        'IfcAxis2Placement3D',
        Location=location,
    )

    # 相対座標系の作成
    local_placement = ifc_file.create_entity(
        'IfcLocalPlacement',
        PlacementRelTo=rel_to,
        RelativePlacement=relative_placement
    )

    return local_placement
エンティティを一つずつ作成し、IfcRelAggregates という関係性を定義するエンティティを使って、プロジェクト→建物→階層といった親子関係を紐付けていきます。IfcOpenShellではifcopenshell.api.aggregate.assign_object関数でこの関連付けができます。(もちろんcreate_entityメソッドで作成することも可能です)
import ifcopenshell
import ifcopenshell.api
import ifcopenshell.api.aggregate
import ifcopenshell.api.context
import ifcopenshell.api.unit

# 建築物の情報を書き込む初期ファイルの作成
ifc_file = ifcopenshell.file(schema='IFC4')

# プロジェクトの作成
project = ifc_file.create_entity('IfcProject', Name='SampleProject')

# コンテキストの作成
context = ifcopenshell.api.context.add_context(
    file=ifc_file,
    context_type='Model',
)

# サブコンテキストの作成
body = ifcopenshell.api.context.add_context(
    file=ifc_file,
    context_type='Model',
    context_identifier='Body',
    target_view='MODEL_VIEW',
    parent=context
)

# 長さの単位を定義
# SI単位の長さで接頭辞がミリ指定なので、
# ここでは長さの単位をミリメートルと定義している
length_unit = ifcopenshell.api.unit.add_si_unit(
    file=ifc_file,
    unit_type="LENGTHUNIT",
    prefix="MILLI"
)

# 定義した単位IfcUnitAssignmentに割り当てる
ifcopenshell.api.unit.assign_unit(
    file=ifc_file,
    units= [length_unit]
)

# 建物の作成
building = ifc_file.create_entity('IfcBuilding', Name='SampleBuilding')

# 階の作成
storey_1 = ifc_file.create_entity(
    'IfcBuildingStorey',
    Name='SampleStorey1',
    ObjectPlacement=create_local_placement(
        ifc_file=ifc_file,
        rel_to=None,
        origin=[0.,0.,0.]
    ),
    Elevation=0.
)
storey_2 = ifc_file.create_entity(
    'IfcBuildingStorey',
    Name='SampleStorey2',
    ObjectPlacement=create_local_placement(
        ifc_file=ifc_file,
        rel_to=None,
        origin=[0.,0.,3000.]
    ),
    Elevation=3000.
)

# プロジェクト->建物->階で関連付け
ifcopenshell.api.aggregate.assign_object(
    file=ifc_file,
    products=[building],
    relating_object=project
)
ifcopenshell.api.aggregate.assign_object(
    file=ifc_file,
    products=[storey_1, storey_2],
    relating_object=building
)
3.2. 床を作る (IfcSlab)
次に、建物の基礎となる床(スラブ)を作成します。
3D形状の作成方法は色々ありますが、今回は、2Dの輪郭(Profile)を定義し、それを特定の厚みで押し出す(Extrusion)ことで表現します。こちらも形状を作成するために様々なエンティティが必要なため、以下のcreate_swept_solid_representation関数にまとめます。
create_swept_solid_representation関数
import ifcopenshell.util.shape_builder

def create_swept_solid_representation(
    ifc_file:ifcopenshell.file,
    body:ifcopenshell.entity_instance,
    outer_curve:list[tuple[float,float]],
    inner_curves:list[list[tuple[float, float]]],
    depth:float
):
    """押し出し形状のIfcShapeRepresentationを作成する"""
    builder = ifcopenshell.util.shape_builder.ShapeBuilder(ifc_file)

    # 輪郭をIfcIndexedPolyCurveで作成
    _outer_curve = builder.polyline(points=outer_curve, closed=True)

    # 内側の穴をIfcIndexedPolyCurveで作成
    _inner_curves = [
        builder.polyline(points=inner_curve, closed=True)
        for inner_curve in inner_curves
    ]

    # 平面の形状を作成
    profile=builder.profile(
        outer_curve=_outer_curve,
        inner_curves=_inner_curves,
        profile_type='AREA'
    )

    # 押し出し用の方向ベクトルを作成
    direction = ifc_file.create_entity(
        'IfcDirection',
        DirectionRatios=[0.,0.,1.]
    )

    # 押し出し形状を作成
    solid = ifc_file.create_entity(
        'IfcExtrudedAreaSolid',
        SweptArea=profile,
        ExtrudedDirection=direction,
        Depth=depth,
    )

    # 押し出し形状を持つIfcShapeRepresentationを作成
    representation = ifc_file.create_entity(
        'IfcShapeRepresentation',
        ContextOfItems=body,
        Items=[solid],
        RepresentationIdentifier=body.ContextIdentifier,
        RepresentationType="SweptSolid",
    )

    return representation
それでは1階に床を作成してみましょう٩( 'ω' )و
import ifcopenshell.api.geometry
import ifcopenshell.api.spatial

# 床を作成
slab_1 = ifc_file.create_entity(
    'IfcSlab',
    Name='SampleSlab',
    # 1階の座標系を参照する
    ObjectPlacement=storey_1.ObjectPlacement
)

# 床の形状を定義
floor_representation = create_swept_solid_representation(
    ifc_file=ifc_file,
    body=body,
    outer_curve=[(0.,0.),(0.,10000.),(10000.,10000.),(10000.,0.)],
    inner_curves=[],
    depth=500.
)

# 床に形状を割り当てる
ifcopenshell.api.geometry.assign_representation(
    file=ifc_file,
    product=slab_1,
    representation=floor_representation
)

# 1階に床を割り当て(これがないと床が表示されません)
ifcopenshell.api.spatial.assign_container(
    file=ifc_file,
    products=[slab_1],
    relating_structure=storey_1
)
IFCファイルを出力するにはifcopenshell.file.write関数を使います。可視化してみましょう!
今回は描画のためにOpenIFCViewerというフリーソフトを使っています。
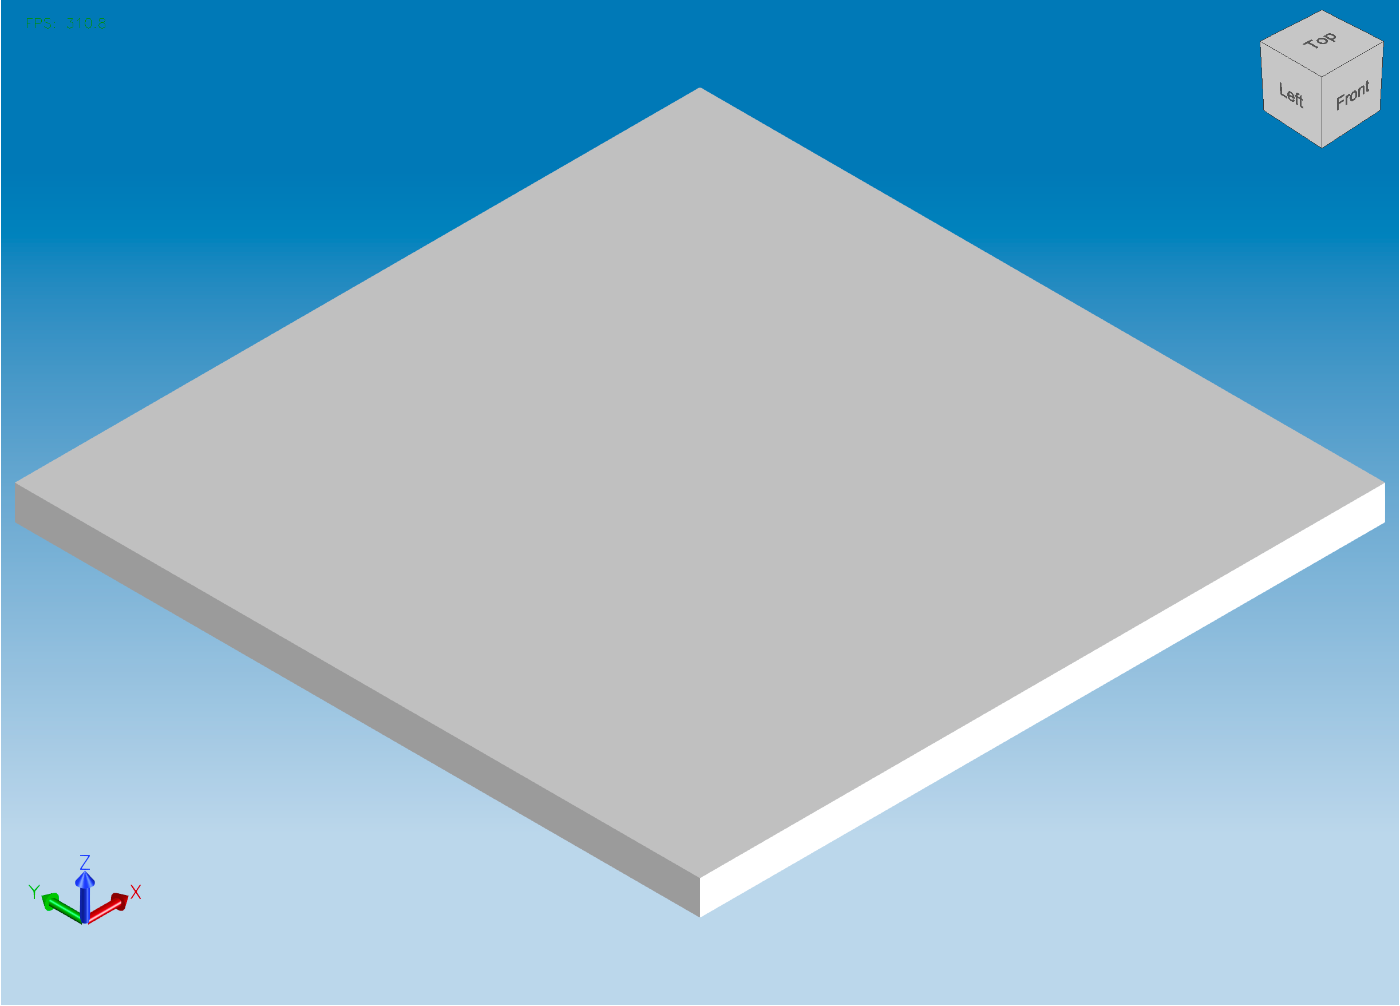
確かに床ができています。同じように2階の床を作成してみましょう。
2階の床作成
#床の作成
slab_2 = ifc_file.create_entity(
    'IfcSlab',
    Name='SampleSlab',
    ObjectPlacement=storey_2.ObjectPlacement
)

# 床に形状を割り当てる
ifcopenshell.api.geometry.assign_representation(
    file=ifc_file,
    product=slab_2,
    representation=floor_representation
)
# 2階に床を割り当てる
ifcopenshell.api.spatial.assign_container(
    file=ifc_file,
    products=[slab_2],
    relating_structure=storey_2
)

宙に浮いた床が作成できました٩( ᐛ )و
3.3. 壁を立てる (IfcWall)
床ができたら、次に壁を立てていきましょう。床と壁の作り方の違いは使うエンティティがIfcSlabからIfcWallに変わるだけで、実装はほぼ同じです。
壁作成コード
# 壁を作成
wall_1 = ifc_file.create_entity(
    'IfcWall',
    Name='SampleSlab',
    ObjectPlacement=create_local_placement(
        ifc_file=ifc_file,
        rel_to=storey_1.ObjectPlacement,
        origin=[0.,0.,500.,]
    )
)
wall_2 = ifc_file.create_entity(
    'IfcWall',
    Name='SampleSlab',
    ObjectPlacement=create_local_placement(
        ifc_file=ifc_file,
        rel_to=storey_2.ObjectPlacement,
        origin=[0.,0.,500.,]
    )
)

# 壁の形状を作成
wall_representation_1 = create_swept_solid_representation(
    ifc_file=ifc_file,
    body=body,
    outer_curve=[(0.,0.),(0.,10000.),(10000.,10000.),(10000.,0.)],
    inner_curves=[[(500.,500.),(500.,9500.),(9500.,9500.),(9500.,500.)]],
    depth=2500.
)
wall_representation_2 = create_swept_solid_representation(
    ifc_file=ifc_file,
    body=body,
    outer_curve=[(0.,0.),(0.,10000.),(10000.,10000.),(10000.,0.)],
    inner_curves=[[(500.,500.),(500.,9500.),(9500.,9500.),(9500.,500.)]],
    depth=2500.
)

# 壁に形状を割り当てる
ifcopenshell.api.geometry.assign_representation(
    file=ifc_file,
    product=wall_1,
    representation=wall_representation_1
)
ifcopenshell.api.geometry.assign_representation(
    file=ifc_file,
    product=wall_2,
    representation=wall_representation_2
)

# 1階に床、壁、ドアを割り当て
ifcopenshell.api.spatial.assign_container(
    file=ifc_file,
    products=[wall_1],
    relating_structure=storey_1
)

# 2階に床、壁、窓を割り当て
ifcopenshell.api.spatial.assign_container(
    file=ifc_file,
    products=[wall_2],
    relating_structure=storey_2
)
床の高さが500mm高いので、その分壁の原点の座標をcreate_local_placement関数を使って移動させています
wall_1 = ifc_file.create_entity(
    'IfcWall',
    Name='SampleSlab',
    ObjectPlacement=create_local_placement(
        ifc_file=ifc_file,
        rel_to=storey_1.ObjectPlacement,
        origin=[0.,0.,500.,]
    )
)
壁が作成できました!

3.4. 壁に開口を開ける (IfcOpeningElement)
壁ができたら、ドアや窓を取り付けるための「開口」を作成します。
開口は、壁に対して「この部分をくり抜く」という関係性(IfcRelVoidsElement)で定義します。
- 開口の3D形状を作成します。
-
IfcOpeningElementエンティティを作成し、1の形状情報を紐付けます。 -
IfcRelVoidsElementという関係エンティティを作成し、対象の壁(RelatingBuildingElement)と開口(RelatedOpeningElement)を紐付けます。
IfcRelVoidsElementの関連付けはifcopenshell.api.feature.add_feature関数でも可能です。
import ifcopenshell.api.feature

# 開口部を定義
opening_1 = ifc_file.create_entity(
    'IfcOpeningElement',
    ObjectPlacement=create_local_placement(
        ifc_file=ifc_file,
        rel_to=wall_1.ObjectPlacement,
        origin=[4500.,0.,0.]
    )
)

# 開口部の形状を定義
opening_representation = create_swept_solid_representation(
    ifc_file=ifc_file,
    body=body,
    outer_curve=[(0.,0.), (0., 500.),(1000., 500.), (1000., 0.)],
    inner_curves=[],
    depth=1500.
)

# 開口部に形状を割り当てる
ifcopenshell.api.geometry.assign_representation(
    file=ifc_file,
    product=opening_1,
    representation=opening_representation
)

# 壁1の形状に穴を開ける
ifcopenshell.api.feature.add_feature(
    file=ifc_file,
    feature=opening_1,
    element=wall_1
)
開口部を壁の真ん中に設置したいので、'create_local_placement`関数を使って原点を移動させています。
# 開口部を定義
opening_1 = ifc_file.create_entity(
    'IfcOpeningElement',
    ObjectPlacement=create_local_placement(
        ifc_file=ifc_file,
        rel_to=wall_1.ObjectPlacement,
        origin=[4500.,0.,0.]
    )
)
描画すると穴が空きましたd(^_^o)
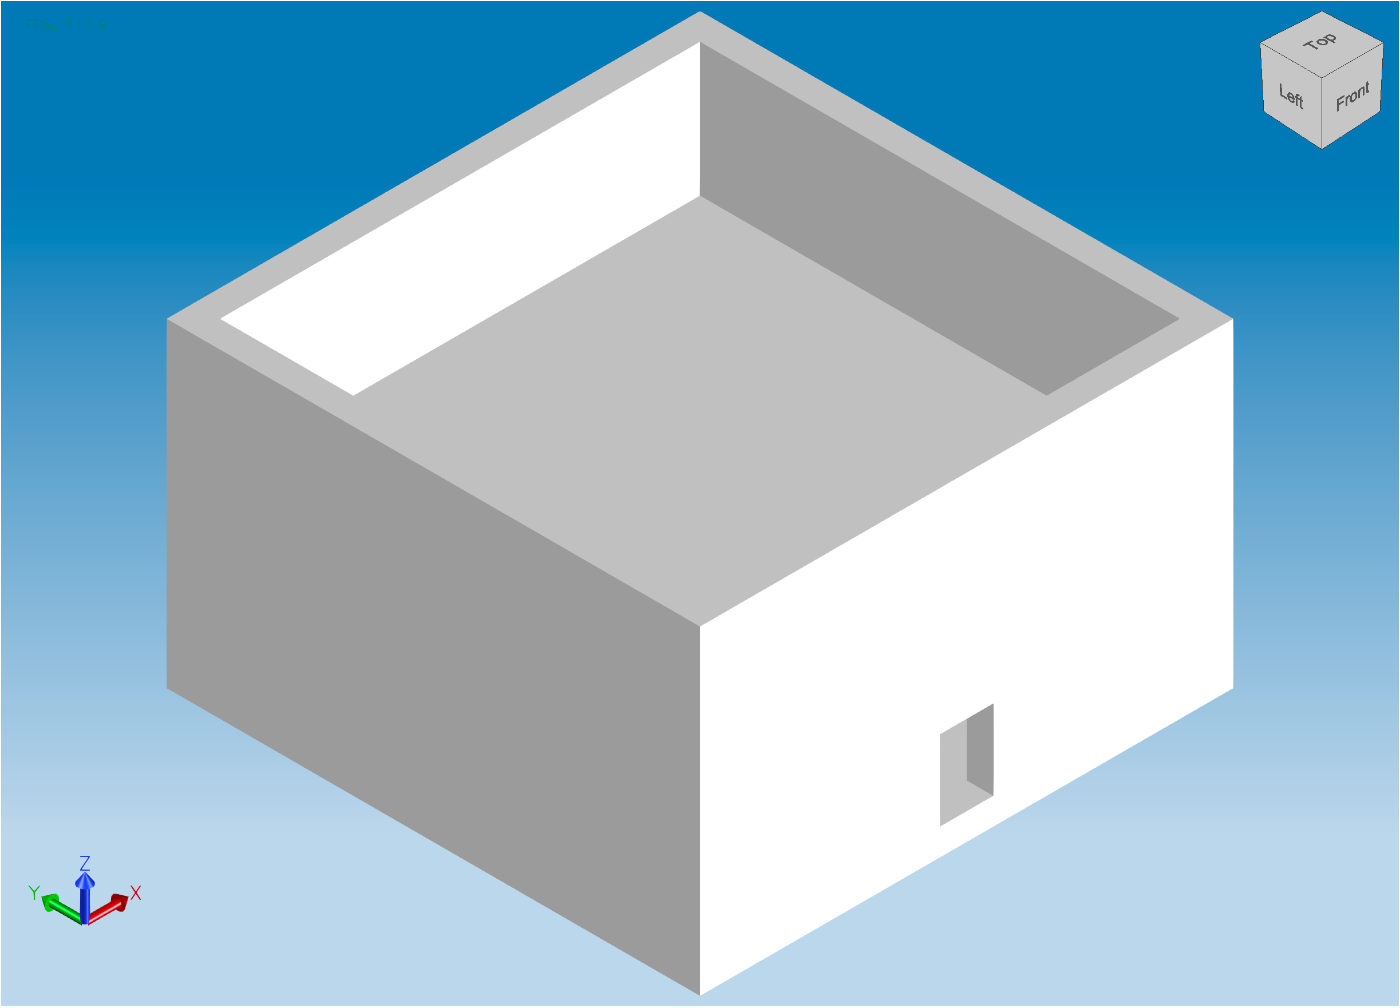
ついでに2階の壁にも穴を空けましょう!
2階の開口部作成コード
opening_2 = ifc_file.create_entity(
    'IfcOpeningElement',
    ObjectPlacement=create_local_placement(
        ifc_file=ifc_file,
        rel_to=wall_2.ObjectPlacement,
        origin=[4500.,0.,500.]
    )
)

# 開口部に形状を割り当てる
ifcopenshell.api.geometry.assign_representation(
    file=ifc_file,
    product=opening_2,
    representation=opening_representation
)

# 壁2の形状に穴を開ける
ifcopenshell.api.feature.add_feature(
    file=ifc_file,
    feature=opening_2,
    element=wall_2
)

3.5. 開口にドアを設置する (IfcDoor)
くり抜いた開口にドアをはめ込みます。
これは、開口とドアを「埋める・満たす」という関係性(IfcRelFillsElement)で定義します。
- ドアの3D形状を作成します。
-
IfcDoorエンティティを作成し、1の形状情報を紐付けます。 -
IfcRelFillsElementという関係エンティティを作成し、対象の開口(RelatingOpeningElement)とドア(RelatedBuildingElement)を紐付けます。
# ドアを定義
door = ifc_file.create_entity(
    'IfcDoor',
    Name='SampleWindow',
    ObjectPlacement=opening_1.ObjectPlacement
)

# ドアの形状を作成
door_representation = create_swept_solid_representation(
    ifc_file=ifc_file,
    body=body,
    outer_curve=[(0.,0.), (0., 200.),(1000., 200.), (1000., 0.)],
    inner_curves=[],
    depth=1500.
)

# ドアに形状を割り当てる
ifcopenshell.api.geometry.assign_representation(
    file=ifc_file,
    product=door,
    representation=door_representation
)

# ドアを開口部に割り当てる
ifcopenshell.api.feature.add_filling(
    file=ifc_file,
    opening=opening_1,
    element=door
)

# 1階に床、壁、ドアを割り当て
ifcopenshell.api.spatial.assign_container(
    file=ifc_file,
    products=[door],
    relating_structure=storey_1
)

ドアが設置できましたが、壁と色が同じで見にくいですね(~_~;)
ドアの形状に色をつけてみましょう。
形状に色をつけるにはIfcStyledItemを使って関連付けます。
import ifcopenshell.api.style

# ドア用のスタイルを作成
door_style = ifcopenshell.api.style.add_style(file=ifc_file)

# 表面のスタイルを割り当てる
ifcopenshell.api.style.add_surface_style(
    file=ifc_file,
    style=door_style,
    ifc_class='IfcSurfaceStyleShading',
    attributes={
        "SurfaceColour": {
            "Name":None,
            "Red":0.0,
            "Green":0.0,
            "Blue":0.0
        },
        "Transparency": 0
    }
)

# ドアの形状にスタイルを適用
ifcopenshell.api.style.assign_representation_styles(
    file=ifc_file,
    shape_representation=door_representation,
    styles=[door_style],
    replace_previous_same_type_style=True,
    should_use_presentation_style_assignment=False
)
真っ黒のかっこいいドアができました!
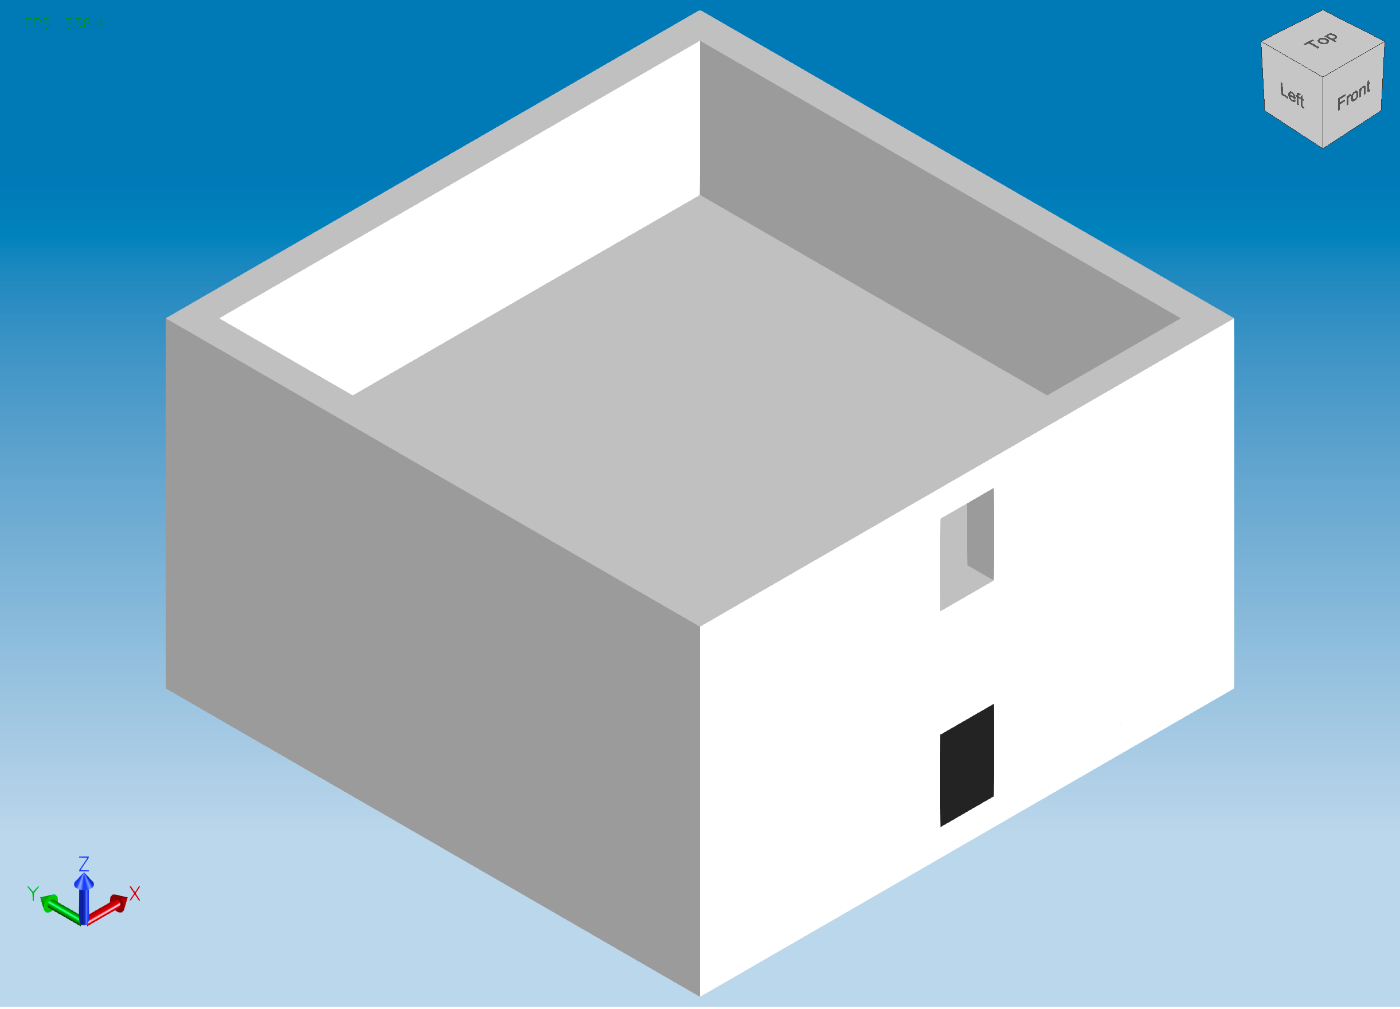
3.6. 開口に窓を設置する (IfcWindow)
最後に、開口部に窓を設置してみましょう。
実装はほとんどドアのときと同じになります。
# 窓を定義
window = ifc_file.create_entity(
    'IfcWindow',
    Name='SampleWindow',
    ObjectPlacement=opening_2.ObjectPlacement
)

# 窓に形状を割り当てる
ifcopenshell.api.geometry.assign_representation(
    file=ifc_file,
    product=window,
    representation=opening_representation
)

# 2階の開口部に窓を割り当てる
ifcopenshell.api.feature.add_filling(
    file=ifc_file,
    opening=opening_2,
    element=window
)

# 窓のスタイルを定義
window_style = ifcopenshell.api.style.add_style(file=ifc_file)
# 窓の表面のスタイルを定義
ifcopenshell.api.style.add_surface_style(
    file=ifc_file,
    style=window_style,
    ifc_class='IfcSurfaceStyleShading',
    attributes={
        "SurfaceColour": {
            "Name":None,
            "Red":0.0,
            "Green":0.5,
            "Blue":1
        },
        "Transparency": 0.7
    }
)

# 窓の形状に色を割り当て
ifcopenshell.api.style.assign_representation_styles(
    file=ifc_file,
    shape_representation=opening_representation,
    styles=[window_style],
    replace_previous_same_type_style=True,
    should_use_presentation_style_assignment=False
)

# 2階に窓を割り当て
ifcopenshell.api.spatial.assign_container(
    file=ifc_file,
    products=[window],
    relating_structure=storey_2
)
透明な窓が作成できましたd(^_^o)

4. 完成と次のステップ
お疲れ様でした!ここまでの手順で、床、壁、ドア、窓を持つ簡単な建物のIFCデータが完成しました。
全体のコード
import ifcopenshell
import ifcopenshell.api.aggregate
import ifcopenshell.api.context
import ifcopenshell.api.feature
import ifcopenshell.api.geometry
import ifcopenshell.api.spatial
import ifcopenshell.api.style
import ifcopenshell.api.unit
import ifcopenshell.util.shape_builder

def create_local_placement(
    ifc_file:ifcopenshell.file,
    rel_to:ifcopenshell.entity_instance|None=None,
    origin:list[float]=[0.,0.,0.]):
    """相対座標系を作成する"""

    # 原点の作成
    location = ifc_file.create_entity(
        'IfcCartesianPoint',
        Coordinates=origin
    )

    # 3D座標系の作成
    relative_placement = ifc_file.create_entity(
        'IfcAxis2Placement3D',
        Location=location,
    )

    # 相対座標系の作成
    local_placement = ifc_file.create_entity(
        'IfcLocalPlacement',
        PlacementRelTo=rel_to,
        RelativePlacement=relative_placement
    )

    return local_placement

def create_swept_solid_representation(
    ifc_file:ifcopenshell.file,
    body:ifcopenshell.entity_instance,
    outer_curve:list[tuple[float,float]],
    inner_curves:list[list[tuple[float, float]]],
    depth:float
):
    """押し出し形状のIfcShapeRepresentationを作成する"""
    builder = ifcopenshell.util.shape_builder.ShapeBuilder(ifc_file)

    # 輪郭をIfcIndexedPolyCurveで作成
    _outer_curve = builder.polyline(points=outer_curve, closed=True)

    # 内側の穴をIfcIndexedPolyCurveで作成
    _inner_curves = [
        builder.polyline(points=inner_curve, closed=True)
        for inner_curve in inner_curves
    ]

    # 平面の形状を作成
    profile=builder.profile(
        outer_curve=_outer_curve,
        inner_curves=_inner_curves,
        profile_type='AREA'
    )

    # 押し出し用の方向ベクトルを作成
    direction = ifc_file.create_entity('IfcDirection', DirectionRatios=[0.,0.,1.])

    # 押し出し形状を作成
    solid = ifc_file.create_entity(
        'IfcExtrudedAreaSolid',
        SweptArea=profile,
        ExtrudedDirection=direction,
        Depth=depth,
    )

    # 押し出し形状を持つIfcShapeRepresentationを作成
    representation = ifc_file.create_entity(
        'IfcShapeRepresentation',
        ContextOfItems=body,
        Items=[solid],
        RepresentationIdentifier=body.ContextIdentifier,
        RepresentationType="SweptSolid",
    )

    return representation

def main():
    # 建築物の情報を書き込む初期ファイルの作成
    ifc_file = ifcopenshell.file(schema='IFC4')

    # プロジェクトの作成
    project = ifc_file.create_entity('IfcProject', Name='SampleProject')

    # コンテキストの作成
    context = ifcopenshell.api.context.add_context(
        file=ifc_file,
        context_type='Model',
    )

    # サブコンテキストの作成
    body = ifcopenshell.api.context.add_context(
        file=ifc_file,
        context_type='Model',
        context_identifier='Body',
        target_view='MODEL_VIEW',
        parent=context
    )

    # 長さの単位を定義
    # SI単位の長さで接頭辞がミリ指定なので、
    # ここでは長さの単位をミリメートルと定義している
    length_unit = ifcopenshell.api.unit.add_si_unit(
        file=ifc_file,
        unit_type="LENGTHUNIT",
        prefix="MILLI"
    )

    # 定義した単位IfcUnitAssignmentに割り当てる
    ifcopenshell.api.unit.assign_unit(
        file=ifc_file,
        units= [length_unit]
    )

    # 建物の作成
    building = ifc_file.create_entity('IfcBuilding', Name='SampleBuilding')

    # 階の作成
    storey_1 = ifc_file.create_entity(
        'IfcBuildingStorey',
        Name='SampleStorey1',
        ObjectPlacement=create_local_placement(
            ifc_file=ifc_file,
            rel_to=None,
            origin=[0.,0.,0.]
        ),
        Elevation=0.
    )
    storey_2 = ifc_file.create_entity(
        'IfcBuildingStorey',
        Name='SampleStorey2',
        ObjectPlacement=create_local_placement(
            ifc_file=ifc_file,
            rel_to=None,
            origin=[0.,0.,3000.]
        ),
        Elevation=3000.
    )

    # プロジェクト->建物->階で関連付け
    ifcopenshell.api.aggregate.assign_object(
        file=ifc_file,
        products=[building],
        relating_object=project
    )
    ifcopenshell.api.aggregate.assign_object(
        file=ifc_file,
        products=[storey_1, storey_2],
        relating_object=building
    )

    # 床を作成
    slab_1 = ifc_file.create_entity(
        'IfcSlab',
        Name='SampleSlab',
        PredefinedType='FLOOR',
        ObjectPlacement=storey_1.ObjectPlacement
    )
    slab_2 = ifc_file.create_entity(
        'IfcSlab',
        Name='SampleSlab',
        PredefinedType='FLOOR',
        ObjectPlacement=storey_2.ObjectPlacement
    )

    # 床の形状を定義
    floor_representation = create_swept_solid_representation(
        ifc_file=ifc_file,
        body=body,
        outer_curve=[(0.,0.),(0.,10000.),(10000.,10000.),(10000.,0.)],
        inner_curves=[],
        depth=500.
    )

    # 床に形状を割り当てる
    ifcopenshell.api.geometry.assign_representation(
        file=ifc_file,
        product=slab_1,
        representation=floor_representation
    )
    ifcopenshell.api.geometry.assign_representation(
        file=ifc_file,
        product=slab_2,
        representation=floor_representation
    )

    # 壁を作成
    wall_1 = ifc_file.create_entity(
        'IfcWall',
        Name='SampleSlab',
        ObjectPlacement=create_local_placement(
            ifc_file=ifc_file,
            rel_to=storey_1.ObjectPlacement,
            origin=[0.,0.,500.,]
        )
    )
    wall_2 = ifc_file.create_entity(
        'IfcWall',
        Name='SampleSlab',
        ObjectPlacement=create_local_placement(
            ifc_file=ifc_file,
            rel_to=storey_2.ObjectPlacement,
            origin=[0.,0.,500.,]
        )
    )

    # 壁の形状を作成
    wall_representation_1 = create_swept_solid_representation(
        ifc_file=ifc_file,
        body=body,
        outer_curve=[(0.,0.),(0.,10000.),(10000.,10000.),(10000.,0.)],
        inner_curves=[[(500.,500.),(500.,9500.),(9500.,9500.),(9500.,500.)]],
        depth=2500.
    )
    wall_representation_2 = create_swept_solid_representation(
        ifc_file=ifc_file,
        body=body,
        outer_curve=[(0.,0.),(0.,10000.),(10000.,10000.),(10000.,0.)],
        inner_curves=[[(500.,500.),(500.,9500.),(9500.,9500.),(9500.,500.)]],
        depth=2500.
    )

    # 壁に形状を割り当てる
    ifcopenshell.api.geometry.assign_representation(
        file=ifc_file,
        product=wall_1,
        representation=wall_representation_1
    )
    ifcopenshell.api.geometry.assign_representation(
        file=ifc_file,
        product=wall_2,
        representation=wall_representation_2
    )

    # 開口部を定義
    opening_1 = ifc_file.create_entity(
        'IfcOpeningElement',
        ObjectPlacement=create_local_placement(
            ifc_file=ifc_file,
            rel_to=wall_1.ObjectPlacement,
            origin=[4500.,0.,0.]
        )
    )
    opening_2 = ifc_file.create_entity(
        'IfcOpeningElement',
        ObjectPlacement=create_local_placement(
            ifc_file=ifc_file,
            rel_to=wall_2.ObjectPlacement,
            origin=[4500.,0.,500.]
        )
    )

    # 開口部の形状を定義
    opening_representation = create_swept_solid_representation(
        ifc_file=ifc_file,
        body=body,
        outer_curve=[(0.,0.), (0., 500.),(1000., 500.), (1000., 0.)],
        inner_curves=[],
        depth=1500.
    )

    # 開口部に形状を割り当てる
    ifcopenshell.api.geometry.assign_representation(
        file=ifc_file,
        product=opening_1,
        representation=opening_representation
    )

    # 開口部に形状を割り当てる
    ifcopenshell.api.geometry.assign_representation(
        file=ifc_file,
        product=opening_2,
        representation=opening_representation
    )

    # 壁1の形状に穴を開ける
    ifcopenshell.api.feature.add_feature(
        file=ifc_file,
        feature=opening_1,
        element=wall_1
    )

    # 壁2の形状に穴を開ける
    ifcopenshell.api.feature.add_feature(
        file=ifc_file,
        feature=opening_2,
        element=wall_2
    )

    # ドアを定義
    door = ifc_file.create_entity(
        'IfcDoor',
        Name='SampleWindow',
        ObjectPlacement=opening_1.ObjectPlacement
    )

    # ドアの形状を作成
    door_representation = create_swept_solid_representation(
        ifc_file=ifc_file,
        body=body,
        outer_curve=[(0.,0.), (0., 200.),(1000., 200.), (1000., 0.)],
        inner_curves=[],
        depth=1500.
    )

    # ドアに形状を割り当てる
    ifcopenshell.api.geometry.assign_representation(
        file=ifc_file,
        product=door,
        representation=door_representation
    )

    # ドアを開口部に定義
    ifcopenshell.api.feature.add_filling(
        file=ifc_file,
        opening=opening_1,
        element=door
    )

    # ドア用のスタイルを作成
    door_style = ifcopenshell.api.style.add_style(file=ifc_file)

    # 表面のスタイルを割り当てる
    ifcopenshell.api.style.add_surface_style(
        file=ifc_file,
        style=door_style,
        ifc_class='IfcSurfaceStyleShading',
        attributes={
            "SurfaceColour": { "Name":None, "Red":0.0, "Green":0.0, "Blue":0.0 },
            "Transparency": 0
        }
    )

    # ドアの形状にスタイルを適用
    ifcopenshell.api.style.assign_representation_styles(
        file=ifc_file,
        shape_representation=door_representation,
        styles=[door_style],
        replace_previous_same_type_style=True,
        should_use_presentation_style_assignment=False
    )

    # 窓を定義
    window = ifc_file.create_entity(
        'IfcWindow',
        Name='SampleWindow',
        ObjectPlacement=opening_2.ObjectPlacement
    )

    # 窓に形状を割り当てる
    ifcopenshell.api.geometry.assign_representation(
        file=ifc_file,
        product=window,
        representation=opening_representation
    )

    # 2階の開口部に窓を割り当てる
    ifcopenshell.api.feature.add_filling(
        file=ifc_file,
        opening=opening_2,
        element=window
    )

    # 窓のスタイルを定義
    window_style = ifcopenshell.api.style.add_style(file=ifc_file)
    # 窓の表面のスタイルを定義
    ifcopenshell.api.style.add_surface_style(
        file=ifc_file,
        style=window_style,
        ifc_class='IfcSurfaceStyleShading',
        attributes={
            "SurfaceColour": { "Name":None, "Red":0.0, "Green":0.5, "Blue":1 },
            "Transparency": 0.7
        }
    )

    # 窓の形状に色を割り当て
    ifcopenshell.api.style.assign_representation_styles(
        file=ifc_file,
        shape_representation=opening_representation,
        styles=[window_style],
        replace_previous_same_type_style=True,
        should_use_presentation_style_assignment=False
    )

    # 1階に床、壁、ドアを割り当て
    ifcopenshell.api.spatial.assign_container(
        file=ifc_file,
        products=[slab_1, wall_1, door],
        relating_structure=storey_1
    )

    # 2階に床、壁、窓を割り当て
    ifcopenshell.api.spatial.assign_container(
        file=ifc_file,
        products=[slab_2, wall_2, window],
        relating_structure=storey_2
    )

    ifc_file.write('test.ifc')


if __name__ == "__main__":
    main()
今回は基本的な形状作成に焦点を当てましたが、BIMの真価は「情報」にあります。色以外にも材質の種類を定義したり、材質の物性(熱伝導率など)を持たせたりすることが可能です。次のステップとして、
- 各部材に材質やコストなどのプロパティ(
IfcPropertySet)を追加する - 階段(
IfcStair)など、より複雑な要素を作成する
などに挑戦してみると、さらに理解が深まるはずです。この記事が、あなたのBIM/IfcOpenShellライフの第一歩となれば幸いです。
Discussion