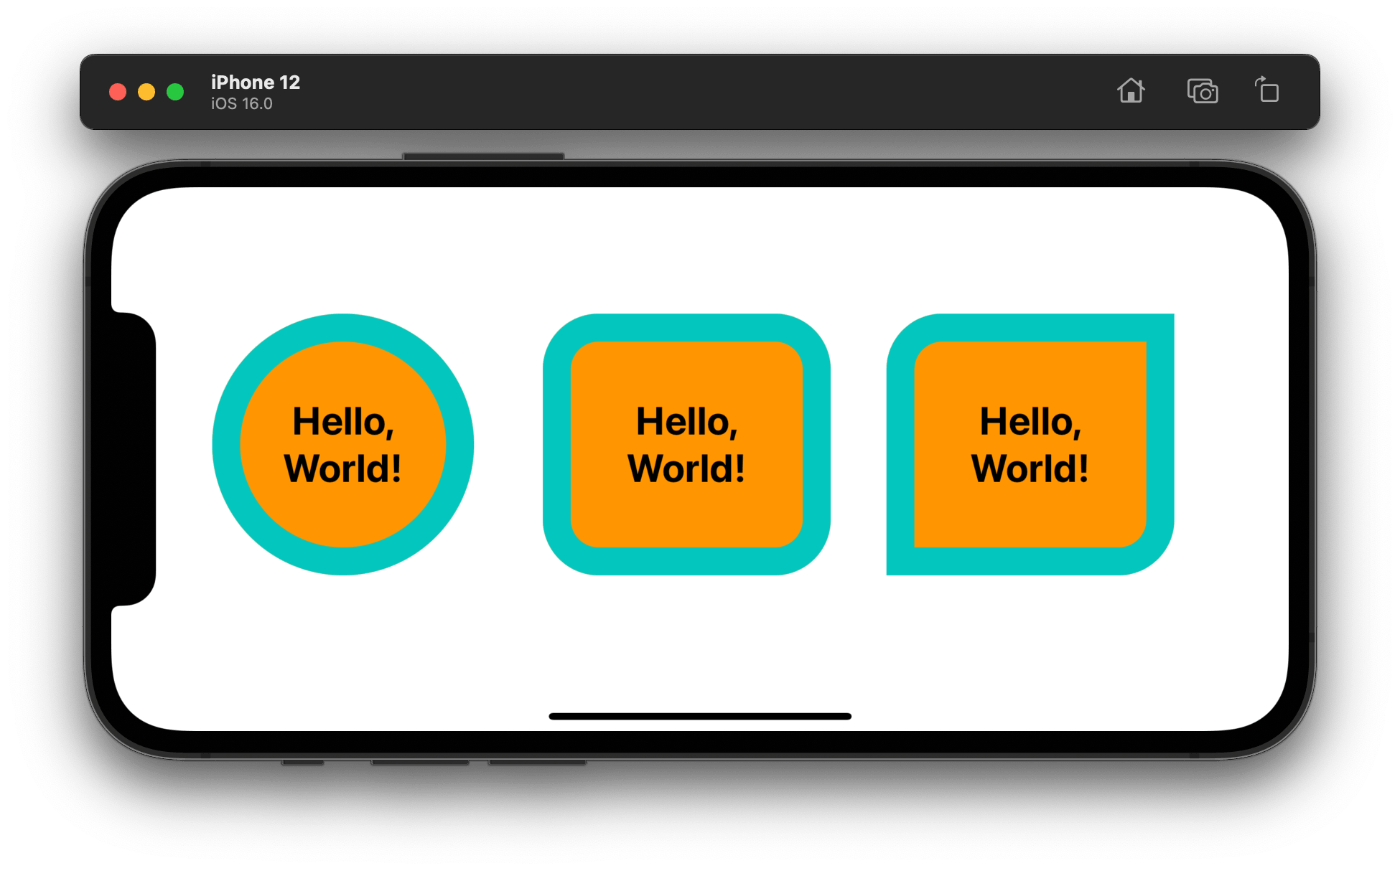
SwiftUIのViewに角丸な枠線を引く
はじめに
矩形領域を角丸にクリップして枠線を引きたい。

要約
次のようなViewModifierを定義すると簡単に実現できます。
struct RoundedBorderModifier<Style: ShapeStyle>: ViewModifier {
    var style: Style, width: CGFloat = 0, radius: CGFloat

    func body(content: Content) -> some View {
        content
            .overlay {
                RoundedRectangle(cornerRadius: radius)
                    .stroke(lineWidth: width*2)
                    .fill(style)
            }
            .mask {
                RoundedRectangle(cornerRadius: radius)
            }
    }
}
また、Viewを拡張することで、更に簡単に利用できるようになります。
extension View {
    func roundedBorder<S: ShapeStyle>(
        _ style: S,
        width: CGFloat,
        radius: CGFloat
    ) -> some View {
        let modifier = RoundedBorderModifier(
            style: style,
            width: width,
            radius: radius
        )
        return self.modifier(modifier)
    }
}
それでは、順を追って説明します。
RoundedRectangle を利用する
RoundedRectangleは角丸のシェイプです。
overlayでRoundedRectangleを重ねて角丸に見せることができます。
struct ContentView: View {
    var radius: CGFloat = 40
    var width: CGFloat = 10
    var color: Color = .black

    var body: some View {
        HelloWorld()
            .overlay {
                RoundedRectangle(cornerRadius: radius)
                    .stroke(lineWidth: width)
                    .fill(color)
            }
    }
}
struct HelloWorld: View {
    var body: some View {
        Text("Hello,\nWorld!")
            .font(.title)
            .fontWeight(.bold)
            .lineLimit(2)
            .multilineTextAlignment(.center)
            .padding(60)
    }
}

RoundedRectangle のoverlayだけではクリップできていない
一見するとこの実装だけで十分なように見えますが、overlayだけではクリップできていないことに注意してください。パラメータを変えてみると一目瞭然です。
struct ContentView: View {
    var radius: CGFloat = 40
    var width: CGFloat = 20 // ⬅️
    var color: Color = .mint.opacity(0.5) // ⬅️

    var body: some View {
        HelloWorld()
            .overlay {
                RoundedRectangle(cornerRadius: radius)
                    .stroke(lineWidth: width)
                    .fill(color)
            }
    }
}
struct HelloWorld: View {
    var body: some View {
        Text("Hello,\nWorld!")
            .font(.title)
            .fontWeight(.bold)
            .lineLimit(2)
            .multilineTextAlignment(.center)
            .padding(60)
            .background(.orange) // ⬅️
    }
}
次のような結果になります。

実行結果から、次の修正が必要なことが分かりました。
- RoundedRectangleでクリップされていない
-
strokeはRoundedRectangleの境界の内部と外部に等幅で線を引いている
上記の2点を修正します。
RoundedRectangleでクリップする
overlayしたRoundedRectangleと同様のビューでmaskすることでクリップできます。
struct ContentView: View {
    var radius: CGFloat = 40
    var width: CGFloat = 20
    var color: Color = .mint.opacity(0.5)

    var body: some View {
        HelloWorld()
            .overlay {
                RoundedRectangle(cornerRadius: radius)
                    .stroke(lineWidth: width)
                    .fill(color)
            }
+           .mask {
+               RoundedRectangle(cornerRadius: radius)
+           }
    }
}

strokeが図形境界の外部にも幅を持っているので、上記の実行結果は実線の幅が半分になっています。これを調整する必要があります。
strokeを調整する
表示されている実線の幅が半分になったので2倍にします。
struct ContentView: View {
    var radius: CGFloat = 40
    var width: CGFloat = 20
    var color: Color = .mint.opacity(0.5)

    var body: some View {
        HelloWorld()
            .overlay {
                RoundedRectangle(cornerRadius: radius)
-                   .stroke(lineWidth: width)
+                   .stroke(lineWidth: 2*width)
                    .fill(color)
            }
            .mask {
                RoundedRectangle(cornerRadius: radius)
            }
    }
}

これで矩形領域を角丸にクリップして線を引くことができました。
ViewModifierを定義する
overlayしてmaskすることで角丸でクリップして線を引くことが実現できました。
ただ、このような実装は可読性を損ねていますし、都度実装するのは面倒です。
次のように利用できると便利です。
struct ContentView: View {
    var radius: CGFloat = 40
    var width: CGFloat = 20
    var color: Color = .mint.opacity(0.5)

    var body: some View {
        HelloWorld()
            .roundedBorder(color, width: width, radius: radius)
    }
}
そこで、先程の実装をViewModifierに適合した構造体として実装しました。
struct RoundedBorderModifier<Style: ShapeStyle>: ViewModifier {
    var style: Style, width: CGFloat = 0, radius: CGFloat

    func body(content: Content) -> some View {
        content
            .overlay {
                RoundedRectangle(cornerRadius: radius)
                    .stroke(lineWidth: width*2)
                    .fill(style)
            }
            .mask {
                RoundedRectangle(cornerRadius: radius)
            }
    }
}
extension View {
    func roundedBorder<S: ShapeStyle>(
        _ style: S,
        width: CGFloat,
        radius: CGFloat
    ) -> some View {
        let modifier = RoundedBorderModifier(
            style: style,
            width: width,
            radius: radius
        )
        return self.modifier(modifier)
    }
}
まとめ
『角丸にクリップして枠線を引きたい』は次の実装で実現できました。
- RoundedRectangleで
overlayする - RoundedRectangleで
maskする -
strokeはmaskで境界外部の幅半分が消えるので代わりに2倍する
具体的な実装を隠蔽するためにViewModifierを実装しました。
角丸を実現する目的でRoundedRectangleを利用しましたが、任意のShapeに置き換えることで別の図形でマスク、枠線を引くこともできます。これを応用して、角の一部だけを角丸にすることもできます。

角の一部だけを角丸にする実装はサンプルコードをGistに公開しました。

Discussion