📑
[Terraform/AWS] 簡単な Iaas 環境の構築

概要
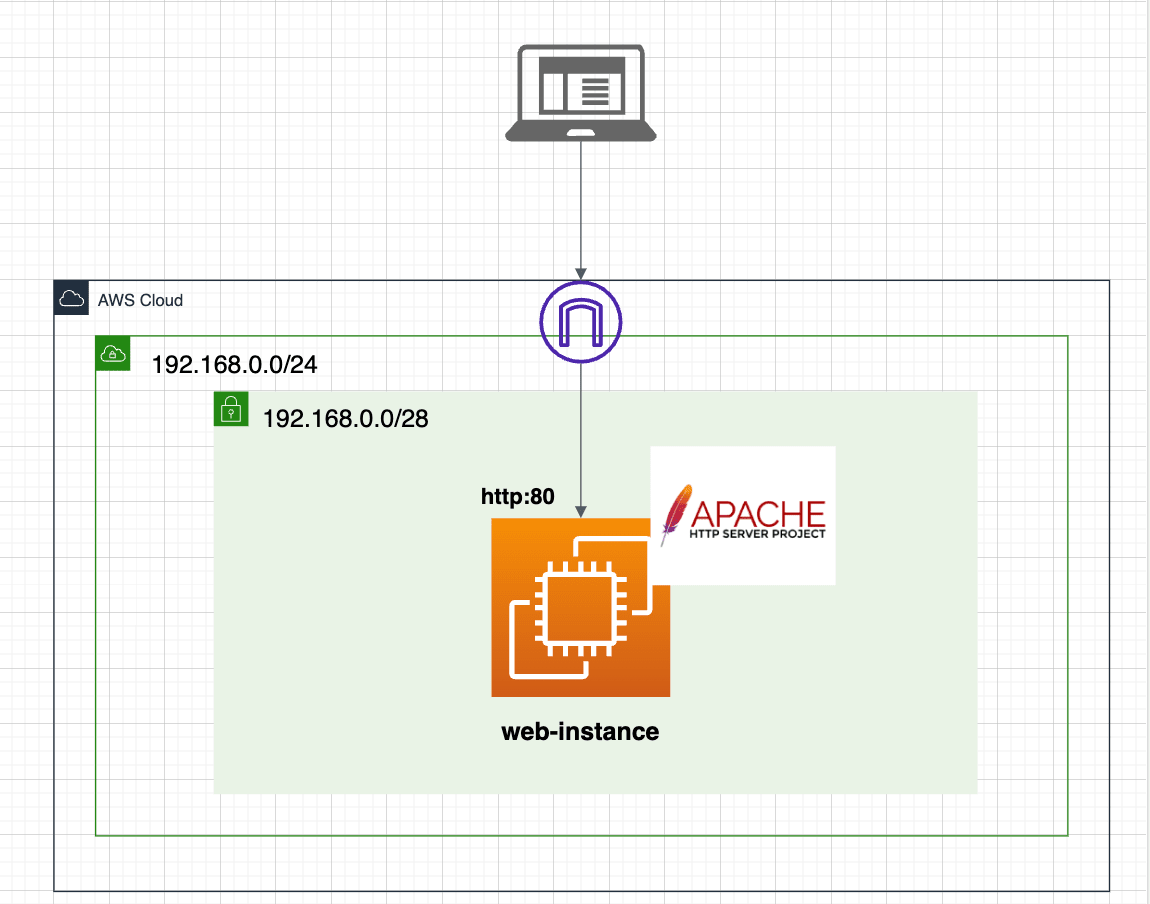
- Apache に設定した index.html の内容が表示される事をゴールとして Terraform で AWS 環境を構築する。
本記事を読み終わった時のゴール
- TerraformでEC2インスタンスを起動し、その中に設定したindex.htmlへリクエストが成功する事。
本編
簡単な Iaas 環境の構築 (index.html へのアクセスまで)
構成
- Apache に設定した index.html の内容が表示される事をゴールとして Terraform で AWS 環境を構築する。

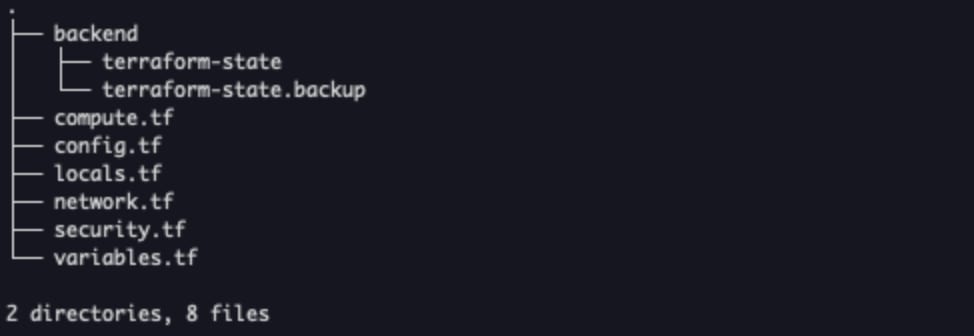
ファイル配置
-
Terraformは基本的にカレントディレクトリのファイルを認識するため、今回はカレントに使用するファイルを配置。
(moduleで分割する場合は、sourceで指定するとディレクトリを超えてTerraformが認識出来るが、今回は用いない。) -
単一のファイルに全てのコードを纏めて記述すると保守性、視認性、可読性の観点で良くないため、リソースのカテゴリごとに分割して作成しています。 (例:network.tf→VPC,Subnet,インターネットゲートウェイ,ルートテーブル)

実際のコード
.terraform-version
.terraform-version
1.6.5
config.tf
- 主に Terraform や Provider(ここでは AWS) に関する設定を記述。
尚、backend ディレクトリ以下には、terraform 配下で管理されている リソースの情報を JSON 形式で構成するステートファイルが自動作成される。
config.tf
#===================================
# Terraform block
#===================================
terraform {
    required_version = "1.6.5" // 使用する terraform のバージョンを設定

    required_providers {
        aws = {
            source ="hashicorp/aws"//プロバイダーとしてAWSを使用する事を明示的に設定
            version = "5.30.0"
        }
    }
    // テスト用のため、ステートファイルは local で対応。
    backend "local" {
        path = "./backend/terraform-state"
    }
}
#===================================
# Provider block
#===================================
provider "aws" {
    region ="ap-northeast-1" //東京リージョンをデフォルトリージョンに 指定。
    profile = "{ご自身の認証ユーザ}" // CLI や SDK で API 接続可能な認証ユーザ名 を設定。
                                    // AWS CLI の場合は、aws configure で設定した profile 名。
    default_tags {
        tags = {
            env = local.environment // 全リソース共通で付与したいタグを設定
        }
    }
}
local.tf
- local 変数の設定を記述する。
local.tf
locals {
    environment = "dev" // リソースを構築するデフォルトの環境を記載
    az = "ap-northeast-1a" // サブネットを設定する AZ を定義
    internet = "0.0.0.0/0" // インターネットゲートウェイ,セキュリティグル ープで下記 CIDR を指定
    ami = "ami-0dafcef159a1fc745" // AmazonLinux2 の AMI を変数で定義
}
variables.tf
- variable 変数の設定を記述する。
variables.tf
variable "cidr_block" {
    description = "VPC,Subnet の CIDR ブロックを定義"
    type = list(string)
    default = ["192.168.0.0/24","192.168.0.0/28"]
}
network.tf
- ネットワーク周りの設定を記述。
今回は、VPC Subnet RouteTable InternetGateway を設定。
network.tf
#===================================
# VPC
#===================================
resource "aws_vpc" "test" {
    cidr_block = var.cidr_block[0] //variables.tf の配列が 0 の値を 設定

    tags = {
        Name = "test-vpc"
    }
}

#===================================
# IGW
#===================================
resource "aws_internet_gateway" "test" {
    vpc_id = aws_vpc.test.id //VPC の ID を参照。

    tags = {
        Name = "test-igw"
    }
}

#===================================
# Subnet
#===================================
resource "aws_subnet" "test" {
    vpc_id = aws_vpc.test.id
    cidr_block = var.cidr_block[1]  //variables.tf の配列が 1 の値を設定
    availability_zone = local.az // locals.tf の az の値を設定 map_public_ip_on_launch = false

    tags = {
        Name = "test-subent"
    }
}

#===================================
# Route Table
#===================================
resource "aws_route_table" "test" {
    vpc_id = aws_vpc.test.id
    route {
    cidr_block = local.internet
    gateway_id = aws_internet_gateway.test.id
    }

    tags = {
        Name = "test-route"
    }
}

resource "aws_route_table_association" "test" {
    subnet_id = aws_subnet.test.id
    route_table_id = aws_route_table.test.id
}
security.tf
- セキュリティグループの設定を記述。
今回は、web サーバのテストページを表示する事が目的の為、自身の IP から http アクセス出来るよう設定する。
security.tf
#=========================================
# Security Group
#=========================================
resource "aws_security_group" "test" {
    description = "sg for http" name = "test"
    vpc_id = aws_vpc.test.id

    tags = {
        Name = "test-sg"
    }
}

//インバウンドルールの設定
resource "aws_vpc_security_group_ingress_rule" "http" {
    description = "inboound rule for http"
    security_group_id = aws_security_group.test.id
    cidr_ipv4 = local.internet
    from_port = 80
    to_port = 80
    ip_protocol = "tcp"

    tags = {
        Name = "in-http"
    }
}

// アウトバウンドルールの設定
resource "aws_vpc_security_group_egress_rule" "http" {
    description = "outboound rule for http"
    security_group_id = aws_security_group.test.id
    cidr_ipv4 = local.internet
    ip_protocol = "all"

    tags = {
        Name = "out-http"
    }
}
compute.tf
- EC2 インスタンスの設定を記述。
web サーバにアクセス出来るよう、user_data で Apache の自動起動までに必要なコマンドをシェルスクリプトとして実行するよう予め設定する。
compute.tf
resource "aws_instance" "test" {
    ami = local.ami // 「Amazon Linux 2 AMI (HVM) - Kernel 5.10, SSD Volume Type」の AMI
    subnet_id = aws_subnet.test.id
    instance_type = "t2.micro" vpc_security_group_ids = [aws_security_group.test.id]
    associate_public_ip_address = true // グローバル IP の有効化

    user_data = <<-EOF #!/bin/bash
        yum update -y
        yum install -y httpd
        systemctl start httpd
        systemctl enable httpd
        echo "Hello World!" > /var/www/html/index.html
        EOF

    root_block_device {
        volume_type = "gp3"
        volume_size = 8
        delete_on_termination = false
        encrypted = true
    }

    tags = {
        Name = "web-instance"
    }
}
Terraformコードのデプロイ
- ファイルが配置されているカレントディレクトリで下記コマンドを順に実行する。
コマンド
terraform init // terraform プロジェクトの初期化
terraform plan // terraform が作成するリソースの一覧を表示して内容に相違ないか確認
terraform apply // 設定を適用してリソースを作成
terraform destroy // index.html の表示が確認出来れば、後片付けで不要 になったリソースを削除
- 以下のようにhttp接続が確認でき、index.htmlの内容が表示されれば、完了。


Discussion