webrtc
概要
- わかりやすい記事
- リポジトリ
- 通信するには自分のsdpが必要
- 最低でも最初のsdpをofferする側とreceiveする側の2人が必要
- sdpのやりとりはなんでもいい
- 最悪手動でも良いが、websocketが多い
sdp
- 各ブラウザが通信した内容を示し、テキストで表現される
- ICE candidateを含む
- 通信経路の候補が含まれるもの
- ICEの交換方法によりVanila ICEとTrickle ICEがある
- Vanila ICEは全ての候補が出揃った後に通信を開始する方式でTrickleは逐次的に通信する方式
やってみた
技術要件
Backend
-
Laravel
- sdpの送信のためにルーティングを用意
- エコシステムであるlaravel echoを利用
-
- sdpの受信にwebsocketを利用するため
-
redis
- websocketの通信に利用
- laravel + redis
-
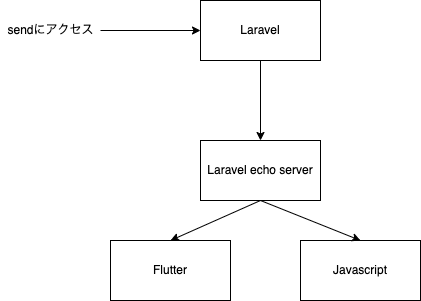
通信は client1 -> laravel -> laravel echo server -> client2という流れになる
Frontend
それぞれlaravel echoのクライアントとしてライブラリを利用する。
- Flutter
- JS
他
- docker
Laravelのセットアップ
-
docker-compose up -d workspace nginx mysql redis- mysqlはいらないかも
docker-compose exec workspace bashcomposer create-project laravel/laravel . --prefer-distcomposer require predis/predislaravel-echo-server init
laravel-echo-server.json
{
"authHost": "http://localhost",
"authEndpoint": "/broadcasting/auth",
"clients": [],
"database": "redis",
"databaseConfig": {
"redis": {
"port": "6379",
"host": "redis",
"keyPrefix": ""
},
"sqlite": {
"databasePath": "/database/laravel-echo-server.sqlite"
}
},
"devMode": true,
"host": null,
"port": "6001",
"protocol": "http",
"socketio": {},
"secureOptions": 67108864,
"sslCertPath": "",
"sslKeyPath": "",
"sslCertChainPath": "",
"sslPassphrase": "",
"subscribers": {
"http": true,
"redis": true
},
"apiOriginAllow": {
"allowCors": false,
"allowOrigin": "",
"allowMethods": "",
"allowHeaders": ""
}
}
- app.phpでコメントイン
App\Providers\BroadcastServiceProvider::class,

'Redis' => Illuminate\Support\Facades\Redis::class,
- .envを修正
BROADCAST_DRIVER=redis
REDIS_HOST=redis
REDIS_PASSWORD=null
REDIS_PORT=6379
REDIS_PREFIX=
-
編集したら
php artisan config:cacheを忘れずに -
laravel echo serverの起動
laravel-echo-server start
broadcastの用意
-
['message' => 'success!']をwebsocketで送信できるようにする - メッセージをbroadcastするeventを作成し、それを発火させるcontrollerを作成
CheckEvent.php
<?php
namespace App\Events;
use Illuminate\Broadcasting\Channel;
use Illuminate\Broadcasting\InteractsWithSockets;
use Illuminate\Contracts\Broadcasting\ShouldBroadcastNow;
use Illuminate\Foundation\Events\Dispatchable;
use Illuminate\Queue\SerializesModels;
class CheckEvent implements ShouldBroadcastNow
{
use Dispatchable, InteractsWithSockets, SerializesModels;
/**
 * Create a new event instance.
 *
 * @return void
 */
public function __construct()
{

}

/**
 * Get the channels the event should broadcast on.
 *
 * @return \Illuminate\Broadcasting\Channel|array
 */
public function broadcastOn()
{
    return new Channel('check-channel');
}

public function broadcastWith()
{
    return ['message' => 'success!'];
}
}
routes/web.php
<?php
use App\Events\CheckEvent;
use Illuminate\Support\Facades\Route;
/*
|--------------------------------------------------------------------------
| Web Routes |
|---|
| Here is where you can register web routes for your application. These |
| routes are loaded by the RouteServiceProvider within a group which |
| contains the "web" middleware group. Now create something great! |
| */ |
Route::get('/', function () {
return view('welcome');
});
Route::get('/send', function () {
broadcast(new CheckEvent);
return 'check receive page';
});
Route::get('/receive', function () {
return view('receive');
});
clientの用意
- laravel echoをclientで利用する
JS
- laravel echoのclientをインストール
- socket.io-clientは2系をインストールする
npm install --save laravel-echo socket.io-client@2.3.1
bootstrap.js
import Echo from 'laravel-echo';
window.io = require('socket.io-client');
window.Echo = new Echo({
broadcaster: 'socket.io',
host: 'http://localhost:6001',
});
window.Echo.channel('check-channel')
.listen('CheckEvent', (e) => {
console.log(e);
});
webpack.mix.js
const mix = require('laravel-mix');
/*
|--------------------------------------------------------------------------
| Mix Asset Management |
|---|
| Mix provides a clean, fluent API for defining some Webpack build steps |
| for your Laravel applications. By default, we are compiling the CSS |
| file for the application as well as bundling up all the JS files. |
| */ |
mix.js('resources/js/app.js', 'public/js')
.postCss('resources/css/app.css', 'public/css', [
//
]);
mix.options({
legacyNodePolyfills: false
});
npm run dev
Flutter
- laravel_echo
- 依存関係追加
  http: ^0.13.4
  socket_io_client: ^1.0.1
  laravel_echo: ^1.0.0-beta.1
main.dart
import 'package:flutter/material.dart';
import 'package:laravel_echo/laravel_echo.dart';
import 'package:socket_io_client/socket_io_client.dart';
void main() {
runApp(const MyApp());
}
class MyApp extends StatelessWidget {
const MyApp({Key? key}) : super(key: key);
@override
Widget build(BuildContext context) {
return MaterialApp(
title: 'Flutter Demo',
theme: ThemeData(
primarySwatch: Colors.blue,
),
home: const MyHomePage(title: 'Flutter Demo Home Page'),
);
}
}
class MyHomePage extends StatefulWidget {
const MyHomePage({Key? key, required this.title}) : super(key: key);
final String title;
@override
State<MyHomePage> createState() => _MyHomePageState();
}
class _MyHomePageState extends State<MyHomePage> {
@override
void initState() {
_createClient();
super.initState();
}
@override
Widget build(BuildContext context) {
return Scaffold(
appBar: AppBar(
title: Text(widget.title),
),
body: Center(
child: Column(
mainAxisAlignment: MainAxisAlignment.center,
children: <Widget>[
const Text(
'You have pushed the button this many times:',
),
Text(
'',
style: Theme.of(context).textTheme.headline4,
),
],
),
),
);
}
void _createClient() {
Socket socket = io(
'http://localhost',
OptionBuilder().disableAutoConnect().setTransports(['websocket']).build(),
);
Echo echo = Echo(
  broadcaster: EchoBroadcasterType.SocketIO,
  client: socket,
);

// Listening public channel
echo.channel('check-channel').listen('CheckEvent', (e) {
  debugPrint(e.toString());
});

echo.connector.socket.on('connect', (_) => debugPrint('connected'));
echo.connector.socket.on('disconnect', (_) => debugPrint('disconnected'));
}
}
websocket通信の確認
- laravel echo serverを起動
laravel-echo-server start - クライアントをlaravel echo serverに接続する
- http://localhost/receive を開く
- エミュレーターを起動させる
- http://localhost/send を開く
- コンソールに
{message: success!, socket: null}が表示されることを確認
他
- laravel-echo-serverは6001ポートですが、nginxでlocalhostにアクセスしても6001にプロキシされるようにしています
ここまででできたこと
- sendにアクセスするとクライアントにpushされる
webrtcまで
クライアント
- flutter
- react
laravel
- ルートの追加
Route::prefix('v0')->group(function () {
    Route::post('/sdp', [SdpController::class, 'store']);
});
<?php

namespace App\Http\Controllers;

use Illuminate\Http\Request;
use App\Events\SdpEvent;

class SdpController extends Controller
{
    public function store(Request $request)
    {
        $request->validate([
            'sdp' => 'required',
            'socket_id' => 'required',
            'type' => 'required|in:offer,answer'
        ]);

        broadcast(new SdpEvent($request->all()))->toOthers();

        return 'success';
    }
}
実行時の注意
- 実機で試すこと https://github.com/flutter-webrtc/flutter-webrtc/issues/713
- 同じPCでブラウザ2つではうまくいかない