network namespaceで遊ぶ - OSPF(1)
OSPF
単純にスタティックルーティングする構成は以下ででした。
この構成だけだとあんまり面白くないので、今回はルータにOSPFを設定してダイナミックルーティングを試してみます。
構成図
ネットワーク構成は次の通りです。
router1からrouter4に行くには2通りの経路があります。
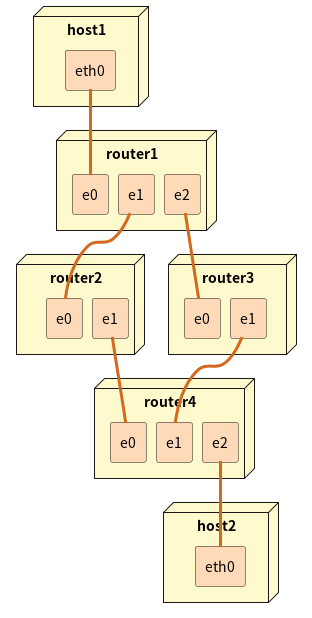
物理NW構成図
論理ネットワーク図ではこんな感じになります。
どうでもいい話ですが、router1の第4オクテットはすべて.1になるように、同じくrouter2, 3, 4の第4オクテットは.2, ,.3, .4になるようにしています。
router1とrouter2の間のセグメントはxx.xx.12.xx、router2とrouter4の間のセグメントはxx.xx.24.xxみたいな感じにしています。
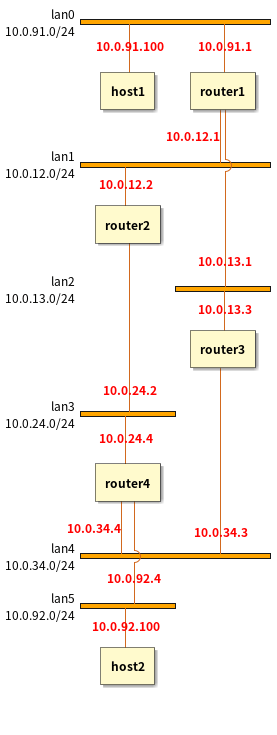
論理NW構成図
作成
ノード、ケーブル作成、IP設定
スタティックルーティングの記事で書いたのとほぼ同じなので説明は省略。
# create network namespaces
ip netns add host1
ip netns add router1
ip netns add router2
ip netns add router3
ip netns add router4
ip netns add host2

# create cable(veth pairs)
ip link add eth0 netns host1 type veth peer name e0 netns router1
ip link add e1 netns router1 type veth peer name e0 netns router2
ip link add e2 netns router1 type veth peer name e0 netns router3
ip link add e1 netns router2 type veth peer name e0 netns router4
ip link add e1 netns router3 type veth peer name e1 netns router4
ip link add e2 netns router4 type veth peer name eth0 netns host2

# set IP address: host1
ip netns exec host1 ip addr add 10.0.91.100/24 dev eth0

# set IP address: router1
ip netns exec router1 sysctl -w net.ipv4.ip_forward=1
ip netns exec router1 ip addr add 10.0.91.1/24 dev e0
ip netns exec router1 ip addr add 10.0.12.1/24 dev e1
ip netns exec router1 ip addr add 10.0.13.1/24 dev e2

# set IP address: router2
ip netns exec router2 sysctl -w net.ipv4.ip_forward=1
ip netns exec router2 ip addr add 10.0.12.2/24 dev e0
ip netns exec router2 ip addr add 10.0.24.2/24 dev e1

# set IP address: router3
ip netns exec router3 sysctl -w net.ipv4.ip_forward=1
ip netns exec router3 ip addr add 10.0.13.3/24 dev e0
ip netns exec router3 ip addr add 10.0.34.3/24 dev e1

# set IP address: router4
ip netns exec router4 sysctl -w net.ipv4.ip_forward=1
ip netns exec router4 ip addr add 10.0.24.4/24 dev e0
ip netns exec router4 ip addr add 10.0.34.4/24 dev e1
ip netns exec router4 ip addr add 10.0.92.4/24 dev e2

# set IP address: host2
ip netns exec host2 ip addr add 10.0.92.100/24 dev eth0
Link Up、スタティックルーティング設定
リンクアップさせます。
host1, host2だけスタティックルーティング入れます。
router達はダイナミックルーティングさせるのでスタティックルートは入れません。
# linkup & set routes (routes can not be set before linkup.)
ip netns exec host1 ip link set lo up
ip netns exec host1 ip link set eth0 up
ip netns exec host1 ip route add default via 10.0.91.1

ip netns exec router1 ip link set lo up
ip netns exec router1 ip link set e0 up
ip netns exec router1 ip link set e1 up
ip netns exec router1 ip link set e2 up

ip netns exec router2 ip link set lo up
ip netns exec router2 ip link set e0 up
ip netns exec router2 ip link set e1 up

ip netns exec router3 ip link set lo up
ip netns exec router3 ip link set e0 up
ip netns exec router3 ip link set e1 up

ip netns exec router4 ip link set lo up
ip netns exec router4 ip link set e0 up
ip netns exec router4 ip link set e1 up
ip netns exec router4 ip link set e2 up

ip netns exec host2 ip link set lo up
ip netns exec host2 ip link set eth0 up
ip netns exec host2 ip route add default via 10.0.92.4
OSPFインストール、起動
ospfdを動かす必要があります。
quaggaとかメジャーかなと思っていたのですが、いつの間にかquaggaを元にしてfrrというプロジェクトができていました。これ使ってみましょう。
インストールはUbuntuだとaptで入れるだけです。
# apt install frr
Reading package lists... Done
Building dependency tree... Done
Reading state information... Done
The following additional packages will be installed:
  frr-pythontools
Suggested packages:
  frr-doc
The following NEW packages will be installed:
  frr frr-pythontools
0 upgraded, 2 newly installed, 0 to remove and 15 not upgraded.
Need to get 4223 kB of archives.
After this operation, 20.1 MB of additional disk space will be used.
Do you want to continue? [Y/n] y
Get:1 http://jp.archive.ubuntu.com/ubuntu jammy/main amd64 frr amd64 8.1-1ubuntu1 [4199 kB]
Get:2 http://jp.archive.ubuntu.com/ubuntu jammy/main amd64 frr-pythontools all 8.1-1ubuntu1 [23.8 kB]
Fetched 4223 kB in 1s (7893 kB/s)
Selecting previously unselected package frr.
(Reading database ... 219368 files and directories currently installed.)
Preparing to unpack .../frr_8.1-1ubuntu1_amd64.deb ...
Unpacking frr (8.1-1ubuntu1) ...
Selecting previously unselected package frr-pythontools.
Preparing to unpack .../frr-pythontools_8.1-1ubuntu1_all.deb ...
Unpacking frr-pythontools (8.1-1ubuntu1) ...
Setting up frr (8.1-1ubuntu1) ...
addgroup: The group `frrvty' already exists as a system group. Exiting.
addgroup: The group `frr' already exists as a system group. Exiting.
Warning: The home dir /nonexistent you specified can't be accessed: No such file or directory
The system user `frr' already exists. Exiting.
Created symlink /etc/systemd/system/multi-user.target.wants/frr.service -> /lib/systemd/system/frr.service.
Setting up frr-pythontools (8.1-1ubuntu1) ...
Processing triggers for man-db (2.10.2-1) ...
Processing triggers for rsyslog (8.2112.0-2ubuntu2.2) ...
network namespaceを使わない場合はsystemctlで起動してあげるだけでいいのですが、今回はnetwork namesapceの中でデーモンを起動したいのでちょっと設定を変えます。
frr自体がnetwork namespaceを意識して作られているので、設定ファイルを置いて、frr付属のスクリプトで起動します。
設定ファイル
frrをnetwork namespaceで動かす方法は以下に記載があります。
namespace名がrouter1の場合、/etc/frr/router1/ディレクトリを作成し、コンフィグファイルを用意します。
- /etc/frr/router1
- daemons
- vtysh.conf
mkdir "/etc/frr/router1"
cat <<__EOF__ > /etc/frr/router1/vtysh.conf
no service integrated-vtysh-config
hostname router1
__EOF__
sed -e 's/^ospfd=.*/ospfd=yes/' -e 's/#watchfrr_options="--netns"/watchfrr_options="--netns"/' < /etc/frr/daemons > /etc/frr/router1/daemons
chown -R frr.frr "/etc/frr/router1"
vtysh.confは2行だけ。
frrはospfdだけではなくbgpdやripdなど他のダイナミックルーティングプロトコルデーモンを動作させることができます。通常は各デーモンごとにospfd.conf, bgpd.conf, ripd.confと別々のファイルにコンフィグが保存されます。
service integrated-vtysh-configを設定するとfrr.confというファイルにすべて保存してくれて便利… となるはずなのですが、network namespace環境で使おうとするからなのか、うまく動作しないのでnoをつけて無効化しています。
frrの各デーモンはfrrユーザの権限で動作し、/etc/frr/router1/ディレクトリにコンフィグファイルを保存するので、ディレクトリの所有ユーザ、所有グループをfrr.frrに設定しておきます。
daemonsファイルの編集箇所は以下の通り。
--- /etc/frr/daemons    2022-05-29 18:56:57.422267144 +0900
+++ /etc/frr/router1/daemons    2022-05-29 19:31:18.966467963 +0900
@@ -15,7 +15,7 @@
 # The watchfrr, zebra and staticd daemons are always started.
 #
 bgpd=no
-ospfd=no
+ospfd=yes
 ospf6d=no
 ripd=no
 ripngd=no
@@ -75,7 +75,7 @@
 #watchfrr_options=""

 # To make watchfrr create/join the specified netns, use the following option:
-#watchfrr_options="--netns"
+watchfrr_options="--netns"
 # This only has an effect in /etc/frr/<somename>/daemons, and you need to
 # start FRR with "/usr/lib/frr/frrinit.sh start <somename>".
デーモン起動
以下のコマンドでrouter1 namespace下でfrrを起動します。
# start frr
/usr/lib/frr/frrinit.sh start "router1"
/etc/init.d/frrスクリプトで起動してみたのですが、思った通りの動作にならないので、frrパッケージに含まれる/usr/lib/frr/frrinit.shスクリプトを使用します。
起動に成功するとwatchfrr, zebra, ospfd, staticdの4つのデーモンが起動します。
# ps aux | grep fr[r]
root       33340  0.0  0.0   7956  3620 ?        Ss   19:31   0:00 /usr/lib/frr/watchfrr -N router1 -d -F traditional --netns zebra ospfd staticd
frr        33356  0.0  0.2 316908  8372 ?        Ssl  19:31   0:00 /usr/lib/frr/zebra -N router1 -d -F traditional -A 127.0.0.1 -s 90000000
frr        33361  0.0  0.1  12060  6084 ?        Ss   19:31   0:00 /usr/lib/frr/ospfd -N router1 -d -F traditional -A 127.0.0.1
frr        33364  0.0  0.1   9324  4308 ?        Ss   19:31   0:00 /usr/lib/frr/staticd -N router1 -d -F traditional -A 127.0.0.1
OSPF設定
やっとOSPFの設定です。frrはCisco風のコマンドでOSPF設定を行います。interfaceのIPはLinux側でip addrで設定した値が入るのでzebra, ospfd側で設定する必要はないです。
# ip netns exec router1 vtysh -N router1

Hello, this is FRRouting (version 8.1).
Copyright 1996-2005 Kunihiro Ishiguro, et al.

router1# conf t
router1(config)# router ospf
router1(config-router)# network 10.0.0.0/8 area 0
router1(config-router)# end
router1# write
Note: this version of vtysh never writes vtysh.conf
Building Configuration...
Configuration saved to /etc/frr/router1/zebra.conf
Configuration saved to /etc/frr/router1/ospfd.conf
Configuration saved to /etc/frr/router1/staticd.conf
router1# exit
「Cisco風」であって、Ciscoとまったく同じではないので、Ciscoに詳しい人がはまりやすい罠としては、ospfのnetworkコマンドはワイルドカードを使用するのに対し、frrではネットマスクで指定します。
| 機器 | 設定コマンド |
|---|---|
| Cisco | network 10.0.0.0 0.255.255.255 area 0 |
| frr | network 10.0.0.0/8 area 0 |
ここまででrouter1の設定は終わりです。
同じ要領でrouter2, 3, 4を設定していきます。
router2設定コマンドはここをクリック
# run post linkup commands: router2
# create frr config directory if not exists
if [ ! -d "/etc/frr/router2" ]; then
        mkdir "/etc/frr/router2"
fi

# generate config file for network namespace
cat <<__EOF__ > /etc/frr/router2/vtysh.conf
no service integrated-vtysh-config
hostname router2
__EOF__

# generate config file for network namespace
cat <<__EOF__ > /etc/frr/router2/daemons
# This file tells the frr package which daemons to start.
#
# Sample configurations for these daemons can be found in
# /usr/share/doc/frr/examples/.
#
# ATTENTION:
#
# When activating a daemon for the first time, a config file, even if it is
# empty, has to be present *and* be owned by the user and group "frr", else
# the daemon will not be started by /etc/init.d/frr. The permissions should
# be u=rw,g=r,o=.
# When using "vtysh" such a config file is also needed. It should be owned by
# group "frrvty" and set to ug=rw,o= though. Check /etc/pam.d/frr, too.
#
# The watchfrr, zebra and staticd daemons are always started.
#
bgpd=no
ospfd=yes
ospf6d=no
ripd=no
ripngd=no
isisd=no
pimd=no
ldpd=no
nhrpd=no
eigrpd=no
babeld=no
sharpd=no
pbrd=no
bfdd=no
fabricd=no
vrrpd=no
pathd=no

#
# If this option is set the /etc/init.d/frr script automatically loads
# the config via "vtysh -b" when the servers are started.
# Check /etc/pam.d/frr if you intend to use "vtysh"!
#
vtysh_enable=yes
zebra_options="  -A 127.0.0.1 -s 90000000"
bgpd_options="   -A 127.0.0.1"
ospfd_options="  -A 127.0.0.1"
ospf6d_options=" -A ::1"
ripd_options="   -A 127.0.0.1"
ripngd_options=" -A ::1"
isisd_options="  -A 127.0.0.1"
pimd_options="   -A 127.0.0.1"
ldpd_options="   -A 127.0.0.1"
nhrpd_options="  -A 127.0.0.1"
eigrpd_options=" -A 127.0.0.1"
babeld_options=" -A 127.0.0.1"
sharpd_options=" -A 127.0.0.1"
pbrd_options="   -A 127.0.0.1"
staticd_options="-A 127.0.0.1"
bfdd_options="   -A 127.0.0.1"
fabricd_options="-A 127.0.0.1"
vrrpd_options="  -A 127.0.0.1"
pathd_options="  -A 127.0.0.1"

# configuration profile
#
#frr_profile="traditional"
#frr_profile="datacenter"

#
# This is the maximum number of FD's that will be available.
# Upon startup this is read by the control files and ulimit
# is called.  Uncomment and use a reasonable value for your
# setup if you are expecting a large number of peers in
# say BGP.
#MAX_FDS=1024

# The list of daemons to watch is automatically generated by the init script.
#watchfrr_options=""

# To make watchfrr create/join the specified netns, use the following option:
watchfrr_options="--netns"
# This only has an effect in /etc/frr/<somename>/daemons, and you need to
# start FRR with "/usr/lib/frr/frrinit.sh start <somename>".

# for debugging purposes, you can specify a "wrap" command to start instead
# of starting the daemon directly, e.g. to use valgrind on ospfd:
#   ospfd_wrap="/usr/bin/valgrind"
# or you can use "all_wrap" for all daemons, e.g. to use perf record:
#   all_wrap="/usr/bin/perf record --call-graph -"
# the normal daemon command is added to this at the end.
__EOF__

chown -R frr.frr "/etc/frr/router2"

# start frr
/usr/lib/frr/frrinit.sh start "router2"

# ospf setting
ip netns exec router2 vtysh -N router2 -E <<__EOF__
conf t
router ospf
network 10.0.0.0/8 area 0
end
write
__EOF__
router3設定コマンドはここをクリック
# run post linkup commands: router3
# create frr config directory if not exists
if [ ! -d "/etc/frr/router3" ]; then
        mkdir "/etc/frr/router3"
fi

# generate config file for network namespace
cat <<__EOF__ > /etc/frr/router3/vtysh.conf
no service integrated-vtysh-config
hostname router3
__EOF__

# generate config file for network namespace
cat <<__EOF__ > /etc/frr/router3/daemons
# This file tells the frr package which daemons to start.
#
# Sample configurations for these daemons can be found in
# /usr/share/doc/frr/examples/.
#
# ATTENTION:
#
# When activating a daemon for the first time, a config file, even if it is
# empty, has to be present *and* be owned by the user and group "frr", else
# the daemon will not be started by /etc/init.d/frr. The permissions should
# be u=rw,g=r,o=.
# When using "vtysh" such a config file is also needed. It should be owned by
# group "frrvty" and set to ug=rw,o= though. Check /etc/pam.d/frr, too.
#
# The watchfrr, zebra and staticd daemons are always started.
#
bgpd=no
ospfd=yes
ospf6d=no
ripd=no
ripngd=no
isisd=no
pimd=no
ldpd=no
nhrpd=no
eigrpd=no
babeld=no
sharpd=no
pbrd=no
bfdd=no
fabricd=no
vrrpd=no
pathd=no

#
# If this option is set the /etc/init.d/frr script automatically loads
# the config via "vtysh -b" when the servers are started.
# Check /etc/pam.d/frr if you intend to use "vtysh"!
#
vtysh_enable=yes
zebra_options="  -A 127.0.0.1 -s 90000000"
bgpd_options="   -A 127.0.0.1"
ospfd_options="  -A 127.0.0.1"
ospf6d_options=" -A ::1"
ripd_options="   -A 127.0.0.1"
ripngd_options=" -A ::1"
isisd_options="  -A 127.0.0.1"
pimd_options="   -A 127.0.0.1"
ldpd_options="   -A 127.0.0.1"
nhrpd_options="  -A 127.0.0.1"
eigrpd_options=" -A 127.0.0.1"
babeld_options=" -A 127.0.0.1"
sharpd_options=" -A 127.0.0.1"
pbrd_options="   -A 127.0.0.1"
staticd_options="-A 127.0.0.1"
bfdd_options="   -A 127.0.0.1"
fabricd_options="-A 127.0.0.1"
vrrpd_options="  -A 127.0.0.1"
pathd_options="  -A 127.0.0.1"

# configuration profile
#
#frr_profile="traditional"
#frr_profile="datacenter"

#
# This is the maximum number of FD's that will be available.
# Upon startup this is read by the control files and ulimit
# is called.  Uncomment and use a reasonable value for your
# setup if you are expecting a large number of peers in
# say BGP.
#MAX_FDS=1024

# The list of daemons to watch is automatically generated by the init script.
#watchfrr_options=""

# To make watchfrr create/join the specified netns, use the following option:
watchfrr_options="--netns"
# This only has an effect in /etc/frr/<somename>/daemons, and you need to
# start FRR with "/usr/lib/frr/frrinit.sh start <somename>".

# for debugging purposes, you can specify a "wrap" command to start instead
# of starting the daemon directly, e.g. to use valgrind on ospfd:
#   ospfd_wrap="/usr/bin/valgrind"
# or you can use "all_wrap" for all daemons, e.g. to use perf record:
#   all_wrap="/usr/bin/perf record --call-graph -"
# the normal daemon command is added to this at the end.
__EOF__

chown -R frr.frr "/etc/frr/router3"

# start frr
/usr/lib/frr/frrinit.sh start "router3"

# ospf setting
ip netns exec router3 vtysh -N router3 -E <<__EOF__
conf t
router ospf
network 10.0.0.0/8 area 0
end
write
__EOF__
router4設定コマンドはここをクリック
# run post linkup commands: router4
# create frr config directory if not exists
if [ ! -d "/etc/frr/router4" ]; then
        mkdir "/etc/frr/router4"
fi

# generate config file for network namespace
cat <<__EOF__ > /etc/frr/router4/vtysh.conf
no service integrated-vtysh-config
hostname router4
__EOF__

# generate config file for network namespace
cat <<__EOF__ > /etc/frr/router4/daemons
# This file tells the frr package which daemons to start.
#
# Sample configurations for these daemons can be found in
# /usr/share/doc/frr/examples/.
#
# ATTENTION:
#
# When activating a daemon for the first time, a config file, even if it is
# empty, has to be present *and* be owned by the user and group "frr", else
# the daemon will not be started by /etc/init.d/frr. The permissions should
# be u=rw,g=r,o=.
# When using "vtysh" such a config file is also needed. It should be owned by
# group "frrvty" and set to ug=rw,o= though. Check /etc/pam.d/frr, too.
#
# The watchfrr, zebra and staticd daemons are always started.
#
bgpd=no
ospfd=yes
ospf6d=no
ripd=no
ripngd=no
isisd=no
pimd=no
ldpd=no
nhrpd=no
eigrpd=no
babeld=no
sharpd=no
pbrd=no
bfdd=no
fabricd=no
vrrpd=no
pathd=no

#
# If this option is set the /etc/init.d/frr script automatically loads
# the config via "vtysh -b" when the servers are started.
# Check /etc/pam.d/frr if you intend to use "vtysh"!
#
vtysh_enable=yes
zebra_options="  -A 127.0.0.1 -s 90000000"
bgpd_options="   -A 127.0.0.1"
ospfd_options="  -A 127.0.0.1"
ospf6d_options=" -A ::1"
ripd_options="   -A 127.0.0.1"
ripngd_options=" -A ::1"
isisd_options="  -A 127.0.0.1"
pimd_options="   -A 127.0.0.1"
ldpd_options="   -A 127.0.0.1"
nhrpd_options="  -A 127.0.0.1"
eigrpd_options=" -A 127.0.0.1"
babeld_options=" -A 127.0.0.1"
sharpd_options=" -A 127.0.0.1"
pbrd_options="   -A 127.0.0.1"
staticd_options="-A 127.0.0.1"
bfdd_options="   -A 127.0.0.1"
fabricd_options="-A 127.0.0.1"
vrrpd_options="  -A 127.0.0.1"
pathd_options="  -A 127.0.0.1"

# configuration profile
#
#frr_profile="traditional"
#frr_profile="datacenter"

#
# This is the maximum number of FD's that will be available.
# Upon startup this is read by the control files and ulimit
# is called.  Uncomment and use a reasonable value for your
# setup if you are expecting a large number of peers in
# say BGP.
#MAX_FDS=1024

# The list of daemons to watch is automatically generated by the init script.
#watchfrr_options=""

# To make watchfrr create/join the specified netns, use the following option:
watchfrr_options="--netns"
# This only has an effect in /etc/frr/<somename>/daemons, and you need to
# start FRR with "/usr/lib/frr/frrinit.sh start <somename>".

# for debugging purposes, you can specify a "wrap" command to start instead
# of starting the daemon directly, e.g. to use valgrind on ospfd:
#   ospfd_wrap="/usr/bin/valgrind"
# or you can use "all_wrap" for all daemons, e.g. to use perf record:
#   all_wrap="/usr/bin/perf record --call-graph -"
# the normal daemon command is added to this at the end.
__EOF__

chown -R frr.frr "/etc/frr/router4"

# start frr
/usr/lib/frr/frrinit.sh start "router4"

# ospf setting
ip netns exec router4 vtysh -N router4 -E <<__EOF__
conf t
router ospf
network 10.0.0.0/8 area 0
end
write
__EOF__
動作確認
すべてのルータの設定が終わったら30秒くらい待ってからhost1からhost2宛にPingしてみます。
うまくいってればPing通ります。うれしいですね。
# ip netns exec host1 ping -c 10 10.0.92.100
PING 10.0.92.100 (10.0.92.100) 56(84) bytes of data.
64 bytes from 10.0.92.100: icmp_seq=1 ttl=61 time=0.062 ms
64 bytes from 10.0.92.100: icmp_seq=2 ttl=61 time=0.185 ms
64 bytes from 10.0.92.100: icmp_seq=3 ttl=61 time=0.128 ms
64 bytes from 10.0.92.100: icmp_seq=4 ttl=61 time=0.139 ms
64 bytes from 10.0.92.100: icmp_seq=5 ttl=61 time=0.131 ms
64 bytes from 10.0.92.100: icmp_seq=6 ttl=61 time=0.068 ms
64 bytes from 10.0.92.100: icmp_seq=7 ttl=61 time=0.126 ms
64 bytes from 10.0.92.100: icmp_seq=8 ttl=61 time=0.129 ms
64 bytes from 10.0.92.100: icmp_seq=9 ttl=61 time=0.132 ms
64 bytes from 10.0.92.100: icmp_seq=10 ttl=61 time=0.058 ms

--- 10.0.92.100 ping statistics ---
10 packets transmitted, 10 received, 0% packet loss, time 9209ms
rtt min/avg/max/mdev = 0.058/0.115/0.185/0.038 ms
細かい確認は別の記事で。
Discussion