React + Golang + websocketでリアルタイムチャットアプリを作る -Part1/websocket編-
はじめに
websocketについて何となく理解していたものの、実際実装したことはありませんでした
なので今回Client側にReact, Server側にGoを利用して、
1:Nでリアルタイムにテキストメッセージのやりとりができるシンプルなチャットアプリを作ってみます
また、サーバーのスケールアウトにも対応できるようにRedisのPub/Subも取り入れます
※長くなったのでPub/SubはPart2にて!
利用する技術とか
Client
・ React 18
・ TypeScript
・ Vite
・ Recoil
Server
・ Golang 1.18
・ gorilla/websocket
その他ミドルウェア
・ Docker,docker-compose
※Part1のソースコード全文はこちら
Part1の最終的なディレクトリ構成はこんな感じ(一部省略)
.
├── docker-compose.yaml
├── Makefile
├── client
│   ├── Dockerfile
│   ├── package.json
│   ├── package-lock.json
│   ├── vite.config.ts
│   ├── index.html
│   └── src
│       ├── App.tsx
│       ├── main.tsx
│       ├── components
│       ├── hooks
│       ├── models
│       └── state
└── server
    ├── go.mod
    ├── go.sum
    ├── Dockerfile
    ├── .air.toml
    └── src
        ├── main.go
        ├── domain
        └── handlers
Server側の実装
GoのDocker環境を用意する
まずはDockerfileとdocker-compose.yamlを用意します
FROM golang:1.18.3
ENV TZ=Asia/Tokyo

ENV CGO_ENABLED=0
ENV GOOS=linux
ENV GOARCH=amd64
ENV ROOTPATH=/go/app

WORKDIR ${ROOTPATH}

RUN go install github.com/cosmtrek/air@v1.40.0
COPY go.mod go.sum .air.toml ./
RUN go mod download

EXPOSE 80
CMD ["air", "-c", ".air.toml"]
※ホットリロードのためにairを使ってますが好みで変更してください
airの設定ファイルはこちら
# Config file for [Air](https://github.com/cosmtrek/air) in TOML format

# Working directory
# . or absolute path, please note that the directories following must be under root.
root = "."
tmp_dir = "tmp"

[build]
# Just plain old shell command. You could use `make` as well.
cmd = "go build -o ./tmp/main ./src/main.go"
# Binary file yields from `cmd`.
bin = "tmp/main"
# Customize binary, can setup environment variables when run your app.
full_bin = "APP_ENV=dev APP_USER=air ./tmp/main"
# Watch these filename extensions.
include_ext = ["go", "tpl", "tmpl", "html"]
# Ignore these filename extensions or directories.
exclude_dir = ["assets", "tmp", "vendor", "frontend/node_modules"]
# Watch these directories if you specified.
include_dir = []
# Exclude files.
exclude_file = []
# Exclude specific regular expressions.
exclude_regex = ["_test.go"]
# Exclude unchanged files.
exclude_unchanged = true
# Follow symlink for directories
follow_symlink = true
# This log file places in your tmp_dir.
log = "air.log"
# It's not necessary to trigger build each time file changes if it's too frequent.
delay = 1000 # ms
# Stop running old binary when build errors occur.
stop_on_error = true
# Send Interrupt signal before killing process (windows does not support this feature)
send_interrupt = false
# Delay after sending Interrupt signal
kill_delay = 500 # ms

[log]
# Show log time
time = false

[color]
# Customize each part's color. If no color found, use the raw app log.
main = "magenta"
watcher = "cyan"
build = "yellow"
runner = "green"

[misc]
# Delete tmp directory on exit
clean_on_exit = true
version: "3.8"

services:
  server:
    build:
      context: ./server
      dockerfile: Dockerfile
    stdin_open: true
    tty: true
    ports:
      - 80:80
    volumes:
      - type: bind
        source: server/src
        target: /go/app/src
go.modはこんな感じです
module github.com/TadayoshiOtsuka/simple_chat

go 1.18

require github.com/gorilla/websocket v1.5.0
httpサーバーを用意する
Goの環境が用意できたのでhttpサーバーから実装していきます
標準パッケージのnet/httpを利用します
package main

import (
	"fmt"
	"log"
	"net/http"
)

func main() {
	port := "80"
	log.Printf("Listening on port %s", port)
	if err := http.ListenAndServe(fmt.Sprintf(":%v", port), nil); err != nil {
		log.Panicln("Serve Error:", err)
	}
}
websocketのhandlerを追加する
httpサーバーからのリクエストをhandleし、
http通信をwebsocketへupgradeするhandlerを実装します
今回websocket周りはgorilla/websocketを利用します
gorilla/websocketは簡単にhttp->websocketのupgradeを行える、
Upgrader構造体を提供してくれているのでこれを用います
package handlers

import (
	"log"
	"net/http"

	"github.com/gorilla/websocket"
)

type WebsocketHandler struct {}

func NewWebsocketHandler() *WebsocketHandler {
	return &WebsocketHandler{}
}

func (h *WebsocketHandler) Handle(w http.ResponseWriter, r *http.Request) {
	upgrader := &websocket.Upgrader{
		CheckOrigin: func(r *http.Request) bool {
			return true
		},
	}
	_, err := upgrader.Upgrade(w, r, nil)
	if err != nil {
		log.Fatal(err)
	}
}
httpサーバーにエンドポイントを追加
httpサーバーとwebsocketのhandlerが作成できたので、
main.goでエンドポイントを作成し、handlerを登録します
package main

import (
	"fmt"
	"log"
	"net/http"

	"github.com/TadayoshiOtsuka/simple_chat/src/handlers"
)

func main() {
+	http.HandleFunc("/ws", handlers.NewWebsocketHandler().Handle)

	port := "80"
	log.Printf("Listening on port %s", port)
	if err := http.ListenAndServe(fmt.Sprintf(":%v", port), nil); err != nil {
		log.Panicln("Serve Error:", err)
	}
}
この時点でhttp://localhost:3000/wsに対してリクエストを行うとprotocolがwebsocketにupgradeされるはずです。
curlでwebsocket通信を試してみます
% docker-compose up -d --build
% curl -i -N -H "Connection: keep-alive, Upgrade" -H "Upgrade: websocket" -H "Sec-WebSocket-Version: 13" -H "Sec-WebSocket-Extensions: deflate-stream" -H "Sec-WebSocket-Key: WIY4slX50bnnSF1GaedKhg==" -H "Host: localhost:80" -H "Origin:http://localhost:80" http://localhost:80/ws
=>
HTTP/1.1 101 Switching Protocols
Upgrade: websocket
Connection: Upgrade
Sec-WebSocket-Accept: HLsuiHpqiMRADWIpBmfKuNWkpHk=
上記のように正常にレスポンスが帰ってきていればwebsocketコネクションの確立は成功です🎉
Hub構造体の実装
ユーザーの入室/退出/チャット送信を管理するためのHubを実装します
実装は以下のようになります、一つずつ説明していきます
※現時点ではClientが未定義なのでコンパイルエラーになります
package domain

type Hub struct {
	Clients      map[*Client]bool
	RegisterCh   chan *Client
	UnRegisterCh chan *Client
	BroadcastCh  chan []byte
}

func NewHub() *Hub {
	return &Hub{
		Clients:      make(map[*Client]bool),
		RegisterCh:   make(chan *Client),
		UnRegisterCh: make(chan *Client),
		BroadcastCh:  make(chan Message),
	}
}

func (h *Hub) RunLoop() {
	for {
		select {
		case client := <-h.RegisterCh:
			h.register(client)

		case client := <-h.UnRegisterCh:
			h.unregister(client)

		case msg := <-h.BroadcastCh:
			h.broadCastToAllClient(msg)
		}
	}
}

func (h *Hub) register(c *Client) {
	h.Clients[c] = true
}

func (h *Hub) unregister(c *Client) {
	delete(h.Clients, c)
}

func (h *Hub) broadCastToAllClient(msg []byte) {
	for c := range h.Clients {
		c.sendCh <- msg
	}
}
・Hubの各フィールド
type Hub struct {
	Clients      map[*Client]bool
	RegisterCh   chan *Client
	UnRegisterCh chan *Client
	BroadcastCh  chan []byte
}
・Clients
=>現在のチャット参加者一覧です。後ほど定義するClientの参照をmapで保持します
・RegisterCh
=>Clientの参照をやり取りするchannelです。ユーザーの入室時に利用します
・UnregisterCh
=>Clientの参照をやり取りするchannelです。ユーザーの退出時に利用します
・BroadcastCh
=>[]byteをやりとりするためのchannelです。ユーザーがチャットを送信した際に利用します
・入室/退室/チャット送信を管理するメソッド
func (h *Hub) register(c *Client) {
	h.Clients[c] = true
}

func (h *Hub) unregister(c *Client) {
	delete(h.Clients, c)
}

func (h *Hub) broadCastToAllClient(msg []byte) {
	for c := range h.Clients {
		c.sendCh <- msg
	}
}
・registerメソッド
=> Clientの参照を受け取り、HubのフィールドにあるClientsに追加します
・unregisterメソッド
=> Clientの参照を受け取り、HubのフィールドにあるClientsから削除します
・broadCastToAllClientメソッド
=>
[]byteを受け取り、レシーバであるHubのClientsフィールドで保持している全てのClientの、sendChフィールド(後ほど定義しますが型はchan []byte)へ値を送信します
・RunLoop
func (h *Hub) RunLoop() {
	for {
		select {
		case client := <-h.RegisterCh:
			h.register(client)

		case client := <-h.UnRegisterCh:
			h.unregister(client)

		case msg := <-h.BroadcastCh:
			h.broadCastToAllClient(msg)
		}
	}
}
forで無限にループしつつ、selectで単一caseの処理を実行します
それぞれのcaseは右辺のchannelに値が送信されることがconditionとなります
実装を見た上で、ユーザーの入室を例に一連の流れをまとめると、
1, HubのRegisterChへ*Clientを送信する
2, RunLoopの、case client := <-h.RegisterCh:節の、registerが実行される
3, registerによってHubのClientsフィールドに*Clientが追加される
という感じになります
Client構造体の実装
チャットに参加しているユーザーを表すClientを実装します
実装は以下のようになります
package domain

import (
	"log"

	"github.com/gorilla/websocket"
)

type Client struct {
	ws     *websocket.Conn
	sendCh chan Message
}

func NewClient(ws *websocket.Conn) *Client {
	return &Client{
		ws:     ws,
		sendCh: make(chan Message),
	}
}

func (c *Client) ReadLoop(broadCast chan<- Message, unregister chan<- *Client) {
	defer func() {
		c.disconnect(unregister)
	}()

	for {
		_, jsonMsg, err := c.ws.ReadMessage()
		if err != nil {
			if websocket.IsUnexpectedCloseError(err, websocket.CloseGoingAway, websocket.CloseAbnormalClosure) {
				log.Printf("unexpected close error: %v", err)
			}
			break
		}

		broadCast <- jsonMsg
	}

}

func (c *Client) WriteLoop() {
	defer func() {
		c.ws.Close()
	}()

	for {
		message := <-c.sendCh

		w, err := c.ws.NextWriter(websocket.TextMessage)
		if err != nil {
			return
		}
		w.Write(message)

		if err := w.Close(); err != nil {
			return
		}
	}
}

func (c *Client) disconnect(unregister chan<- *Client) {
	unregister <- c
	c.ws.Close()
}
・Client構造体の各フィールド
type Client struct {
	ws     *websocket.Conn
	sendCh chan Message
}
・ws
=> websocketHandlerで確立したwebsocketコネクションの参照です
・sendCh
=>
[]byteの値をやりとりするchannelです。つい先ほど登場しました。
・ReadLoop
func (c *Client) ReadLoop(broadCast chan<- Message, unregister chan<- *Client) {
	defer func() {
		c.disconnect(unregister)
	}()

	for {
		_, jsonMsg, err := c.ws.ReadMessage()
		if err != nil {
			if websocket.IsUnexpectedCloseError(err, websocket.CloseGoingAway, websocket.CloseAbnormalClosure) {
				log.Printf("unexpected close error: %v", err)
			}
			break
		}

		broadCast <- jsonMsg
	}

}
送信専用の broadCast、unregister channelを引数に取ります。
forで無限ループしつつ、wsに送信されるチャットをReadMessageで読み取ります
読み取りに成功すると、引数で受け取っているbroadCastに読み取った値を送信します。
defer関数によって、ReadLoopが終了する際に後ほど説明するdisconnectメソッドを呼んでいます。
・WriteLoop
func (c *Client) WriteLoop() {
	defer func() {
		c.ws.Close()
	}()

	for {
		message := <-c.sendCh

		w, err := c.ws.NextWriter(websocket.TextMessage)
		if err != nil {
			return
		}
		w.Write(message)

		if err := w.Close(); err != nil {
			return
		}
	}
}
forで無限ループしつつ、
レシーバの*Clientが持つsendChに値が送信されるのを待ちます
値が送信されると、ws.NextWriter(websocket.TextMessage)によって、
websocketレスポンスを行うためのWriterを発行します
発行した後、Writerにmessageを書き込みます。
書き込み後、w.Close()によってwebsocketコネクションを確立しているブラウザにレスポンスを返します。
実際にsendChへ[]byteを送信しているのは、
HubのbroadCastToAllClientだけです
broadCastToAllClientは、HubのBroadcastChに[]byteが送信されると発火します。
ややこしいので一旦チャットの送受信についてまとめると、
1, ReadLoopでwsから新たなチャットを読み取る
2, 読み取りに成功すると、BroadCastChへ読み取った[]byteを送信する
3, BroadCastChへの送信をトリガーに、HubのbroadCastToAllClientが発火する。
4, broadCastToAllClientによって、HubのClientsフィールドが保持しているClient全てのsendChへ[]byteが送信される
5, sendChへの送信をトリガーに、WriteLoopのブロックが解除され、各ユーザーのブラウザにレスポンスが送られる
といった流れになっています
・disconnect
func (c *Client) disconnect(unregister chan<- *Client) {
	unregister <- c
	c.ws.Close()
}
送信専用のunregister channelを引数に取ります
呼び出されると、unregsiterへレシーバーである*Clientを送信し、
レシーバーである*Clientが持つwebsocketコネクションをClose()します
main.goとwebsocket_handler.goの更新
チャットに必要な機能は実装できたので、main.goとwebsocket_handler.goでそれぞれのメソッドを呼び出します。
package main

import (
	"fmt"
	"log"
	"net/http"

+	"github.com/TadayoshiOtsuka/simple_chat/src/domain"
	"github.com/TadayoshiOtsuka/simple_chat/src/handlers"
)

func main() {
+	hub := domain.NewHub()
+	go hub.RunLoop()

+	http.HandleFunc("/ws", handlers.NewWebsocketHandler(hub).Handle)

	port := "80"
	log.Printf("Listening on port %s", port)
	if err := http.ListenAndServe(fmt.Sprintf(":%v", port), nil); err != nil {
		log.Panicln("Serve Error:", err)
	}
}
Hub構造体を初期化し、RunLoopメソッドをgoroutineで実行します
WebsocketHandlerにもHubを渡すようにします
package handlers

import (
	"log"
	"net/http"

+	"github.com/TadayoshiOtsuka/simple_chat/src/domain"
	"github.com/gorilla/websocket"
)

type WebsocketHandler struct {
+	hub *domain.Hub
}

+func NewWebsocketHandler(hub *domain.Hub) *WebsocketHandler {
+	return &WebsocketHandler{
+		hub: hub,
+	}
+}

func (h *WebsocketHandler) Handle(w http.ResponseWriter, r *http.Request) {
	upgrader := &websocket.Upgrader{
		CheckOrigin: func(r *http.Request) bool {
			return true
		},
	}
+	ws, err := upgrader.Upgrade(w, r, nil) // "_"を"ws"に
	if err != nil {
		log.Fatal(err)
	}

+	client := domain.NewClient(ws)
+	go client.ReadLoop(h.hub.BroadcastCh, h.hub.UnRegisterCh)
+	go client.WriteLoop()
+	h.hub.RegisterCh <- client
}
Client構造体を初期化し、goroutineでReadLoopとWriteLoopを実行します
また、今回のアプリはwebsocketコネクション確立 = 入室なので
hubのResgiterChに*Clientを送信するようにします
以上でServer側の実装は完了です🎉
個人的にchannelやgoroutineが出てくると急にわからなくなったりしましたが、
それぞれのchannelとgoroutineがどう作用するのかに着目しながら実装していくと理解しやすかったです(当たり前ですが…)
Client側の実装
環境構築
続いてClient側の実装をしていきます
reactの環境構築にはVite, 状態管理にはRecoil(使ってみたかったので)を利用します
npm create vite
react-tsを選択し、
project nameはclientとします
・Dockerfileの作成とdocker-compose.yamlの更新
FROM node:18 as Dev

WORKDIR /usr/app

COPY package*.json /usr/app/
COPY tsconfig*.json /usr/app/
COPY vite.config.ts /usr/app/
COPY index.html /usr/app/
RUN npm i

EXPOSE 5173
CMD ["npm", "run", "dev" ]
ちなみにVite3.0.0からdev serverのポートが3000から5173になりました
version: "3.8"

services:
+ client:
+   build:
+     context: ./client
+     dockerfile: Dockerfile
+   tty: true
+   stdin_open: true
+   ports:
+     - 3000:5173
+   volumes:
+     - type: bind
+       source: "client/src"
+       target: "/usr/app/src"
+   depends_on:
+     - server

  server:
    build:
      context: ./server
      dockerfile: Dockerfile
    stdin_open: true
    tty: true
    ports:
      - 80:80
    volumes:
      - type: bind
        source: server/src
        target: /go/app/src
package.jsonは以下のような感じです。コピーしてnpm installしてください
{
  "name": "client",
  "private": true,
  "version": "0.0.0",
  "type": "module",
  "scripts": {
    "dev": "vite",
    "build": "tsc && vite build",
    "preview": "vite preview"
  },
  "dependencies": {
    "react": "^18.2.0",
    "react-dom": "^18.2.0",
    "recoil": "^0.7.4",
    "websocket": "^1.0.34"
  },
  "devDependencies": {
    "@types/react": "^18.0.15",
    "@types/react-dom": "^18.0.6",
    "@types/websocket": "^1.0.5",
    "@vitejs/plugin-react": "^2.0.0",
    "typescript": "^4.6.4",
    "vite": "^3.0.0"
  }
}
また、Dockerを利用する場合はvite.config.tsに以下の追記が必要です
import { defineConfig } from "vite";
import react from "@vitejs/plugin-react";

// https://vitejs.dev/config/
export default defineConfig({
  plugins: [react()],
+ server: {
+   host: true,
+ },
});
websocketコネクションの確立
websocketコネクションの確立は非同期で行うため、
・websocketコネクション確立をPromiseでラップする関数
・上記関数を呼び出すselector
・websocketコネクションをstateとして保持するatom
を実装します
import { atom, selector } from "recoil";
import * as WebSocket from "websocket";

const connect = (): Promise<WebSocket.w3cwebsocket> => {
  return new Promise((resolve, reject) => {
    const socket = new WebSocket.w3cwebsocket("ws://localhost:80/ws");
    socket.onopen = () => {
      console.log("connected");
      resolve(socket);
    };
    socket.onclose = () => {
      console.log("reconnecting...");
      connect();
    };
    socket.onerror = (err) => {
      console.log("connection error:", err);
      reject(err);
    };
  });
};

const connectWebsocketSelector = selector({
  key: "connectWebsocket",
  get: async (): Promise<WebSocket.w3cwebsocket> => {
    return await connect();
  },
});

export const websocketAtom = atom<WebSocket.w3cwebsocket>({
  key: "websocket",
  default: connectWebsocketSelector,
});
websocketを利用してチャットを送るカスタムフックの作成
import { useCallback, useState } from "react";
import { websocketAtom } from "../state/websocket";
import { useRecoilValue } from "recoil";

export const useSendMessage = () => {
  const socket = useRecoilValue(websocketAtom);
  const [input, setInput] = useState<string>("");

  const send = useCallback(() => {
    if (input.length === 0) return;
    socket.send(JSON.stringify(input));
    setInput("");
  }, [input]);

  return { input, setInput, send };
};
useRecoilValueで、websocketを保持しているatomの中身を読み出しています。
websocketを利用してチャットを受信するカスタムフックの作成
カスタムフックの前に、チャットの一覧を保持するatomを定義します
export type Message = {
  content: string;
};
import { Message } from "../models/message";
import { atom } from "recoil";

export const messageListAtom = atom<Message[]>({
  key: "messageList",
  default: [],
});
websocketでチャットを受け取る度に、
messageListAtomを更新して返すカスタムフックを実装します。
import { websocketAtom } from "../state/websocket";
import { messageListAtom } from "../state/messages";
import { useRecoilCallback, useRecoilValue } from "recoil";
import { Message } from "../models/message";

export const useMessageList = (): Message[] => {
  const socket = useRecoilValue(websocketAtom);
  const messageList = useRecoilValue(messageListAtom);

  const updateMessageList = useRecoilCallback(
    ({ set }) =>
      (message: Message) => {
        set(messageListAtom, [...messageList, message]);
      }
  );
  socket.onmessage = (msg) => {
    const content = JSON.parse(msg.data as string);
    const message: Message = { content: content };
    updateMessageList(message);
  };

  return messageList;
};
useRecoilValueで、websocketを保持しているatomの中身を読み出しています。
新規のメッセージが来る度にトリガーされるsocket.onmessageでデータを受け取り、
整形してmessageListAtomに追加/更新しています
チャットリスト/新規チャットフォームコンポーネントの作成
先ほど作成したカスタムフックを利用するコンポーネントを作成していきます
import { useMessageList } from "../hooks/use-message-list";

export const MessageList = () => {
  const messageList = useMessageList();

  return (
    <div>
      {messageList.map((m, i) => (
        <div key={i}>{m.content}</div>
      ))}
    </div>
  );
};
import { useSendMessage } from "../hooks/use-send-message";

export const MessageInput = () => {
  const { input, setInput, send } = useSendMessage();

  return (
    <div>
      <input
        onChange={(e) => setInput(e.target.value)}
        value={input}
        placeholder="new message"
      />
      <button onClick={send}>Send</button>
    </div>
  );
};
アプリがシンプルすぎるのもありますが、
websocketコネクションとそれを利用したロジック部分をカスタムフックに隔離したことで、思ったよりスッキリ実装できた気がします
チャット画面の作成
先ほど作成したコンポーネントを利用してチャット画面を構築します
import React from "react";
import ReactDOM from "react-dom/client";
import { RecoilRoot } from "recoil";
import { App } from "./App";

ReactDOM.createRoot(document.getElementById("root") as HTMLElement).render(
  <React.StrictMode>
    <RecoilRoot>
      <App />
    </RecoilRoot>
  </React.StrictMode>
);
import { MessageInput } from "./components/MessageInput";
import { MessageList } from "./components/MessageList";

export const App = () => {
  return (
    <div>
      <h1>Simple Chat</h1>
      <MessageInput />
      <MessageList />
    </div>
  );
};
動作確認
長かったですがここまででServer/Client共に実装が完了しました🎉
実際に動作確認してみます!
% docker-compose up --build
コンテナが起動したら、ブラウザのウィンドウを2つ立ち上げて、
それぞれhttp://localhost:3000を開きます
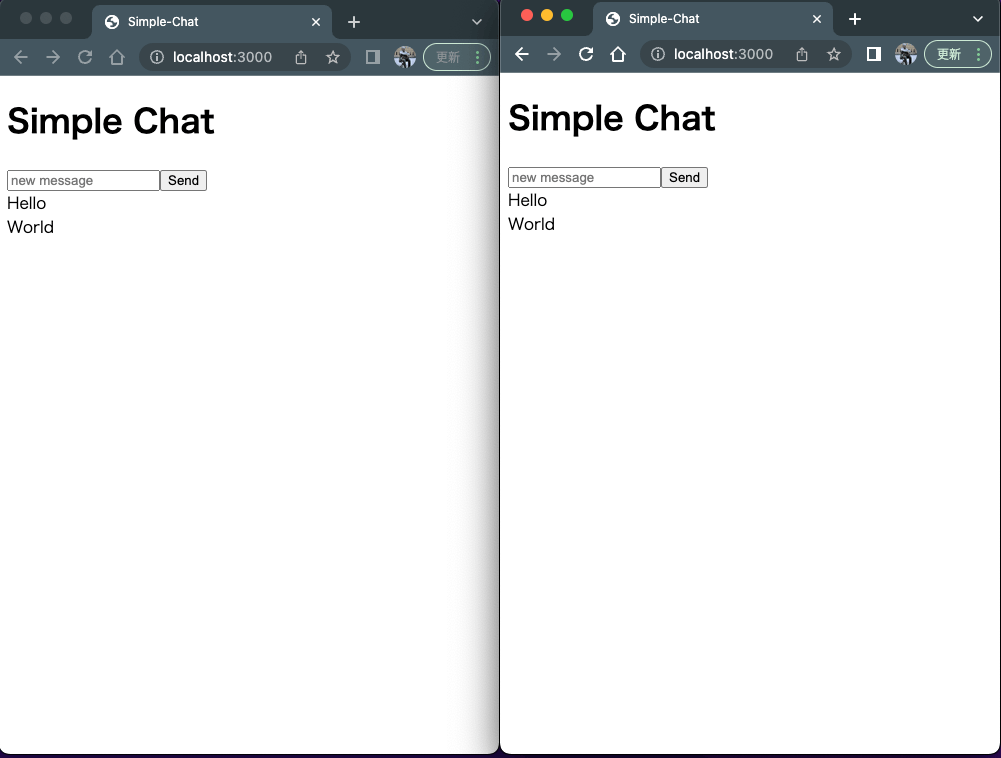
上記画像のように、
それぞれのウィンドウで開いているhttp://localhost:3000同士でチャットが行えれば成功です🎉
次のステップ
現状の実装だと同一のサーバーに接続しているユーザー同士でしかチャットを行うことができません
本番でサーバーをスケールアウト/スケールインさせるケースも意識して、
各ユーザーがどのサーバーへ接続していてもチャットが行えるように改善します
具体的にはRedisのPub/Sub機能を利用します。
※長くなってしまったのでPart2にて!
おわりに
普段の業務ではwebsocketのようなリアルタイム通信を実装することがなかったので今回やってみました
Goのchannel,goroutineの復習にもなってよかったです
ただ考えることが多くなる印象でプロダクションレベルの要件だと難易度が爆上がりしそうだなと感じました
Nodejsでsocket.ioとか使うともう少し手軽に実装できたりするのかな…
もしくはスキーマファーストな恩恵も得られるgRPCを検討してもいいのかも
参考にさせていただいたリンク
Discussion