Apache Camel × AI ― サービングによる推論 #2: TensorFlow Serving

前回の記事でも紹介した通り、先日リリースされたApache Camel 4.10 LTSではAIモデルサービングに関する3つの新しいコンポーネントが追加されました。[1]
前回はTorchServeコンポーネントについて書いたので、今回はTensorFlow Servingコンポーネントについて紹介します。
TensorFlow Servingコンポーネント
TensorFlow Servingは機械学習フレームワークのTensorFlowが提供するサービング機能です。Camel TensorFlow Servingコンポーネントを使うことで、TensorFlow ServingのgRPC Client APIsを通してTensorFlowモデルサーバーにデプロイされているAIモデルを呼び出せるようになります。
準備
改めて、まだCamel CLIがインストールされていなければインストールしてください。
jbang app install camel@apache/camel
インストールできたか動作確認をします。
$ camel --version
4.10.0
モデルの準備とサーバー立ち上げ
次に、TensorFlow Servingのサーバーを立ち上げます。最も手軽な方法はDockerイメージを使う方法ですが、記事執筆時点では公式のDockerイメージtensorflow/servingはamd64アーキテクチャにしか対応していないため、macOSユーザーでも試せるようにarm64にも対応しているBitnamiのDockerイメージを使うことにします。
PyTorchと違い、TensorFlow Servingではサーバー起動時にロードするモデルを予め指定する必要があります。本記事では2つのモデルを使います。
-
half_plus_two(x/2 + 2) ⋯ TensorFlow Servingのリポジトリにあるテスト用モデル(testdata) -
mnist⋯ TensorFlowで予め学習したMNISTのモデル
簡略化のためにサンプルコードのリポジトリにそのまま使えるモデル models を用意していますので、こちらを直接ダウンロードしてください。
modelsがダウンロードできたら、modelsディレクトリがある場所から以下のコマンドでコンテナーを起動します。
docker run --rm -it --name tf-serving \
    -p 8500:8500 -p 8501:8501 \
    -v ./models:/models \
    -v ./models/models.pbtxt:/bitnami/tensorflow-serving/conf/tensorflow-serving.conf \
    bitnami/tensorflow-serving
モデルの操作
TensorFlow Servingが提供するモデル管理系の操作は基本的に2つです。
- ステータスチェック(Model status API)
- メタデータ取得(Model Metadata API)
それぞれCamelルートからどうやって呼び出せるかを見ていきます。
モデルのステータスチェック
まず、モデルが推論可能な状態にあるかどうかを次のエンドポイントで確認できます。MNISTモデルのステータスを確認してみます。
tensorflow-serving:model-status?modelName=mnist&modelVersion=1
//DEPS org.apache.camel:camel-bom:4.10.0@pom
//DEPS org.apache.camel:camel-core
//DEPS org.apache.camel:camel-tensorflow-serving

import org.apache.camel.builder.RouteBuilder;

public class model_status extends RouteBuilder {
    @Override
    public void configure() throws Exception {
        from("timer:model-status?repeatCount=1")
            .to("tensorflow-serving:model-status?modelName=mnist&modelVersion=1")
            .log("Status: ${body.getModelVersionStatus(0).state}");
    }
}
Camel CLIから以下のように実行します。
camel run model_status.java
成功すれば、以下のようにMNISTモデルのステータスを確認できます。
Status: AVAILABLE
モデルのメタデータ取得
TensorFlowのモデルを呼び出して推論するには、モデルの入出力のシグネチャーを確認することが重要です。
通常は、以下のREST APIを呼び出し、JSON形式でモデルシグネチャーを確認します。(mnistモデルの場合)
http://localhost:8501/v1/models/mnist/metadata
REST APIを叩いて確認するのに比べると有用性は少ないと思われますが、Camelルートからもモデルのメタデータを取得可能です。
tensorflow-serving:model-metadata?modelName=mnist&modelVersion=1
//DEPS org.apache.camel:camel-bom:4.10.0@pom
//DEPS org.apache.camel:camel-core
//DEPS org.apache.camel:camel-tensorflow-serving

import org.apache.camel.builder.RouteBuilder;

public class model_metadata extends RouteBuilder {
    @Override
    public void configure() throws Exception {
        from("timer:model-metadata?repeatCount=1")
            .to("tensorflow-serving:model-metadata?modelName=mnist&modelVersion=1")
            .log("Metadata: ${body.getMetadataOrThrow('signature_def')}");
    }
}
Camel CLIから以下のように実行します。
camel run model_metadata.java
成功すれば、以下のようにMNISTモデルのメタデータが得られていることが確認できます。
Metadata: type_url: "type.googleapis.com/tensorflow.serving.SignatureDefMap"
value: "\n\245\001\n\005serve\022\233\001\n?\n\fkeras_tensor\022/\n\024serve_keras_tensor:0\020\001\032\025\022\v\b\377\377\377\377\377\377\377\377\377\001\022\002\b\034\022\002\b\034\022<\n\boutput_0\0220\n\031StatefulPartitionedCall:0\020\001\032\021\022\v\b\377\377\377\377\377\377\377\377\377\001\022\002\b\n\032\032tensorflow/serving/predict\n\273\001\n\017serving_default\022\247\001\nI\n\fkeras_tensor\0229\n\036serving_default_keras_tensor:0\020\001\032\025\022\v\b\377\377\377\377\377\377\377\377\377\001\022\002\b\034\022\002\b\034\022>\n\boutput_0\0222\n\033StatefulPartitionedCall_1:0\020\001\032\021\022\v\b\377\377\377\377\377\377\377\377\377\001\022\002\b\n\032\032tensorflow/serving/predict\n>\n\025__saved_model_init_op\022%\022#\n\025__saved_model_init_op\022\n\n\004NoOp\032\002\030\001"
推論
本題の推論です。実際のCamelルートで主に使うのはこの操作(エンドポイント)です。TensorFlow Servingには、次の3種類の推論APIが用意されています。
- Predict API ⋯ 汎用の推論API
- Classify API ⋯ 分類問題に特化した推論API
- Regress API ⋯ 回帰分析に特化した推論API
汎用の推論(Predict)
まずは汎用のPredict APIから見ていきます。このAPIは特定の問題によらず、どんなモデルでも呼び出せます。その代わり、データ入出力のAPIも汎用になっており、データを適切に変換するまでが煩雑です。
最初にデプロイしたMNISTモデルをこのPredict APIから呼び出してみます。MNISTは、28x28のグレースケールの手書きの画像を数字として認識させるモデルです。TorchServeのときに使った同じテストデータを今回も使います。
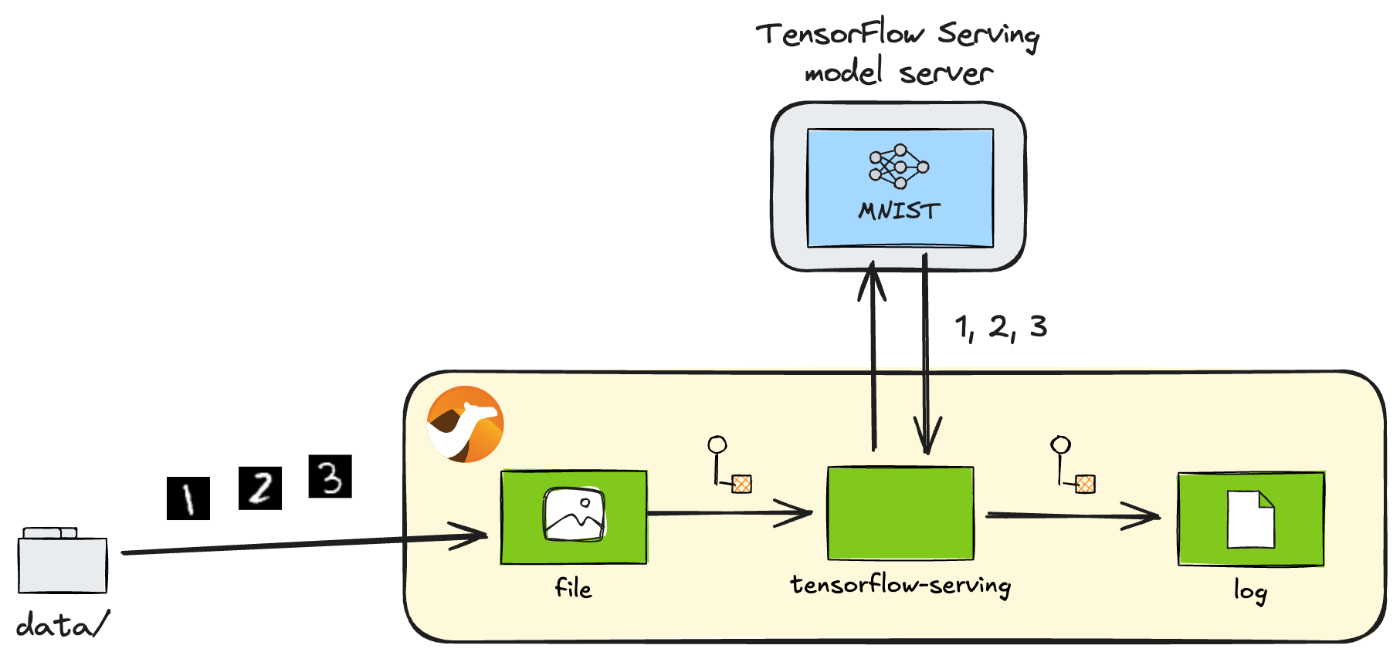
MNISTによる手書き数字の認識
推論には以下のエンドポイントを使います。
tensorflow-serving:predict?modelName=mnist&modelVersion=1
//DEPS org.apache.camel:camel-bom:4.10.0@pom
//DEPS org.apache.camel:camel-core
//DEPS org.apache.camel:camel-tensorflow-serving

import java.awt.image.BufferedImage;
import java.io.ByteArrayInputStream;
import java.io.IOException;
import java.util.ArrayList;
import java.util.List;
import java.util.stream.IntStream;
import javax.imageio.ImageIO;
import org.apache.camel.Exchange;
import org.apache.camel.RuntimeCamelException;
import org.apache.camel.builder.RouteBuilder;
import org.tensorflow.framework.DataType;
import org.tensorflow.framework.TensorProto;
import org.tensorflow.framework.TensorShapeProto;
import org.tensorflow.framework.TensorShapeProto.Dim;
import com.google.protobuf.Int64Value;
import tensorflow.serving.Model.ModelSpec;
import tensorflow.serving.Predict.PredictRequest;
import tensorflow.serving.Predict.PredictResponse;

public class predict extends RouteBuilder {
    @Override
    public void configure() throws Exception {
        from("file:data?noop=true&recursive=true&include=.*\\.png")
            .process(this::toPredictRequest)   // (1)
            .to("tensorflow-serving:predict?modelName=mnist&modelVersion=1")
            .process(this::argmax)             // (2)
            .log("${headers.camelFileName} => ${body}");
    }

    void toPredictRequest(Exchange exchange) { // (3)
        byte[] body = exchange.getMessage().getBody(byte[].class);
        List<Float> data = preprocess(body);
        TensorProto inputs = TensorProto.newBuilder()
                .setDtype(DataType.DT_FLOAT)
                .setTensorShape(TensorShapeProto.newBuilder()
                        .addDim(Dim.newBuilder().setSize(28))
                        .addDim(Dim.newBuilder().setSize(28)))
                .addAllFloatVal(data)
                .build();
        PredictRequest request = PredictRequest.newBuilder()
                .putInputs("keras_tensor", inputs)
                .build();
        exchange.getMessage().setBody(request);
    }

    List<Float> preprocess(byte[] data) {      // (4)
        try {
            BufferedImage image = ImageIO.read(new ByteArrayInputStream(data));
            int width = image.getWidth();
            int height = image.getHeight();
            if (width != 28 || height != 28) {
                throw new RuntimeCamelException("Image size must be 28x28");
            }
            List<Float> normalised = new ArrayList<>(width * height);
            for (int y = 0; y < height; y++) {
                for (int x = 0; x < width; x++) {
                    int rgb = image.getRGB(x, y);
                    normalised.add((rgb & 0xFF) / 255.0f);
                }
            }
            return normalised;
        } catch (IOException e) {
            throw new RuntimeCamelException("Error reading image", e);
        }
    }

    void argmax(Exchange exchange) {           // (5)
        PredictResponse response = exchange.getMessage().getBody(PredictResponse.class);
        TensorProto tensor = response.getOutputsOrThrow("output_0");
        int result = IntStream.range(0, tensor.getFloatValCount())
                .reduce((max, i) -> tensor.getFloatVal(max) > tensor.getFloatVal(i) ? max : i)
                .orElseThrow();
        exchange.getMessage().setBody(result);
    }
}
コードの要点を解説します。
- 推論エンドポイントを呼び出すには、入力データをTensorFlow Servingの
PredictRequestオブジェクトに変換する必要があります。 - 推論エンドポイントから返ってきた
PredictResponseオブジェクトから、後続処理のために出力データを取り出します。ここではArgmax関数を使います。 - ファイルの
byte[]データをPredictRequestに変換します。まずデータを適切に前処理(preprocess(body))し、データ型(DT_FLOAT)と次元(28x28)の一致したTensorProtoオブジェクトでラップします。最後にそのTensorProto入力オブジェクトをラベルkeras_tensorでPredictRequestに登録します。TensorFlow Servingでモデルを呼び出すにはこれらのパラメーターをすべて正確に設定する必要がありますが、これらの情報はすべてモデルのメタデータから取得できます(モデルのメタデータ取得)。 - 画像ファイルを読み込んだ
byte[]データの前処理です。ここでは、28x28のRGB画像データから青色だけを抜き出し、MNISTモデルが期待する0〜1のFloat値に正規化しています。 - Argmax関数を提供する手軽なライブラリはJavaにはないので、自分で実装します。
PredictResponseから出力データを取得するときのラベルoutput_0も、モデルのメタデータから取得できます(モデルのメタデータ取得)。
さて、コードを実行するには、テストデータをローカルのdata/ディレクトリにダウンロードした後、Camel CLIから以下のようにします。
camel run predict.java
成功すれば、以下のような結果が得られるでしょう。手書きの数字が正しく認識されていることが確認できます。
8.png => 8
9.png => 9
4.png => 4
5.png => 5
7.png => 7
6.png => 6
2.png => 2
3.png => 3
1.png => 1
0.png => 0
分類(Classify)
次にClassify APIを紹介します。このAPIは、入力データ群を特定のカテゴリーに分類する分類問題を実行するためのものです。サンプルデータのリストを入力として受け取り、各分類ラベルにスコアを付けたリストを出力として返します。
先ほどのMNISTモデルはClassify APIに対応していないので、代わりにもう1つのデプロイしたモデルhalf_plus_twoを用います。このサンプルモデルは非常に簡単なモデルで、名前から分かるように単に入力値
を計算して返すだけです。答えはラベルのない単一のスコアとして返されます。

half_plus_two
推論には以下のエンドポイントを使います。このモデルは複数のシグネチャを持っているので、エンドポイントオプションsignatureNameでシグネチャclassify_x_to_yを指定する必要があります。
tensorflow-serving:classify?modelName=half_plus_two&modelVersion=123&signatureName=classify_x_to_y
//DEPS org.apache.camel:camel-bom:4.10.0@pom
//DEPS org.apache.camel:camel-core
//DEPS org.apache.camel:camel-tensorflow-serving

import org.apache.camel.builder.RouteBuilder;
import org.tensorflow.example.Example;
import org.tensorflow.example.Feature;
import org.tensorflow.example.Features;
import org.tensorflow.example.FloatList;
import tensorflow.serving.InputOuterClass.ExampleList;
import tensorflow.serving.InputOuterClass.Input;

public class classify extends RouteBuilder {
    @Override
    public void configure() throws Exception {
        from("timer:classify?repeatCount=1")
            .setBody(constant(createInput("x", 1.0f)))
            .to("tensorflow-serving:classify?modelName=half_plus_two&modelVersion=123&signatureName=classify_x_to_y")
            .log("Result: ${body.result}");
    }

    Input createInput(String key, float f) {  // (1)
        Feature feature = Feature.newBuilder()
                .setFloatList(FloatList.newBuilder().addValue(f))
                .build();
        Features features = Features.newBuilder()
                .putFeature(key, feature)
                .build();
        Example example = Example.newBuilder()
                .setFeatures(features)
                .build();
        ExampleList exampleList = ExampleList.newBuilder()
                .addExamples(example)
                .build();
        return Input.newBuilder()
                .setExampleList(exampleList)
                .build();
    }
}
Predict APIの時と同様、入力データとしてInputオブジェクトを作る必要がありますが、
- 1つひとつの特徴量(
Feature)をまとめた(Features)サンプル(Example)をさらにリスト(ExampleList)にまとめる
だけなので、Predict APIに比べて入力データの作成が簡単です。
Camel CLIから以下のように実行します。
camel run classify.java
成功すれば、以下のような結果が得られるでしょう。
Result: classifications {
  classes {
    score: 2.5
  }
}
回帰分析(Regress)
最後にRegress APIです。このAPIは、入力データの系列からそれらの関係性を予測する手法、回帰分析を実行するためのものです。サンプルデータのリストを入力として受け取り、予測されたデータ系列のリストを出力として返します。
先ほどと同様、half_plus_twoモデルを用います。
推論には以下のエンドポイントを使います。エンドポイントオプションsignatureNameでシグネチャregress_x_to_yを指定します。
tensorflow-serving:regress?modelName=half_plus_two&modelVersion=123&signatureName=regress_x_to_y
//DEPS org.apache.camel:camel-bom:4.10.0@pom
//DEPS org.apache.camel:camel-core
//DEPS org.apache.camel:camel-tensorflow-serving

import org.apache.camel.builder.RouteBuilder;
import org.tensorflow.example.Example;
import org.tensorflow.example.Feature;
import org.tensorflow.example.Features;
import org.tensorflow.example.FloatList;
import tensorflow.serving.InputOuterClass.ExampleList;
import tensorflow.serving.InputOuterClass.Input;

public class regress extends RouteBuilder {
    @Override
    public void configure() throws Exception {
        from("timer:regress?repeatCount=1")
            .setBody(constant(createInput("x", 1.0f)))
            .to("tensorflow-serving:regress?modelName=half_plus_two&modelVersion=123&signatureName=regress_x_to_y")
            .log("Result: ${body.result}");
    }

    Input createInput(String key, float f) {
        Feature feature = Feature.newBuilder()
                .setFloatList(FloatList.newBuilder().addValue(f))
                .build();
        Features features = Features.newBuilder()
                .putFeature(key, feature)
                .build();
        Example example = Example.newBuilder()
                .setFeatures(features)
                .build();
        ExampleList exampleList = ExampleList.newBuilder()
                .addExamples(example)
                .build();
        return Input.newBuilder()
                .setExampleList(exampleList)
                .build();
    }
}
Camel CLIから以下のように実行します。
camel run regress.java
成功すれば、以下のような結果が得られるでしょう。通常は値のリストが返りますが、このモデルでは1つだけです。
Result: regressions {
  value: 2.5
}
まとめ
TorchServeコンポーネントに引き続き、最新のCamel 4.10.0 LTSリリースで使えるAIモデルサービングコンポーネントの1つ、TensorFlow Servingコンポーネントの機能を一通り見てきました。
TensorFlow Servingコンポーネントを使えば、Camelをベースに構築したインテグレーションにTensorFlowで学習したAIモデルを簡単に取り入れられるようになります。TensorFlowベースの創造的なAIインテグレーションシステムの可能性が広がります。
次回は、最後にKServeコンポーネントを紹介します。
サンプルコード
今回紹介したCamel×AIのサンプルコードは、このリポジトリで公開しています。
-
Camel TorchServeコンポーネントは4.9から。 ↩︎
Discussion