📃
React Native で SectionIndex を実装する
SectionIndex を表示したい
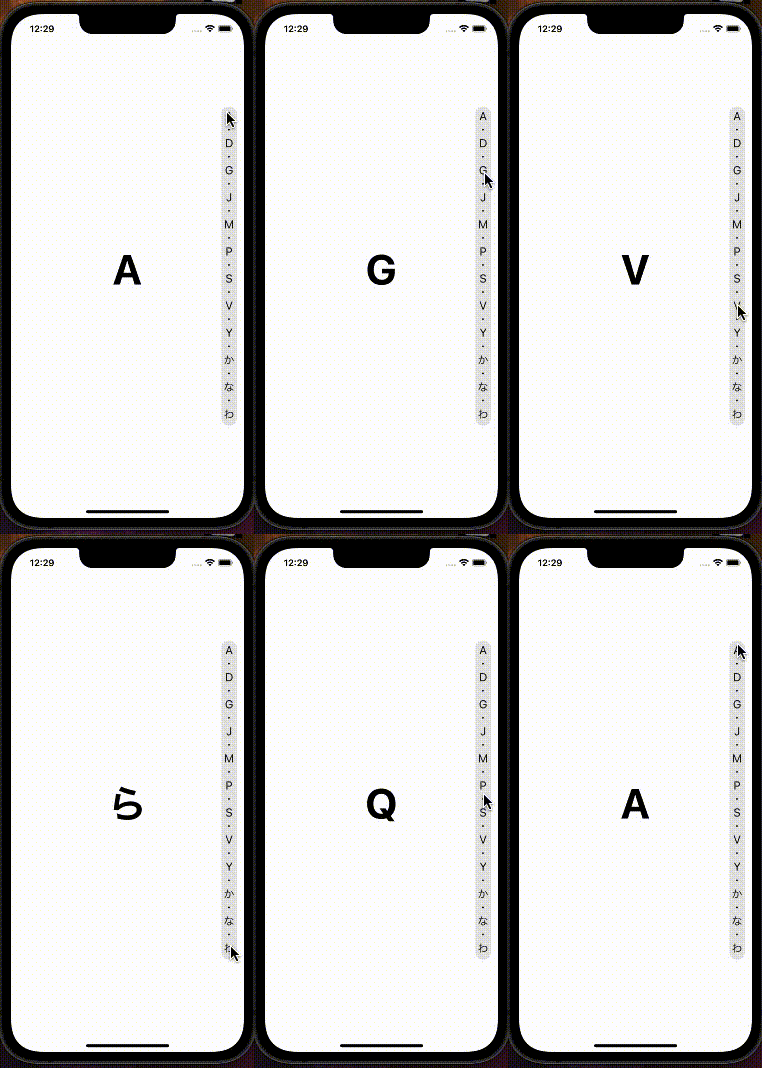
リスト表示で頭出しを行う SectionIndex 機能が標準機能では見当たらなかったためライブラリを探しましたがリスト機能とセットで提供されているケースが多かったため、独立したコンポーネントとしてあったほうが使い勝手がいいんじゃないかなと思い作成してみました。
動作イメージ

実装
SectionIndex.js
import React, { useState } from 'react';
import { StyleSheet, View, Text, PanResponder } from 'react-native';

const ellipsis = Symbol("・");

const SectionIndex = ({
    style = {},
    data = [],
    fontSize = 19,
    getLabel = (data) => data,
    onPressIndex = (data, index) => {},
}) => {
    const [barHeight, setBarHeight] = useState(0);
    const [indexData, setIndexData] = useState([]);
    const onLayout = (e) => {
        // タップ領域の高さを取得
        setBarHeight(e.nativeEvent.layout.height)
        // 表示できる文字数を計算
        const visibleCharCount = parseInt(e.nativeEvent.layout.height / fontSize);
        // データが表示可能な件数以下であればそのまま表示
        if (data.length <= visibleCharCount) {
            setIndexData(data);
            return;
        }
        // ellipsis文字を差し込むため、表示できる文字を1/2にする
        const ellipsisVisibleCharCount = parseInt(visibleCharCount / 2);
        // 表示可能な件数になるまでリストを間引きしていく
        let ellipsisCount = 2;
        let ellipsisList = data.filter((_, i) => i % ellipsisCount === 0);
        while (ellipsisList.length != 0 && ellipsisList.length > ellipsisVisibleCharCount) {
            ellipsisCount++;
            ellipsisList = data.filter((_, i) => i % ellipsisCount === 0);
        }
        // 最後のデータは固定
        ellipsisList[ellipsisList.length - 1] = data[data.length - 1];
        // ellipsis文字を差し込み表示データを作成。最後のellipsisは不要なので-1を指定
        setIndexData(ellipsisList.map((v) => [v, ellipsis]).flat().slice(0, -1));
    };

    // タップイベント
    const panResponder = PanResponder.create({
        onMoveShouldSetPanResponder: () => true,
        onPanResponderMove: (e) => {
            // Viewのタップ位置からデータのindexを割り出す
            const y = e.nativeEvent.locationY;
            let index = parseInt(y / barHeight * (data.length - 1));
            // 範囲外の場合index丸め処理
            index = index < 0 ? 0 : data.length <= index ? data.length - 1 : index;
            onPressIndex(data[index], index);
        },
    });

    return (
        <View style={[{ opacity: indexData.length }, styles.bar, style]}>
            {indexData.map((v, i) => (
                <Text key={i} style={[styles.text, { fontSize, lineHeight: fontSize }]}>
                    {v === ellipsis ? ellipsis.description : getLabel(v)}
                </Text>
            ))}
            <View
                onLayout={onLayout}
                style={styles.touchArea}
                collapsable={false}
                {...panResponder.panHandlers} />
        </View>
    );
};

const styles = StyleSheet.create({
    bar: {
        position: 'absolute',
        right: 12,
        height: "90%",
        overflow: 'hidden',
        justifyContent: 'space-between',
        alignItems: 'center',
        backgroundColor: '#aaaaaa55',
        borderRadius: 12,
        paddingVertical: 8,
        paddingHorizontal: 4,
    },
    touchArea: {
        position: "absolute",
        width: "100%",
        height: "100%",
        marginVertical: 8,
    },
    text: {
        color: '#111',
    },
});

export default SectionIndex;
使い方
-
data・・・ 表示するデータの配列 -
getLabel・・・ 表示文字取得処理。dataが文字の配列であれば不要 -
onPressIndex・・・ タップイベント
App.js
import React, { useState } from 'react';
import { SafeAreaView, StyleSheet, Text } from 'react-native';
import SectionIndex from './SectionIndex';

const DATA = 'ABCDEFGHIJKLMNOPQRSTUVWXYZあかさたなはまやらわ'.split('');

export default function App() {
  const [selected, setSelected] = useState(DATA[0]);
  return (
    <SafeAreaView style={styles.container}>
      <Text style={{ fontSize: 70, fontWeight: 'bold' }}>{selected}</Text>
      <SectionIndex
        style={{ height: "70%" }}
        data={DATA}
        onPressIndex={(data) => setSelected(data)} />
    </SafeAreaView>
  );
}

const styles = StyleSheet.create({
  container: {
    flex: 1,
    backgroundColor: '#fff',
    justifyContent: 'center',
    alignItems: 'center',
  },
});
SectionList と組合わて使用する
今回作成した SectionIndex をリストの頭出し機能として SectionList と組み合わせて使用してみたいと思います。
その際、頭出しなど行をスキップさせる場合 SectionList の getItemLayout を設定する必要があります。
しかし、getItemLayout は高さが異なるセクション行とアイテム行が混在している場合計算がなかなかに面倒くさいので、複雑な計算を変わりに行ってくれる react-native-section-list-get-item-layout を追加でインストールします。
$ npm i react-native-section-list-get-item-layout
これで準備完了です。
SectionList 実装
App.js
import React, { useRef } from 'react';
import { SafeAreaView, SectionList, StatusBar, StyleSheet, Text, View } from 'react-native';
import sectionListGetItemLayout from 'react-native-section-list-get-item-layout';
import SectionIndex from './SectionIndex';

// 各セクションに10件のアイテムがあるデータを作成
const DATA = 'ABCDEFGHIJKLMNOPQRSTUVWXYZあかさたなはまやらわ'.split('').map((v) => ({
  sectionLabel: v,
  data: new Array(10).fill(0).map((_, count) => (`item ${v} - ${count}`))
}));

// react-native-section-list-get-item-layout を使用して getItemLayout を計算
const getItemLayout = sectionListGetItemLayout({
  getItemHeight: () => 50,
  getSectionHeaderHeight: () => 30,
});

// アイテム行
const renderItem = ({ item }) => (
  <View style={styles.line}><Text>{item}</Text></View>
);

// セクション行
const renderSectionHeader = ({ section: { sectionLabel } }) => (
  <View style={styles.section}><Text>{sectionLabel}</Text></View>
);

export default function App() {
  const listRef = useRef();
  return (
    <SafeAreaView style={styles.container}>
      <SectionList
        ref={listRef}
        style={styles.list}
        sections={DATA}
        keyExtractor={(item, index) => item + index}
        renderItem={renderItem}
        renderSectionHeader={renderSectionHeader}
        getItemLayout={getItemLayout}
        maxToRenderPerBatch={100}
        initialNumToRender={100}
        removeClippedSubviews={true}
        stickySectionHeadersEnabled={true}
      />
      <SectionIndex
        data={DATA}
        getLabel={(data) => data.sectionLabel}
        onPressIndex={(_, index) => {
          // セクション先頭へ頭出し
          listRef.current.scrollToLocation({
            animated: false,
            sectionIndex: index,
            itemIndex: 0,
          })
        }} />
      <StatusBar />
    </SafeAreaView>
  );
}

const styles = StyleSheet.create({
  container: {
    flex: 1,
    backgroundColor: '#fff',
    justifyContent: 'center',
    alignItems: 'center',
  },
  list: {
    width: "100%",
    height: "100%",
  },
  section: {
    height: 30,
    justifyContent: 'center',
    paddingStart: 16,
    fontWeight: 'bold',
    backgroundColor: '#888',
  },
  line: {
    height: 49,
    justifyContent: 'center',
    paddingStart: 16,
    borderBottomWidth: 1,
    borderBottomColor: 'grey',
  }
});
動作イメージ

課題
早く動かしすぎるとチラツキが発生したりするため、SectionList 側の設定も検討していく必要がありそうです。

Discussion