Using Stable Diffusion with Python読書メモ
1 Introducing Stable Diffusion
Evolution of the Diffusion model
Before Transformer and Attention
Convolutional Neural Networks (CNNs) and Residual Neural Networks (ResNets) dominated
Transformer transforms machine learning
CLIP from OpenAI makes a big difference
Generate images
Generative Adversarial Networks(GAN)は、非常に写実的な画像を生成することができる。しかし、生成過程でテキストプロンプトを利用することはできない。
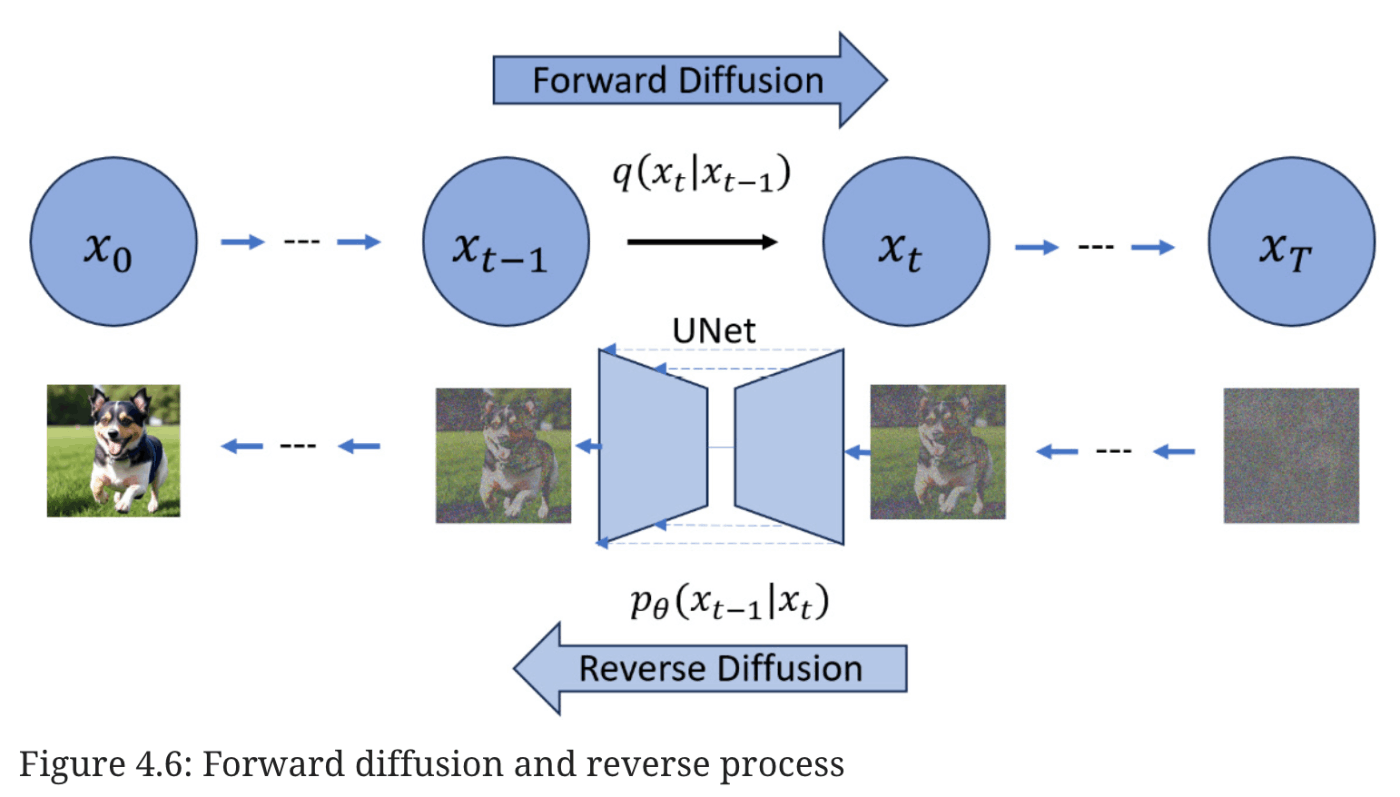
denoising diffusion probabilistic model.
ノイズの多い画像から始めて、徐々にノイズを除去していくことで、より洗練された画像にすることができます。ノイズ除去プロセスは、ノイズの多い画像を徐々に元の画像の鮮明なバージョンに変換します。
このアプローチの背後にある考え方は独創的だ。任意の画像に対して、限られた数の正規分布ノイズ画像がオリジナル画像に追加され、効果的に完全なノイズ画像に変換される。CLIPモデルに導かれながら、この拡散プロセスを逆転させるモデルを訓練したらどうなるだろうか?驚くべきことに、このアプローチは機能する[4]。
DALL-E 2 and Stable Diffusion
Why Stable Diffusion
Which Stable Diffusion to use
2 Setting Up the Environment for Stable Diffusion
Hardware requirements to run Stable Diffusion
This book will cover Stable Diffusion v1.5 and the Stable Diffusion XL (SDXL) version.
Tokenizer:テキストプロンプトを一連のトークンにトークン化します。
Text Encoder:Stable Diffusion のテキストエンコーダは特殊な Transformer 言語モデルであり、具体的には CLIP モデルのテキストエンコーダである。SDXLでは、より大きなサイズのOpenCLIP [6]テキストエンコーダも、トークンをテキスト埋め込みにエンコードするために使用される。
Variational Autoencoder (VAE)::これは画像を潜在空間にエンコードし、デコードして画像に戻す。
UNet:ここでノイズ除去処理が行われる。ノイズ除去/ノイズ除去サイクルに関わるステップを理解するためにUNet構造が採用される。ノイズ、タイムステップデータ、コンディショニング信号(例えば、テキスト記述の表現)のような特定の要素を受け入れ、ノイズ除去プロセスで利用できるノイズ残差を予測する。
Storage
ストレージが256GBや512GBしかない場合、すぐに足りなくなる。
!!
3 Generating Images Using Stable Diffusion
Generation seed
generator = torch.Generator("cuda:0").manual_seed(1234)
Sampling scheduler
# Euler scheduler with 20 steps
from diffusers import EulerDiscreteScheduler

text2img_pipe.scheduler = EulerDiscreteScheduler.from_config(
    text2img_pipe.scheduler.config)
generator = torch.Generator("cuda:0").manual_seed(1234)
prompt ="high resolution, a photograph of an astronaut riding a horse"
image = text2img_pipe(
    prompt = prompt,
    generator = generator,
    num_inference_steps = 20
).images[0]
display(image)
Changing a model
stablediffusionapi/deliberate-v2
deliberate-v2.safetensors
from diffusers import StableDiffusionPipeline
text2img_pipe = StableDiffusionPipeline.from_single_file(
    "path/to/deliberate-v2.safetensors",
    torch_dtype = torch.float16
).to("cuda:0")
Guidance scale
Guidance scaleまたはClassifier-Free Guidance (CFG)は、生成される画像のテキスト・プロンプトへの追従性を制御するパラメータです。Guidance scaleを大きくすると、画像はよりプロンプトに沿うようになり、Guidance scaleを小さくすると、Stable Diffusionが画像に何を入れるかを決めるためのスペースが大きくなります。
image_3_gs = text2img_pipe(
    prompt = prompt,
    guidance_scale = 3,

image_7_gs = text2img_pipe(
    prompt = prompt,
    guidance_scale = 7,

image_10_gs = text2img_pipe(
    prompt = prompt,
    guidance_scale = 10,
高Guidance scaleの設定は、以下のような効果がある:
彩度を上げる
コントラストを上げる
高すぎると画像がぼやける
guidance_scaleパラメータは通常7から8.5の間で設定します。デフォルト値としては7.5がよい。
4 Understanding the Theory Behind Diffusion Models
Understanding the image-to-noise process
画像にガウスノイズを加える
colabで動作させたけど動かなかった
新しい画像は、ガウスノイズを平均に加えることで生成される。これはnp.random.normalを使って行われる。
※ 正規分布とは、平均値・最頻値・中央値が一致し、それを軸として左右対称となっている確率分布です。 「ガウス分布」とも呼ばれる
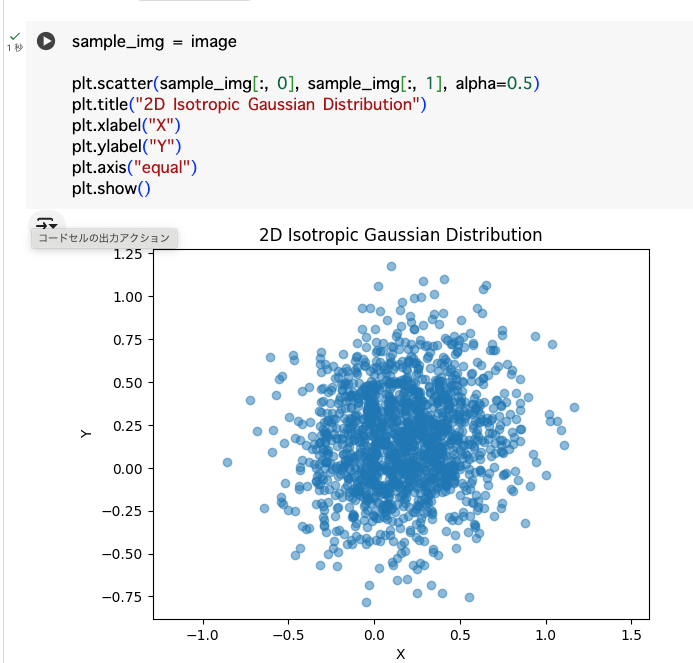
この図は、図4.2の最後の画像に示されているように、コードがわずか16ステップで画像をほぼ等方性の正規分布ノイズ画像に効率的に変換する様子を示している。
(図4.2は書籍参照)

A more efficient forward diffusion process
reparameterizationと呼ばれるトリックを利用して、元の連鎖プロセスをワンステッププロセスに変換することができる。
The noise-to-image training process
Understanding Classifier Guidance denoising
公式の解説の部分が全然分からなかった
というか計算式のHTMLへの出力うまくいってないと思う。下の式はそのスクショだが分数の部分が表現できていない

その他参考
UNetの解説動画
拡散モデルの特徴

ガウス分布を使用している理由が分かる解説
5 Understanding How Stable Diffusion Works
Stable Diffusion in latent space
Generating latent vectors using diffusers
この処理はよく見る
    # convert image from 0 ~ 255 to 0 ~ 1
    image_array     = np.array(image).astype(np.float16)/255.0

    # convert the number from 0 ~ 1 to -1 ~ 1
    image_array     = image_array * 2.0 - 1.0
Generating text embeddings using CLIP
Initializing time step embeddings
Initializing the Stable Diffusion UNet
Implementing a text-to-image Stable Diffusion inference pipeline
Implementing a text-guided image-to-image Stable Diffusion inference pipeline
Summary
この章でやったことまとめ
初期画像を潜在データにエンコードする、
入力プロンプトをトークンIDに変換し、
CLIPテキストモデルを使用してテキスト埋め込みに埋め込む、
Stable Diffusionスケジューラを使用して推論のための詳細なステップをサンプリングする、
初期ノイズ潜在を作成する、
初期ノイズ潜在と初期画像潜在を連結する、
すべてのコンポーネントを組み合わせてカスタムテキストから画像へのStable Diffusionパイプラインを構築する、
テキストガイド付き画像から画像へのStable Diffusionパイプラインを可能にするためにパイプラインを拡張する、
などの方法を使用してコンポーネントを作成しました。
これらのコンポーネントを1つずつ作成し、最終的に2つのStable Diffusionパイプライン(1つはテキストから画像へのパイプライン、もう1つは拡張テキストガイド付き画像から画像へのパイプライン)を構築しました。
6 Using Stable Diffusion Models
Loading the Diffusers model
モデルのキャッシュ先 (linuxの場合)
\home\user_name.cache\huggingface\hub
torch_dtype = torch.float16 デフォルトは32
メモリ節約に役立つとのこと
Loading model checkpoints from safetensors and ckpt files
完全なモデルファイルはチェックポイントデータとも呼ばれる。
チェックポイントには、.ckptファイル、safetensorsファイル、diffusersファイルなど多くの種類がある
- .ckptは最も基本的なファイル形式で、ほとんどのStable Diffusionモデルと互換性があります。しかし、悪意のある攻撃に対して最も脆弱です。
- safetensorsは新しいファイルフォーマットで、.ckptファイルよりも安全に設計されています。safetensorsフォーマットは.ckptと比較して、セキュリティ、スピード、使いやすさの点で優れています。
- Diffusers ファイルは、Diffusers ライブラリとのシームレスな統合のために特別に作成された最新のファイル形式です。このフォーマットは、一流のセキュリティ機能を誇り、Stable Diffusion の全モデルとの互換性を保証します。従来の単一ファイルへの圧縮とは異なり、Diffusers フォーマットは、ウェイトと設定ファイルの両方を含むフォルダの形式をとります。さらに、これらのフォルダーに含まれるモデルファイルは、safetensors フォーマットに準拠しています。
Using ckpt and safetensors files with Diffusers
from diffusers import StableDiffusionPipeline

model_path = r"some.cpket または some.safetensors"
StableDiffusionPipeline.from_single_file(
  model_path,
  torch_dtype = torch.float16
)
Turning off the model safety checker
safety_checker = None # or load_safety_checker = False
Converting the checkpoint model file to the Diffusers format
ckpt_checkpoint_path = r"D:\temp\anythingV3_fp16.ckpt"
target_part = r"D:\temp\anythingV3_fp16"
pipe = download_from_original_stable_diffusion_ckpt(
    ckpt_checkpoint_path,
    from_safetensors = False,
    device = "cuda:0"
)
pipe.save_pretrained(target_part)
To convert a safetensors file
from_safetensors = True,
よりフルスタックな変換処理
- https://github.com/huggingface/diffusers/tree/main/scripts
- https://github.com/huggingface/diffusers/blob/main/scripts/convert_original_stable_diffusion_to_diffusers.py
Using Stable Diffusion XL

上の画像のSDXLモデルから最高品質の画像を生成するには、ベースモデルを使って生画像を生成し、128x128の潜像として出力し、リファイナーモデルを使ってそれを強調する必要があることを示している。
7 Optimizing Performance and VRAM Usage
Optimization solution 1 – using the float16 or bfloat16 data type
bfloat16は通常、ディープ・ニューラル・ネットワークに有用である。
CPUを使用している場合は、torch.float16を使用しないでください。CPUはfloat16をハードウェアでサポートしていないからです。
Optimization solution 2 – enabling VAE tiling
text2img_pipe.enable_vae_tiling() # < Enable VAE Tiling
タイル化エンコーディングとデコーディングの結果は、非タイル化バージョンとほとんど違いがないことに注意してください。違いはVRAMの使用率だけです。
Optimization solution 3 – enabling Xformers or using PyTorch 2.0
text2img_pipe.enable_xformers_memory_efficient_attention()
Optimization solution 4 – enabling sequential CPU offload
第5章で説明したように、1つのパイプラインには複数のサブモデルが含まれる:
テキストを埋め込みにエンコードするために使用されるText embedding model
Image latent encoder/decoder:入力誘導画像をエンコードし、潜在空間をピクセル画像にデコードする。
UNetは推論ノイズ除去ステップをループする。
The safety checker model は生成されたコンテンツの安全性をチェックする。
シーケンシャルCPUオフロードの考え方は、アイドル状態のサブモデルがタスクを終えてアイドル状態になったときに、CPU RAMにオフロードすることである。
- CLIPテキストモデルをGPU VRAMにロードし、入力プロンプトをエンベッディングにエンコードする。
- CLIPテキストモデルをCPU RAMにオフロードする。
- VAEモデル(画像から潜在空間へのエンコーダとデコーダ)をGPU VRAMにロードし、現在のタスクが画像から画像へのパイプラインである場合、開始画像をエンコードします。
- VAEをCPU RAMにオフロードする。
- UNetをロードしてノイズ除去ステップをループする(未使用のサブモ ジュールの重みデータもロードしてオフロードする)。
- UNetをCPU RAMにオフロード。
- VAEモデルをCPU RAMからGPU VRAMにロードして、潜在空間から画像へのデコードを実行。
text2img_pipe.enable_sequential_cpu_offload() # <- Enable sequential CPU offload
Optimization solution 5 – enabling model CPU offload
text2img_pipe = StableDiffusionPipeline.from_pretrained(
    "runwayml/stable-diffusion-v1-5",
    torch_dtype = torch.float16
)                 # .to("cuda") is removed here
text2img_pipe.enable_model_cpu_offload()    # <- enable model offload
画像生成の最後に、以下のコードを使って、モデルのウェイトデータを手動でVRAMからCPU RAMに移動させることができる:
pipe.to("cpu")
torch.cuda.empty_cache()
Optimization solution 6 – Token Merging (ToMe)
ToMeは、モデル内の冗長なトークンをマージすることで機能する。つまり、マージしないモデルに比べて、モデルの作業量は少なくなる。
pip install tomesd
import tomesd
tomesd.apply_patch(text2img_pipe, ratio=0.5)
8 Using Community-Shared LoRAs
Low-Rank Adaptation (LoRA — “Low” is why the “o” is in lowercase)
LoRAでは、オリジナルのチェックポイントはそのまま凍結され、調整されたウェイトの変更は、通常LoRAファイルと呼ばれる独立したファイルに保存されます。
Diffusersは、PEFT(Parameter-Efficient Fine-Tuning)[10]を使用して、LoRAのロードとオフロードを管理する
PEFTの重要な考え方は、モデルのパラメーターをすべて微調整するのではなく、ごく一部だけを微調整することで、計算量とメモリー使用量を大幅に削減することである。
How does LoRA work?
Using LoRA with Diffusers
# load lora
pipeline.load_lora_weights(
    "andrewzhu/MoXinV1"
    , weight_name   = "MoXinV1.safetensors"
    , adapter_name  = "MoXinV1"
)
Applying a LoRA weight during loading
PEFTはHugging Face社によって開発されたライブラリで、大規模言語モデル(LLM)や安定拡散モデルのような事前に訓練されたモデルを、モデル全体を微調整することなく新しいタスクに効率的に適応させることができる。
PEFTは、LLMを効率的に微調整することを目的とした手法のコレクションを表す、より広い概念である。
LoRAは、PEFTの傘下にある特定のテクニックである。
pipeline.set_adapters(
    ["MoXinV1"],
    adapter_weights=[0.5]
)
Diving into the internal structure of LoRA
Finding the A and B weight matrix from the LoRA file
Finding the corresponding checkpoint model layer name
Updating the checkpoint model weights
Making a function to load LoRA
Why LoRA works
9 Using Textual Inversion
Textual inversion (TI)
LoRA(Low-Rank Adaptation)が、テキストエンコーダとUNetのアテンションウェイトに適用される微調整技術であるのとは異なり、TIは学習されたデータに基づいて新たなembedding spaceを追加する技術である。
Diffusers inference using TI
# load TI
pipe.load_textual_inversion(
    "sd-concepts-library/midjourney-style"
    , token = "midjourney-style"
)
How TI works
Building a custom TI loader
TI in the pt file format
TI in bin file format
Detailed steps to build a TI loader
10 Overcoming 77-Token Limitations and Enabling Prompt Weighting
Stable DiffusionはOpenAIのCLIPモデルをテキスト・エンコーダとして利用している。CLIPモデルのトークン化の実装は、ソースコード[6]によると、コンテキストの長さは77トークンです。
CLIPモデルにおけるこの77トークンの制限は、ハギング・フェイス・ディフューザーにも適用され、最大入力プロンプトが77トークンに制限される。残念ながら、この制約のために、いくつかの変更を加えない限り、これらの入力プロンプト内でキーワードの重みを割り当てることはできない。
Understanding the 77-token limitation
Overcoming the 77-tokens limitation
- Stable Diffusionパイプラインからテキストトークナイザーとテキストエンコーダを取り出す。
- サイズに関係なく、入力プロンプトをトークン化する。
- 追加された開始と終了のトークンを除去する。
- 最初の77個のトークンを取り出し、エンベッディングにエンコードする。
- エンベッディングをサイズ[1, x, 768]のテンソルにスタックする。
Enabling long prompts with weighting
Overcoming the 77-token limitation using community pipelines
custom_pipeline = "lpw_stable_diffusion"
from diffusers import DiffusionPipeline
import torch

model_id_or_path = "stablediffusionapi/deliberate-v2"
pipe = DiffusionPipeline.from_pretrained(
    model_id_or_path
    , torch_dtype       = torch.float16
    , custom_pipeline   = "lpw_stable_diffusion"
).to("cuda:0")
11 Image Restore and Super-Resolution
Understanding the terminologies
A solution (image interpolation, image upscale, and image super-resolution: 画像補間、画像アップスケール、画像超解像) is commonly referred to as an upscaler or a high-res fixer.
Upscaling images using Img2img diffusion
from diffusers import StableDiffusionImg2ImgPipeline

img2img_pipe = StableDiffusionImg2ImgPipeline.from_pretrained(
    "stablediffusionapi/deliberate-v2"
    , torch_dtype = torch.float16
).to("cuda:0")

# this later, see github code
Img-to-Img limitations
1024x1024以上の画像生成はそんなに効果的ではない
ControlNet Tile image upscaling
Steps to use ControlNet Tile to upscale an image
import torch
from diffusers import ControlNetModel

controlnet = ControlNetModel.from_pretrained(
    'takuma104/control_v11'
    , subfolder='control_v11f1e_sd15_tile'
    , torch_dtype=torch.float16
)

# load controlnet tile
from diffusers import StableDiffusionControlNetImg2ImgPipeline

# load checkpoint model with controlnet
pipeline = StableDiffusionControlNetImg2ImgPipeline.from_pretrained(
    "stablediffusionapi/deliberate-v2"
    , torch_dtype    = torch.float16
    , safety_checker = None
    , controlnet     = controlnet
)

# this later, see github code
Additional ControlNet Tile upscaling samples
12 Scheduled Prompt Parsing
Using the Compel package
Compelは、1つの画像内で複数のコンセプトを組み合わせるプロセスを簡素化します。 例えば、プロンプト「("猫の写真", "犬の写真").blend(0.7, 0.3)」は、猫70%、犬30%の画像を生成するようStable Diffusionに指示します。この方法は、手作業によるプロンプトエンジニアリングの複雑さに比べ、より直感的でユーザーフレンドリーなアプローチを提供します。この章では、Stable DiffusionのワークフローにCompel45をインストールし、活用する方法をコード例で説明します。
Building a custom scheduled prompt pipeline
scheduled promptを使用して、画像生成プロセスをより詳細に制御できるカスタムパイプラインの構築方法が説明されています。これにより、1つの画像生成の中で、コンセプト間のダイナミックな移行が可能になります。例えば、静的なブレンドの代わりに、Stable Diffusionに、最初に猫を生成し、次に一連のノイズ除去ステップを経て犬に遷移するよう指示することができる。
デフォルトの動作は、ノイズ除去プロセスの各ステップに同じテキスト埋め込みを適用します。ダイナミックトランジションを実現するために、第12章では3つの主要コンポーネントを持つカスタムパイプラインの構築について概説します
-
A Scheduled Prompt Parser: このコンポーネントは、入力プロンプトを解析し、スケジューリング命令を特定し、画像生成ディレクティブから分離します。この章では、オープンソースの "lark "パーシングツールキットを活用し、互換性のためにStable Diffusion WebUIで使用されている構文を採用しています。これにより、ユーザは[A photo of cat:A photo of dog:0.5]のようなフォーマットを使用してトランジションを指定することができ、ノイズ除去ステップの50%後に猫から犬へと生成がシフトすることを示します。
-
Prompt Embedding Generation: プロンプトが解析されると、各セグメントは、Stable Diffusionが画像生成をガイドするために使用するテキスト埋め込みに変換される必要があります。この章では、各ステップで正しい埋め込みが適用されるように、ノイズ除去プロセスの各ステップごとに1つずつ、埋め込みリストを作成する方法を説明します。
-
Modified Stable Diffusion Pipeline: 最後に、既存の機能を保持するために、ベースとなるDiffusersパイプラインを継承した新しいパイプラインクラスが作成されます。このカスタムパイプラインは、プロンプトの解析とエンベッディング生成を統合し、修正されたscheduler_call関数を通して、各デノイジングステップで正しいエンベッディングを適用します。この関数はデフォルトの動作をオーバーライドし、画像生成プロセスを制御するためにスケジュールされたエンベッディングを動的にフィードします。
13 Generating Images with ControlNet
What is ControlNet and how is it different?
| Control Method | Functioning Stage | Usage Scenario |
|---|---|---|
| Textual Embedding | Text encoder | Add a new style, a new concept, or a new face |
| LoRA | Merge LoRA weights to the UNet model (and the CLIP text encoder, optional) | Add a set of styles, concepts, and generate content |
| Image-to-Image | Provide the initial latent image | Fix images, or add styles and concepts to images |
| ControlNet | ControlNet participant denoising together with a checkpoint model UNet | Control shape, pose, content detail |
Usage of ControlNet
Using multiple ControlNets in one pipeline
# create a Normal BAE ControlNet
from diffusers import ControlNetModel
canny_controlnet = ControlNetModel.from_pretrained(
    'takuma104/control_v11'
    , subfolder='control_v11p_sd15_canny'
    , torch_dtype=torch.float16
)
bae_controlnet = ControlNetModel.from_pretrained(
    'takuma104/control_v11'
    , subfolder='control_v11p_sd15_normalbae'
    , torch_dtype=torch.float16
)
controlnets = [canny_controlnet, bae_controlnet]

# a pipeline with two controlnet models
from diffusers import StableDiffusionControlNetPipeline
two_cn_pipe = StableDiffusionControlNetPipeline.from_pretrained(
    "stablediffusionapi/deliberate-v2"
    , torch_dtype           = torch.float16
    , controlnet            = controlnets
).to("cuda")

prompt = """
high resolution photo,best quality, masterpiece, 8k
A cute dog on the tree branch, depth of field, detailed body,
"""

neg_prompt = """
paintings,ketches, worst quality, low quality, normal quality, lowres,
monochrome, grayscale
"""
image_from_2cn = two_cn_pipe(
    prompt = prompt
    , image                 = [canny_image,bae_image]
    , controlnet_conditioning_scale = [0.5,0.5]
    , generator             = torch.Generator("cuda").manual_seed(2)
    , num_inference_steps   = 30
    , guidance_scale        = 5.5
).images[0]
image_from_2cn
14 Generating Video Using Stable Diffusion
The principles of text-to-video generation
Practical applications of AnimateDiff
from diffusers import MotionAdapter

adapter = MotionAdapter.from_pretrained(
    "guoyww/animatediff-motion-adapter-v1-5-2"
)
15 Generating Image Descriptions Using BLIP-2 and LLaVA
BLIP-2: Bootstrapping Language-Image Pre-training with Frozen Image Encoders and Large Language Models
LLaVA: Large Language and Vision Assistant
BLIP-2 – Bootstrapping Language-Image Pre-training
LLaVA – Large Language and Vision Assistant
16 Exploring Stable Diffusion XL
What’s new in SDXL?
Using SDXL
Using SDXL with an unlimited prompt
from diffusers import DiffusionPipeline

pipe = DiffusionPipeline.from_pretrained(
    "RunDiffusion/RunDiffusion-XL-Beta"
    , torch_dtype       = torch.float16
    , use_safetensors   = True
    , variant           = "fp16"
    , custom_pipeline   = "lpw_stable_diffusion_xl",
)
17 Building Optimized Prompts for Stable Diffusion
What makes a good prompt?
Be clear and specific
Be descriptive
Using consistent terminology
Reference artworks and styles
Incorporate negative prompts
ex.
"paintings, sketches, worst quality, low quality, normal quality, lowres,
monochrome, grayscale, skin spots, acne, skin blemishes, age spots, extra fingers,
fewer fingers,broken fingers"
"絵画、スケッチ、最低画質、低画質、普通画質、低解像度、モノクロ、グレースケール、肌のシミ、ニキビ、肌のシミ、年齢によるシミ、指が余る、指が少ない、指が折れる"
Iterate and refine
Using LLMs to generate better prompts
promptを生成するテンプレートを提示
⭐
18 Applications – Object Editing and Style Transferring
Editing images using Stable Diffusion
Background Replacement: この章では、画像の背景を置き換える方法を説明する。
まず、CLIPSegモデルを使って背景のマスクを生成。
次に、マスクをバイナリマスクに変換。
最後に、SD inpainting modelを使って背景を新しい背景に置き換え。
Background Removal: この章では、画像から背景を除去し、透明な背景を持つ画像を作成する方法について説明。
背景置換用に作成したバイナリマスクを使って、元の背景を除去。
この方法ではエッジがギザギザになることがある。
Rembgツールを使って、より滑らかな背景除去を行った。
Object and style transferring
この章では、IP-Adapter を紹介する。IP-Adapter は、テキストプロンプト内で画像を参照として使用することを容易にするツールである。基本的に、IP-Adapter は画像をプロンプトの一部として扱うことができる。この機能により、画像間でオブジェクトとスタイルの両方を転送することができる。画像エンコーダーとIP-AdapterをStable Diffusionパイプラインに統合するプロセスの概要は以下の通りです。
https://github.com/tencent-ailab/IP-Adapter のREADMEにある変換画像を見るとIP-Adapterを使用した結果のイメージが湧くと思う。
pipeline.load_ip_adapter(
    "h94/IP-Adapter",
    subfolder       = "models",
    weight_name     = "ip-adapter_sd15.bin"
)
SDXL使うなら
pipeline.load_ip_adapter(
    "h94/IP-Adapter",
    subfolder       = "sdxl_models",
    weight_name     = "ip-adapter_sdxl.bin"
)
19 Generation Data Persistence
Exploring and understanding the PNG file structure
Stable Diffusionで使用されるプロンプトとパラメータを生成されたPNG画像ファイルに直接埋め込むテクニックを検証している。これにより、画像生成中に行われたクリエイティブな決定を保存し、再利用することが可能になる。
この章では、データの明確なチャンクで構成されるPNGフォーマットの構造を強調している。これにより、画像の内容に影響を与えることなく、任意のデータを保持するためのカスタムチャンクを追加することができる。
Saving extra text data in a PNG image file
この章では、以下の方法を示す実践的なコード例を提供します。
PNGファイル内にStable Diffusion生成メタデータを保存する。
Pythonを使用してPNGファイルからこのメタデータを抽出する。
A1111のStable Diffusion Web UIのような、出力画像に生成パラメータを埋め込むことが多いインターフェースで特に役立ちます。
20 Creating Interactive User Interfaces
Introducing Gradio
Gradioフレームワークを使用したStable DiffusionアプリケーションのユーザーフレンドリーなWeb UIの構築について説明しています。この章では、Pythonを使用した機械学習モデルのための直感的なインターフェースの作成を簡素化するGradioの能力に焦点を当てています。
Gradio fundamentals
入力フィールド、スライダー、ボタン、プログレスバーのようなインタラクティブな要素を作成する例を紹介
Building a Stable Diffusion text-to-image pipeline with Gradio
プロンプト・ボックスとネガティブ・プロンプト・ボックスからユーザー入力を受け付ける。そして、ユーザが「画像を生成」ボタンをクリックすると、生成された画像が表示される例を紹介
21 Diffusion Model Transfer Learning
この章では、まずモデルトレーニングの核となる概念を説明し、シンプルな線形モデルをゼロからトレーニングする。この基礎的な演習では、データのロード、モデルの初期化、損失計算、勾配降下などの重要なステップを紹介する。
次に、この章ではHugging Face Accelerateパッケージを紹介する。このパッケージは、Stable Diffusionの計算需要に対応するために必要な、複数のGPUにまたがるモデルのトレーニングプロセスを簡素化する。
最後に、Stable Diffusion V1.5 LoRAモデルをトレーニングするためのステップバイステップのガイドを提供する。この章では、特定のニーズに合わせて事前にトレーニングされたモデルをカスタマイズすることの重要性を強調している。提供されているコード例では、わずか8枚の画像を使用してLoRAモデルをトレーニングし、その結果、画像生成の品質が顕著に向上することを実証している。
22 Exploring Beyond Stable Diffusion
現在のAIの波は教師付き学習とattentionメカニズムによってもたらされていることを強調し、これによってStable Diffusionのようなモデルが、明示的なラベルなしで膨大なデータセットから学習することを可能にしている。本章では、この進化する状況を乗り切るためには、数学やプログラミングなどのコアスキルが重要であることを強調している。
社会へのポジティブな影響を確実にするために、倫理的配慮、プライバシー、セキュリティを重視し、責任あるAI開発の必要性を強調している。最後に、AIの変革の可能性を認識し、潜在的な課題を認識しつつ、これらの進歩を受け入れることを読者に勧めている。