API GatewayとLambdaでReactをホスティングする
はじめに
AWSでReactデプロイしろって言われたらどうします?
AWSでこういったSPAをデプロイしようとすると大体S3とCloudfrontに行き着くかと思います。
今回はReactとおまけにフロントエンドからリクエストするAPIも合わせてAPI GatewayとLambdaにぶち込もうと思います。
柔軟なインフラ構成ではないので小ネタです。本番環境には適していないのであしからず。
また、今回使用するサンプルはGithubに置いてありますので、よかったら実際にデプロイしてみてください。
対象読者
- Reactを使用したことがある方
- API Gatewayを使用したことがある方
- AWS Lambdaを使用したことがある方
- Dockerに理解がある方
- お手軽にSPA環境をデプロイしたい方
技術スタック
- API Gateway
- AWS Lambda
- Typescript(5.5.3)
- React
- node(20.0.0)
- vite(5.4.1)
- Python(3.11)
- AWS SAM
- CloudFormation
概要
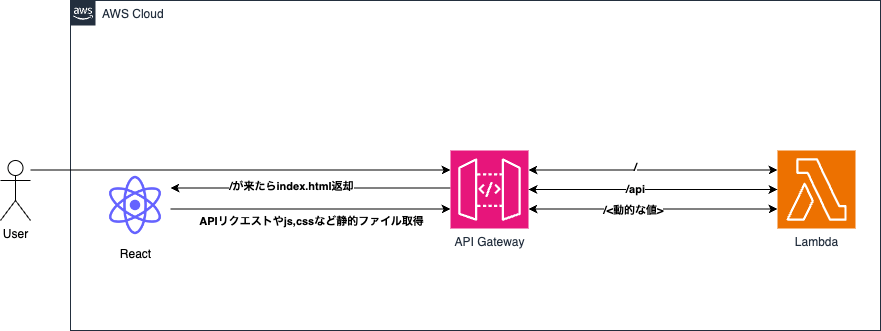
構成自体はとてもシンプルです。

API Gatewayをつかって3つのエンドポイントを作成します。
- /
- Reactがレンダリングされる
index.htmlを返却
- Reactがレンダリングされる
- /<動的な値>
-
index.htmlから読み込まれる静的ファイルを返却- js
- css
- その他画像やsvg
-
- /api
- React側から呼び出されるAPIのレスポンスを返却
- 今回はサンプルのAPIとしてitemsというAPIを作成します(/api/items)
コード解説
まずこちらがディレクトリ構成です。
ルートにCloudFormationテンプレート、srcディレクトリ配下にLambda用のapp.pyとさらにその下のfrontディレクトリにReactのソースが入ってます。
.
├── src
│   ├── Dockerfile
│   ├── __init__.py
│   ├── app.py
│   ├── front
│   │   ├── ※ viteで作ったReact(npm create vite@latest front)
│   └── requirements.txt
├── template.yaml
インフラ
一般的なLambda x API Gatewayのテンプレートになります。
今回はDockerコンテナを使用したLambdaになっています。
前述した3つのエンドポイントの定義もしています。
{proxy+}と入れることでその部分にマッチングするパスをそのままパラメータとして受け取ることができます。
また、API Gatewayのステージ名を固定でlambda-react-sampleとしています。
AWSTemplateFormatVersion: "2010-09-09"
Transform: AWS::Serverless-2016-10-31
Description: >
  lambda-react-sample

  Sample SAM Template for lambda-react-sample

Resources:
  LambdaReactSampleFunction:
    Type: AWS::Serverless::Function
    Properties:
      Timeout: 3
      PackageType: Image
      Architectures:
        - x86_64
      ImageUri: !Sub ${AWS::AccountId}.dkr.ecr.${AWS::Region}.amazonaws.com/lambda-react-sample:latest
      Events:
        Root:
          Type: Api
          Properties:
            Path: /
            Method: GET
            RestApiId: !Ref LambdaReactSampleApi
        GetItemRoute:
          Type: Api
          Properties:
            Path: /api/items
            Method: GET
            RestApiId: !Ref LambdaReactSampleApi
        DynamicRoute:
          Type: Api
          Properties:
            Path: /{proxy+}
            Method: GET
            RestApiId: !Ref LambdaReactSampleApi
    Metadata:
      Dockerfile: Dockerfile
      DockerContext: ./src

  LambdaReactSampleApi:
    Type: AWS::Serverless::Api
    Properties:
      StageName: lambda-react-sample

Outputs:
  LambdaReactSampleApi:
    Description: "API Gateway endpoint URL without stage for LambdaReactSample function"
    Value: !Sub "https://${LambdaReactSampleApi}.execute-api.${AWS::Region}.amazonaws.com/lambda-react-sample"
続いてDockerfileです。
NodeとPythonのマルチステージビルドになっています。
まずNodeでfrontディレクトリのReactをビルドして、Python環境に成果物を配置しています。
FROM node:20.0.0 as builder
WORKDIR /app
COPY front .
RUN npm install && npm run build
FROM public.ecr.aws/lambda/python:3.11
WORKDIR ${LAMBDA_TASK_ROOT}
COPY app.py requirements.txt ./
COPY /app/dist ./dist
RUN pip install -r requirements.txt
CMD ["app.lambda_handler"]
Lambda
Lambdaの実装になります。
API Gatewayから渡されてくる3つのエンドポイントのリクエストに対して、それぞれ実装しています。
import json
import mimetypes
import os
from pathlib import Path
from typing import Callable

front_dist = Path("dist")


def root(event: dict) -> dict:
    """
    /へのリクエストハンドラ
    SPAのルートである```index.html```を成果物ディレクトリから読み取って返却。
    """
    try:
        index_html_filepath = front_dist.joinpath("index.html")
        with open(index_html_filepath, "r") as file:
            index_content = file.read()
        return {
            "statusCode": 200,
            "headers": {"Content-Type": "text/html"},
            "body": index_content,
        }
    except FileNotFoundError:
        return {"statusCode": 400}


def get_item_route(event: dict) -> dict:
    """
    商品一覧を返却するAPIモック
    """
    return {
        "statusCode": 200,
        "body": json.dumps(
            {
                "items": [
                    {"id": 1, "name": "item1"},
                    {"id": 2, "name": "item2"},
                ],
            }
        ),
    }


def dynamic_route(event: dict) -> dict:
    """
    index.htmlからのリクエストを受け取るための動的ルート。
    jsや、その他静的リソースを返却。
    ex. /asserts/xxx.js /vite.svg
    """
    path = event.get("path", "")
    filepath = front_dist.joinpath(path.lstrip(os.path.sep))
    try:
        with open(filepath, "r") as file:
            file_content = file.read()

        content_type, _ = mimetypes.guess_type(filepath)
        if not content_type:
            return {"statusCode": 400}

        return {
            "statusCode": 200,
            "headers": {"Content-Type": content_type},
            "body": file_content,
        }
    except FileNotFoundError:
        return {"statusCode": 404}


routes: dict[str, Callable[[dict], dict]] = {
    "/": root,
    "/api/items": get_item_route,
    "/{proxy+}": dynamic_route,
}


def lambda_handler(event, context):
    path = event.get("resource", "")
    route = routes.get(path)

    if not route:
        return {"statusCode": 404}

    return route(event)
Frontend
React側の実装になります。
index.htmlから静的リソースを取得するにあたってちょっと工夫が必要です。
通常ではビルドしたindex.htmlから静的ファイルへのリクエストは成果物ディレクトリ(dist)からの相対パスで
出力されています。
<!doctype html>
<html lang="en">
  <head>
    <meta charset="UTF-8" />
    <link rel="icon" type="image/svg+xml" href="/vite.svg" /> <-ココ
    <meta name="viewport" content="width=device-width, initial-scale=1.0" />
    <title>Vite + React + TS</title>
    <script type="module" crossorigin src="/assets/index-CFjpMqL1.js"> <-ココ</script>
    <link rel="stylesheet" crossorigin href="/assets/index-DiwrgTda.css"><-ココ
  </head>
  <body>
    <div id="root"></div>
  </body>
</html>
今回はAPI Gatewayを通るのでパスを変えないといけません。
API Gatewayにはステージがあるからですね。
今回はlambda-react-sampleというステージ名で固定していますので、
ユーザーがアクセスできるURLは以下の形になります。
https://xxxxx.execute-api.region.amazonaws.com/lambda-react-sample
このステージ名をルートとして取り扱ってあげないとindex.htmlからの静的リソースへのアクセスはAPI Gatewayにリクエストされず失敗してしまうので設定します。
import { defineConfig } from "vite";
import react from "@vitejs/plugin-react";

// https://vitejs.dev/config/
export default defineConfig({
  plugins: [react()],
  base: "/lambda-react-sample/", <- ビルド時のルートパスにステージ名を指定
});
これビルドされたindex.htmlを見るとステージ名がついた成果物にアクセスする形になっていると思います。
/vite.svg -> lambda-react-sample/vite.svg
/assets/index-CFjpMqL1.js -> lambda-react-sample/assets/index-CFjpMqL1.js
続いては今回の検証用にviteで作成されたApp.tsxをちょこっといじります。
ただボタンを押したら用意した/api/itemsのモックAPIを取得しに行くだけです。
ここもステージ名を考慮して一工夫。モックAPIはAPI Gatewayにアクセスしなければいけないため、
window.location.pathnameでユーザーがアクセスしているURLのパス(lambda-react-sample)を取得しています。
import { useState } from "react";
import reactLogo from "./assets/react.svg";
import viteLogo from "/vite.svg";
import "./App.css";

function App() {
  const [state, setState] = useState<{ items: { id: string; name: string }[] }>(
    { items: [] }
  );
  const { items } = state;

  const handleOnClick = () => {
    // /api/items -> X
    // lambda-react-sample/api/items -> O
    fetch(`${window.location.pathname}/api/items`)
      .then((response) => response.json())
      .then((data) => {
        setState((s) => ({ ...s, items: [...s.items, ...data.items] }));
      });
  };

  return (
    <>
      <div>
        <a href="https://vitejs.dev" target="_blank">
          <img src={viteLogo} className="logo" alt="Vite logo" />
        </a>
        <a href="https://react.dev" target="_blank">
          <img src={reactLogo} className="logo react" alt="React logo" />
        </a>
      </div>
      <h1>Vite + React</h1>
      <div className="card">
        <button onClick={handleOnClick}>fetch items</button>
        <ul>
          {items.map((item: { id: string; name: string }) => (
            <li key={item.id}>{item.name}</li>
          ))}
        </ul>
      </div>
    </>
  );
}

export default App;
検証
では実際に動かしていきましょう。
まずはSAMを使ってビルドしてデプロイです。
事前準備としてECRに今回のLambdaのコンテナイメージを置くリポジトリとSAMの成果物を置くためのS3バケットをつくっておきましょう。
デプロイ
sam build
sam deploy \
 --stack-name lambda-react-sample \
 --s3-bucket <S3バケット> \
 --capabilities CAPABILITY_IAM \
 --image-repository xxxxx.dkr.ecr.region.amazonaws.com/lambda-react-sample
出力
Key                 LambdaReactSampleApi
Description         API Gateway endpoint URL without stage for LambdaReactSample function
Value               https://xxxxxx.execute-api.ap-northeast-1.amazonaws.com/lambda-react-sample
ValueにあるURLにアクセスしてみましょう。

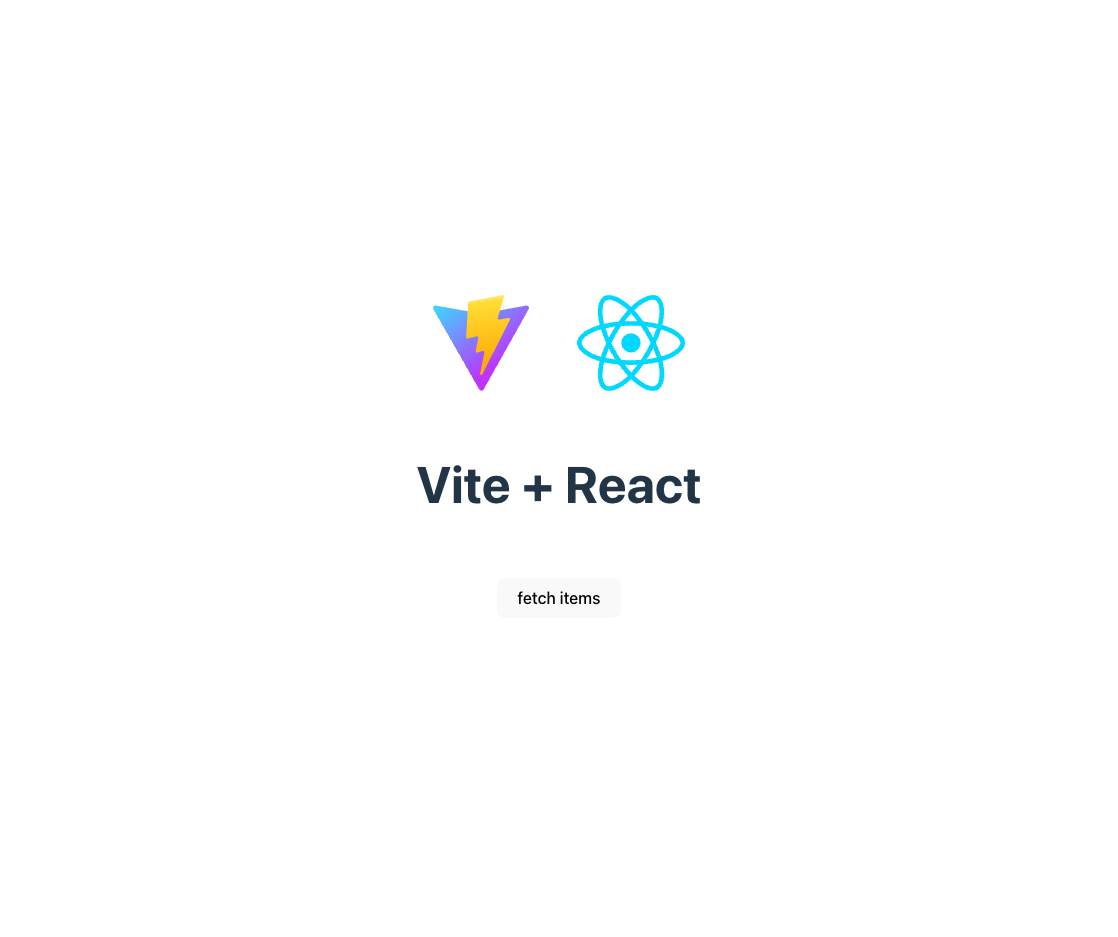
でましたね!ではアイテムAPIからアイテムを取得するボタンを押してみると。。

追加されました!疎通確認OKです。
最後に
いかがでしたでしょうか。中々の力技ではありますがまあ使えないこともないっていう印象でした。
認証つけてあげれば、限られた人への小規模かつ限定的なSPAとしてだったらアリな気もします。
あとは簡単な問い合わせフォームとかですかね?まあそしたらSPAにしなくてもいい気はしますが。。
API Gatewayを使ってるのでカスタムドメイン機能なども使えば、見てくれは立派なウェブサイトにすることもできますね。
まあ真面目にS3xCloudFront使えばいいんですけどね笑
Discussion