Next.js App Router で実装!フリマっぽいサンプルアプリ
年末年始に読んだ 「TypeScript と React/Next.js でつくる実践 Web アプリケーション」 の読書感想文を先月記事にしました。(多くの方に読んでいただき、非常にありがたい経験ができました。)
この中で惜しかったところとして、書籍内のサンプルアプリケーションが Page Router で実装されていた点をあげました。これは自身のモチベーションに App Router を学びたいことがあったためです。(書籍では丁寧にサンプルアプリケーションの実装手順が記載されていました。)
こちらの記事では書籍内のサンプルアプリケーションを参考に App Router で実際に実装してみての個人的なポイントや所感を書いていこうと思います。大まかにはディレクトリ構成・レンダリングモデル(Static Rendering, Dynamic Rendering, Partial Prerendering)・バックエンドの叩き方といった基本的なところに触れています。
Page Router とは別物で覚えるべき概念の多さに驚きましたが、非常に楽しかったです。
この記事のターゲット
- Next.js 15 の App Router でのサンプルアプリケーションに興味がある方
リポジトリ
書籍内のサンプルアプリケーション
「TypeScript と React/Next.js でつくる実践 Web アプリケーション」内で紹介・説明されているアプリケーションは下記の本家様のリポジトリで公開されています。
ts-nextbook-app は Page Router で実装されている React/Next.js アプリです。ts-nextbook-json は簡易的なバックエンドとして json を返却してくれるアプリです。
実装したサンプルアプリケーション
今回は上記の ts-nextbook-app の部分を 0 から構築して、ts-nextbook-json は Fork して一部改良したものを利用しています。また、デザインはそっくりそのままではなく自分好みに変更しています。
現時点では、ローカルで動かすことを想定していますので、両方リポジトリを起動することで動作を確認することができます。
実装まとめ
以降では、akfm_sato さんの下記の本を中心に多くのドキュメントを参考にさせていただきました。感謝しております。
また、アプリケーションの概要については、こちらに記載しましたので興味ある方はご参照ください。
主要な環境・パッケージ・バージョン
詳細は package.json 等を見ていただければと思いますが、主要どころは抜き出しておきます。
- next:15.2.0-canary.2
- react:19.0.0
- tailwindow:3.4.1
- mantine:7.15.2
- yarn:1.22.19
ディレクトリ構成
まずは、ディレクトリ構成ですが、「Container 1st な設計」を参考にさせていただきました。
下記の users/[id] はこちらのユーザー詳細画面の実際の構成です。
app
├── actions
├── api
├── users/[id]
│   ├── page.tsx
│   ├── error.tsx
│   ├── loading.tsx
│   ├── _containers
│   │   ├── user-profile
│   │   │   ├── index.tsx
│   │   │   ├── container.tsx
│   │   │   └── presentation.tsx
│   │   └── user-product-cardlist
│   │       ├── index.tsx
│   │       ├── container.tsx
│   │       └── presentation.tsx
│   └── ...
└──  ...
こちらの構成で実装することで、データフェッチを極力 Server Components で行うというベストプラクティスに従った実装をしやすくなったと感じています。
具体的にどの部分で実装のしやすさを感じたかというと Client Components と Server Components の使い分けやデータフェッチするコンポーネントを下記の手順に沿って実装することで、どこでどの組み合わせで実装すればよいかということにあまり迷わなくて済むようになりました。(今回のサンプルアプリが簡易的なものであることも大きいですが。)
- 1.ページを構成するコンポーネント単位で Container に切り出す(Container の切り出しは親子関係なのか兄弟関係なのか(兄弟関係であれば並列でフェッチが可能となる)を考慮しました)
- 2.各 Container は
container.tsxから書き始め、必要に応じて Server Components でデータフェッチを実装する - 3-a.フェッチしたデータを
presentation.tsxに渡す、React Hooks の利用やユーザーからインタラクティブな操作がない場合に Server Components で実装する - 3-b.React Hooks の利用やユーザーからインタラクティブな操作がある場合に Client Components で実装する
こうすることでデータフェッチに限らず、Server Components を基本として実装しやすくなるので、Client Components での実装を最小限に抑えられそうな感覚がありました。
※設計当初は Parallel Routes などを考慮していなかったので、それを踏まえるとこちらをベースに改良できそうだと感じました。
Route Handlers でのデータフェッチ
基本的なデータフェッチは、Route Handlers で実装しました。コンポーネント内に記載することもできるかと思うのですが、コンポーネント内に記載するとコンポーネントのロジックとデータフェッチのロジックが密結合しそうに感じたので「関心の分離」として、Route Handlers を経由するデータフェッチに集約しました。
こちらのユーザー詳細画面の中でもユーザープロファイル部分(アイコンや名前)とユーザー出品一覧部分で分けた時のユーザープロファイル部分では、こんな感じにしてみました。
import { User } from "@/common/types/data";
import { UserProfilePresentation } from "./presentation";

/**
 * UserProfileContainer is a container component that fetches user data based on the provided user ID.
 *
 * @param id - The ID of the user.
 * @returns {Promise<JSX.Element>} The presentation component UserProfilePresentation with the user data.
 * @throws Error if the fetch request fails or returns an error response.
 */
export async function UserProfileContainer({ id }: { id: number }) {
    const res = await fetch(`${process.env.ROUTE_HANDELR_BASE_URL}/users/${id}`);

    if (!res.ok) {
        const error = await res.json();
        console.log(error);
        throw new Error(error.error || `Failed to fetch product (status: ${res.status})`);
    }

    const user = (await res.json()) as User;
    return (
        <UserProfilePresentation
            username={user.username}
            displayName={user.displayName}
            discription={user.description}
            imageUrl={user.profileImageUrl}
        />
    );
}
import { User } from "@/common/types/data";
import { NextResponse } from "next/server";

/**
 * GET function for fetching a user by ID.
 *
 * @param request - The incoming request object.
 * @param params - The parameters object containing the user ID.
 * @returns {Promise<NextResponse>} The response from the API.
 * @throws {Error} If an error occurs during the API request.
 */
export async function GET(request: Request, { params }: { params: Promise<{ id: string }> }) {
    try {
        const id = (await params).id;

        const res = await fetch(`${process.env.API_BASE_URL}/users/lazy/${id}`, {
            method: "GET",
            headers: {
                "Content-Type": "application/json",
            },
            cache: "no-cache",
            next: {
                revalidate: 0,
            },
        });

        if (!res.ok) {
            console.error("API request failed:", res.status, res.statusText);

            if (res.status === 404) {
                return NextResponse.json({ error: `User with ID ${id} not found` }, { status: 404 });
            }

            return NextResponse.json({ error: "Failed to fetch product" }, { status: 500 });
        }

        const resJson = (await res.json()) as User;
        return NextResponse.json<User>(resJson);
    } catch (error) {
        console.error("Error in GET handler:", error);
        return NextResponse.json({ error: "Internal server error" }, { status: 500 });
    }
}
App Router ではキャッシュをうまく扱えるかがポイントの 1 つだと考えています。このサンプルアプリケーションでは、それぞれがどんな挙動をするかを確認するためにいくつかの設定を試しています。
上記では、fetch API では cache: "no-store", next: { revalidate: 0 } を設定しており Dynamic Rendering としています。Dynamic Rendering はリクエスト毎にサーバーに問い合わせをして常に最新の情報を取得しにいきます。
Dynamic Rendering のユースケース
Dynamic Rendering
With Dynamic Rendering, routes are rendered for each user at request time.Dynamic rendering is useful when a route has data that is personalized to the user or has information that can only be known at request time, such as cookies or the URL's search param
公式ドキュメント - Server Components:Dynamic Rendering
こちらの通り、Dynamic Rendering のユースケースとしては、ユーザー依存のデータやリクエスト時にしか知り得ないデータがある時に利用されるようです。
Static Rendering
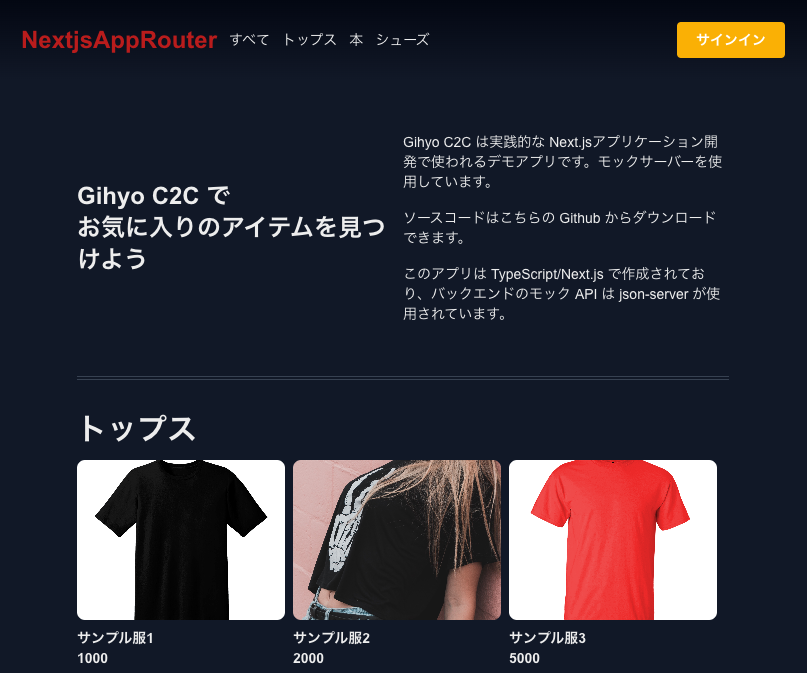
ユーザーの詳細画面のデータフェッチはユーザー依存であることから Dynamic Rendering としてみました。一方で、こちらの商品一覧画面はそこまでリアルタイム性を求めない & データ取得量が多くなるコンポーネントだと思ったので、Static Rendering としてみます。
import { Product } from "@/common/types/data";
import { HomeProductCardListPresentation } from "./presentation";

/**
 * Fetches product data and renders the HomeProductCardListPresentation component.
 *
 * @returns {Promise<JSX.Element>} The HomeProductCardListPresentation component with the fetched product data.
 * @throws Will throw an error if the fetch request fails.
 */
export async function HomeProductCardListContainer() {
    const res = await fetch(`${process.env.ROUTE_HANDELR_BASE_URL}/products/quick`);

    if (!res.ok) {
        const error = await res.json();
        throw new Error(error.error || `Failed to fetch product (status: ${res.status})`);
    }

    const products = (await res.json()) as Product[];
    return <HomeProductCardListPresentation products={products} />;
}
import { Product } from "@/common/types/data";
import { NextResponse } from "next/server";

/**
 * GET function for fetching quick products.
 *
 * @returns {Promise<NextResponse>} The response from the API.
 * @throws {Error} If an error occurs during the API request.
 */
export async function GET() {
    try {
        const res = await fetch(`${process.env.API_BASE_URL}/products/quick`, {
            method: "GET",
            headers: {
                "Content-Type": "application/json",
            },
            next: {
                revalidate: 60,
            },
        });

        if (!res.ok) {
            console.error("API request failed:", res.status, res.statusText);
            return NextResponse.json({ error: "Failed to fetch product" }, { status: 500 });
        }

        const resJson = (await res.json()) as Product[];
        return NextResponse.json<Product[]>(resJson);
    } catch (error) {
        console.error("Error in GET handler:", error);
        return NextResponse.json({ error: "Internal server error" }, { status: 500 });
    }
}
上記では、fetch API に next: { revalidate: 60 } を設定することでキャッシュしたデータの再検証を行うようにしています。再検証の方法は、 Time-based Revalidation(時間ベースの再検証)と On-demand Revalidation(オンデマンドの再検証)が提供されています。上記では 60 秒ごとに再検証し、バックグラウンドでデータフェッチが走ります。
これにより、フェッチの頻度低減や表示速度向上を実現できるようです。
これは下記の表のように整理されたキャッシュメカニズムの中で Data Cache に当たります。

また、akfm_sato さんの本でもキャッシュについて詳細に説明されています。大変勉強になりました。
データキャッシュとリクエストメモ化
Differences between the Data Cache and Request Memoization
While both caching mechanisms help improve performance by re-using cached data, the Data Cache is persistent across incoming requests and deployments, whereas memoization only lasts the lifetime of a request.
公式ドキュメント - Data Cache
データキャッシュとリクエストメモ化の違いについては、上記のようにわかりやすく記述されていました。データキャッシュはリクエストとデプロイメント全体で永続的なのに対して、メモ化はリクエストのライフサイクルでのみ持続するとあります。
メモ化はキャッシュの有無に関係なくリクエストに対して常に行われるようです。(だから、重複を気にせず必要とするコンポーネントでのデータフェッチ(コロケーション)が可能となるんですかね。)
Server Actions でのデータミューテーション
まずは Server Actions の理解として、React の公式ドキュメントから定義を引用します。
Server Functions are for use in React Server Components.
Note: Until September 2024, we referred to all Server Functions as “Server Actions”. If a Server Function is passed to an action prop or called from inside an action then it is a Server Action, but not all Server Functions are Server Actions. The naming in this documentation has been updated to reflect that Server Functions can be used for multiple purposes.
公式ドキュメント - Server Functions:Overview
Server Actions は Server Functions の一部であり、action プロパティに渡されるか・action 内から呼び出されている場合は Server Actions と言って良いとのことです。
ここでは「action プロパティに渡す」に該当するフォームアクションと Server Functions の組み合わせに触れるので、Server Actions と呼びます。
ここでは、こちらの出品画面で Server Actions を用いました。また、React Hooks を利用したかったため、Client Components で実装しています。
"use client";

import { Button, Flex, LoadingOverlay, NumberInput, Select, Text, Textarea, TextInput } from "@mantine/core";
import { FC, useActionState } from "react";
import { postSellForm } from "@/app/actions/sell";
import { useAuthContext } from "@/common/contexts/authContexts";
import { useRouter } from "next/navigation";

export const SellFromPresentation: FC = () => {
    const [state, formAction, pending] = useActionState(postSellForm, {
        imageUrl: "",
        title: "",
        description: "",
        category: null,
        price: 0,
        condition: null,
    });
    const { authUser } = useAuthContext();
    const router = useRouter();

    if (!authUser) {
        router.push("/signin");
        console.log(state);
    }

    return (
        <>
            <form action={formAction}>
                <Flex direction="column" className="h-full w-full items-center justify-center gap-y-12 py-10">
                    <div className="w-2/3 space-y-1">
                        <Text className="font-bold text-lg">商品の写真 URL</Text>
                        <TextInput
                            name="imageUrl"
                            placeholder="URL"
                            error={state.zodErrors && state.zodErrors.imageUrl}
                        />
                    </div>
                    <div className="w-2/3 space-y-2 -mt-6">
                        <Text className="font-bold text-lg">商品情報</Text>
                        <TextInput name="title" label="タイトル" placeholder="商品のタイトル" />
                        <Textarea name="description" label="説明" placeholder="商品の説明" minRows={5} autosize />
                    ...
                </Flex>
            </form>
        </>
    );
};
import { redirect } from "next/navigation";
import { z } from "zod";

type SellForm = {
    productId?: number;
    imageUrl: string;
    title: string;
    description: string;
    category: "shoes" | "clothes" | "book" | null;
    price: number;
    condition: "new" | "used" | null;
};

type ZodErrors = {
    imageUrl?: string[];
    title?: string[];
    description?: string[];
    category?: string[];
    price?: string[];
    condition?: string[];
};

type SellState = SellForm & {
    zodErrors?: ZodErrors;
};

const SellFormSchema = z.object({
    imageUrl: z.string().url(),
    title: z.string(),
    description: z.string(),
    category: z.enum(["shoes", "clothes", "book"]),
    price: z.number().min(0),
    condition: z.enum(["new", "used"]),
});

/**
 * Validates the sell form data and sends a POST request to the API to create a new product.
 *
 * @param {SellState} prevState - The current state of the sell form.
 * @param {FormData} formData - The form data to validate and submit.
 * @returns {Promise<SellState>} The updated state of the sell form.
 */
export async function postSellForm(prevState: SellState, formData: FormData): Promise<SellState> {
    const imageUrl = formData.get("imageUrl") as string;
    ...

    const validatedFormData = SellFormSchema.safeParse({
        imageUrl: imageUrl,
        ...
    });

    if (!validatedFormData.success) {
        return {
            imageUrl: imageUrl,
            ...
            zodErrors: validatedFormData.error.flatten().fieldErrors,
        };
    }

    const res = await fetch(`${process.env.API_BASE_URL}/products`, {
        method: "POST",
        headers: {
            "Content-Type": "application/json",
        },
        body: JSON.stringify(validatedFormData.data),
        credentials: "include",
    });

    if (!res.ok) {
        console.log("error");
        return {
            imageUrl: imageUrl,
            ...
            zodErrors: {
                imageUrl: ["画像のアップロードに失敗しました"],
                ...
            },
        };
    }

    const resJson = await res.json();
    redirect(`/users/${resJson.id}`);
}
Pending の状態も管理したかったので、useActionState を使ってみました。下記の記事を参考に zod でのバリデーションも組み合わせています。
form の action プロパティに渡しているのは、useActionState から得られた formAction で、こちらの実行状況が pending に反映されています。今回は、Mantine の LoadingOverlay に渡してローディングを表示しています。
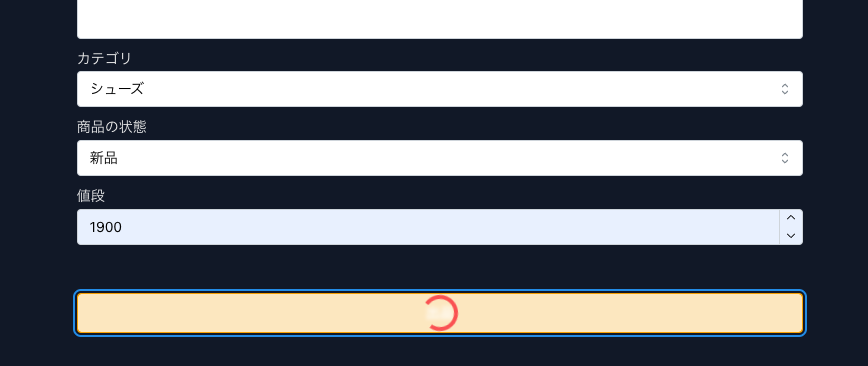
pending の状態管理には useState を使いがちなので、Server Actions の実行状況も管理できるのは良いなと感じました。また、zod によってサーバーでのバリデーションも強固にできるため良さを感じました。
Partial Prerendering
新たなレンダリングモデルということで、試しに使ってみました。そのため、Next.js のバージョンは 15.2.0-canary.2 としています。
同一のルートの中で Static Rendering と Dynamic Rendering を共存させるレンダリングモデルです。
実装方法としては、next.config.ts で experimental の設定をした上で Static Rendering のコンポーネントと Dynamic Rendering を共存させ、Dynamic Rendering のみを Suspense で括るという形です。
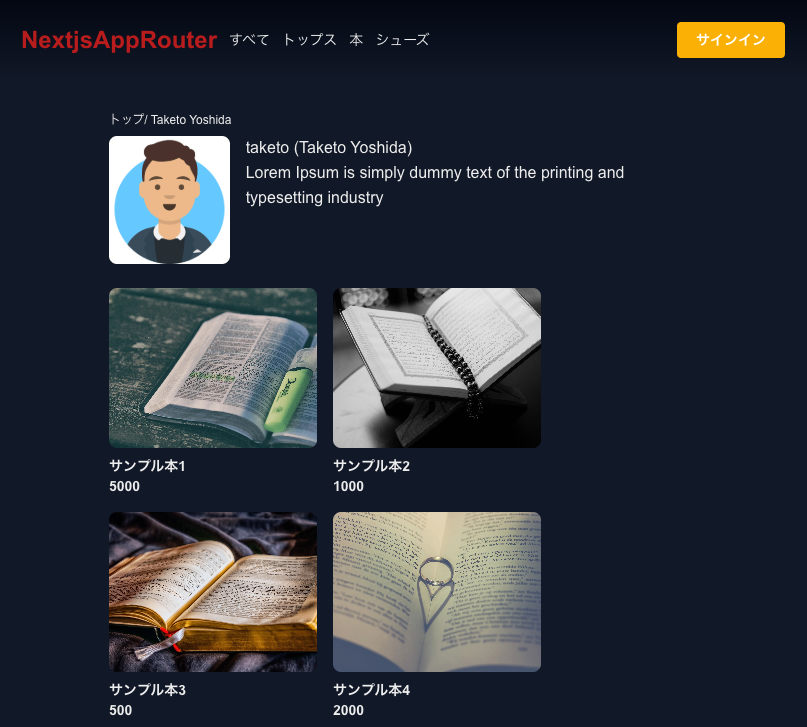
公式ドキュメントのサンプルコードを参考にこちらのユーザー詳細画面を Partial Prerendering が適用されるように実装しました。
import { Suspense } from "react";
import { UserProductCardList } from "./_containers/user-product-cardlist";
import { UserProfile } from "./_containers/user-profile";
import LoadingUserProfile from "./loading";

type Props = {
    params: Promise<{
        id: string;
    }>;
};

/**
 * UserPage is a page component that fetches and displays a user's profile and products.
 *
 * @param {Props} props - The component's props.
 * @returns {JSX.Element} The UserPage component.
 */
export default async function UserPage({ params }: Props) {
    const { id } = await params;

    const userId = Number(id);

    if (typeof userId !== "number") {
        return;
    }

    return (
        <div className="space-y-6">
            <Suspense fallback={<LoadingUserProfile />}>
                <UserProfile id={userId} />
            </Suspense>
            <UserProductCardList id={userId} />
        </div>
    );
}
// UserProfile 内で呼び出される Dynamic Rendering のコンポーネント
import { User } from "@/common/types/data";
import { NextResponse } from "next/server";

/**
 * GET function for fetching a user by ID.
 *
 * @param request - The incoming request object.
 * @param params - The parameters object containing the user ID.
 * @returns {Promise<NextResponse>} The response from the API.
 * @throws {Error} If an error occurs during the API request.
 */
export async function GET(request: Request, { params }: { params: Promise<{ id: string }> }) {
    try {
        const id = (await params).id;

        const res = await fetch(`${process.env.API_BASE_URL}/users/lazy/${id}`, {
            method: "GET",
            headers: {
                "Content-Type": "application/json",
            },
            cache: "no-cache",
            next: {
                revalidate: 0,
            },
        });

        if (!res.ok) {
            console.error("API request failed:", res.status, res.statusText);

            if (res.status === 404) {
                return NextResponse.json({ error: `User with ID ${id} not found` }, { status: 404 });
            }

            return NextResponse.json({ error: "Failed to fetch product" }, { status: 500 });
        }

        const resJson = (await res.json()) as User;
        return NextResponse.json<User>(resJson);
    } catch (error) {
        console.error("Error in GET handler:", error);
        return NextResponse.json({ error: "Internal server error" }, { status: 500 });
    }
}
// UserProductCardList 内で呼び出される Static Rendering のコンポーネント
import { Product } from "@/common/types/data";
import { NextResponse } from "next/server";

/**
 * GET function for fetching quick products.
 *
 * @returns {Promise<NextResponse>} The response from the API.
 * @throws {Error} If an error occurs during the API request.
 */
export async function GET() {
    try {
        const res = await fetch(`${process.env.API_BASE_URL}/products/quick`, {
            method: "GET",
            headers: {
                "Content-Type": "application/json",
            },
            next: {
                revalidate: 60,
            },
        });

        if (!res.ok) {
            console.error("API request failed:", res.status, res.statusText);
            return NextResponse.json({ error: "Failed to fetch product" }, { status: 500 });
        }

        const resJson = (await res.json()) as Product[];
        return NextResponse.json<Product[]>(resJson);
    } catch (error) {
        console.error("Error in GET handler:", error);
        return NextResponse.json({ error: "Internal server error" }, { status: 500 });
    }
}
ビルドしてみると下記の出力となります。ユーザー詳細画面である /users/[id] は Partial Prerendering という結果になりました。
Route (app)                              Size     First Load JS
┌ ○ /                                    154 B           108 kB
├ ○ /_not-found                          983 B           109 kB
...
├ ƒ /api/users/[id]                      154 B           108 kB
├ ○ /home                                151 B           264 kB
...
└ ◐ /users/[id]                          1.56 kB         264 kB
    └ /users/[id]
...

○  (Static)             prerendered as static content
◐  (Partial Prerender)  prerendered as static HTML with dynamic server-streamed content
ƒ  (Dynamic)            server-rendered on demand
UserProfile 内で呼び出される Dynamic Rendering のコンポーネントが叩きに行くエンドポイントには意図的に遅延を仕込んでいます。そのため、ページに遷移するとした図のようにリクエストごとにデータフェッチしにいくので数秒遅延します。
さらに括った Suspence の fallback プロパティには loading.tsx で定義したスケルトン用の LoadingUserProfile コンポーネントが表示されます。

レスポンスを受け取ったら想定通りの表示になりました。

今後
今回は Container/Presentational パターンでのディレクトリ構成、3 つのレンダリングモデルの実装、Route Handlers と Server Actions の実装を試してみました。
今後はまだ試していない機能である Parallel Routes や Intercepting Routes を試してみたいと思います。
また、よりアプリケーションとして成り立たせるためにも下記のことに挑戦してみたいです。
- 認証周りの実装
- OpenTelemetry での計装
- Cloud Run へのデプロイ
etc
さいごに
実装を通して、App Router の基本的な概念や機能を知ることができました。Page Router は別物で知っておくべき要素に圧倒されましたが、非常に楽しかったです。
Google Cloud に加えて、フロントエンド周りでも発信を継続できたらと思っています。読んでいただきありがとうございました。
アプリ概要
最後に参考程度にアプリケーションの概要を説明しておきます。詳細は書籍を読むか、本家様のリポジトリを参照ください。
参照元に戻る:Next.js 15 App Router で実装したフリマアプリ
商品一覧画面:/home
フリーマーケットに出品されている商品一覧を模擬した画面です。
商品一覧画面
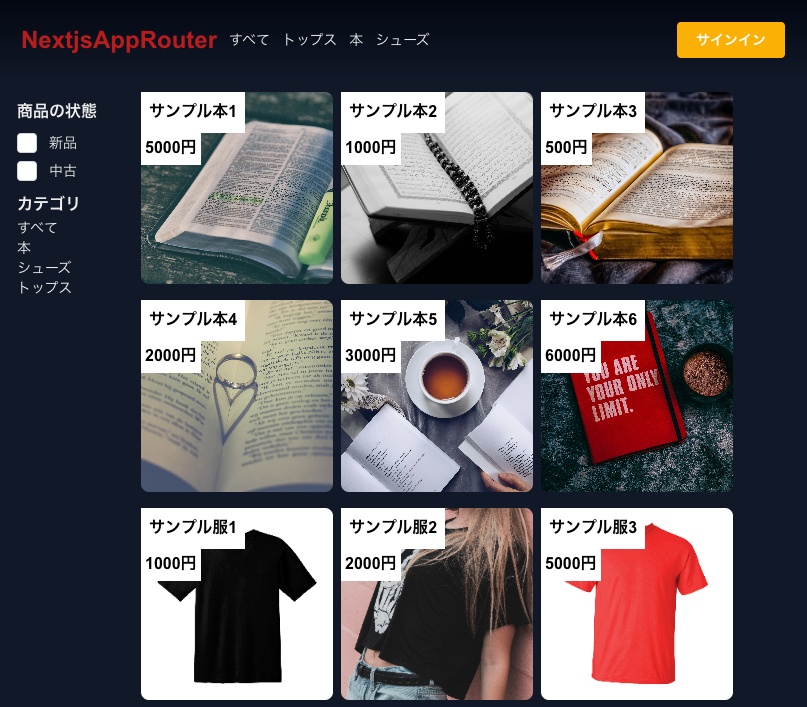
検索画面:/search
出品されている商品の検索を模擬した画面です。商品一覧を「商品の状態」「カテゴリ」の選択によってフィルタリングしています。
検索画面
商品詳細画面:/products/[id]
出品されている商品をクリックすると商品説明と出品者が表示される商品詳細を模擬した画面です。
商品詳細画面

ユーザー詳細画面:/users/[id]
出品者であるユーザーと出品している商品一覧が表示されるユーザー詳細を模擬した画面です。
参照元に戻る:ディレクトリ構成
参照元に戻る:Route Handlers 経由でのデータフェッチ
参照元に戻る:Partial Prerendering
ユーザー詳細画面
出品画面:/sell
出品を模擬した画面です。ログイン後にヘッダーに出品ボタンが表示され、情報を入力して出品ボタンをクリックすると商品一覧に追加されます。実態としては nextjs-app-sample-json に一時的に json 情報が格納されます。
出品画面

参考
Discussion