Oracle Cloud InstructureのAlways Free Tierで仮想マシンをNomadで使い倒す
Oracle Cloud InstructureのAlways Free Tierで仮想マシンをNomadで使い倒す
-
無料でVPSを使って遊ぶ
- ディスクの消費(I/O)が無料なので、Dockerコンテナで検証環境を作っては潰し、作っては潰しできる。
- 積極的にOracleのディスクを摩耗していこう。
- ディスクの消費(I/O)が無料なので、Dockerコンテナで検証環境を作っては潰し、作っては潰しできる。
-
制約
- OCIのA1シェイプが使えない
- RHEL,CentOSの代わりにAlmaLinuxを使いたい
- Podman-Dockerは使いたくない
- Kubernetesは使いたくない(スペック的に)
第一章 Nomadのシングルノード環境を構築して遊牧民になろう
- microk8sでよくない?という意見はある。でも、Nomadという名前が好き。
最小構成インストール
-
環境
- OCI Compute: VM.Standard.E2.1.Micro (Always Free-eligible)
- 1 core OCPU, 1 GB memory, 0.48 Gbps network bandwidth
- OS: AlmaLinux9
- OCI Compute: VM.Standard.E2.1.Micro (Always Free-eligible)
-
Docker-CEのインストール
- Apache License 2.0
Docker-CEのインストール
# https://www.techrepublic.com/article/install-latest-docker-almalinux/
sudo dnf update
sudo dnf groupinstall "Development Tools"
sudo reboot
sudo dnf config-manager --add-repo=https://download.docker.com/linux/centos/docker-ce.repo
sudo dnf install docker-ce --allowerasing
sudo systemctl enable --now docker
- Nomad/Consulのインストール
- Mozilla Public License 2.0
Nomad/Consulのインストール
# releaseをRHELでインストールしている所がポイント
sudo dnf install -y dnf-plugins-core
sudo dnf config-manager --add-repo https://rpm.releases.hashicorp.com/RHEL/hashicorp.repo
sudo dnf -y install nomad
sudo dnf -y install consul
- Nomad/Consulエージェントのテスト実行
# それぞれ新しいコンソールから実行する
sudo nomad agent -dev
# それぞれ新しいコンソールから実行する
sudo consul agent -dev
systemd(自動実行スクリプト)の設定
/etc/systemd/system/nomad.service
# https://developer.hashicorp.com/nomad/tutorials/enterprise/production-deployment-guide-vm-with-consul#configure-systemd
# sudo touch /etc/systemd/system/nomad.service
# /etc/systemd/system/nomad.service
# AlmaLinuxのバイナリ配置が若干違うので、nomadバイナリのPATHはちょっと修正
# 今回はスタンドアローン(serverであり、clientでもある)ので、user/groupともにrootに修正
[Unit]
Description=Nomad
Documentation=https://www.nomadproject.io/docs/
Wants=network-online.target
After=network-online.target

# When using Nomad with Consul it is not necessary to start Consul first. These
# lines start Consul before Nomad as an optimization to avoid Nomad logging
# that Consul is unavailable at startup.
Wants=consul.service
After=consul.service

[Service]

# Nomad server should be run as the nomad user. Nomad clients
# should be run as root
#User=nomad
#Group=nomad
User=root
Group=root

ExecReload=/bin/kill -HUP $MAINPID
ExecStart=/usr/bin/nomad agent -config /etc/nomad.d
# ExecStart=/usr/local/bin/nomad agent -config /etc/nomad.d
KillMode=process
KillSignal=SIGINT
LimitNOFILE=65536
LimitNPROC=infinity
Restart=on-failure
RestartSec=2

## Configure unit start rate limiting. Units which are started more than
## *burst* times within an *interval* time span are not permitted to start any
## more. Use `StartLimitIntervalSec` or `StartLimitInterval` (depending on
## systemd version) to configure the checking interval and `StartLimitBurst`
## to configure how many starts per interval are allowed. The values in the
## commented lines are defaults.

# StartLimitBurst = 5

## StartLimitIntervalSec is used for systemd versions >= 230
# StartLimitIntervalSec = 10s

## StartLimitInterval is used for systemd versions < 230
# StartLimitInterval = 10s

TasksMax=infinity
OOMScoreAdjust=-1000

[Install]
WantedBy=multi-user.target
/etc/systemd/system/consul.service
# https://developer.hashicorp.com/consul/tutorials/production-deploy/deployment-guide
# sudo touch /etc/systemd/system/consul.service
[Unit]
Description="HashiCorp Consul - A service mesh solution"
Documentation=https://www.consul.io/
Requires=network-online.target
After=network-online.target
ConditionFileNotEmpty=/etc/consul.d/consul.hcl

[Service]
EnvironmentFile=-/etc/consul.d/consul.env
User=consul
Group=consul
ExecStart=/usr/bin/consul agent -config-dir=/etc/consul.d/
ExecReload=/bin/kill --signal HUP $MAINPID
KillMode=process
KillSignal=SIGTERM
Restart=on-failure
LimitNOFILE=65536

[Install]
WantedBy=multi-user.target
動作確認・エラー切り分け
エラー切り分け
# ほぼ間違いなくエラーが出るので、それぞれ以下のコマンドで切り分け
# # Nomad
# https://developer.hashicorp.com/nomad/docs/configuration
sudo -u nomad /usr/bin/nomad config validate /etc/nomad.d
sudo -u nomad /usr/bin/nomad agent -config /etc/nomad.d
sudo systemctl start nomad
sudo systemctl enable nomad
sudo journalctl -xe
# # Consul
# https://developer.hashicorp.com/consul/docs/agent/config/config-files
sudo -u consul consul validate /etc/consul.d/
sudo -u consul /usr/bin/consul agent -config-dir=/etc/consul.d/
sudo systemctl start consul
sudo systemctl enable consul
sudo journalctl -xe
-
nomad: WARNING: Bootstrap mode enabled! Potentially unsafe operation.- Nomadクラスタを構築するときに初回だけ使うが、今回はシングルノード構成なので、無視
-
consul: ==> Multiple private IPv4 addresses found. Please configure one with 'bind' and/or 'advertise'.- OCIというか、VPCは基本的にプライベートIPでサーバを運用するので、docker-ce daemonが稼働している場合は
docker0のネットワークである172.17.0.1/16を検知してこのエラーが出る。ip aコマンドで確認する事ができる。 - 今回はシングルノード構成なので以下の設定を加える
- /etc/consul.d/consul.hcl
/etc/consul.d/consul.hcl
# /etc/consul.d/consul.hcl server = true bind_addr = "127.0.0.1" advertise_addr = "127.0.0.1" bootstrap_expect = 1 retry_join = ["127.0.0.1"] - OCIというか、VPCは基本的にプライベートIPでサーバを運用するので、docker-ce daemonが稼働している場合は
-
/opt/consul/* 周りのバグ- 潔く過去の記憶を吹き飛ばそう
sudo rm -rf /opt/consul/*
動作確認
-
WebUIの動作確認
- Nomadの初期設定ではあろうことか全てのIFでリッスンする設定になっているが、デフォルトでOCIのVPSはSSHのポートしかfirewalldで許可していないので、SSHポートフォワーディングで接続を試す。
-
ssh <user>@<hostname> -L 4646:localhost:4646
-
サンプルjobの稼働
- http://localhost:4646/ui/jobs からRun Jobボタンでjobを登録できる
docs.job
job "docs" { datacenters = ["dc1"] group "example" { network { port "http" { static = 5678 } } task "server" { driver = "docker" config { image = "hashicorp/http-echo" ports = ["http"] args = [ "-listen", ":5678", "-text", "hello world", ] } } } }-
これをそのまま実行すると、0.0.0.0へのルーティングを持ったI/Fにバインドされてしまう(別にいいけど・・・)ので以下の設定を加える。
- /etc/nomad.d/nomad.hcl
client { network_interface = "lo" }- こうすることで、127.0.0.1でリッスンしてくれる。多分。
- テンプレートを使用することもできる。
- https://pkg.go.dev/github.com/hashicorp/go-sockaddr/template#section-readme
-
改めて動作確認する
sudo nomad run docs.job
curl localhost:5678
# hello world
まとめ
-
Nomadサーバを建てることで、jobの実行管理ができるようになった。
- Hashicorp製品はかなり整った設定なので、完全にシングルノード構成で構築するのは逆に手こずった。
-
以下の設定ファイルが全てなのでこれらをNode毎にAnsibleで管理するのが良い。Ansible使えないやつはNomad使うべきじゃない。
- /etc/consul.d/
- /etc/nomad.d/
-
本質的にはclientとserverの両方をたてている
- 結構ボロボロと要らんポート使うので、クラウド業者側のfirewallはしっかり制限しよう。
第二章 Nomadでクラスタを組もう
- Oracle Cloud InstructureのAlways Free Tierで1 OCPU / 1G MEMな仮想マシンが二台まで作れるらしいので、クラスタを組んで遊ぼう。
- 冗長構成ではないので、注意
まずは第一章で作成したサーバと同じ設定のものを二台用意する。
-
用意した環境
-
VM1 OCI Compute: VM.Standard.E2.1.Micro (Always Free-eligible)
- 1 core OCPU, 1 GB memory, 0.48 Gbps network bandwidth
- OS: AlmaLinux9
-
VM2 OCI Compute: VM.Standard.E2.1.Micro (Always Free-eligible)
- 1 core OCPU, 1 GB memory, 0.48 Gbps network bandwidth
- OS: AlmaLinux9
-
VM1 OCI Compute: VM.Standard.E2.1.Micro (Always Free-eligible)
-
ポイント
- 二台とも同じVirtual Cloud Networkに設定すること
- NomadとConsulがスタンドアローンで動いている状態までもっていくこと。
VM1とVM2の間の通信を全許可する
-
VM1,VM2の所属するVirtual Cloud Network(VCN)のサブネットを特定
- デフォルトは10.0.0.0/24のはず。
-
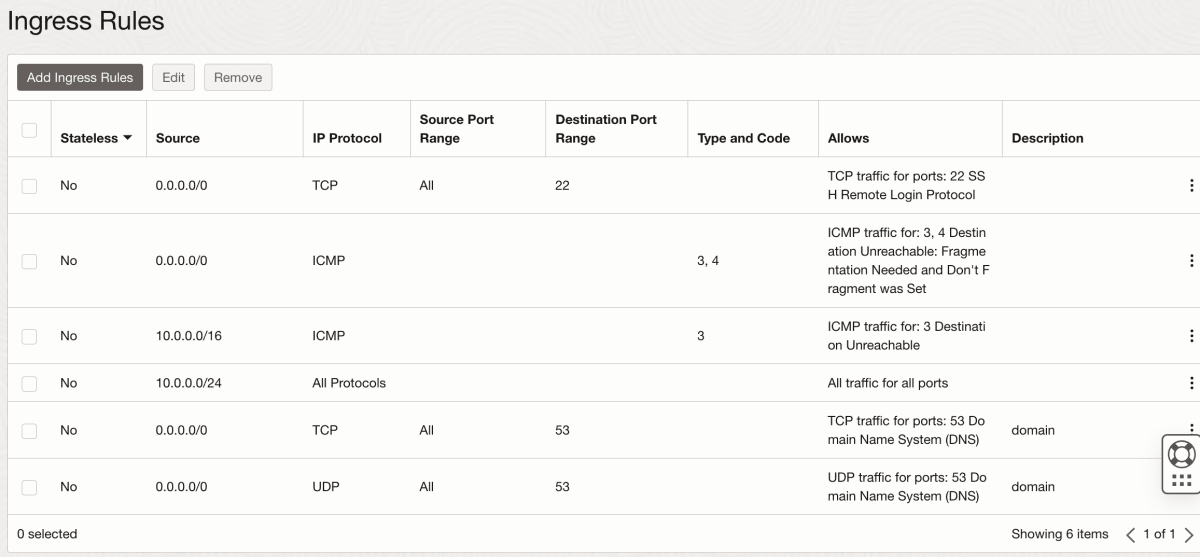
VM1,VM2の所属するVCNのSecurityListのingress-ACLを設定
- 10.0.0.0/24からの通信を全許可する

-
VM1,2のfirewalldをALL Permitに設定する
# 全許可!
sudo firewall-cmd --permanent --zone=public --set-target=ACCEPT
sudo firewall-cmd --reload
-
VM1,VM2のInternal FQDN (OCIのInstance情報参照)
- VCN内でクラスタ接続を行う為。
- 通常はVM名.subnet名.vcn名.oraclevcn.comである。
-
以上を実施後、お互いにInternal FQDNに対してpingを打ち応答があること、ARP情報に乗っかってきている事を確認しよう。
ping VM名.subnet名.vcn名.oraclevcn.com
cat /proc/net/arp
VM1,2の設定を変更しプロセスを再起動、クラスタ化する
-
VM1がマスターであるので、全く同じ設定になる。
-
{{ GetDefaultInterfaces | attr \"address\" }}という記法は https://pkg.go.dev/github.com/hashicorp/go-sockaddr/template を参考にすること。OCIの場合はプライベートIPが0.0.0.0/0へのルートを持つので、この記法を使う必要があった。 -
Nomadの設定
/etc/nomad.d/nomad.hcl
# /etc/nomad.d/nomad.hcl data_dir = "/opt/nomad/data" bind_addr = "0.0.0.0" server { enabled = true bootstrap_expect = 2 } client { enabled = true servers = ["<VM1のInternal FQDN>"] }- 設定のチェックと再起動
sudo -u nomad /usr/bin/nomad config validate /etc/nomad.d sudo systemctl restart nomad sudo journalctl -xe sudo systemctl status nomad -
Consulの設定
/etc/consul.d/consul.hcl
# /etc/consul.d/consul.hcl server = true bind_addr = "{{ GetDefaultInterfaces | attr \"address\" }}" bootstrap_expect = 2 retry_join = ["<VM1のInternal FQDN>"]- 設定のチェックと再起動
sudo -u consul consul validate /etc/consul.d/
sudo rm -rf /opt/consul/* #前回の思い出を削除
sudo systemctl restart consul
sudo journalctl -xe
sudo systemctl status consul
Nomadクラスタが稼働している事を確認する
- VM1,VM2両方でクラスタの稼働を確認する。
- Nomad
sudo nomad node status sudo nomad server members # どちらかがLeaderになっているはず- Consul
sudo consul members- ポイント
- 通常、優先度の概念が無いシステムにおいて、ノードが3の倍数とならない冗長構成は取らないので、うまくいかないケースが多い。(ビザンチン将軍問題)
- うまく行かない場合、片方を手動でjoinさせるか、再起動してみよう。
- 各ノードのNomadのNomadプロセスを意図的に落としてみよう。
- Leaderを落とすと、他のメンバーにLeaderが移譲される
- Leaderが復活しても、Leaderが移譲されたままである。
- 片方のノードを落とすと、Nomadクラスタが全断する
- ノードが3の倍数となってらず、残されたノードはリーダーを正しく決定することが出来ない為
- Leaderを落とすと、他のメンバーにLeaderが移譲される
- 通常、優先度の概念が無いシステムにおいて、ノードが3の倍数とならない冗長構成は取らないので、うまくいかないケースが多い。(ビザンチン将軍問題)
Nomadクラスタにジョブを登録し2つのノードで実行してみる
-
全部のノードで1個ずつjobを動かしたいなら、spreadを使う。
- 実はSpreadを指定しなくても、countが2以上であればデフォルトで複数のノードで均等にバランシングしてくれる。
- この場合、ノード数以上のcount(例えば、4)を設定すると、TCPのリッスンポートがコリジョンを起こすので3台目,4台目のデプロイが延々と終わらない。(ノードがクラスタの"dc1"に増えるのを健気に待ってくれる・・・)
- spread記法については https://developer.hashicorp.com/nomad/docs/job-specification/spread#value
docs.job
job "docs" { datacenters = ["dc1"] group "example" { count=2 spread { attribute = "${node.unique.id}" } network { port "http" { static = 5678 } } task "server" { driver = "docker" config { image = "hashicorp/http-echo" ports = ["http"] args = [ "-listen", ":5678", "-text", "hello world", ] } } } } - 実はSpreadを指定しなくても、countが2以上であればデフォルトで複数のノードで均等にバランシングしてくれる。
-
実行
sudo nomad run docs.job #どっちのノードから実行しても良い
curl <VM1かVM2のInternal FQDN>:5678
# hello world
まとめ
-
Nomadクラスタを2台のノードで構築し、冗長構成が機能しない事を確認した。
- 通常は3の倍数のノードで構築すること。
-
Nomadクラスタを使って、複数ノードに対して同一のJobを実行する事を確認した。
第三章 NomadでHTTPサービスを冗長構成にしよう
- ドメインレジストラ: 適当なやつ
- DNS権威サーバ: KnotDNS
- ロードバランサ: HAProxy
- HTTPサーバ: nginx
構築する構成
- 環境設定:
    - 所有するドメイン: example.com
    - 切り出すサブドメイン: oracle.example.com
    - Host1のグローバルIPv4アドレス: IP1
        - ドメイン1: a.oracle.example.com
        - ドメイン2: ns1.oracle.example.com
    - Host2のグローバルIPv4アドレス: IP2
        - ドメイン1: b.oracle.example.com
        - ドメイン2: ns2.oracle.example.com
サブドメインの委任
ドメインレジストラのexample.comのDNSレコード管理画面からDNSゾーンカット・ドメイン委任を行う
- DNSレコード設定例
oracle.example.com.       IN   NS   ns1.oracle.example.com.
oracle.example.com.       IN   NS   ns2.oracle.example.com.
ns1.oracle.example.com.   IN   A    IP1
ns1.oracle.example.com.   IN   A    IP2
ns2.oracle.example.com.   IN   A    IP1
ns2.oracle.example.com.   IN   A    IP2
DNS権威サーバの構築
-
DNS権威サーバとしてknotdnsを使用します
- https://hub.docker.com/r/cznic/knot
- knotdnsを使う理由
- 余計な機能(特にフルリゾルバ機能)を動かさなくてもよく、権威サーバとして軽量であり、RRLが使える。
- プログラマブルな権威サーバであり、knotcというクライアントソフトを使用して動的にConfigurationができる。
-
/config/knot.confを作成
- knotdnsのコンテナの中の /config/ の中にサンプルあります。
- DNS権威サーバのエチケットとして、DNS Cookie+RRLを適用しています
/config/knot.conf
server:
    rundir: "/rundir"
    user: knot:knot
    automatic-acl: off # NO NOTIFY
    answer-rotation: on # DNS-ROUND-ROBIN
    listen: [ 0.0.0.0@53 ]

log:
  - target: stdout
    any: debug

database:
    storage: "/storage"

mod-cookies:
  - id: default
    secret-lifetime: 30h # The Server Secret is regenerated every 30 hours
    badcookie-slip: 3    # The server replies only to every third query with a wrong cookie

mod-rrl:
  - id: default
    rate-limit: 200   # Allow 200 resp/s for each flow
    slip: 2           # Approximately every other response slips

template:
  - id: default
    storage: "/config"
    file: "%s.zone"
    global-module: mod-cookies/default
    global-module: mod-rrl/default

zone:
  - domain: oracle.example.com
- /config/oracle.example.com.zoneを作成
/config/oracle.example.com.zone
$ORIGIN oracle.example.com.
$TTL 3600
@       SOA     ns1.oracle.example.com. hostmaster.oracle.example.com. (
                2010111213      ; serial
                6h              ; refresh
                1h              ; retry
                1w              ; expire
                1d )            ; minimum

        NS      ns1
        NS      ns2
        A       IP1
        A       IP2

ns1     A       IP1
ns1     A       IP2
ns2     A       IP1
ns2     A       IP2
a       A       IP1
b       A       IP2
- knotdの実行
knotd -v -c /config/knot.conf
- 以上をもとに、Nomadのjobファイルを作成 (knotdns.jobという名前で保存)
knotdns.job
# Change variables
variables {
    domain = "oracle.example.com"
    ip1 = "0.0.0.1"
    ip2 = "0.0.0.2"
}

job "knotdns.job" {
    datacenters = ["dc1"]
    group "knotdns.group" {
        count=2
        spread {
            attribute = "${node.unique.id}"
        }
        network {
            port "domain" {
                static = 53
            }
        }
        task "knotdns.server" {
            driver = "docker"

            template {
                destination = "local/knot.conf"
                data = <<EOH

server:
  rundir: "/rundir"
  user: knot:knot
  automatic-acl: off # NO NOTIFY
  answer-rotation: on # DNS-ROUND-ROBIN
  listen: [ 0.0.0.0@53 ]

log:
  - target: stdout
    any: debug

database:
  storage: "/storage"

mod-cookies:
  - id: default
    secret-lifetime: 30h # The Server Secret is regenerated every 30 hours
    badcookie-slip: 3    # The server replies only to every third query with a wrong cookie

mod-rrl:
  - id: default
    rate-limit: 200   # Allow 200 resp/s for each flow
    slip: 2           # Approximately every other response slips

template:
  - id: default
    storage: "/config"
    file: "%s.zone"
    global-module: mod-cookies/default
    global-module: mod-rrl/default

zone:
  - domain: ${ var.domain }
EOH
            }

            template {
                destination = "local/${ var.domain }.zone"
                data = <<EOH
$ORIGIN ${ var.domain }.
$TTL 3600
@       SOA     ns1.${ var.domain }. hostmaster.${ var.domain }. (
                2010111213      ; serial
                6h              ; refresh
                1h              ; retry
                1w              ; expire
                1d )            ; minimum

        NS      ns1
        NS      ns2
        A       ${ var.ip1 }
        A       ${ var.ip2 }

ns1     A       ${ var.ip1 }
ns1     A       ${ var.ip2 }
ns2     A       ${ var.ip1 }
ns2     A       ${ var.ip2 }
a       A       ${ var.ip1 }
b       A       ${ var.ip2 }
EOH
            }

            config {
                image = "cznic/knot"
                ports = ["domain"]
                args = [
                    "knotd",
                    "-v",
                    "-c",
                    "/config/knot.conf",
                ]
                volumes = ["local/knot.conf:/config/knot.conf","local/${ var.domain }.zone:/config/${ var.domain }.zone"]
            }
        }
    }
}
- Nomadで実行
nomad run knotdns.job
-
VM1,VM2の所属するVCNのSecurityListのingress-ACLを設定
- 0.0.0.0/0からVMへのTCP/UDP53番ポート宛の通信を全許可する
-
動作確認
- oracle.example.comは例。ご自身の指定ドメイン
- 何度か叩いて、DNSラウンドロビンを確認すること
host oracle.example.com 8.8.8.8
host ns1.oracle.example.com 8.8.8.8
host ns2.oracle.example.com 8.8.8.8
# 連打するとDNS-Cookiesが発動し、RRLも引き起こすので
# 常識的な回数実行
- もし実行中コンテナ上のknotdにアクセスしたい場合は以下
nomad job status knotdns.job
#(Allocation IDをメモ)
nomad exec $AID bash
knotc stats
nginx(HTTPサーバ)の構築
-
参考: https://developer.hashicorp.com/nomad/tutorials/load-balancing/load-balancing-nginx
-
とりあえず立てます。これをnginx.jobとして保存します。
- job.group.serviceの値はこのjobの中では意味をなしません。次のHAProxyとの連携の際に使います。
nginx.job
# Change variables
variables {
    domain = "oracle.example.com"
}

job "nginx.job" {
    datacenters = ["dc1"]
    group "nginx.group" {
        count = 2
        spread {
            attribute = "${node.unique.id}"
        }
        network {
            port "http" {
                static = 80
            }
        }
        service {
            name = "nginx"
            port = "http"
        }
        task "nginx.server" {
            driver = "docker"
            config {
                image = "nginx"
                ports = ["http"]
                volumes = [
                    "local/conf.d:/etc/nginx/conf.d",
                    "local/html:/usr/share/nginx/html"
                ]
            }
            template {
                destination = "local/conf.d/${ var.domain }.index.conf"
                data = <<EOH
server {
    listen       80;
    server_name  ${ var.domain };
    location / {
        root   /usr/share/nginx/html;
        index  index.html index.htm;
    }
}
EOH
            }
            env {
                dc = "${NOMAD_DC}"
                region = "${NOMAD_REGION}"
                allocation = "${NOMAD_ALLOC_NAME}(${NOMAD_ALLOC_ID} #${NOMAD_ALLOC_INDEX})"
            }
            template {
                destination = "local/html/index.html"
                data = <<EOH
<body><pre>Hello World from {{ env "allocation" }} at {{ env "region" }}, {{ env "dc" }}</pre></body>
EOH
            }
        }
    }
}
-
VM1,VM2の所属するVCNのSecurityListのingress-ACLを設定
- 0.0.0.0/0からVMへのTCP80番ポート宛の通信を全許可する

-
Nomadでジョブを実行してHTTPアクセスを試す
nomad run nginx.job

# Nodeにデプロイされている事を確認する。
curl http://oracle.example.com/
# 以下のような出力があればOK。
# <body><pre>Hello World from nginx.job.nginx.group[1](fe6fe771-4c1c-12e1-5479-bd08a3352792 #1) at global, dc1</pre></body>

# 両方のNodeにデプロイされている事を確認する。
curl http://a.oracle.example.com/
curl http://b.oracle.example.com/
# 以下のような、異なるUUIDの出力が出ればOK。
# <body><pre>Hello World from nginx.job.nginx.group[1](fe6fe771-4c1c-12e1-5479-bd08a3352792 #1) at global, dc1</pre></body>
# <body><pre>Hello World from nginx.job.nginx.group[0](ab7e3e4e-c77c-72da-9d51-77186c0c91ac #0) at global, dc1</pre></body>
- 確認終わったらNomadで一旦ジョブを停止する。
- HTTPポート(TCP80番)は次の項でHAProxyが使用する為
nomad stop nginx.job
HAProxy(ロードバランサー)の構築
- 先にnginxの80番ポートを隠蔽しておく(変更箇所抜粋)
nginx.job
job "nginx.job" {
    group "nginx.group" {
        network {
            port "http" {
                # static = 80
                to = 8888
            }
        }
        task "nginx.server" {
            template {
                destination = "local/conf.d/${ var.domain }.index.conf"
                data = <<EOH
server {
    listen       8888;
}
            }
        }
    }
}
-
参考: https://developer.hashicorp.com/nomad/tutorials/load-balancing/load-balancing-haproxy
-
とりあえず立てます。これをhaproxy.jobとして保存します。
- hostで動いている127.0.0.1:8600で稼働しているConsul DNSサーバを使用するため、hostネットワークを使っています。
- こうすることで、HTTPバックエンドのIPをConsulから取ってこれます。
- hostで動いている127.0.0.1:8600で稼働しているConsul DNSサーバを使用するため、hostネットワークを使っています。
haproxy.job
# Change variables
variables {
    http_srv = "nginx"
}

job "haproxy.job" {
    datacenters = ["dc1"]
    group "haproxy.group" {
        count = 2
        spread {
            attribute = "${node.unique.id}"
        }
        network {
            port "http" {
                static = 80
            }
            port "haproxy_ui" {
                static = 8080
            }
        }
        task "haproxy.server" {
            user = "root"
            driver = "docker"
            config {
                image        = "haproxy"
                network_mode = "host"
                volumes = [
                    "local/haproxy.cfg:/usr/local/etc/haproxy/haproxy.cfg",
                ]
            }
            template {
                destination = "local/haproxy.cfg"
                data = <<EOH

global
    stats socket /var/run/api.sock user haproxy group haproxy mode 660 level admin expose-fd listeners
    log stdout format raw local0 info
    maxconn 16384

defaults
    mode http
    timeout connect 10000 # default 10 second time out if a backend is not found
    timeout client 300000 # 5 min timeout for client
    timeout server 300000 # 5 min timeout for server

frontend stats
    bind *:8080
    stats uri /
    stats show-legends
    no log

frontend http_frontend
    bind *:80
    default_backend http_backend

backend http_backend
    balance roundrobin
    server-template nginx 2 _${ var.http_srv }._tcp.service.consul:8888 resolvers consul resolve-opts allow-dup-ip resolve-prefer ipv4 check

resolvers consul
    nameserver consul 127.0.0.1:8600
    accepted_payload_size 8192
    hold valid 5s

EOH
            }
        }
    }
}
-
見舞われたトラブル
- メモリエラー
- 原因
- Nomadの各Taskはデフォルトで各Raskに以下のリソースをリザーブする
- CPU: 100MHz
- MEM: 300MB
- VM.Standard.E2.1.Microは1GBしかメモリが無い
- 3つタスクを動かすと900MBとなり限界
- Nomadの各Taskはデフォルトで各Raskに以下のリソースをリザーブする
- 対応
- 各JobのTaskのCPU, メモリ割当を以下の配置とする
- knotdns.job: 256MHz, 128MB
- nginx.job: 256MHz, 128MB
- haproxy.job: 256MHz, 128MB
- 各JobのTaskのCPU, メモリ割当を以下の配置とする
- 原因
- ファイルディスクリプタ多すぎてメモリエラー
- 原因
- HAProxyがデフォルトでmaxconn=1073741815のファイルディスクリプタ用のメモリを確保しようとする
- 対応
- ファイルディスクリプタを制限する
- 16384にする
- global.maxconnを指定する
- 16384にする
- ファイルディスクリプタを制限する
- 原因
- メモリエラー
-
knotsdns.job 追加部分抜粋
job "knotdns.job" {
    group "knotdns.group" {
        task "knotdns.server" {
            resources {
                cpu = 256
                memory = 128
            }
        }
    }
}
- nginx.job 追加部分抜粋
job "nginx.job" {
    group "nginx.group" {
        task "nginx.server" {
            resources {
                cpu = 256
                memory = 128
            }
        }
    }
}
- haproxy.job 追加部分抜粋
job "haproxy.job" {
    group "haproxy.group" {
        task "haproxy.server" {
            resources {
                cpu = 256
                memory = 128
            }
            config {
                ulimit {
                    nofile = "16384:16384"
                }
            }
            template {
                destination = "local/haproxy.cfg"
                data = <<EOH

global
    maxconn 16384
EOH
            }
        }
    }
}
- Nomadで実行
- Nomadにrestartという概念はなく、runが再適用になる。
nomad run knotdns.job
nomad run nginx.job
nomad run haproxy.job
- HTTPアクセスを試す
# Nodeにデプロイされている事を確認する。
curl http://oracle.example.com/
# 以下のような出力があればOK。
# <body><pre>Hello World from nginx.job.nginx.group[1](fe6fe771-4c1c-12e1-5479-bd08a3352792 #1) at global, dc1</pre></body>

# 両方のNodeにデプロイされている事を確認する。
curl http://a.oracle.example.com/
curl http://b.oracle.example.com/
# 以下のような、異なるUUIDの出力が出ればOK。
# <body><pre>Hello World from nginx.job.nginx.group[1](fe6fe771-4c1c-12e1-5479-bd08a3352792 #1) at global, dc1</pre></body>
# <body><pre>Hello World from nginx.job.nginx.group[0](ab7e3e4e-c77c-72da-9d51-77186c0c91ac #0) at global, dc1</pre></body>
ß
# 片方のNodeにアクセスしてももう片方のNodeにアクセスできる事を確認する。
curl http://a.oracle.example.com/
# 何度かやると以下のような、異なるUUIDの出力が出ればOK。
# <body><pre>Hello World from nginx.job.nginx.group[1](fe6fe771-4c1c-12e1-5479-bd08a3352792 #1) at global, dc1</pre></body>
# <body><pre>Hello World from nginx.job.nginx.group[0](ab7e3e4e-c77c-72da-9d51-77186c0c91ac #0) at global, dc1</pre></body>
まとめ
-
マネージドサービスなんてなくてもできるもん!
-
再現性の確保
- 作成したファイル
- 確認したNomadのバージョン
- nomad: v.1.5.6
- consul: v.1.15.3
- 確認したDockerイメージのバージョン
- cznic/knot:v3.2.7
- nginx:3.17 (DOCKER OFFICIAL IMAGE)
- haproxy:2.8: (DOCKER OFFICIAL IMAGE)
おまけ
- 3つのコンテナを動かした時点でメモリは悲鳴をあげている
[ root@oracle ~]> free -h
               total        used        free      shared  buff/cache   available
Mem:           958Mi       797Mi        70Mi        21Mi       260Mi       160Mi
Swap:             0B          0B          0B
- swapを追加したところで、NomadはSwapMemoryをコンテナで使用しないという仕様がある
- しかし、OOMでsshdが殺されるので緊急脱出装置としてswapを有効化しておく。
[2023-07-23 02:58:23 root@oracle ~]> free -h
               total        used        free      shared  buff/cache   available
Mem:           958Mi       625Mi        51Mi       3.0Mi       426Mi       332Mi
Swap:          4.0Gi       8.0Mi       4.0Gi
- 前回の思い出の削除
- メモリ構成を変えるとconsulが狂う事がある
rm -rf /opt/consul/*
第四章 knotdnsでACMEを喋れるようにするついでにNomadのjobをまとめてみよう
knotdnsをACME(RFC2136)に対応させる
-
RFC2136
-
秘密鍵の作成
- 適当に動いてるknotsdnsのTaskに乗り込んで適当に作る
- 本来これらの情報を通信する場合はVault等でnomadのjob渡し伝送路を暗号化すべきだが、今回は同一VNC内の通信なのでjobファイルに直書きする
秘密鍵の作成
nomad exec -job knotdns.job keymgr -t acme
# 以下のようなものが出力される
# # hmac-sha256:acme:poo2QswqgDH9KzlJmKeY0lbae/yT5rqRdUxPqMPGjfY=
# key:
#  - id: acme
#    algorithm: hmac-sha256
#    secret: poo2QswqgDH9KzlJmKeY0lbae/yT5rqRdUxPqMPGjfY=
- keyを設定し、そのkeyによるDNSレコードの更新を許す
knotdns.job
# Change variables
variables {
    domain = "oracle.example.com"
    ip1 = "0.0.0.1"
    ip2 = "0.0.0.2"
}

job "knotdns.job" {
    datacenters = ["dc1"]
    group "knotdns.group" {
        count=2
        spread {
            attribute = "${node.unique.id}"
        }
        network {
            port "domain" {
                static = 53
            }
        }
        task "knotdns.server" {
            driver = "docker"

            template {
                destination = "local/knot.conf"
                data = <<EOH

server:
  rundir: "/rundir"
  user: knot:knot
  automatic-acl: off # NO NOTIFY
  answer-rotation: on # DNS-ROUND-ROBIN
  listen: [ 0.0.0.0@53 ]

log:
  - target: stdout
    any: debug

database:
  storage: "/storage"

mod-cookies:
  - id: default
    secret-lifetime: 30h # The Server Secret is regenerated every 30 hours
    badcookie-slip: 3    # The server replies only to every third query with a wrong cookie

mod-rrl:
  - id: default
    rate-limit: 200   # Allow 200 resp/s for each flow
    slip: 2           # Approximately every other response slips

template:
  - id: default
    storage: "/config"
    file: "%s.zone"
    global-module: mod-cookies/default
    global-module: mod-rrl/default

key:
  - id: acme
    algorithm: hmac-sha256
    secret: poo2QswqgDH9KzlJmKeY0lbae/yT5rqRdUxPqMPGjfY=

acl:
  - id: acme
    key: acme
    action: update

zone:
  - domain: ${ var.domain }
    acl: acme

EOH
            }

            template {
                destination = "local/${ var.domain }.zone"
                data = <<EOH
$ORIGIN ${ var.domain }.
$TTL 3600
@       SOA     ns1.${ var.domain }. hostmaster.${ var.domain }. (
                2010111213      ; serial
                6h              ; refresh
                1h              ; retry
                1w              ; expire
                1d )            ; minimum

        NS      ns1
        NS      ns2
        A       ${ var.ip1 }
        A       ${ var.ip2 }

ns1     A       ${ var.ip1 }
ns1     A       ${ var.ip2 }
ns2     A       ${ var.ip1 }
ns2     A       ${ var.ip2 }
a       A       ${ var.ip1 }
b       A       ${ var.ip2 }
EOH
            }

            config {
                image = "cznic/knot"
                ports = ["domain"]
                args = [
                    "knotd",
                    "-v",
                    "-c",
                    "/config/knot.conf",
                ]
                volumes = ["local/knot.conf:/config/knot.conf","local/${ var.domain }.zone:/config/${ var.domain }.zone"]
            }
        }
    }
}
- Nomadで実行
nomad run knotdns.job
3つのJobファイルを結合したjobファイルを作成
-
作成したJobファイル3点を一つのjobファイルとして結合する
- groupを複線化することで、一個のjobセットとしてまとめられ、一括起動・停止が可能になる
- 共通で使える変数定義を一箇所にすることでよりjob specがシンプルになる
- 分割管理が出来なくなる
-
各種jobの停止
nomad stop haproxy.job
nomad stop knotdns.job
nomad stop nginx.job
- 結合jobファイルを作成
web.job
# Change variables
variables {
    domain = "oracle.example.com"
    ip1 = "ip1"
    ip2 = "ip2"
    http_srv = "nginx"
    # nomad exec <AID> keymgr -t acme
    acme = "CHANGEME"
}

job "web.job" {
    datacenters = ["dc1"]
    group "knotdns.group" {
        count=2
        spread {
            attribute = "${node.unique.id}"
        }
        network {
            port "domain" {
                static = 53
            }
        }
        task "knotdns.server" {
            resources {
                # cpu = 256
                memory = 128
            }
            driver = "docker"

            template {
                destination = "local/knot.conf"
                data = <<EOH

server:
  rundir: "/rundir"
  user: knot:knot
  automatic-acl: off # NO NOTIFY
  answer-rotation: on # DNS-ROUND-ROBIN
  listen: [ 0.0.0.0@53 ]

log:
  - target: stdout
    any: debug

database:
  storage: "/storage"

mod-cookies:
  - id: default
    secret-lifetime: 30h # The Server Secret is regenerated every 30 hours
    badcookie-slip: 3    # The server replies only to every third query with a wrong cookie

mod-rrl:
  - id: default
    rate-limit: 200   # Allow 200 resp/s for each flow
    slip: 2           # Approximately every other response slips

template:
  - id: default
    storage: "/config"
    file: "%s.zone"
    global-module: mod-cookies/default
    global-module: mod-rrl/default
key:
  - id: acme
    algorithm: hmac-sha256
    secret: ${ var.acme }
acl:
  - id: acme
    key: acme
    action: update
zone:
  - domain: ${ var.domain }
    acl: acme
EOH
            }

            template {
                destination = "local/${ var.domain }.zone"
                data = <<EOH
$ORIGIN ${ var.domain }.
$TTL 3600
@       SOA     ns1.${ var.domain }. hostmaster.${ var.domain }. (
                2010111213      ; serial
                6h              ; refresh
                1h              ; retry
                1w              ; expire
                1d )            ; minimum

        NS      ns1
        NS      ns2
        A       ${ var.ip1 }
        A       ${ var.ip2 }

ns1     A       ${ var.ip1 }
ns1     A       ${ var.ip2 }
ns2     A       ${ var.ip1 }
ns2     A       ${ var.ip2 }
a       A       ${ var.ip1 }
b       A       ${ var.ip2 }
EOH
            }

            config {
                image = "cznic/knot"
                ports = ["domain"]
                args = [
                    "knotd",
                    "-v",
                    "-c",
                    "/config/knot.conf",
                ]
                volumes = ["local/knot.conf:/config/knot.conf","local/${ var.domain }.zone:/config/${ var.domain }.zone"]
            }
        }
    }
    group "haproxy.group" {
        count = 2
        spread {
            attribute = "${node.unique.id}"
        }
        network {
            port "http" {
                static = 80
            }
            port "haproxy_ui" {
                static = 8080
            }
        }
        task "haproxy.server" {
            resources {
                # cpu = 256
                memory = 128
            }
            user = "root"
            driver = "docker"
            config {
                image        = "haproxy"
                network_mode = "host"
                volumes = [
                    "local/haproxy.cfg:/usr/local/etc/haproxy/haproxy.cfg",
                ]
            }
            template {
                destination = "local/haproxy.cfg"
                data = <<EOH

global
    #stats socket /var/run/api.sock user root group root mode 660 level admin expose-fd listeners
    stats socket /var/run/api.sock user haproxy group haproxy mode 660 level admin expose-fd listeners
    log stdout format raw local0 info
    maxconn 16384

defaults
    mode http
    timeout connect 10000 # default 10 second time out if a backend is not found
    timeout client 300000 # 5 min timeout for client
    timeout server 300000 # 5 min timeout for server

frontend stats
    bind *:8080
    stats uri /
    stats show-legends
    no log

frontend http_frontend
    bind *:80
    default_backend http_backend

backend http_backend
    balance roundrobin
    server-template nginx 2 _${ var.http_srv }._tcp.service.consul:8888 resolvers consul resolve-opts allow-dup-ip resolve-prefer ipv4 check

resolvers consul
    nameserver consul 127.0.0.1:8600
    accepted_payload_size 8192
    hold valid 5s

EOH
            }
        }
    }
    group "nginx.group" {
        count = 2
        spread {
            attribute = "${node.unique.id}"
        }
        network {
            port "http" {
                to = 8888
            }
        }
        service {
            name = "nginx"
            port = "http"
        }

        task "nginx.server" {
            resources {
                # cpu = 256
                memory = 128
            }
            driver = "docker"
            config {
                image = "nginx"
                ports = ["http"]
                volumes = [
                    "local/conf.d:/etc/nginx/conf.d",
                    "local/html:/usr/share/nginx/html"
                ]
            }
            template {
                destination = "local/conf.d/${ var.domain }.index.conf"
                data = <<EOH
server {
    listen       8888;
    server_name  ${ var.domain };
    location / {
        root   /usr/share/nginx/html;
        index  index.html index.htm;
    }
}
EOH
            }
            env {
                dc = "${NOMAD_DC}"
                region = "${NOMAD_REGION}"
                allocation = "${NOMAD_ALLOC_NAME}(${NOMAD_ALLOC_ID} #${NOMAD_ALLOC_INDEX})"
            }
            template {
                destination = "local/html/index.html"
                data = <<EOH
<body><pre>Hello World from {{ env "allocation" }} at {{ env "region" }}, {{ env "dc" }}</pre></body>
EOH
            }
        }
    }
}
- 結合jobの実行
nomad run web.job
- 結合jobの動作状況の確認
[2023-07-23 04:07:12 root@oracle ~]> nomad status
ID           Type     Priority  Status          Submit Date
web.job      service  50        running         2023-07-23T04:03:33Z
第五章 nomadを使ってletsencryptの証明書を発行しよう
-
Let's Encryptのドメイン証明方法はACME認証を使う
-
今回はACME認証を行う
- ACME認証による証明書発行
- ローカルファイルシステムに依存が薄い
- ワイルドカード証明書が発行できる
- certbotの.well-knownフォルダへのファイル存在確認認証による証明書発行
- ローカルファイルシステムに強く依存する
- ACME認証による証明書発行
Discussion