🏁
SwiftUI のプレビュー用の便利背景
はじめに
Xcode Previews は便利ですが、デザインによっては背景を透過、または逆に透過してはいけないデザイン指定の場合があり、気を抜くとプレビューではそういったところをついつい見逃してしまいます
その都度適当な背景色をセットしては確認していたのですが、少し面倒なのでプレビュー用に便利な背景を作成してみました
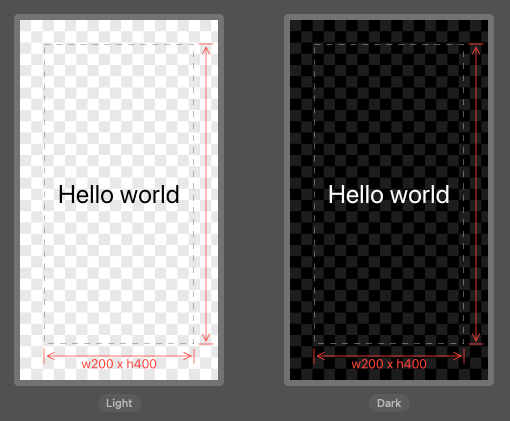
完成形は以下のようなイメージです
struct TransparentDemo_Previews: PreviewProvider {
    static var previews: some View {
        Text("Hello world")
            .font(.largeTitle)
            .frame(width: 200, height: 400)
            .demoBackground(withBorder: true)
            .previewLayout(.sizeThatFits)
    }
}

struct TransparentDemo_Previews: PreviewProvider {
    static var previews: some View {
        Text("Hello world")
            .font(.largeTitle)
            .demoBackground()
            .previewLayout(.sizeThatFits)
    }
}

実装
背景を市松模様に
まずは透過画像などでよく利用される市松模様を用意します
サイズによって目が細かくなりすぎないように適当に調整しています
public struct TransparentDemo: View {
    public var body: some View {
        GeometryReader { geometry in
            let width = geometry.size.width
            let unit = max(15, min(width / 20, 120))

            let xCount = Int(width / unit) + 1
            let yCount = Int(geometry.size.height / unit) + 1

            Path { path in
                for x in 0..<xCount {
                    for y in 0..<yCount {
                        switch (x.isMultiple(of: 2), y.isMultiple(of: 2)) {
                        case (true, false): continue
                        case (false, true): continue
                        default: break
                        }
                        path.addRect(.init(x: CGFloat(x) * unit, y: CGFloat(y) * unit,
                                           width: unit, height: unit))
                    }
                }
            }
            .fill(Color.secondary)
            .opacity(0.2)
        }
        .clipped()
    }
}
これだけでも十分ですが、これを書いている途中でサイズ情報も分かったら便利だと思ったので、次にそれを描画します
サイズ情報の付加
サイズはターゲットビューに対して overlay モディファイアでサイズに影響を与えないように別レイヤーで GeometryReader から取得した結果を描画しています
extension View {
    public func demoBackground(withBorder: Bool = false) -> some View {
        self
            .background(
                Rectangle()
                    .strokeBorder(style: .init(lineWidth: 1, dash: [8]))
                    .foregroundColor(Color.secondary.opacity(0.8))
                    .opacity(withBorder ? 1 : 0)
            )
            .overlay(
                // width x height
                GeometryReader { geometry in
                    Rectangle()
                        .fill(Color.clear)
                        .overlay(
                            Text("w\(Int(geometry.size.width)) x h\(Int(geometry.size.height))")
                                .foregroundColor(.red)
                                .font(.system(size: 16))
                                .padding(.top),
                            alignment: .top
                        )
                }
                .alignmentGuide(.bottom) { d in d[.top] },
                alignment: .bottom
            )
            ...
またプレビュー用に見やすくするために余白を加えているため、ターゲットビュー自体のサイズ感が分かりづらい場合があるので、同じように目盛りをそれぞれ描画しています
            ...
            .overlay(
                // vertical scale
                GeometryReader { geometry in
                    Rectangle()
                        .fill(Color.clear)
                        .overlay(
                            Path { path in
                                let h = geometry.size.height
                                let padding = 4 as CGFloat

                                path.move(to: .init(x: -10, y: 0))
                                path.addLine(to: .init(x: 10, y: 0))

                                path.move(to: .init(x: 0, y: padding))
                                path.addLine(to: .init(x: -5, y: 10 + padding))
                                path.move(to: .init(x: 0, y: padding))
                                path.addLine(to: .init(x: 5, y: 10 + padding))

                                path.move(to: .init(x: 0, y: padding))
                                path.addLine(to: .init(x: 0, y: h - padding))

                                path.addLine(to: .init(x: -5, y: h - padding - 10))
                                path.move(to: .init(x: 0, y: h - padding))
                                path.addLine(to: .init(x: 5, y: h - padding - 10))

                                path.move(to: .init(x: -10, y: h))
                                path.addLine(to: .init(x: 10, y: h))
                            }
                            .stroke(style: .init(lineCap: .round, lineJoin: .round))
                            .fill(.red)
                            .padding(.leading),
                            alignment: .leading
                        )
                }
                .alignmentGuide(.trailing) { d in d[.leading] },
                alignment: .trailing
            )
alignmentGuide を利用することでターゲットビューのアライメントに対して位置を指定しているのでどのようなサイズであってもずれずに描画することができます
※ あまりに対象のサイズが小さいと潰れてしまいますが…
おわりに
ちょっとした拡張ですが、 あるとないとでは結構開発効率に違いが出てくる部分だと思うので是非参考にしてみてください!
コード全体
import SwiftUI

public struct TransparentDemo: View {
    public var body: some View {
        GeometryReader { geometry in
            let width = geometry.size.width
            let unit = max(15, min(width / 20, 120))

            let xCount = Int(width / unit) + 1
            let yCount = Int(geometry.size.height / unit) + 1

            Path { path in
                for x in 0..<xCount {
                    for y in 0..<yCount {
                        switch (x.isMultiple(of: 2), y.isMultiple(of: 2)) {
                        case (true, false): continue
                        case (false, true): continue
                        default: break
                        }
                        path.addRect(.init(x: CGFloat(x) * unit, y: CGFloat(y) * unit,
                                           width: unit, height: unit))
                    }
                }
            }
            .fill(Color.secondary)
            .opacity(0.2)
        }
        .clipped()
    }
}

extension View {
    public func demoBackground(withBorder: Bool = false) -> some View {
        self
            .background(
                Rectangle()
                    .strokeBorder(style: .init(lineWidth: 1, dash: [8]))
                    .foregroundColor(Color.secondary.opacity(0.8))
                    .opacity(withBorder ? 1 : 0)
            )
            .overlay(
                // width x height
                GeometryReader { geometry in
                    Rectangle()
                        .fill(Color.clear)
                        .overlay(
                            Text("w\(Int(geometry.size.width)) x h\(Int(geometry.size.height))")
                                .foregroundColor(.red)
                                .font(.system(size: 16))
                                .padding(.top),
                            alignment: .top
                        )
                }
                .alignmentGuide(.bottom) { d in d[.top] },
                alignment: .bottom
            )
            .overlay(
                // vertical scale
                GeometryReader { geometry in
                    Rectangle()
                        .fill(Color.clear)
                        .overlay(
                            Path { path in
                                let h = geometry.size.height
                                let padding = 4 as CGFloat

                                path.move(to: .init(x: -10, y: 0))
                                path.addLine(to: .init(x: 10, y: 0))

                                path.move(to: .init(x: 0, y: padding))
                                path.addLine(to: .init(x: -5, y: 10 + padding))
                                path.move(to: .init(x: 0, y: padding))
                                path.addLine(to: .init(x: 5, y: 10 + padding))

                                path.move(to: .init(x: 0, y: padding))
                                path.addLine(to: .init(x: 0, y: h - padding))

                                path.addLine(to: .init(x: -5, y: h - padding - 10))
                                path.move(to: .init(x: 0, y: h - padding))
                                path.addLine(to: .init(x: 5, y: h - padding - 10))

                                path.move(to: .init(x: -10, y: h))
                                path.addLine(to: .init(x: 10, y: h))
                            }
                            .stroke(style: .init(lineCap: .round, lineJoin: .round))
                            .fill(.red)
                            .padding(.leading),
                            alignment: .leading
                        )
                }
                .alignmentGuide(.trailing) { d in d[.leading] },
                alignment: .trailing
            )
            .overlay(
                // horizontal scale
                GeometryReader { geometry in
                    Rectangle()
                        .fill(Color.clear)
                        .overlay(
                            Path { path in
                                let w = geometry.size.width
                                let padding = 4 as CGFloat

                                path.move(to: .init(x: 0, y: -10))
                                path.addLine(to: .init(x: 0, y: 10))

                                path.move(to: .init(x: padding, y: 0))
                                path.addLine(to: .init(x: 10 + padding, y: -5))
                                path.move(to: .init(x: padding, y: 0))
                                path.addLine(to: .init(x: 10 + padding, y: 5))

                                path.move(to: .init(x: padding, y: 0))
                                path.addLine(to: .init(x: w - padding, y: 0))

                                path.addLine(to: .init(x: w - padding - 10, y: -5))
                                path.addLine(to: .init(x: w - padding, y: 0))
                                path.addLine(to: .init(x: w - padding - 10, y: 5))

                                path.move(to: .init(x: w, y: -10))
                                path.addLine(to: .init(x: w, y: 10))
                            }
                            .stroke(style: .init(lineCap: .round, lineJoin: .round))
                            .fill(.red)
                            .padding(.top),
                            alignment: .bottom
                        )
                }
                .alignmentGuide(.bottom) { d in d[.top] },
                alignment: .bottom
            )
            .padding()
            .padding()
            .padding(.bottom)
            .background(TransparentDemo())
    }
}
Discussion