前書き
WordPressで稼働しているリニューアル案件で、Astroを使って実装を行った。
ライブラリにサイトが完全に依存するデメリットもあるものの、
Astroを使用した理由としては、コンポーネント指向による保守性拡張性の観点からと、サイトの最適化の観点から採用した。
結果普通のレンタルサーバーでPageSpeedInsightsでほぼ100点満点。
SPの点数
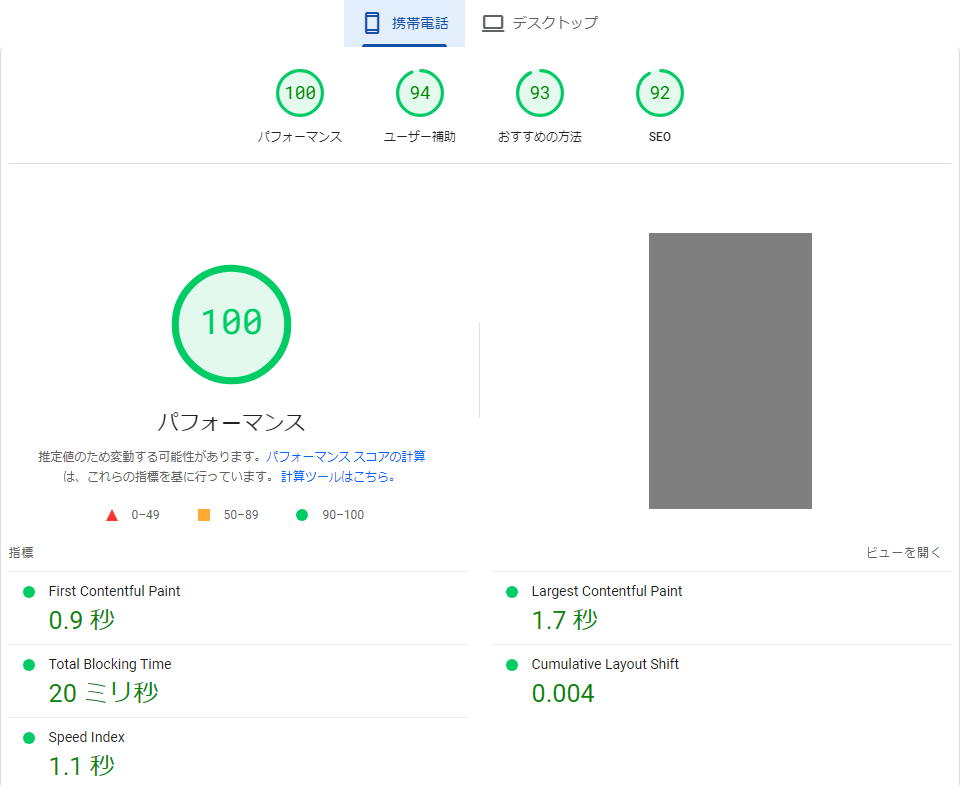
PCの点数

使用感と感想
正直これまでのタスクランナーやモジュールバンドラーなどを使ったHTML開発は若干レガシー化している感があった。
そんな中、まさに現時点でのWeb開発ベストプラクティスを詰め込み、ほぼ何も考えずに最適化されたサイトを実装できる非常にすぐれたライブラリだと感じる。
また、これまでPageSpeedInsigthsの点数を上げようと思ったら、構築後、PageSpeedInsightsの助言に一つ一つ従いながら、一生懸命タグやアセットの読み込みをチューニングしたり、圧縮したり、画像を次世代フォーマットに変換したり等々やってた。
Astroでウェブサイトを構築すと「一体これら何だったのか」と拍子抜けするくらいの完成度と簡単さで静的ファイルを出力してくれる。
正直基本、上記のようにPageSpeedInsightsで100点取るためにやるべきことはほぼ一つ。
Astroの公式Imageコンポーネントででformat"webp"を指定することくらいである。
(もしwebp対応していないブラウザで表示した場合でもデフォルトの形式で表示してくれるので普通に画像ファイルなどはpngなどで用意したらよい)
Astroでは所謂「コンポーネント」の単位をAstro Islandと呼んでいるが、その使い方も分かりやすく、またページの配置も直感的で学習コストも低い。
WordPressと連携させる手順
Astro側APIデータ取得ロジック
まずwp-typesというnodeライブラリがあり、TypeScript用に基本的な型を使うと便利
WP APIはWordPressにビルトインされていて、何もせずとも投稿などに対してGETリクエストを打ってJSONを取得できる。
しかしちょっとしたハマりポイントとして、FeatureImageやAdvanced Custom Fieldのデータなど、パラメーターが必要で「あれ?画像が取れないな」となりがちなのが若干ハマりどころ。(例:/?_embed=_embed&acr_fomat=standardなどの指定が必要)
以下はTSで書いたAPI取得ロジック。
ビルド時に各種カスタム投稿タイプとカスタムフィールド、画像データ、ページを取得するために下記のようなuseWPAPI()というHooksを作成した。
useWPAPI
import type {
  WP_REST_API_Post,
  WP_REST_API_Pages,
  WP_REST_API_Error,
  WP_REST_API_Settings,
  WP_REST_API_Attachment,
} from "wp-types";
import client from "~/api";
import type {
  StaffCustomField,
  ReformStoryCustomField,
  EventsCustomField,
} from "~/types/customFields";

export type Endpoints =
  | "news"
  | "events"
  | "staff"
  | "reform_story"
  | "column"
  | "case";

export type FeaureImageDetail = {
  file: string;
  width: number;
  height: number;
  mime_type: string;
  source_url: string;
};
export type WP_REST_API_Attachment_Detail = WP_REST_API_Attachment & {
  media_details: {
    sizes: {
      thumbnail: FeaureImageDetail;
      medium: FeaureImageDetail;
      medium_large: FeaureImageDetail;
      large: FeaureImageDetail;
      past_case_thumbnail: FeaureImageDetail;
    };
  };
};

export type WPApiResult<T> = T | WP_REST_API_Error;

export type WP_REST_API_Post_With_FeatureImage = WP_REST_API_Post & {
  "wp:featuredmedia": WP_REST_API_Attachment_Detail[];
};

export type WP_REST_API_Staff = WP_REST_API_Post & { acf: StaffCustomField };

export type WP_REST_API_ReformStory = WP_REST_API_Post & {
  acf: ReformStoryCustomField;
};

export type WP_REST_API_Event = WP_REST_API_Post_With_FeatureImage & {
  acf: EventsCustomField;
};

const useWPApi = () => {
  const fetchPost = async <T = WP_REST_API_Post>(
    endpoint: Endpoints,
    id: number,
    _embed = true
  ) => {
    try {
      const res = await client.get<T>(`/wp-json/wp/v2/${endpoint}/${id}`, {
        params: { _embed, acf_format: "standard" },
      });
      const data = res.data;
      return data;
    } catch (e: unknown) {
      console.error(e);
    }
  };

  const fetchPosts = async <
    T extends unknown[] = WP_REST_API_Post_With_FeatureImage[]
  >(
    endpoint: Endpoints,
    options: Partial<WP_REST_API_Settings> = { posts_per_page: 10 },
    _embed = true
  ) => {
    try {
      const res = await client.get<T>(`/wp-json/wp/v2/${endpoint}`, {
        params: { ...options, _embed, acf_format: "standard" },
      });
      const data = res.data;
      if (data.length === 0) {
        throw new Error("No Data");
      }
      return data;
    } catch (e: unknown) {
      console.error(e);
    }
  };

  const fetchImage = async (mediaId: number = 0) => {
    try {
      const res = await client.get<WP_REST_API_Attachment_Detail>(
        `/wp-json/wp/v2/media/${mediaId}`
      );
      const data = res.data;
      return data;
    } catch (e: unknown) {
      console.error(e);
    }
  };

  const fetchPage = async (slug: string) => {
    try {
      const res = await client.get<WP_REST_API_Pages>(
        `/wp-json/wp/v2/pages/?slug=${slug}`
      );
      const data = res.data[0];
      return data;
    } catch (e: unknown) {
      console.error(e);
    }
  };

  return {
    fetchPost,
    fetchPosts,
    fetchImage,
    fetchPage,
  };
};

export default useWPApi;
ちなみにACFのImageデータは下記のような型になるので共有しておく。
(sizesは使わなかったので少し粒度が荒いが)
ACFImageの型
export interface ACFImage {
  ID: number;
  id: number;
  title: string;
  filename: string;
  filesize: number;
  url: string;
  link: string;
  alt: string;
  author: string;
  description: string;
  caption: string;
  name: string;
  status: string;
  uploaded_to: number;
  date: string;
  modified: string;
  menu_order: number;
  mime_type: string;
  type: string;
  subtype: string;
  icon: string;
  width: number;
  height: number;
  sizes: { [key: string]: string | number };
}
こちらでサイトを作成し、ビルドを行えば静的ファイルが出力される。
Astroはアイランド内で単に---の中にTypeScriptを書けばビルド時に実行してくれる
---
import useWPApi from "~/hooks/useWPApi";
import { Image } from "astro:assets";
const { fetchPosts } = useWPApi();
const Columns = await fetchPosts("column", { per_page: 3 });
if (!Columns) return;

export type Props = {
  title?: string;
  catchCopy?: string;
};
const { title, catchCopy } = Astro.props;
---
git actionの設定
.github/workflowsに下記のように指定する。
ちなみに自分はnodeのバージョン管理にvoltaを使用しており、そちらを利用した。
masterブランチへのpush時と、あとでWordPress側で簡単なプラグインを作るが、記事の投稿時に静的サイトを再生成するためにworkflow_dispatch時にビルドをするワークフローを作成している。
なお、workflow_dispatchというのは引数を付けたマニュアル発火可能なトリガーである。
また下記の特徴としては、WP APIとの通信がエラーやタイムアウトになることがあり(恐らくWordPress側を自動更新などにしてたりするからだと思われる)、buildが失敗しても5回まで再実行するようにしている
git workflow
name: Manual trigger workflow - Production

on:
  workflow_dispatch:
  push:
    branches:
      - master
jobs:
  deploy:
    runs-on: ubuntu-20.04
    steps:
      - uses: actions/checkout@v3
      - run: git checkout master
      - run: echo "SITE_URL=[サイトのURL]" >> $GITHUB_ENV
      - run: echo "API_URL=[WordPressのサイトURL]" >> $GITHUB_ENV
      # インストールとビルド
      - name: Use Volta
        uses: volta-cli/action@v4
      - run: |
          yarn install --immutable && \
          yarn build --immutable
        env:
          RETRY_LIMIT: 5 # 再試行の最大回数を定義
      - name: Check if build was successful
        if: failure() # 前のステップが失敗した場合
        run: |
          retry_count=1
          while [ "$retry_count" -le "$RETRY_LIMIT" ] && [ ! -d "./dist" ]; do
            echo "Retrying build... ($retry_count/$RETRY_LIMIT)"
            yarn build
            ((retry_count++))
            sleep 5m  # ウェイト時間
          done
      # SSH 設定
      - name: SSH Deploy
        uses: shimataro/ssh-key-action@v2
        with:
          key: ${{ secrets.PRODUCTION_SSH_PRIVATE_KEY }}
          name: example-production.key
          known_hosts: ${{ secrets.PRODUCTION_SSH_KNOWN_HOST }}
          config: |
            Host example-production
              HostName ${{ secrets.PRODUCTION_SSH_HOST_NAME }}
              User ${{ secrets.PRODUCTION_SSH_USER }}
              IdentityFile ~/.ssh/example-production.key
              Port 10022
              StrictHostKeyChecking no
      - name: rsync over SSH
        run: rsync -r ./static/ [サーバー公開ディレクトリ]/static/
.htaccessでstaticディレクトリをまず見に行くように追記する
WordPressのリライト記述の前に下記を追記する
.htaccess
### staticディレクトリに静的ファイルを配置
<IfModule mod_rewrite.c>
RewriteEngine On

RewriteCond %{DOCUMENT_ROOT}/static%{REQUEST_URI} -f
RewriteRule ^ /static%{REQUEST_URI} [L]

RewriteCond %{DOCUMENT_ROOT}/static%{REQUEST_URI}/index.html -f
RewriteRule ^ /static%{REQUEST_URI}/index.html [L]
</IfModule>
WordPressでプラグインを作成する
次に各種WordPressにカスタム投稿などで新しく投稿される度にAstroでビルドが行われファイルがデプロイされるようにする
今回Astro Build Triggerという名前にした。
<?php
/*
Plugin Name: Astro Build Trigger
Description: Trigger a Astro build when a post or custom post is published or updated.
Version: 1.1
Author: en-gine
Author URI: https://en-gine.co
*/

class AstroBuildTrigger {
    const PLUGINDIR = WP_PLUGIN_DIR . '/astro-build-trigger';
    public function __construct() {
        // // For standard posts
        // add_action('publish_post', array($this, 'trigger_build'));

        // For custom post types, replace 'custom_post_type' with your custom post type
        add_action('publish_reform_story', array($this, 'trigger_build'));
        add_action('publish_staff', array($this, 'trigger_build'));
        add_action('publish_news', array($this, 'trigger_build'));
        add_action('publish_events', array($this, 'trigger_build'));
        add_action('publish_column', array($this, 'trigger_build'));
    }

    public function trigger_build() {
        // Specify the command to run
        $url = "[gitのURL]/actions/workflows/workflow_dispatch_master.yaml/dispatches";
        $user = "[gitのユーザー]";
        $token = "[gitのトークン]";

        $headers = array(
            "Accept: application/vnd.github.v3+json",
            "User-Agent: {$user}",
            "Authorization: token {$token}",
        );

        $data = array(
            "ref" => "master",
        );

        // セッションを初期化
        $ch = curl_init();

        // オプションをセット
        curl_setopt($ch, CURLOPT_URL, $url); // URLをセット
        curl_setopt($ch, CURLOPT_HTTPHEADER, $headers); // HTTPヘッダーをセット
        curl_setopt($ch, CURLOPT_POST, true); // POSTを使用
        curl_setopt($ch, CURLOPT_POSTFIELDS, json_encode($data)); // POSTデータをJSON形式でセット
        curl_setopt($ch, CURLOPT_RETURNTRANSFER, true); // curl_exec()の結果を文字列で取得

        // URLの情報を取得
        $output = curl_exec($ch);

        // セッションを終了
        curl_close($ch);

        // 結果を出力
        if($output){
            $this->log_to_file($output);
        }

    }
    /**
     * メッセージをログファイルに書き込む。
     * 各曜日に対応するログファイルを作成し、それぞれのログファイルは7日間保持される。
     * 7日以上経過したログファイルは新しいメッセージで上書きされる。
     *
     * @param string $message
     */
    private function log_to_file($message) {
        date_default_timezone_set('Asia/Tokyo');
        $weekday = date('w');
        $log_file =  self::PLUGINDIR . '/log/log_' . $weekday . '.log';
        $log_entry = date('[Y-m-d H:i:s]') . ' ' . $message . "\n";

        if (file_exists($log_file)) {
            $file_mod_time = filemtime($log_file);
            $diff = time() - $file_mod_time;

            if ($diff >= 7 * 24 * 60 * 60) {
                // If the file was last modified more than 7 days ago,
                // reset the file (i.e., overwrite with new log entries)
                file_put_contents($log_file, $log_entry);
            } else {
                // If the file was last modified within 7 days, append to the file
                file_put_contents($log_file, $log_entry, FILE_APPEND | LOCK_EX);
            }
        } else {
            // If the file does not exist, create a new one
            file_put_contents($log_file, $log_entry);
        }
    }
}

return new AstroBuildTrigger();
これで柔軟で保守性も高く、SEOもバッチリな爆速サイトが作成可能。
デメリット
当たり前だが、あくまで静的ファイルのため、WordPressでいえばアーカイブページ、すなわちタクソノミーやカテゴリーの一覧や検索結果一覧などの動的なものは苦手。
数が少なければまだ静的ファイルでなんとか出来るかもしれないが。
その部分は結局WordPressのテンプレートで実装するしかないか、もしくは一昔前にPerlなどでCGIとして書いていたようなことを実装するしかないかもしれない。
ただ現在のバージョンのAstroは環境を選べばオンデマンドレンダリングにも対応しており、今回は既存のWordPressサイトをリニューアルし、すべて同じレンタルサーバーに乗せる、という要件であったため上記の方法を取ったが、インフラから選定できるのであればこちらも考慮されたい。
追記:
Reactなどを挟んでCSRできるようになってます。ホント最強っすね。

AIをフル活用した生産的な実装。 言語特性とアーキテクチャを理解したクリーンなコード。 テスト網羅性を意識した堅実なプログラム。 en-gineではエンジニア(未経験者はポテンシャル採用)、営業、PMを募集しております。 人が困ってることをITで解決するために始めた会社です。案件もお気軽にご相談ください。
Discussion