[初心者向け]Unityの2Dキャラクターのセットアップ その2
前回は、2Dキャラクターのアニメーション周りのセットアップについて解説しました。
今回は、移動に関して解説します。
とりあえず動かしてみる
前回の記事を最後まで行った場合は、このようなスクリプトになっていると思います。
using System.Collections;
using System.Collections.Generic;
using UnityEngine;

public class DogAnimationControl : MonoBehaviour
{
    Animator animator;

    // Start is called before the first frame update
    void Start()
    {
        animator = GetComponent<Animator>();
    }

    // Update is called once per frame
    void Update()
    {
        if (Input.GetKeyDown(KeyCode.UpArrow))
        {
            animator.SetBool("MoveUp", true);
            animator.SetBool("MoveDown", false);
            animator.SetBool("MoveRight", false);
            animator.SetBool("MoveLeft", false);
        }
        else if (Input.GetKeyDown(KeyCode.DownArrow))
        {
            animator.SetBool("MoveUp", false);
            animator.SetBool("MoveDown", true);
            animator.SetBool("MoveRight", false);
            animator.SetBool("MoveLeft", false);
        }
        else if (Input.GetKeyDown(KeyCode.LeftArrow))
        {
            animator.SetBool("MoveUp", false);
            animator.SetBool("MoveDown", false);
            animator.SetBool("MoveRight", false);
            animator.SetBool("MoveLeft", true);
        }
        else if (Input.GetKeyDown(KeyCode.RightArrow))
        {
            animator.SetBool("MoveUp", false);
            animator.SetBool("MoveDown", false);
            animator.SetBool("MoveRight", true);
            animator.SetBool("MoveLeft", false);
        }
    }
}
これを改造します。
まずは、キーの入力を毎フレーム処理するように変更します。
Input.GetKeyDownは押された瞬間だけ検知する処理なので、
Input.GetKeyにして、押されている間ずっと検知するようにします。
if (Input.GetKeyDown(KeyCode.UpArrow))
↓
if (Input.GetKey(KeyCode.UpArrow))
次に、毎フレームの移動方向をVector3で保持します。
void Update()
{
    Vector3 moveDirection = Vector3.zero;

    if (Input.GetKey(KeyCode.UpArrow))
    {
        moveDirection = Vector3.up;

        animator.SetBool("MoveUp", true);
        animator.SetBool("MoveDown", false);
        animator.SetBool("MoveRight", false);
        animator.SetBool("MoveLeft", false);
    }
    else if (Input.GetKey(KeyCode.DownArrow))
    {
        moveDirection = Vector3.down;

        animator.SetBool("MoveUp", false);
        animator.SetBool("MoveDown", true);
        animator.SetBool("MoveRight", false);
        animator.SetBool("MoveLeft", false);
    }
    else if (Input.GetKey(KeyCode.LeftArrow))
    {
        moveDirection = Vector3.left;

        animator.SetBool("MoveUp", false);
        animator.SetBool("MoveDown", false);
        animator.SetBool("MoveRight", false);
        animator.SetBool("MoveLeft", true);
    }
    else if (Input.GetKey(KeyCode.RightArrow))
    {
        moveDirection = Vector3.right;

        animator.SetBool("MoveUp", false);
        animator.SetBool("MoveDown", false);
        animator.SetBool("MoveRight", true);
        animator.SetBool("MoveLeft", false);
    }
}
そして最後に、移動方向の値を現在の座標に加算します。
void Update()
{
    Vector3 moveDirection = Vector3.zero;

    if (Input.GetKey(KeyCode.UpArrow))
    {
        moveDirection = Vector3.up;

        animator.SetBool("MoveUp", true);
        animator.SetBool("MoveDown", false);
        animator.SetBool("MoveRight", false);
        animator.SetBool("MoveLeft", false);
    }
    else if (Input.GetKey(KeyCode.DownArrow))
    {
        moveDirection = Vector3.down;

        animator.SetBool("MoveUp", false);
        animator.SetBool("MoveDown", true);
        animator.SetBool("MoveRight", false);
        animator.SetBool("MoveLeft", false);
    }
    else if (Input.GetKey(KeyCode.LeftArrow))
    {
        moveDirection = Vector3.left;

        animator.SetBool("MoveUp", false);
        animator.SetBool("MoveDown", false);
        animator.SetBool("MoveRight", false);
        animator.SetBool("MoveLeft", true);
    }
    else if (Input.GetKey(KeyCode.RightArrow))
    {
        moveDirection = Vector3.right;

        animator.SetBool("MoveUp", false);
        animator.SetBool("MoveDown", false);
        animator.SetBool("MoveRight", true);
        animator.SetBool("MoveLeft", false);
    }

    float speed = 5f;
    this.transform.position += moveDirection * speed * Time.deltaTime;
}
Time.deltaTimeは、前のフレームと現在のフレームの時間差を取得できます。
パソコンのスペックや環境によってフレームの呼ばれるタイミングがまちまちなので、
フレームの時間差を移動に掛けることによって、環境差をなくすようにしています。
上記のスクリプトを実行すると、矢印キーで動くことを確認できます。

当たり判定のある移動をさせる
当たり判定を機能させるには、物理挙動のRigidBody2Dをアタッチする必要があるのですが、実は先ほどの座標に直接数値を加算する方法は好ましくありません。
なぜなら、物理挙動を考慮した関数を使っていないからです。
なので、RigidBody2D用のスクリプトに書き換えます。
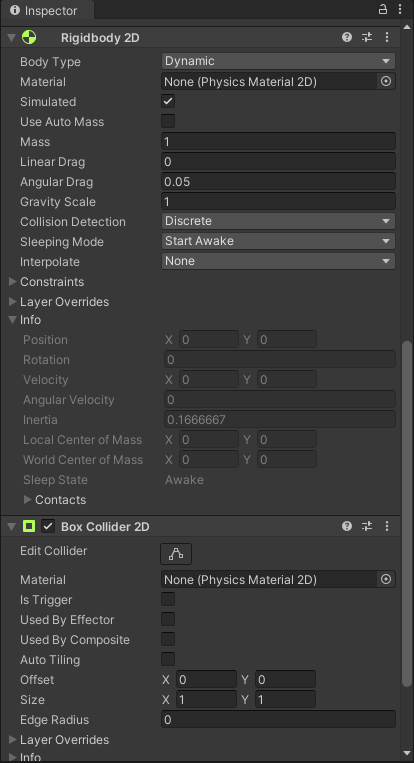
まずは犬のゲームオブジェクトを選択し、RigidBody2DとCollider2Dをアタッチします。
ひとまず実行してみましょう。
すると、犬が下に落ちていってしまいます。

これは、デフォルトだとロックマンのような横スクロールゲームの設定になっているからです。
なので、重力の数値を0にして、ついでにZ軸の回転を禁止します。
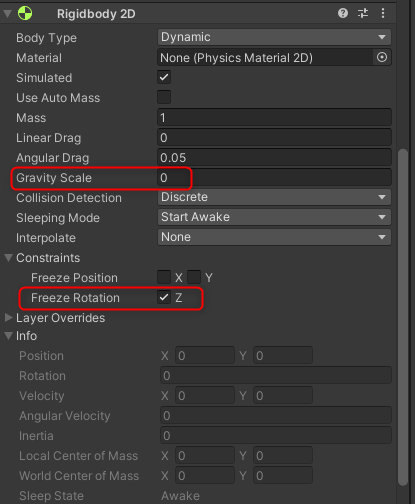
改めて実行すると、落ちるような挙動をしなくなります。
次に、スクリプトを編集して、物理挙動に適した移動処理に書き換えます。
ひとまずスクリプト全文を貼ります。
using System.Collections;
using System.Collections.Generic;
using UnityEngine;

public class DogAnimationControl : MonoBehaviour
{
    Animator animator;
    Vector2 currentVelocity;

    // Start is called before the first frame update
    void Start()
    {
        animator = GetComponent<Animator>();
    }

    // Update is called once per frame
    void FixedUpdate()
    {
        Vector3 moveDirection = Vector3.zero;

        if (Input.GetKey(KeyCode.UpArrow))
        {
            moveDirection = Vector3.up;

            animator.SetBool("MoveUp", true);
            animator.SetBool("MoveDown", false);
            animator.SetBool("MoveRight", false);
            animator.SetBool("MoveLeft", false);
        }
        else if (Input.GetKey(KeyCode.DownArrow))
        {
            moveDirection = Vector3.down;

            animator.SetBool("MoveUp", false);
            animator.SetBool("MoveDown", true);
            animator.SetBool("MoveRight", false);
            animator.SetBool("MoveLeft", false);
        }
        else if (Input.GetKey(KeyCode.LeftArrow))
        {
            moveDirection = Vector3.left;

            animator.SetBool("MoveUp", false);
            animator.SetBool("MoveDown", false);
            animator.SetBool("MoveRight", false);
            animator.SetBool("MoveLeft", true);
        }
        else if (Input.GetKey(KeyCode.RightArrow))
        {
            moveDirection = Vector3.right;

            animator.SetBool("MoveUp", false);
            animator.SetBool("MoveDown", false);
            animator.SetBool("MoveRight", true);
            animator.SetBool("MoveLeft", false);
        }

        float speed = 2f;
        float smoothTime = 0.1f;
        Rigidbody2D rigidbody2D = GetComponent<Rigidbody2D>();
        rigidbody2D.velocity = Vector2.SmoothDamp(rigidbody2D.velocity, moveDirection * speed, ref currentVelocity, smoothTime);
    }
}
変更点を説明します。
まず移動処理を、このような処理に変えました。
float speed = 2f;
float smoothTime = 0.1f;
Rigidbody2D rigidbody2D = GetComponent<Rigidbody2D>();
rigidbody2D.velocity = Vector2.SmoothDamp(rigidbody2D.velocity, moveDirection * speed, ref currentVelocity, smoothTime);
ここで要となるのは、Vector2.SmoothDamp関数です。
これは、指定の秒数までに指定の速度まで滑らかに値を変化させる処理で、
今回の場合は、
rigidbody2D.velocityの値を
smoothTime(0.1秒)までに、
moveDirection * speedの値に
滑らかに変化させるようにしています。
途中で使っているref currentVelocityですが、
滑らかな値変化にするために、途中の値を保持する必要があるため、スクリプトの上部で変数宣言しています。
また、先ほど説明したTime.deltaTimeを使用していませんが、
物理挙動を使用している時点で、フレームレート依存ではなくなっているため、記述不要になってます。
あとは、void Update関数をvoid FixedUpdate()関数に変えています。physicsの移動処理はFixedUpdate内で行うことが推奨されているためです。
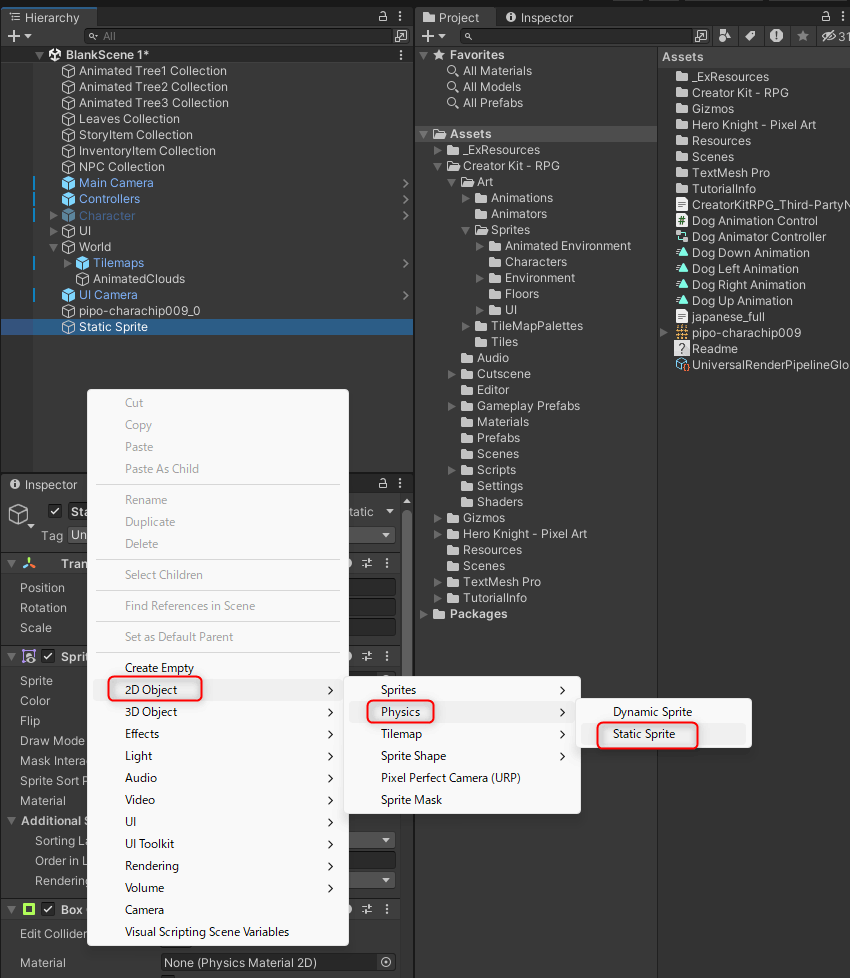
さて、動かしてみる前に、障害物を設置しておきます。
Hierarchyビューで空いているところを右クリックし、
"2D Object"->"Physics"->"Static Sprite"を作成し、
犬と重ならないように横にずらして配置します。
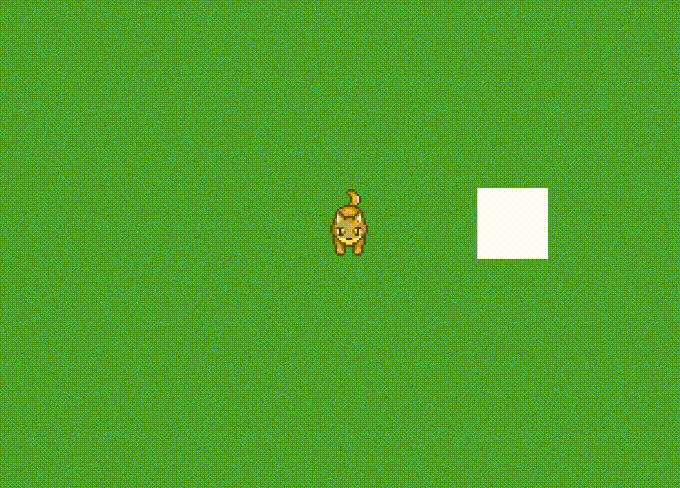
ゲームを実行して動かしてみると、当たり判定が機能していることが確認できます。
滑らないようにする(オプション)
現状、上移動の直後に右移動すると、右斜め上に滑ってしまいます。
また、滑らかに移動速度が変化する必要が無い場合もあります。
その場合は、次のようなスクリプトを書きます。
float speed = 2f;
Rigidbody2D rigidbody2D = GetComponent<Rigidbody2D>();
rigidbody2D.velocity = moveDirection * speed;
変化の値を直接velocityに入れるだけです。
unityの"Creator Kit: RPG"に対応する
"Creator Kit: RPG"を使用している場合は、今まで書いたスクリプトは使用せず、"Character Controller 2D"スクリプトをアタッチします。
それと、中身の処理は今まで解説した内容を使っているのですが、スプライトアニメーション周りだけ変更しておく必要があります。
まず、"Character Controller 2D"には使っていない変数や処理が大量にあるので、次のスクリプトのように書き換えます。
using System;
using System.Collections;
using System.Collections.Generic;
using RPGM.Gameplay;
using UnityEngine;
using UnityEngine.EventSystems;
using UnityEngine.U2D;

namespace RPGM.Gameplay
{
    /// <summary>
    /// A simple controller for animating a 4 directional sprite using Physics.
    /// </summary>
    public class CharacterController2D : MonoBehaviour
    {
        public float speed = 1;
        public float acceleration = 2;
        public Vector3 nextMoveCommand;
        public Animator animator;
        public bool flipX = false;

        new Rigidbody2D rigidbody2D;
        PixelPerfectCamera pixelPerfectCamera;

        Vector2 currentVelocity;

        void MoveState()
        {
            UpdateAnimator(nextMoveCommand);
            rigidbody2D.velocity = Vector2.SmoothDamp(rigidbody2D.velocity, nextMoveCommand * speed, ref currentVelocity, acceleration);
        }

        void UpdateAnimator(Vector3 direction)
        {
            if (animator)
            {
                if (direction.y > 0)
                {
                    animator.SetBool("MoveUp", true);
                    animator.SetBool("MoveDown", false);
                    animator.SetBool("MoveRight", false);
                    animator.SetBool("MoveLeft", false);
                }
                else if (direction.y < 0)
                {
                    animator.SetBool("MoveUp", false);
                    animator.SetBool("MoveDown", true);
                    animator.SetBool("MoveRight", false);
                    animator.SetBool("MoveLeft", false);
                }
                else if (direction.x < 0)
                {
                    animator.SetBool("MoveUp", false);
                    animator.SetBool("MoveDown", false);
                    animator.SetBool("MoveRight", false);
                    animator.SetBool("MoveLeft", true);
                }
                else if (direction.x > 0)
                {
                    animator.SetBool("MoveUp", false);
                    animator.SetBool("MoveDown", false);
                    animator.SetBool("MoveRight", true);
                    animator.SetBool("MoveLeft", false);
                }
            }
        }

        void Update()
        {
            MoveState();
        }

        void LateUpdate()
        {
            if (pixelPerfectCamera != null)
            {
                transform.position = pixelPerfectCamera.RoundToPixel(transform.position);
            }
        }

        void Awake()
        {
            rigidbody2D = GetComponent<Rigidbody2D>();
            pixelPerfectCamera = GameObject.FindObjectOfType<PixelPerfectCamera>();
        }
    }
}
そして、"Character Controller 2D"スクリプトをアタッチして、プロパティを次のように設定します。

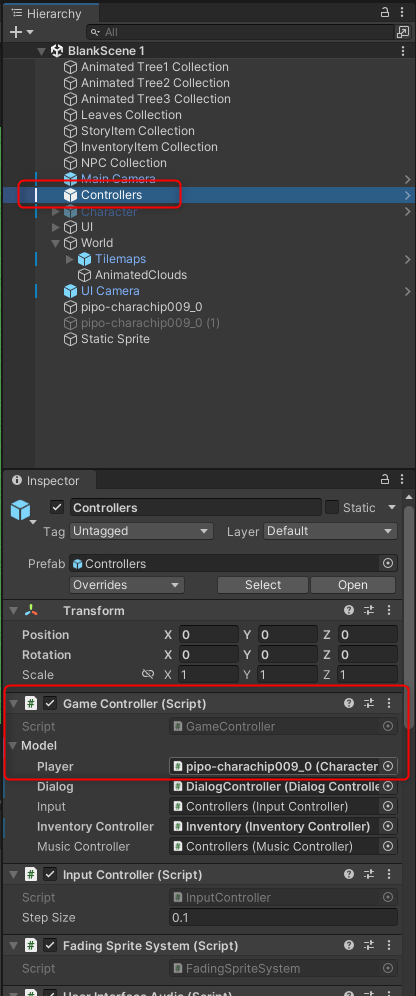
そのあと、シーン内にある"Controllers"ケームオブジェクトの"Game Controller"の"Model"の"Player"に、犬のゲームオブジェクトをセットします。
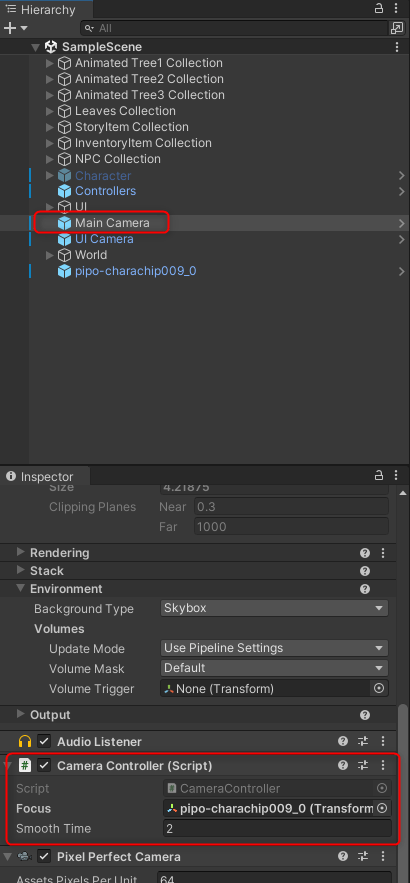
また、"Main Camera"の"Camera Controller"の"Focus"に、犬をセットします。
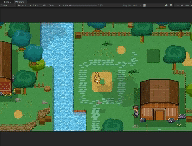
以上で、"Creator Kit: RPG"のサンプルシーンでプレイヤーの置き換えが出来ていることが確認できます。
宣伝
「1か月間 Unityの学習サポート」をするサービスを自分はココナラでしているので、もし興味のある方はチェックして頂けると嬉しいです。
Discussion