setup semantic-release from scratch
必要なもの
- GitHubリポジトリ
- GitHubのPersonal Access Token
- https://github.com/settings/tokens/new?scopes=repoで発行する
- 必要な権限:read:org, repo, user:email, workflow, write:packages, write:repo_hook
- npmのアカウント
ルートプロジェクトを作ります。
mkdir my-project
cd my-project
# gitの初期化
git init
# 空初期コミットをする
npx git-cz --non-interactive --type=chore --subject='new repo!' --allow-empty
# remote originの追加
git remote add origin git@github.com:suinplayground/monorepo-with-npm-workspaces.git
package.jsonを作ります。
{
  "name": "my-project",
  "version": "0.0.0",
  "description": "",
  "main": "index.js",
  "scripts": {
    "test": "echo \"Error: no test specified\" && exit 1"
  },
  "repository": {
    "type": "git",
    "url": "git+https://github.com/suinplayground/monorepo-with-npm-workspaces.git"
  },
  "author": "My Organization <support@example.com> (https://example.com/)",
  "license": "UNLICENSED",
  "bugs": {
    "url": "https://github.com/suinplayground/monorepo-with-npm-workspaces/issues"
  },
  "homepage": "https://github.com/suinplayground/monorepo-with-npm-workspaces#readme"
}
semantic-releaseのセットアップ
npx semantic-release-cli setup
起動するといろいろ聞かれるので答えていきます。
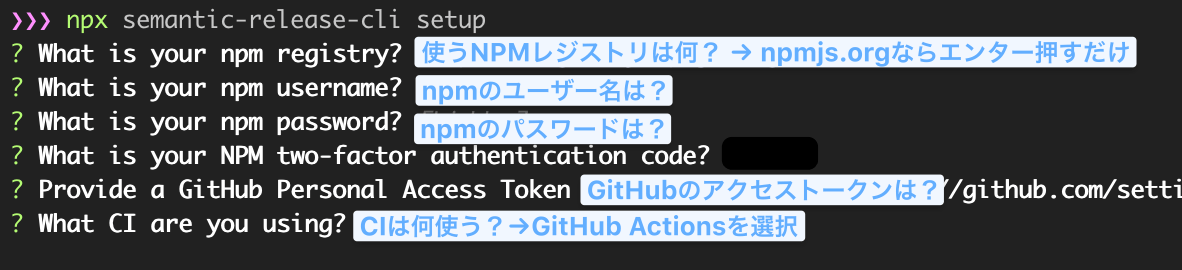
これを行うと、npmjs.orgでアクセストークンが生成され、それがGitHubのリポジトリのActions secrets
に環境変数NPM_TOKENとして登録されます。この環境変数はGitHub Actionsでnpm publishするときに使われます。
また、package.jsonも下記の変更が加えられます。
-
versionが0.0.0-developmentになる -
devDependenciesにsemantic-releaseが追加される -
repository.urlがgit+https://からhttps://に変わる
npmのパスワードが聞かれるのはNPMのトークンを取るためですが、予め自分でトークンを用意しておくこともできます。その場合、--npm-tokenオプションで指定します。
npx semantic-release setup --npm-token [NPM_TOKEN]
devDependeciesにsemantic-releaseが加わったので、それをインストールするためにnpm installを実行します。
npm install
設定
ルートパッケージのpackage.jsonにreleaseフィールドを追加します。
 {
   "name": "my-project",
   "version": "0.0.0-development",
   ...
+  "release": {
+    "branches": ["main"]
+  }
 }
設定項目は次のとおりです。
branches
ここで指定したGitブランチにコミットがあった場合にリリースが行われます。
semantic-releaseでは、誰がコミットしたかはチェックしません。なので、ここで指定するブランチは、GitHubの保護ブランチに指定しておくと良いです。
plugins
semantic-releaseでは、リリース時に行う作業がプラグイン化されています。pluginsで指定した作業がリリース時に実行されます。
デフォルトでは次のプラグインが実行されます。
- @semantic-release/commit-analyzer
- コミットログから発番するセマンティックバージョンを決める
- @semantic-release/release-notes-generator
- コミットログからリリースノートデータを生成する
- @semantic-release/npm
- リリースが必要な場合に、package.jsonの
versionを更新し、npm publishを行う
- リリースが必要な場合に、package.jsonの
- @semantic-release/github
- リリースが必要な場合に、GitHub Releaseを作成し、GitHub issuesとPRにリリースに関するコメントを追加する
各プラグインはnpmパッケージになっています。上のプラグインはsemantic-releaseに同梱されているため、別途インストールする必要はありません。これ以外にも便利なプラグインが公式とコミュニティから提供されているので、必要に応じてインストールすると、リリース作業を拡張することもできます。
- @semantic-release/changelog
- CHANGELOG.mdを生成する
- @semantic-release/git
- 発番されたセマンティックバージョンでgitタグを作り、リリース作業中に変更されたpackage.jsonや生成されたCHANGELOG.mdをgitにpushする
- @semantic-release/exec
- リリース作業の任意のタイミングでシェルコマンドを実行する
必要なプラグインをインストール
デフォルトで使えるプラグインに合わせて、以下のプラグインもインストールしておきます。
npm install -D @semantic-release/changelog @semantic-release/exec @semantic-release/git conventional-changelog-conventionalcommits
conventional commitsの型の設定
conventional commitsでは型(type)によって、セマンティックバージョンをどうあげるかが決められています。しかし、決まっているのはfeat型とfix型だけです。
- feat型: セマンティックバージョンのマイナーバージョンを上げる
- fix型: セマンティックバージョンのパッチバージョンを上げる
-
BREAKING CHANGEフッターを持つものはメジャーバージョンを上げるといった決まりもあります。
これだけで現実のコミットを分類するとなると表現力が乏しいです。なので、conventional commitsでは、追加の型はプロジェクトで決めていいことになっています。
また、コミットにはgit-czを用いますが、追加の型の設定が可能です。
さらに、@semantic-release/release-notes-generatorは、型をヒントにリリースノートを生成します。どの型をリリースノートに載せるか、リリースノート上の型の見出しはどうするかといった設定が必要です。
まとめると、以下の設定がプロジェクトに必要になります。
- feat、fix以外の追加の型を定義する。
- git-cz用の設定。
- @semantic-release/release-notes-generator用の設定。
これらの情報はバラバラに書いてもいいのですが、まとまっていたほうが管理しやすいので、commit-types.config.jsとしてルートパッケージに作ります。
/**
* @typedef {Object} Type conventional commitsの型の設定
* @property {string} type conventional commitsの型
* @property {"major" | "minor" | "patch" | undefined } [release] セマンティックバージョンの上げ方。undefinedはリリースされません。
* @property {string} description git-czに表示される説明文
* @property {string} emoji git-czで使う絵文字
* @property {string | undefined} [section] changelogに表示する見出し
* @property {boolean | undefined} [hidden] changelogに表示するか否か
*/
/**
* @type {Array.<Type>}
*/
module.exports = [
{
type: "feat", // 機能追加
release: "minor",
description: "A new feature",
emoji: "🎸",
section: "Features",
hidden: false,
},
{
type: "fix", // バグ修正
release: "patch",
description: "A bug fix",
emoji: "🐛",
section: "Bug Fixes",
hidden: false,
},
{
type: "sec", // 脆弱性の解消
release: "patch",
description: "A vulnerability fix",
emoji: "👮",
section: "Security",
hidden: false,
},
{
type: "perf", // パフォーマンスのみの改善
release: "patch",
description: "A code change that improves performance",
emoji: "⚡️",
section: "Performance Improvements",
hidden: false,
},
{
type: "refactor", // 機能追加やバグ修正を伴わないリファクタリング
release: undefined,
description: "A code change that neither fixes a bug or adds a feature",
emoji: "💡",
section: "Code Refactoring",
hidden: false,
},
{
type: "docs", // ドキュメントのみの変更
release: undefined,
description: "Documentation only changes",
emoji: "✏️",
section: `Documentation`,
hidden: false,
},
{
type: "release", // リリースコミット
release: undefined,
description: "Create a release commit",
emoji: "🏹",
hidden: true,
},
{
type: "style", // コーディングスタイル関連の修正
release: undefined,
description: "Markup, white-space, formatting, missing semi-colons...",
emoji: "💄",
section: "Styles",
hidden: false,
},
{
type: "test", // テストの追加変更
release: undefined,
description: "Adding missing tests",
emoji: "💍",
section: "Tests",
hidden: false,
},
{
type: "ci", // CI関連の変更
release: undefined,
description: "CI related changes",
emoji: "🎡",
section: `Continuous Integration`,
hidden: false,
},
{
type: "chore", // ビルドプロセスや補助ツールの変更
release: undefined,
description: "Build process or auxiliary tool changes",
emoji: "🤖",
section: `Chore`,
hidden: true,
},
];
git-czの導入
conventional commitsは<type>[optional scope]: <description>の形式でコミットメッセージを書くことになっています。
この形式に慣れていないと、形式をうまく守れていないコミットメッセージを作ってしまいます。
この問題を解決するのがgit-czです。git-czを使ってコミットすると、conventional commitsの形式を守ったコミットメッセージになります。
git-czは、「型は何?」「BREAKING CHANGEはある?」などインタラクティブな質問に答える形式のCLIツールです。
git-czのインストール
git-czはnpmでインストールします。グローバルにインストールしてもいいですが、チームで同じ環境に揃えるためにもプロジェクトに入れておくのがお薦めです。
npm install -D git-cz
git-czの設定
git-czの設定は、ルートパッケージのchangelog.config.jsに書きます。
/**
 * This is a configuration for git-cz.
 *
 * @see {@link https://github.com/streamich/git-cz#custom-config} for documentation
 * @see {@link https://github.com/streamich/git-cz/blob/master/lib/defaults.js} for default configs.
 */

const types = require("./commit-types.config");

module.exports = {
  /**
   * コミットメッセージに絵文字を含めないか
   */
  // disableEmoji: false,
  /**
   * コミットメッセージの題目の書式
   */
  // format: "{type}{scope}: {emoji}{subject}",
  /**
   * コミット時に選択可能な型
   */
  list: types.map(({ type }) => type),
  /**
   * コミットメッセージ最大文字数
   */
  // maxMessageLength: 64,
  /**
   * コミットメッセージ最小文字数
   */
  // minMessageLength: 3,
  /**
   * コミット時に入力する項目
   */
  // questions: [
  //   "type", // 型
  //   "scope", // スコープ
  //   "subject", // コミットの題名
  //   "body", // コミットの本文
  //   "breaking", // breaking changeの内容
  //   "issues", // クローズするGitHub issues
  //   "lerna", // lernaのenvironment
  // ],
  /**
   * スコープの選択肢。具体的には影響を受けるnpmパッケージ名など。
   */
  scopes: getWorkspaces(),
  /**
   * 各型の設定
   */
  types: Object.fromEntries(
    types.map(({ type, description, emoji }) => [
      type,
      { description, emoji, value: type },
    ])
  ),
  /**
   * BREAKING CHANGEに表示する絵文字
   */
  // breakingChangePrefix: "🧨",
  /**
   * Closesに表示する絵文字
   */
  // closedIssuePrefix: "✅",
};

/**
 * @return {string[]}
 */
function getWorkspaces() {
  let list;
  try {
    list = JSON.parse(
      require("child_process")
        .execSync("npm ls --production --depth 1 -json")
        .toString()
    );
  } catch (e) {
    console.error(e);
  }
  const packages = Object.entries(list?.dependencies ?? {}).flatMap(
    ([name, { resolved }]) =>
      resolved.startsWith("file:") ? [name.replace(/^@.+?\//, "")] : []
  );
  return packages.length > 0 ? [...packages, "*"] : [];
}
git commitの代わりにgit-czを使う
「このプロジェクトではgit-czを使いましょう」と宣言していても、誤ってgit commitでコミットしてしまうこともありえます。
ヒューマンエラーを回避するためには、git commitを実行してもgit-czが起動するようにしておいたほうが良いです。
huskyを導入する
huskyはgit commitをフックして、任意のコマンドを実行するツールです。
これを活用して、git commit実行時にgit-czを起動するようにします。
huskyはnpmでインストールします。
npm install husky -D
次にgit hookを有効化します。
npx husky install
これを実行すると、.git/configファイルのhooksPathに.huskyが追記されます。.huskyディレクトリの中にはhuskyを起動するシェルスクリプトが作られます。
このままだと、ローカル開発環境を作り直したときや、新規開発者が参加したときに、手動でhusky installを行う必要が出てきます。husky installを自動化するためには、npm install時にこれが実行されるように、package.jsonにprepareスクリプトを追加します。npmでは次のコマンドを実行すると、prepareスクリプトが追加できます。
npm set-script prepare "husky install"
 {
   "scripts": {
+    "prepare": "husky install"
   }
 }
git commit時にgit-czを起動するgit hooksを追加する
次のコマンドを実行し、git hooksのprepare-commit-msgフックにgit-czを登録します。
npx husky add .husky/prepare-commit-msg "exec < /dev/tty && npx git-cz --hook || true"
exec < /dev/ttyが必要なのは、git hooksがデフォルトではインタラクティブなコマンドに対応していないためです。この部分を書いておくことで、git hooksでインタラクティブなコマンドが起動できるようになります。
上のコマンドを実行すると、.husky/prepare-commit-msgファイルが作られるので、これをgitにコミットします。
git add .husky/prepare-commit-msg
git commit
この段階でgit commitでgit-czが使われるようになっていれば設定はうまくいっています。
commitlintでコミットメッセージチェックの仕組み化
conventinal commitsを利用したリリース自動化は、コミットメッセージのフォーマットがかなめです。コミットメッセージは後でフォーマットを直すのが難しいので、問題は早期発見する必要があります。
commitlintはフォーマットが正しいかをチェックするツールです。念には念を入れ、このcommitlintも導入しておきます。
commitlintが不正なフォーマットを検出した例:

commitlintを導入する
commitlintはnpmでインストールします。
npm install -D @commitlint/config-conventional @commitlint/cli
commitlintのチェックツールを定義する
チェックルールの定義ファイルcommitlint.config.jsを作ります。
/**
 * A configuration for commitlint.
 * @see {@link https://commitlint.js.org/#/} for details.
 */

const typeEnum = require("./commit-types.config").map(({ type }) => type);
const scopeEnum = require("./changelog.config").scopes;
const subjectMinLength = require("./changelog.config").minMessageLength ?? 3;
const subjectMaxLength = require("./changelog.config").maxMessageLength ?? 64;

module.exports = {
  extends: ["@commitlint/config-conventional"],
  /**
   * @see {@link https://commitlint.js.org/#/reference-rules} for rule details.
   */
  rules: {
    "type-enum": [2, "always", typeEnum],
    "scope-enum": [2, "always", scopeEnum],
    "subject-min-length": [2, "always", subjectMinLength],
    "subject-max-length": [2, "always", subjectMaxLength],
    "body-max-length": [0], // releaseコミットがエラーになるため無効化する
    "body-max-line-length": [0], // releaseコミットがエラーになるため無効化する
    "footer-max-length": [0], // releaseコミットがエラーになるため無効化する
    "footer-max-line-length": [0], // releaseコミットがエラーになるため無効化する
  },
};
commitlintのチェックルールのテスト
commitlintのチェックルールが合っているかテストします。
テストデータを与える方法はいくつかあります。もっとも簡単なのはechoを使う方法です。
echo 'invalid_type(invalid_scope): aa' | npx commitlint
git-czが生成するコミットメッセージに対してテストする場合は、次のコマンドを用います。このコマンドは--hookオプションが付いているためコミットは発生しないので安心してください。
npx git-cz --non-interactive --hook --type feat --scope bbbb --subject '' --body '' && npx commitlint -e
すでにコミットが溜まっている場合は、過去の全コミットメッセージに対してcommitlintを走らせて、ルールが厳しすぎないか確認することもできます。
# 全コミットに対してcommitlintを動かす
npx commitlint --from $(git rev-list --max-parents=0 HEAD) --to HEAD --verbose
エンドツーエンドでテストする場合は、次のコマンドを実行します。
# 空のコミットでテストする
git commit --allow-empty
# git-czを使って空コミットでテストする
npx git-cz --allow-empty
git commit時にcommitlintを走らせるようにする
git commitがあったときにcommitlintを実行するには、git hooksのprepare-commit-msgにcommitlintを追加します。すでにhuskyを導入しているので、huskyでこのフックを追加します。
npx husky add .husky/commit-msg 'npx --no -- commitlint --edit $1'
git add .husky/commit-msg
multi-semantic-release
semantic-releaseはモノレポに対応していません。モノレポでもsemantic-releaseを使えるようにしたのが、multi-semantic-releaseです。
multi-semantic-releaseを導入する
インストールはnpmで行います。
npm i multi-semantic-release -D
multi-semantic-releaseを設定する
設定する前に、ルートパッケージのpackage.jsonにworkspacesフィールドがあり、そこにパッケージのパスがリスト化されていることを確認してください。multi-semantic-releaseはこれを手がかりにリリースするパッケージを探します。
{
  ...
  "workspaces": [
    "packages/*"
  ]
}
リリーススクリプトをmultiに変更する
semantic-release-cli setupでプロジェクトをセットアップした場合、npmスクリプトに"semantic-release"が追加されています。multi-semantic-releaseでは、semantic-releaseコマンドを使わないので、これをmulti-semantic-releaseに直します。
 {
   "scripts": {
-    "semantic-release": "semantic-release",
+    "semantic-release": "SKIP_BY_SEMANTIC_RELEASE=true multi-semantic-release",
   }
 }
環境変数SKIP_BY_SEMANTIC_RELEASEは、リリース処理中にgit hooksでgit-czが起動しないようにするためのものです。
multi-sematic-releaseとワークスペース間依存
multi-semantic-releaseはワークスペース間で依存したパッケージのバージョンの発番にも対応しています。
たとえば、もともと次のような依存関係にあるパッケージがあったとします。
-
@my-project/b1.0.0 →@my-project/a1.0.0
そして、@my-project/aにBREAKING CHANGEを伴うコミットができたとします。このタイミングでリリースを行うと、multi-semantic-releaseは次のようにバージョンを変更します。
-
@my-project/a: 1.0.0 → 2.0.0 (メジャーをインクリメント) -
@my-project/b: 1.0.0 → 1.0.1 (パッチをインクリメント)
これと同時に、@my-project/bのdependeciesも次のように更新し、最新版の@my-project/aに依存するようになります。
{
   "dependencies": {
-    "@my-project/a": "2.0.0"
+    "@my-project/a": "1.0.0"
   }
 }
dependeciesのバージョンを書き換える振る舞いは、--deps.bumpオプションと--deps.releaseオプションで決定されます。
--deps.bumpオプションのデフォルトはoverrideです。overrideは依存するパッケージの最新バージョンと同期します。
satisfyにすると、現在の要求バージョンと依存するパッケージの最新バージョンを照らし合わせて、依存するパッケージの最新バージョンが現在の要求バージョンの範囲内の場合は、dependeciesを更新しません。したがって、リリースも起きません。逆に要求バージョン範囲から外れる場合は、override戦略を取ります。
--deps.releaseはdependeciesを更新したときに、そのパッケージのバージョンのメジャーを上げるのか、マイナーを上げるのか、パッチを上げるかを設定できます。デフォルトはpatchです。
semantic-releaseの設定
semantic-releaseの設定はルートパッケージのrelease.config.jsに書きます。設定はpackage.jsonに持たせることもできますが、JSONだと設定の共通化が難しかったり、表現力が乏しかったりするので、最初からJavaScriptで書くのがおすすめです。
/**
 * A configuration file for semantic-release
 *
 * @see {@link https://semantic-release.gitbook.io/semantic-release/} for about semantic-release.
 * @see {@link https://semantic-release.gitbook.io/semantic-release/usage/configuration} for configuration details.
 * @see {@link https://github.com/semantic-release/semantic-release/blob/971a5e0d16f1a32e117e9ce382a1618c8256d0d9/lib/get-config.js#L56} for about default config.
 */

const types = require("./commit-types.config");

/**
 * GitHubのデフォルトブランチ
 */
const defaultBranch = "main"; // or "master"

/**
 * changelogを書き出すファイル名
 */
const changelogFile = "CHANGELOG.md";

module.exports = {
  /**
   * リリース対象となるGitブランチ
   *
   * @see https://semantic-release.gitbook.io/semantic-release/usage/workflow-configuration
   */
  branches: [
    "+([0-9])?(.{+([0-9]),x}).x", // メンテナンスリリース用
    defaultBranch,
    { name: "beta", prerelease: true },
    { name: "alpha", prerelease: true },
  ],
  /**
   * Gitタグのフォーマット。Lodashのテンプレートが使えます。
   * multi-semantic-releaseを使った場合は、この設定は無視されます。
   */
  tagFormat: "v${version}",
  /**
   * 実行するプラグイン
   */
  plugins: [
    /**
     * conventional-changelogでコミットを解析します。
     * @see https://github.com/semantic-release/commit-analyzer
     */
    [
      "@semantic-release/commit-analyzer",
      {
        preset: "conventionalcommits",
        releaseRules: [
          { breaking: true, release: "major" },
          { revert: true, release: "patch" },
          ...types.flatMap(({ type, release }) =>
            release ? [{ type, release }] : []
          ),
        ],
      },
    ],
    /**
     * conventional-changelogでchangelogコンテンツを生成します。
     * @see https://github.com/semantic-release/release-notes-generator
     */
    [
      "@semantic-release/release-notes-generator",
      {
        preset: "conventionalcommits",
        presetConfig: {
          types: types.map(({ type, section, hidden }) => ({
            type,
            section,
            hidden: hidden ?? true,
          })),
        },
      },
    ],
    /**
     * changelogコンテンツをもとにchangelogFileを生成します。
     * @see https://github.com/semantic-release/changelog
     */
    [
      "@semantic-release/changelog",
      {
        changelogFile,
      },
    ],
    /**
     * package.jsonのバージョンを更新したり、npmパッケージを公開します。
     * @see https://github.com/semantic-release/npm
     */
    [
      "@semantic-release/npm",
      {
        // npmに公開するかどうか
        npmPublish: false,
      },
    ],
    /**
     * リリース時に生成したアセットをGitリポジトリにコミットします。
     * @see https://github.com/semantic-release/git
     */
    [
      "@semantic-release/git",
      {
        // コミット対象のファイル
        assets: [
          "package.json", // versionフィールドの変更をコミットするため
          "package-lock.json", // versionフィールドの変更をコミットするため
          changelogFile, // changelogFileの変更をコミットするため
        ],
        // コミットメッセージ
        message:
          "release: 🏹 ${nextRelease.gitTag} [skip ci]\n\n${nextRelease.notes}",
      },
    ],
    /**
     * GitHub releaseを公開し、リリースされたプルリクエストやissueにコメントを残します。assetsをreleasesにアップロードすることもできます。
     * @see https://github.com/semantic-release/github
     */
    [
      "@semantic-release/github",
      {
        // 関連するissueやPRにつけるラベル
        releasedLabels: ["released", "released-in-${nextRelease.gitTag}"],
        // 関連するissueやPRに残すコメント
        successComment:
          "🎉 This ${issue.pull_request ? 'pull request' : 'issue'} is included in version ${nextRelease.gitTag}.",
      },
    ],
    /**
     * リリースプロセスの各所でシェルコマンドを実行します。
     * @see https://github.com/semantic-release/exec
     */
    [
      "@semantic-release/exec",
      {
        // prepare: "npx typedoc",
      },
    ],
  ],
};
リリースコミットのauthorを設定する
@semantic-release/gitはリリースのタイミングで次のような内容のリリースコミットをしてくれます。

このコミットをよく見てみると、著者名義がsemantic-release-botになっています。コミット者がこれになっていても問題はありません。
気になる場合は次の環境変数を設定すると、コミット者の名義が変更できます。
GIT_AUTHOR_NAMEGIT_AUTHOR_EMAILGIT_COMMITTER_NAMEGIT_COMMITTER_EMAIL
たとえば、自分をコミッターにすることもできます。
GIT_AUTHOR_NAME="yourname"
GIT_AUTHOR_EMAIL="yourname@example.com"
GIT_COMMITTER_NAME="yourname"
GIT_COMMITTER_EMAIL="yourname@example.com"
GitHubではcomitter emailやauthor emailでGitHubユーザーを紐付けるので、次のようにメールアドレスを空白にしておくと、どのGitHubアカウントにも紐付かないリリースコミットになります。
GIT_AUTHOR_EMAIL=""
GIT_COMMITTER_EMAIL=""