Amplify Storageで簡易ファイル管理システムを作る (Vue3,Vuetify3,TypeScript)


要約
- Storage(
CloudFront +S3)はAuthとセット - アクセスレベルは三つ(public,protected,private)
- identityIdの共有の仕方については触れていません。
今回はAmplifyStoregeを使って簡易ファイル管理システムを作ります。

開発環境は以前の記事を参照お願いします。
この環境を使えば@aws-amplify/cliと@vue/cliがインストールされています。
この記事を書いているときのcliのバージョンは7.6.22です。
Step1 vue create & amplify init
このステップでは環境構築を行います。
Amplify Storageの内容はStep2からになります。
vue create(vueの初期化)
@vue/cliのバージョンを5.0.4にします。※任意です。
npm i -g @vue/cli@5.0.4
Amplify configureがまだな場合は下記記事を確認お願いします。
vue createでプロジェクトの初期化を行います。
vue create upload-file
今回はTypeScriptを選択したいのでManuallyを選択します。
? Please pick a preset: (Use arrow keys)
  Default  ([Vue 3] babel, eslint)
 Default  ([Vue 2] babel, eslint)
❯ Manually select features
TypeScriptを選択します。
Vue CLI v5.0.4
? Please pick a preset: Manually select features
? Check the features needed for your project: (Press <space> to select, <a> to toggle all, <i> to invert selection, and <enter> to proceed)
 ◉ Babel
❯◉ TypeScript
 ◯ Progressive Web App (PWA) Support
 ◯ Router
 ◯ Vuex
 ◯ CSS Pre-processors
 ◉ Linter / Formatter
 ◯ Unit Testing
 ◯ E2E Testing
続いてVue.jsのバージョンは 3.xを選択します。
あとはデフォルトでOKです。
Vue CLI v5.0.4
? Please pick a preset: Manually select features
? Check the features needed for your project: Babel, TS, Linter
? Choose a version of Vue.js that you want to start the project with 3.x
? Use class-style component syntax? No
? Use Babel alongside TypeScript (required for modern mode, auto-detected polyfills, transpiling JSX)? Yes
? Pick a linter / formatter config: Basic
? Pick additional lint features: Lint on save
? Where do you prefer placing config for Babel, ESLint, etc.? In dedicated config files
? Save this as a preset for future projects? No
正しく初期化できたか確認します。
cd upload-file
yarn serve
vue add vuetify(Vuetify3の初期化)
続いてVuetify を入れます。
vue add vuetify
Vuetify 3 Preview (Vuetify 3) を選択します。
? Choose a preset:
  Configure (advanced)
  Default (recommended)
  Vite Preview (Vuetify 3 + Vite)
  Prototype (rapid development)
❯ Vuetify 3 Preview (Vuetify 3)
あとはデフォルトでOKです。
amplify init
続いて amplify init をします。
amplify init
残りの選択はデフォルトでOKです。

App Typeがjavascriptになっていますが、問題ありません。
2022/04/01のAmplifyはtypescriptの選択肢がありません。
amplify library ,ui ,dayjsをインストール
npm install aws-amplify@4.3.18 @aws-amplify/ui-vue@2.3.4 dayjs
Step2 amplify add storage とファイルアップロード(Storage.put)
まずは環境構築後の最低限の設定を行います。
次にamplify add storageを行います。
最後にファイルアップロードの仕組みを作ります。
Declaration file for aws-exports と main.tsを編集
Step1でamplify init で行った内容をmain.tsに入れます。
src/aws-exports.jsをインポートにするためにaws-exports.d.tsを作成します。
declare const awsmobile: Record<string, any>
export default awsmobile;
import { createApp } from "vue";
import App from "./App.vue";
import vuetify from "./plugins/vuetify";
import { loadFonts } from "./plugins/webfontloader";
//↓↓↓ 追加
import Amplify from "aws-amplify";
import awsExports from "./aws-exports";
Amplify.configure(awsExports);
//↑↑↑ 追加終わり
loadFonts();

createApp(App).use(vuetify).mount("#app");
amplify add storage
いよいよ今回のメインの storage になります。
amplify add storage
ContentかNoSQL Databaseの選択になります。
今回はファイル管理なのでデフォルトのContentを選びます。
? Please select from one of the below mentioned services (Use arrow keys)
❯ Content (Images, audio, video, etc.)
  NoSQL Database
Contentを選ぶと auth がないので追加しますか?と出ます。
先にamplify add authをしているとこの選択肢ではありませんが、
storageだけ追加しようとするとauthを追加する流れになります。
基本的にはデフォルトでOKです。
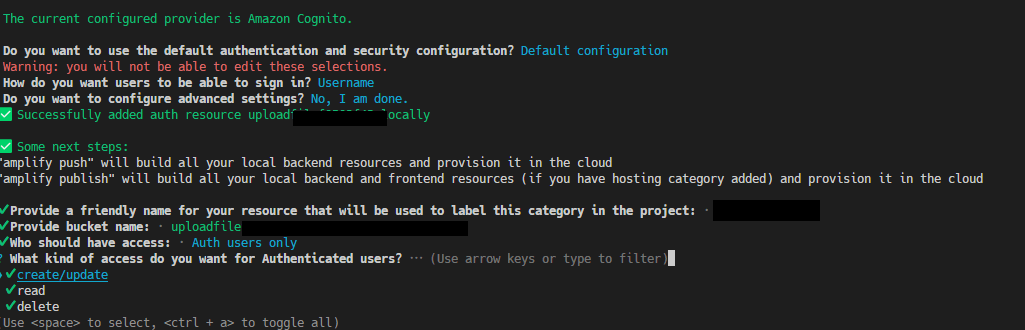
 You need to add auth (Amazon Cognito) to your project in order to add storage for user files. Do you want to add auth now? Yes
Using service: Cognito, provided by: awscloudformation

 The current configured provider is Amazon Cognito.

 Do you want to use the default authentication and security configuration? Default configuration
 Warning: you will not be able to edit these selections.
 How do you want users to be able to sign in? Username
 Do you want to configure advanced settings? No, I am done.
Successfully added auth resource
Authの設定が終わると、Storage関係の設定になります。
最後の What kind of access do you want for Authenticated users?を必要な分をチェックつけましょう。今回はすべてを付けました。
Amplify UI のAuthenticatorを導入する
まずAuthを導入するためにApp.vueを編集します。
<script lang="ts" setup>
import HelloWorld from './components/HelloWorld.vue'
import { Authenticator } from '@aws-amplify/ui-vue'
import '@aws-amplify/ui-vue/styles.css'
</script>

<template>
  <v-app>
    <authenticator>
      <template v-slot="{ user, signOut }">
        <v-container>
          <h1>Hello {{ user.username }}!</h1>
          <v-btn color="secondary" @click="signOut">Sign Out</v-btn>
        </v-container>
        <v-main>
          <HelloWorld />
        </v-main>
      </template>
    </authenticator>
  </v-app>
</template>
putメソッドの基本
Storage.put<T extends Record<string, any>>
(key: string, object: any, config?: StoragePutConfig<T> | undefined)
: PickProviderOutput<S3ProviderPutOutput<T>, T, "put">
keyがファイル名のようなもの。(フォルダを作りたい場合は a/b/.)
objectはanyになっていますが、ドキュメントを見る限り、string,File,BlobはOKのようです。
返り値
 {
    key: "photo.png"
  }
まずfileアップロードだけを作る
まずはファイルアップロードだけを作ってみます。
configにStorageAccessLevelを設定しています。
<script lang='ts' setup>
import { ref } from 'vue'
import { Storage } from 'aws-amplify'
import { StorageAccessLevel } from '@aws-amplify/storage'
const fileinput = ref<File[]>([]),
  level = ref<StorageAccessLevel>('public')
const levelType: StorageAccessLevel[] = ['public', 'protected', 'private']
const uploadFiles = async () => {
  if (fileinput.value.length > 0) {
    const id = await Storage.put(
      fileinput.value[0].name, // ファイル名
      fileinput.value[0],
      { level: level.value }
    )
    console.log(id)
    fileinput.value.length = 0
  }
};
</script>

<template>
  <v-container>
    <v-select v-model="level" :items="levelType" label="level"></v-select>
    <v-file-input v-model="fileinput" label="File input" clearable></v-file-input>
    <v-btn color="primary" :disabled="fileinput.length === 0" @click="uploadFiles">upload</v-btn>
  </v-container>
</template>
vuetifyのコンポーネント
- v-select 2022/04の時点ではコンポーネントのページにはないがAPIにあるので最低限で利用。
:itemsに選択肢の配列を渡している - v-file-input clearableを有効にしている
StorageAccessLevelについて
public,protected,privateの三種類です。
| level | 読み込み | 書き込み |
|---|---|---|
| public | 全員 | 全員 |
| protected | 自身又はオーナーのID(identityId)を知っている人 | 自身のみ |
| private | 自身のみ | 自身のみ |
※protectedのデータを読み取るためには、自身以外はオーナーのIDを知らせる必要があります。
ファイルがアップロードすると種類によりバケット上には以下のように配置されます。
a/b/c.jpgというkeyでアップロードしたとしての例
| level | バケット |
|---|---|
| public | public/a/b/c.jpg |
| protected | protected/オーナーのidentityId/a/b/c.jpg |
| private | private/オーナーのidentityId/a/b/c.jpg |
※同じkeyで同じStorageAccessLevelでアップロードすると上書きになります。
identityIdの取得方法
Authを使うことで自分のIdを取得できます。
import { Auth } from 'aws-amplify'
export const getId = async () => {
  const currentCredentials = await Auth.currentCredentials()
  const identityId = currentCredentials.identityId
  return identityId
}
Step3 ファイル一覧の取得(Storage.list)
ファイルの一覧を取得します。
レベルごとに出力できるようコンポーネント化します。
ファイルアップロードしたことを検知する仕組みがないので、非効率ですが毎回ファイル一覧を呼び出すようにしてみます。
listメソッドの基本
Amplify Storageのファイル一覧は以下の関数で取得できます。
Storage.list<{
    level: StorageAccessLevel;
}>(key: string, config?: S3ProviderListConfig | undefined):Promise<S3ProviderListOutput>
keyはブランクを指定するとすべてのファイルを取得します。
例えばpを指定すると photo.jpg のようなファイル名の前方一致と photo/photo.jpgのファイルをでも取得します。
levelを指定しなかった場合、publicがデフォルトで入ります。
返り値は以下のような形で出力されます。
[
  {
    eTag: ""30074401292215403x42b0739y3b5262"",
    key: "photo.png",
    lastModified: "Thu Oct 08 2022 23:59:31 GMT+0800 (Singapore Standard Time)",
    size: 13856
  },
  // ...
]
StorageAccessLevelをprotectedを指定した場合、identityIdを指定するとそのユーザーのデータを取得できます。
指定していない場合は、自身のprotectedフォルダの中の一覧を取得します。
Amplify Storageに関する操作を外出しにする。
Amplify LibraryのStorageに関する操作を外出しにします。
import { Storage } from 'aws-amplify';
import { StorageAccessLevel, S3ProviderListOutput, S3ProviderPutConfig, PutResult } from '@aws-amplify/storage';
export const levelType: StorageAccessLevel[] = ['public', 'protected', 'private'];
//list用
export interface MyStorageItem {
  level: StorageAccessLevel;
  idx: number;
}
//put
export const putStorage = async (
  key: string,
  object: File,
  config?: S3ProviderPutConfig | undefined
): Promise<PutResult> => {
  return new Promise((resolve, reject) => {
    Storage.put<PutResult>(key, object, config)
      .then(async (result) => {
        resolve(result);
      })
      .catch((err) => reject(err));
  });
};
//get
export const getStorage = async (level: StorageAccessLevel): Promise<S3ProviderListOutput> => {
  return new Promise((resolve, reject) => {
    Storage.list('', { level: level }) // for listing ALL files without prefix, pass '' instead
      .then(async (result) => {
        resolve(result);
      })
      .catch((err) => reject(err));
  });
};
MyStorageItemについてはHelloWorld.vueで使います。
keyが変わるとライフサイクルフックを引き起こします。
HelloWorld.vueを書き換えます。
<script lang='ts' setup>
import { ref } from 'vue'
import { StorageAccessLevel } from '@aws-amplify/storage'
import { levelType, MyStorageItem, putStorage } from '../lib/Storage'
import FileList from './FileList.vue'
const storageListRef = ref<MyStorageItem[]>([])
levelType.map((level, idx) => { storageListRef.value.push({ level: level, idx: idx }) })
const fileRef = ref<File[]>([]),
  levelRef = ref<StorageAccessLevel>('public')
const uploadFiles = async () => {
  if (fileRef.value.length > 0) {
    await putStorage(
      fileRef.value[0].name, // ファイル名
      fileRef.value[0],
      { level: levelRef.value }
    )
    //ライフサイクルフック
    storageListRef.value.find(item => {
      if (item.level === levelRef.value) {
        item.idx += storageListRef.value.length
      }
    })
    //クリアする
    fileRef.value.length = 0
  }
}
</script>

<template>
  <v-container>
    <v-select v-model="levelRef" :items="levelType" label="level"></v-select>
    <v-file-input v-model="fileRef" label="File input" clearable></v-file-input>
    <v-btn color="primary" :disabled="fileRef.length === 0" @click="uploadFiles">upload</v-btn>
    <v-divider class="my-6"></v-divider>
    <file-list class="mt-4" v-for="item in storageListRef" :key="item.idx" :level="item.level"></file-list>
  </v-container>
</template>
FileListコンポーネント
ファイルリストを表示するコンポーネント
<script lang="ts" setup>
import { ref, toRefs } from 'vue'
import { getStorage } from '../lib/Storage'
import { StorageAccessLevel, S3ProviderListOutputItem } from '@aws-amplify/storage'
import dayjs from 'dayjs'
const props = defineProps<{
  level: StorageAccessLevel
}>()
const { level } = toRefs(props)
const filesRef = ref<S3ProviderListOutputItem[]>([])
const getS = async () => {
  const f = await getStorage(level.value)
  if (f.length > 0) {
    filesRef.value.push(...f)
  }
}
const download = async (f: S3ProviderListOutputItem) => {
  console.dir('f')
}
getS()
</script>
<template>
  <div v-if="filesRef.length > 0">
    <p>{{ level }}</p>
    <ul>
      <li v-for="(f, n) in filesRef" :key="n">
        <v-btn variant="text" @click="download(f)">
          {{
            `${f.key} (${dayjs(f.lastModified).format("YYYY-MM-DD HH:mm:ss")})`
          }}
        </v-btn>
      </li>
    </ul>
  </div>
</template>
Step4 Download filesを実装する(Storage.get)
getメソッドの基本
Storage.get<{
    level: StorageAccessLevel;
    download: true;
}>(key: string, config?: (CommonStorageOptions & {
    download?: boolean | undefined;
    track?: boolean | undefined;
    ... 11 more ...;
    SSECustomerKeyMD5?: string | undefined;
} & StorageOptions) | undefined)
keyは先ほどのListから取得したものを使います。
configで今回使うのは level,downloadです。
keyだけでも署名付き URL を取得することができます。
その場合、StorageAccessLevelはpublic,downloadはfalseになります。
※注意
署名付き URL を使ってダウンロードする場合、デフォルトのリンクの有効期限が15分です。
つまり一定時間経過するとファイルが取得できなくなります。
// get the signed URL string
const signedURL = await Storage.get(key); // get key from Storage.list
外出しライブラリ(Storage.ts)を更新
downloadをtrueにした場合、署名付きURLではなく、Blobが取得できます。
公式のサイトを参考にStorege.tsを更新します。
//略
function downloadBlob(blob: Blob, filename: string) {
  const url = URL.createObjectURL(blob);
  const a = document.createElement('a');
  a.href = url;
  a.download = filename || 'download';
  const clickHandler = () => {
    setTimeout(() => {
      URL.revokeObjectURL(url);
      a.removeEventListener('click', clickHandler);
    }, 150);
  };
  a.addEventListener('click', clickHandler, false);
  a.click();
  return a;
}
export const downloadFile = async (key: string, level: StorageAccessLevel) => {
  const result = await Storage.get(key, { level: level, download: true });
  if (result.Body) {
    downloadBlob(result.Body as Blob, key);
  }
};
ダウンロードの箇所を更新
ファイルリストを表示するコンポーネント
<script lang="ts" setup>
import { ref, toRefs } from 'vue'
import { getStorage, downloadFile } from '../lib/Storage' //←変更
//↓変更
const download = async (f: S3ProviderListOutputItem) => {
  downloadFile(f.key as string, level.value)
}
//略
downloadFileをコールするごとにStorage.getするので、
署名付きURLのような期限を気にする必要がありません。
感想とNextStep
TypeScriptは初心者なのでおかしいところが多々あると思います。指摘いただけると嬉しいです。
例えば当初はaws-exports.jsを使うためにAllowJsしたりしていました。
型を意識することにより、簡単なようで複雑なAmplifyへの理解が深まると思います。
Amplifyと比較されるFirebase Storageは署名付きURLではないので、
認証があるときのハンドリングはちょっと手間だけどAmplifyの良さを感じます。
誰に対してというような細かな設定ができるわけではなく、
自分以外の誰かという大雑把な括りになってしまうのでprotectedの使いどころが難しいです。
次回以降は以下の内容を検討中です。
- Amplify Functionsについて掘り下げたい。
- identityIdの共有方法(amplify api?)
- StorageのデータをFunction等で編集した場合などの挙動について調査したい
- S3の設定で履歴ありにするとどうなるか調べたい。(Amplify Storageでは取り出せない)
Discussion