【AWS】サイト間VPNで仮想ルータ(VyOS)と自宅NWを繋げる3Step
概要
自宅NWからAWSまでプライベートな経路を用意したいなと思った時に、
個人で専用線はハードルが高くて用意できないので、
サイト間VPNを手軽に用意するための手順をまとめてみました。
環境構成
以下のような環境でAWSまでVPNを構築してみました。
Windows10 Proを利用していればHyper-Vが無料で使えますが、
なければOracle Virtual Boxでもよいかなと思います。
仮想Routerにぶら下げるサーバは疎通確認のため、必要に応じて用意してください。

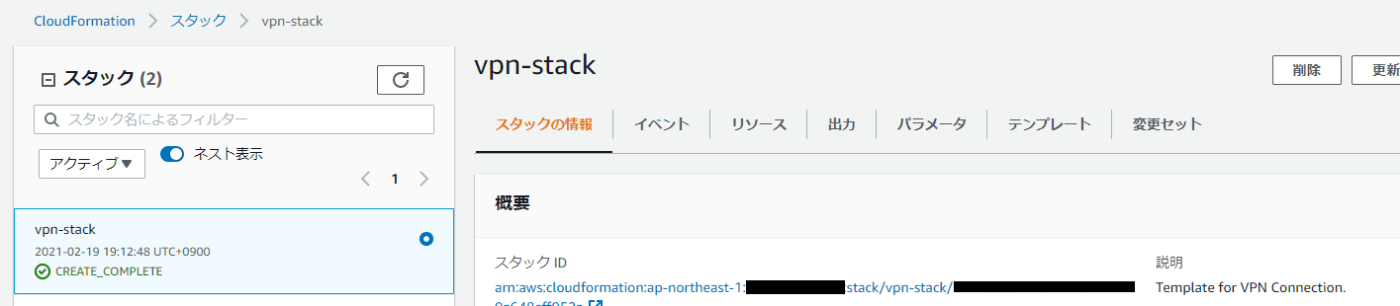
Step1. AWS環境側の設定
以下のコマンドでCloudFormationのテンプレートを展開します。
パラメータは適宜変更してください。
aws cloudformation create-stack --stack-name vpn-stack `
--template-body file://aws_vpn.yml `
--parameters ParameterKey=TagName,ParameterValue=vpn `
ParameterKey=HomeRouterIP,ParameterValue=<自宅ルータのパブリックIPアドレス> `
ParameterKey=VPNStaticRoute,ParameterValue="<接続元のネットワーク>" `
ParameterKey=VPCId,ParameterValue="<接続するVPCのVPCid>" `
ParameterKey=PrivateRouteTableId,ParameterValue="<接続するサブネットに紐づくルートテーブルid>"
CloudFormationテンプレート
#====================
# Parameters
#====================
Parameters:
 HomeRouterIP:
  AllowedPattern: (\d{1,3})\.(\d{1,3})\.(\d{1,3})\.(\d{1,3})
  Description: Type Your Home Network Global IP.(ex:1.2.3.4)
  Default: '1.2.3.4'
  Type: String
 VPNStaticRoute:
  AllowedPattern: (\d{1,3})\.(\d{1,3})\.(\d{1,3})\.(\d{1,3})/(\d{1,2})
  Description: Type Your Home Network CIDR.(ex:192.168.1.0/24)
  Default: '192.168.1.0/24'
  Type: String
 VPCId:
  Description: Type Your VPC ID
  Type: String
 PrivateRouteTableId:
  Description: Type Your Private Route Table Id.
  Type: String
 TagName:
  Description: Type Your tag name.
  Type: String

#====================
# Resources
#====================
Resources:
 # Vitural Private Gateway
 MyVPNGateway:
  Properties:
   Type: ipsec.1
   Tags:
    - Key: System
    Value: !Ref TagName
    - Key: Name
    Value: 'VGW001'
  Type: AWS::EC2::VPNGateway
 VPNGatewayAttachment:
  Properties:
   VpnGatewayId: !Ref 'MyVPNGateway'
   VpcId: !Ref VPCId
  Type: AWS::EC2::VPCGatewayAttachment

 # Customer Gateway
 MyCustomerGateway:
  Properties:
   IpAddress: !Ref HomeRouterIP
   BgpAsn: 65000
   Tags:
    - Key: System
    Value: !Ref TagName
    - Key: Name
    Value: 'CGW001'
   Type: ipsec.1
  Type: AWS::EC2::CustomerGateway

 # VPN Connection
 MyVPNConnection:
  Properties:
   VpnGatewayId: !Ref 'MyVPNGateway'
   CustomerGatewayId: !Ref 'MyCustomerGateway'
   StaticRoutesOnly: false
   Tags:
    - Key: System
    Value: !Ref TagName
    - Key: Name
    Value: 'VPN001'
   Type: ipsec.1
  Type: AWS::EC2::VPNConnection

 VPNConnectionRouteAttachRouteTable:
  DependsOn: MyVPNConnection
  Properties:
   RouteTableId: !Ref PrivateRouteTableId
   DestinationCidrBlock: !Ref VPNStaticRoute
   GatewayId: !Ref 'MyVPNGateway'
  Type: AWS::EC2::Route
Step2. 自宅環境側の仮想ルータの設定
自宅ルータでサイト間VPNを用意するのもよいですが、
できるだけ自宅NW環境と分離をしたかったので、
仮想ルータを使ってHyper-V環境下の仮想マシンのみAWSと通信できるようにしてみました。
仮想ルータ(VyOS)のインストール
VyOSの最新イメージはこちらからダウンロードできます。
システムの推奨動作環境として、512MBのメモリと2GBのストレージが必要みたいなので、
最低要件を満たしながら仮想マシンにダウンロードしたISOイメージをマウントして起動します。
ISOイメージをマウントしてインストールを開始したら、
基本的にはEnterで次々と進めばインストールは完了です。
こちらにインストール時のイメージを載せましたが、
公式ガイドに手順がのっているので詳しくはこちらを参照ください。
vyos@vyos:~$ install image
Welcome to the VyOS install program. This script
will walk you through the process of installing the
VyOS image to a local hard drive.
Would you like to continue? (Yes/No) [Yes]: [return]
Probing drives: OK
Looking for pre-existing RAID groups...none found.
The VyOS image will require a minimum 1000MB root.
Would you like me to try to partition a drive automatically
or would you rather partition it manually with parted? If
you have already setup your partitions, you may skip this step

Partition (Auto/Parted/Skip) [Auto]: [return]

I found the following drives on your system:
sda 2147MB

Install the image on? [sda]: [return]

This will destroy all data on /dev/sda.
Continue? (Yes/No) [No]: Yes

How big of a root partition should I create? (1000MB - 2147MB) [2147]MB: [return]

Creating filesystem on /dev/sda1: OK
Done!

Mounting /dev/sda1...
What would you like to name this image? [VyOS_999.hydrogen.11291501]: [return]
OK. This image will be named: VyOS_999.hydrogen.11291501
Copying squashfs image...
Copying kernel and initrd images...
Done!

I found the following configuration files:
/config/config.boot
/opt/vyatta/etc/config.boot.default
Which one should I copy to sda? [/config/config.boot]: [return]

Copying /config/config.boot to sda.
Enter password for administrator account
Enter password for user 'vyos': <removed>
Retype password for user 'vyos': <removed>
I need to install the GRUB boot loader.
I found the following drives on your system:
sda 2147MB

Which drive should GRUB modify the boot partition on? [sda]: [return]
Setting up grub: OK
Done!
インストールが完了したら再起動します。
vyos@vyos:~$ reboot
Proceed with reboot? (Yes/No) [No] Yes
仮想ルータの設定
仮想ルータに2つNICを割り当てます。
- 内部インターフェース(仮想サーバ側の内部通信用のインタフェース)
- 外部インターフェース(自宅のプライベートネットワークとブリッジ接続するインタフェース)
外部インターフェースとSSH設定
インターフェースとSSH接続できるように設定をします。
$ configure
# set interfaces ethernet eth0 address dhcp
# set interfaces ethernet eth0 description OUTSIDE
# set service ssh
# commit
# save
内部インターフェースの設定
インターフェースの設定と、
仮想ルータにぶらさがるサーバに手動でIPを割り当てるのも面倒なのでDHCPを設定します。
$ configure
# set interfaces ethernet eth1 address 172.16.100.1/24
# set interfaces ethernet eth1 description INSIDE
# set service dhcp-server shared-network-name MY_SUBNET subnet 172.16.100.0/24
# set service dhcp-server shared-network-name MY_SUBNET subnet 172.16.100.0/24 start 172.16.100.1 stop 172.16.100.253
# set service dhcp-server shared-network-name MY_SUBNET subnet 172.16.100.0/24 default-router 172.16.100.1
# set service dhcp-server shared-network-name MY_SUBNET subnet 172.16.100.0/24 dns-server 192.168.1.1
# commit
# save
NATトラバーサルの設定
通常はNAT環境ではVPN接続できないのですが、
NATトラバーサルの設定をすることでこれを回避します。
$ configure
# set vpn ipsec nat-traversal enable
# set vpn ipsec ipsec-interfaces interface eth0
# set vpn ipsec nat-networks allowed-network 0.0.0.0/0
# commit
# save
VPNの設定
CloudFormationのスタックが完成してAWS側の環境が出来上がったら、
configファイルをダウンロードしてきます。
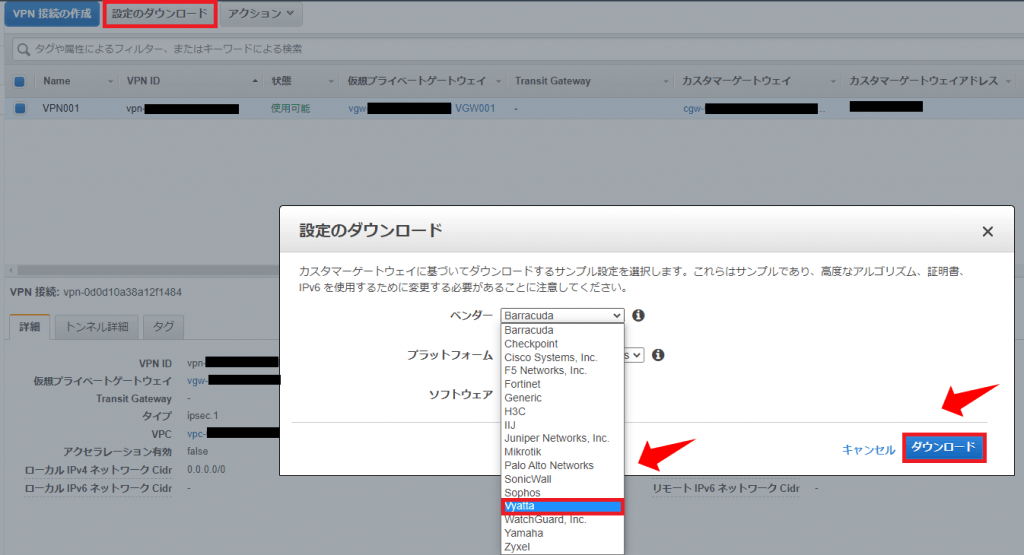
AWSからダウンロードしたconfigファイルをベースに一部コマンドを変更して、
仮想ルータに設定を流し込みます。
①IKEの設定
# set vpn ipsec ike-group AWS lifetime '28800'
# set vpn ipsec ike-group AWS proposal 1 dh-group '2'
# set vpn ipsec ike-group AWS proposal 1 encryption 'aes128'
# set vpn ipsec ike-group AWS proposal 1 hash 'sha1'
# set vpn ipsec site-to-site peer 18.180.90.182 authentication mode 'pre-shared-secret'
# set vpn ipsec site-to-site peer 18.180.90.182 authentication pre-shared-secret '払い出された共有キー'
# set vpn ipsec site-to-site peer 18.180.90.182 description 'VPC tunnel 1'
# set vpn ipsec site-to-site peer 18.180.90.182 ike-group 'AWS'
# set vpn ipsec site-to-site peer 18.180.90.182 local-address '自宅ルータのパブリックIP'
# set vpn ipsec site-to-site peer 18.180.90.182 vti bind 'vti0'
# set vpn ipsec site-to-site peer 18.180.90.182 vti esp-group 'AWS'
②IPSecの設定
# set vpn ipsec ipsec-interfaces interface 'eth0'
# set vpn ipsec esp-group AWS compression 'disable'
# set vpn ipsec esp-group AWS lifetime '3600'
# set vpn ipsec esp-group AWS mode 'tunnel'
# set vpn ipsec esp-group AWS pfs 'enable'
# set vpn ipsec esp-group AWS proposal 1 encryption 'aes128'
# set vpn ipsec esp-group AWS proposal 1 hash 'sha1'
③トンネルインターフェースの設定
# set interfaces vti vti0 address '169.254.XX.XX/30'
# set interfaces vti vti0 description 'VPC tunnel 1'
# set interfaces vti vti0 mtu '1436'
④BGPの設定
set protocols bgp 65000 neighbor 169.254.XX.XX remote-as '64512'
set protocols bgp 65000 neighbor 169.254.XX.XX address-family ipv4-unicast soft-reconfiguration 'inbound'
set protocols bgp 65000 neighbor 169.254.XX.XX timers holdtime '30'
set protocols bgp 65000 neighbor 169.254.XX.XX timers keepalive '10'
set protocols bgp 65000 network 0.0.0.0/0
set protocols bgp 65000 address-family ipv4-unicast network 172.16.100.0/24
忘れずに保存。
# commit
# save
Step3. VPNトンネルの開通
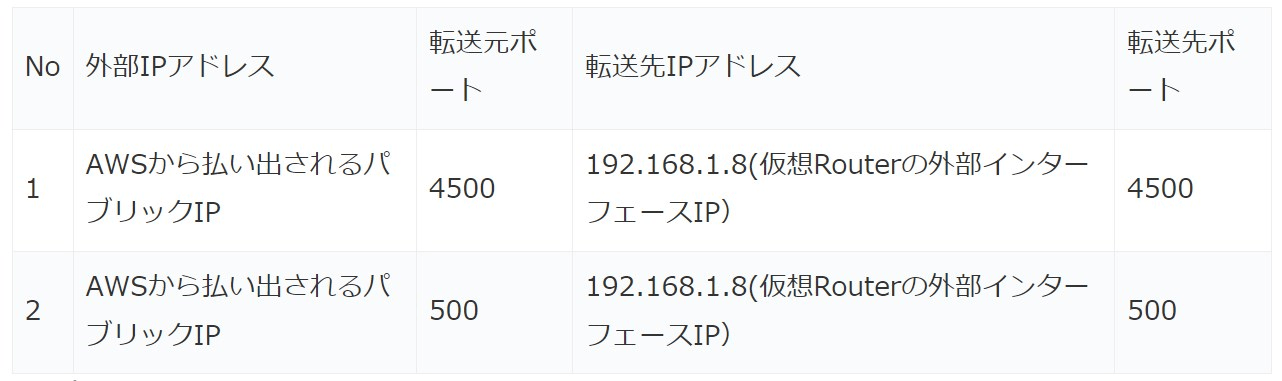
Homeルータのポート転送設定
AWS側でVPN接続するのに必要パブリックIPが払い出されるので、
設定ファイルなどからIPを確認し、
ポート転送できるように自宅ルータに設定をしてきます。(プロトコルはUDPで設定)
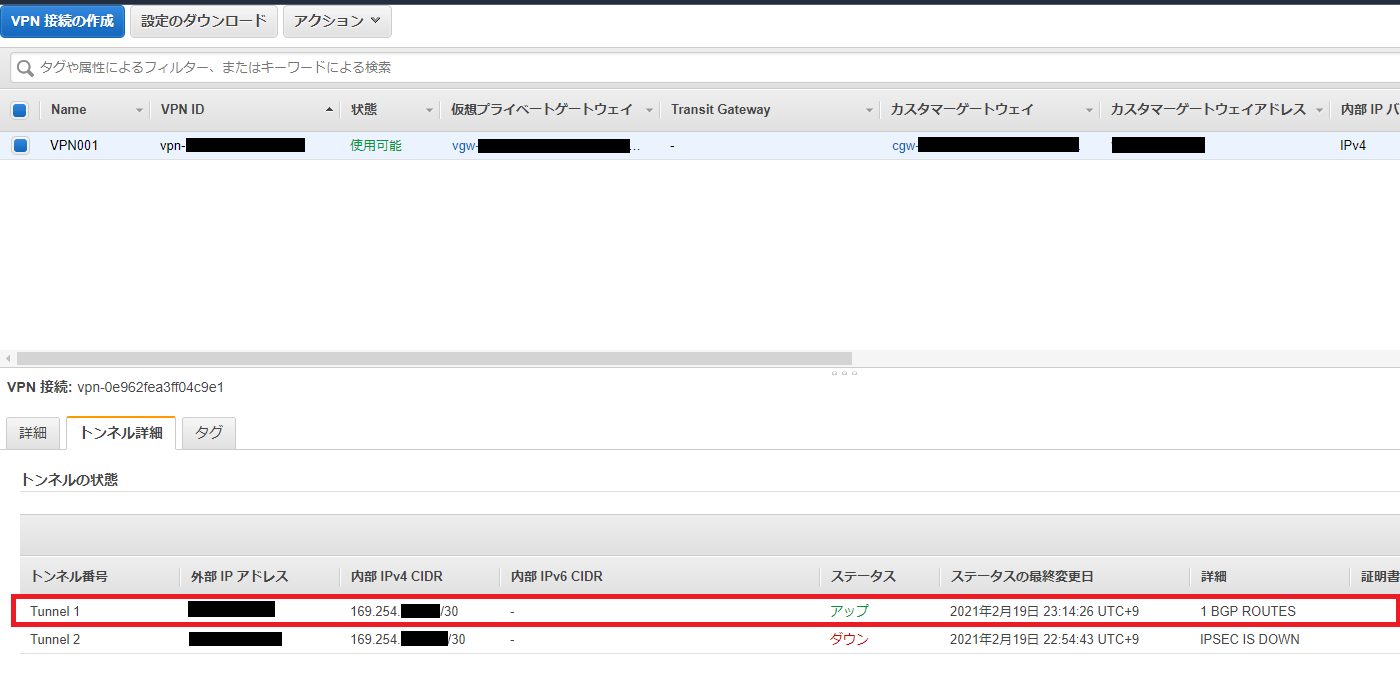
VPNサービスの起動
VyOS側で以下のコマンドを実行してVPNトンネルを開通します。
$ configure
# set vpn ipsec site-to-site peer AWSから払い出されたパブリックIP local-address 192.168.1.8
# commit
# save
# exit
$ sudo /etc/init.d/ipsec restart
AWSコンソールでしばらくするとコネクションが上がってきます。
まとめ
自宅NWからプライベートな経路を用意するのはちょっとハードルが高いなと思っていましたが、
やってみると思いのほか簡単に設定することができます。
機会があればActive-Standby構成の記事にブラッシュアップをしてみたいと思います。
この記事がどなたかの参考になれれば幸いです。
Discussion