hugo でブログサイトを作成し GitHub Pages にデプロイする
概要
hugo でブログサイトを作成し GitHub Pages にデプロイします。
ブログサイトのリポジトリは非公開にしたいので、ブログサイトの管理とデプロイするリポジトリは別けます。
リポジトリ
次の2つのリポジトリを用意します。
- ブログサイトを管理する非公開リポジトリ
- ブログサイトをデプロイする公開リポジトリ
環境構築
VSCode の devcontainer で hugo の環境を構築します。
ブログサイトを管理するリポジトリで実施します。
-
コマンドパレットに
Dev Containers: Add Dev Container Configuration Files...を入力して選択します。 -
Show All Definitions...を選択します。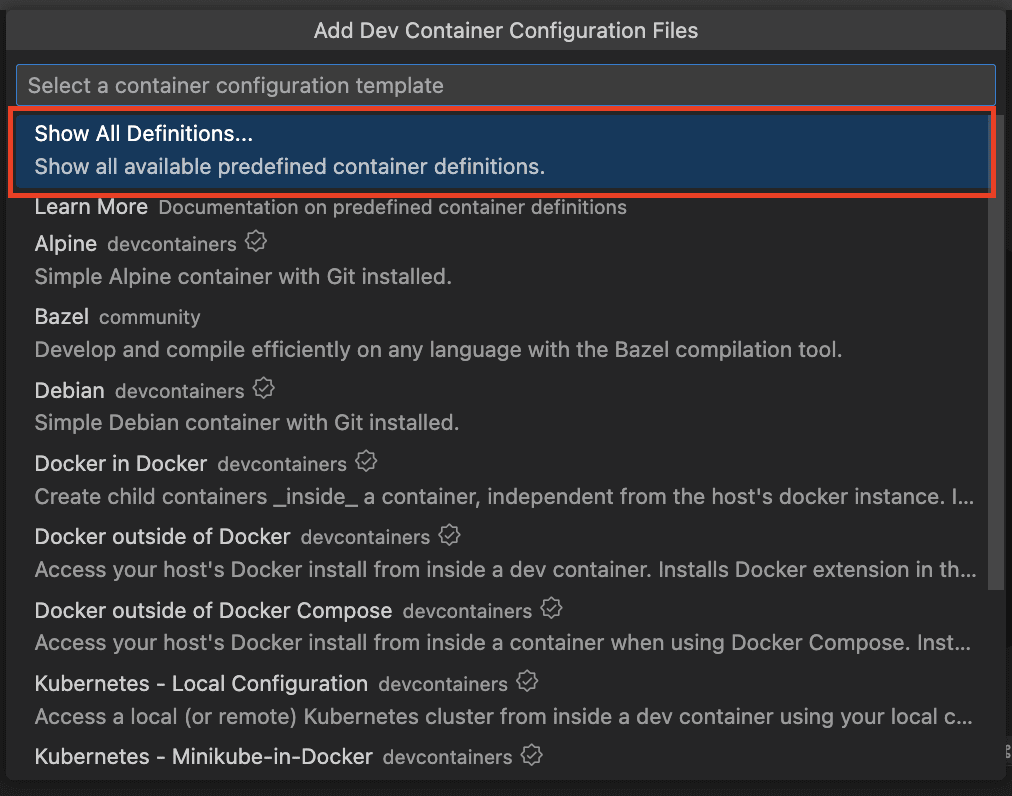
-
Hugo を入力して
Hugo communityを選択します。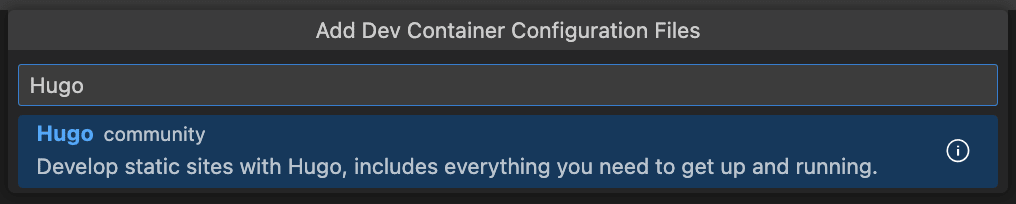
-
追加機能は必要ないので、未選択の状態で
OKを選択します。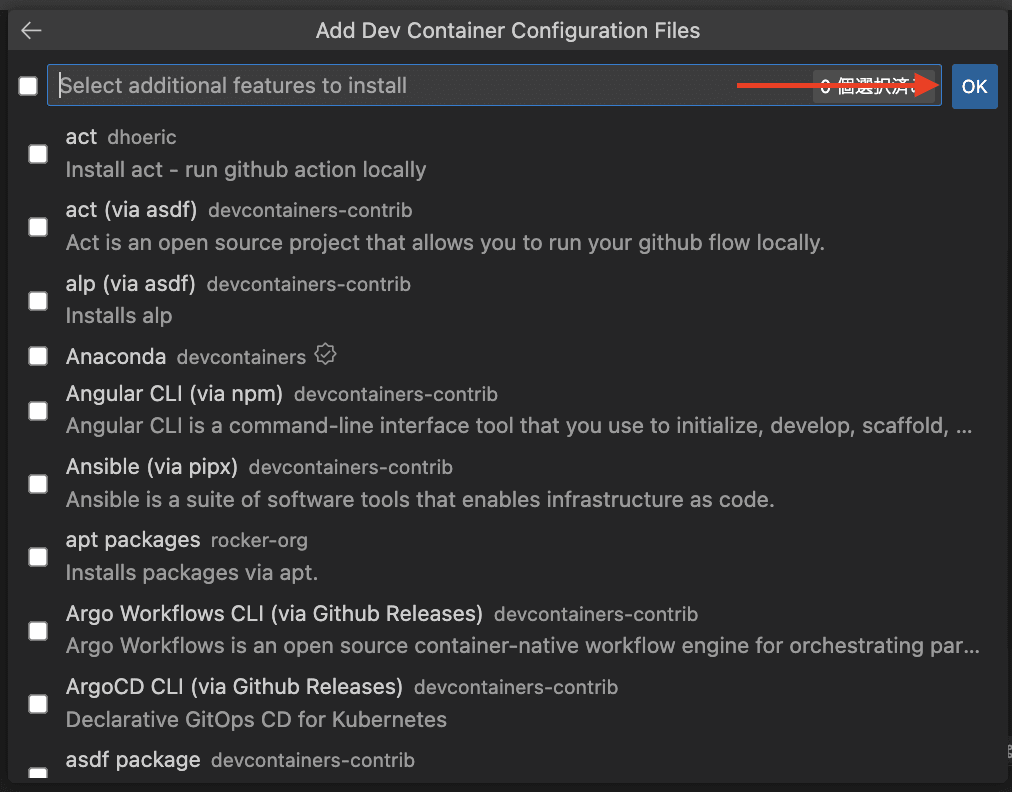
-
devcontainer、vscode の設定ファイルが作成されます。
. ├── .devcontainer │ ├── devcontainer.json │ └── Dockerfile └── .vscode └── tasks.json -
テーマを使用する場合は hugo を hugo_extended に変更します。
.devcontainer/devcontainer.json"build": { "dockerfile": "Dockerfile", "args": { // Update VARIANT to pick hugo variant. // Example variants: hugo, hugo_extended // Rebuild the container if it already exists to update. "VARIANT": "hugo_extended", // hugo_extended に変更 // Update VERSION to pick a specific hugo version. // Example versions: latest, 0.73.0, 0,71.1 // Rebuild the container if it already exists to update. "VERSION": "latest", // Update NODE_VERSION to pick the Node.js version: 12, 14 "NODE_VERSION": "14" } }, -
devcontainer を起動し、 hugo がインストールされていることを確認します。
node ➜ /workspaces/website (develop ✗) $ hugo version
hugo v0.108.0-a0d64a46e36dd2f503bfd5ba1a5807b900df231d linux/arm64 BuildDate=2022-12-06T13:37:56Z VendorInfo=gohugoio
テーマの導入
ブログサイトを管理するリポジトリで実施します。
-
新しいサイトを作成します。
node ➜ /workspaces/website (develop ✗) $ hugo new site blog_site Congratulations! Your new Hugo site is created in /workspaces/website/blog_site. Just a few more steps and you're ready to go: 1. Download a theme into the same-named folder. Choose a theme from https://themes.gohugo.io/ or create your own with the "hugo new theme <THEMENAME>" command. 2. Perhaps you want to add some content. You can add single files with "hugo new <SECTIONNAME>/<FILENAME>.<FORMAT>". 3. Start the built-in live server via "hugo server". Visit https://gohugo.io/ for quickstart guide and full documentation. -
node ➜ /workspaces/website (develop ✗) $ cd blog_site/ node ➜ /workspaces/website/blog_site (develop ✗) $ git submodule add https://github.com/CaiJimmy/hugo-theme-stack themes/stack Cloning into '/workspaces/website/blog_site/themes/stack'... remote: Enumerating objects: 4299, done. remote: Counting objects: 100% (120/120), done. remote: Compressing objects: 100% (74/74), done. remote: Total 4299 (delta 57), reused 91 (delta 46), pack-reused 4179 Receiving objects: 100% (4299/4299), 1.07 MiB | 2.20 MiB/s, done. Resolving deltas: 100% (2725/2725), done. -
blog_site/config.toml に theme を追加します。
node ➜ /workspaces/website/blog_site (develop ✗) $ echo "theme = 'stack'" >> config.toml -
テーマが反映されたことを確認します。
node ➜ /workspaces/website/blog_site (develop ✗) $ hugo server -D
Start building sites …
hugo v0.108.0-a0d64a46e36dd2f503bfd5ba1a5807b900df231d+extended linux/arm64 BuildDate=2022-12-06T13:37:56Z VendorInfo=gohugoio

                | EN
-------------------+-----
Pages            |  7
Paginator pages  |  0
Non-page files   |  0
Static files     |  0
Processed images |  3
Aliases          |  3
Sitemaps         |  1
Cleaned          |  0

Built in 133 ms
Watching for changes in /workspaces/website/blog_site/{archetypes,assets,content,data,layouts,static,themes}
Watching for config changes in /workspaces/website/blog_site/config.toml, /workspaces/website/blog_site/themes/stack/config.yaml
Environment: "development"
Serving pages from memory
Running in Fast Render Mode. For full rebuilds on change: hugo server --disableFastRender
Web Server is available at http://localhost:1313/ (bind address 127.0.0.1)
Press Ctrl+C to stop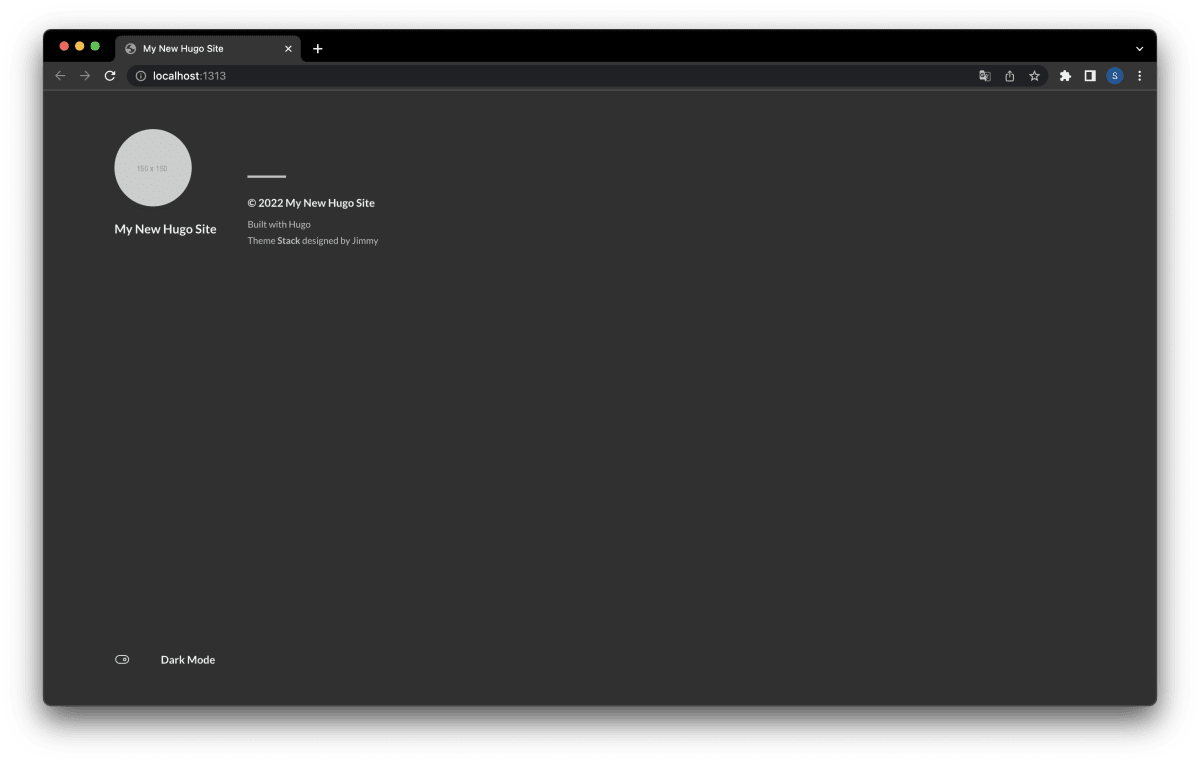
テーマの設定
導入したテーマの設定を ガイド と blog_site/themes/stack/config.yaml を参考に変更します。
ブログサイトを管理するリポジトリで実施します。
-
baseURL, title などのブログサイトの設定を変更します。
baseURL = 'https://st-little.github.io/'
languageCode = 'ja'
title = 'st-little blog'
theme = 'stack'

# カスタムメニュー
[menu]
[[menu.main]]
[[menu.social]]
identifier = "github"
name = "GitHub"
url = "https://github.com/st-little"
[menu.social.params]
icon = "brand-github"

# サイドバーの設定
[params.sidebar]
emoji = "✍️"
subtitle = "開発ブログは zenn に投稿しています。"

# サイドバーのアバターの設定
[params.sidebar.avatar]
# アバター画像へのパス
src = "img/avatar.jpg"  # assets/img/avatar.jpg

# 記事ページの構成
[params.article]
# 目次の有効
toc = true
# 読書時間の有効
readingTime = false
コンテンツの追加
コンテンツ管理 を参考に新しいコンテンツを追加します。
ブログサイトを管理するリポジトリで実施します。
-
新しいページ
blog_site/content/post/test-post.mdを作成します。node ➜ /workspaces/website/blog_site (develop ✗) $ hugo new post/test-post.md Content "/workspaces/website/blog_site/content/post/test-post.md" created -
---ブロックの次にブログの本文を markdown で記述します。blog_site/content/post/test-post.md--- title: "Test Post" description: "テスト用の投稿" date: 2022-12-23 draft: true slug: test categories: [ "game" ] tags: [ "minecraft", ] --- # 概要
Personal access token の作成
GitHub Actions のデプロイで使用する Personal access token を作成します。
ブラウザで実施します。
-
Generate new tokenを選択します。 -
Select scopesの public_repo にチェックを入れます。 -
Generate tokenを選択し Personal access token を作成します。 -
作成された Personal access token は GitHub Actions で使用するのでコピーします。
Personal access token の設定
ブラウザで実施します。
-
ブログサイトを管理するリポジトリを開き Settings を選択します。
-
サイドメニューから Secrets/Actions を選択します。
-
New repository secretを選択します。 -
入力フィールドを入力して
Add secretを選択します。- Name: ACTIONS_DEPLOY_TOKEN
- Secret: Personal access token を貼り付ける
GitHub Actions の作成
GitHub Actions を使用して GitHub Pages にブログサイトをデプロイします。
ブログサイトを管理するリポジトリで実施します。
-
Build Hugo With GitHub Action を参考に GitHub Actions を作成します。
.github/workflows/gh-pages.ymlname: github pages on: push: branches: - main # Set a branch that will trigger a deployment pull_request: jobs: deploy: runs-on: ubuntu-22.04 steps: - uses: actions/checkout@v3 with: submodules: true # Fetch Hugo themes (true OR recursive) fetch-depth: 0 # Fetch all history for .GitInfo and .Lastmod - name: Setup Hugo uses: peaceiris/actions-hugo@v2 with: hugo-version: 'latest' extended: true # コメントアウトを削除 - name: Build working-directory: ./blog_site # ビルドするディレクトリを変更 run: hugo --minify - name: Deploy uses: peaceiris/actions-gh-pages@v3 if: github.ref == 'refs/heads/main' with: personal_token: ${{ secrets.ACTIONS_DEPLOY_TOKEN }} # Personal access token を指定 external_repository: st-little/st-little.github.io # デプロイするリポジトリを指定 publish_dir: ./blog_site/public # デプロイするディレクトリを変更
デプロイの実施
ブログサイトを管理するリポジトリで実施します。
-
main ブランチに作成したブログサイトをマージします。
-
Github Actions でビルド&デプロイが実施されます。
ブログサイトの確認
ブラウザで実施します。
-
ブログサイトをデプロイするリポジトリを開き Settings を選択します。
-
サイドメニューから Pages を選択します。
-
Visit siteボタンを選択しデプロイしたブログサイトを表示します。
Discussion
hugo_extended が必要なのは Sass/SCSS などを使う場合なのでテーマによっては必要ないですね。