TypeScriptによるDependency Injection入門:DIコンテナを自作して内部構造を理解する
はじめに
私は初めてDependency Injection(依存性注入)という概念に出会ったのは、NestJSのドキュメントを読んでいるときでした。その時、providerや@Injectable()は何なのか?といった素朴な疑問を感じましたが、ドキュメントを読んでもすぐには理解できず、そのまま一度放置しました。
最近、業務で触れているAPIサービスではNestJSではなく、InversifyJSというライブラリを使用してDependency Injectionを実装しています。これを機に、DIについてもう一度学び直すことにしました。そして、自分が調べて理解したことをまとめて共有したいと思います。
この記事では、以下のような疑問に答える形で情報をまとめています:
- Dependency Injectionは何?なぜ使うのか?
- Dependency Injectionはどのように実装されているのか?
- オブジェクトの依存関係をどう管理されているのか?
-
@Injectable()や@Inject()はどのような役割を果たしているのか? - 依存オブジェクトの注入はどのように実現されているのか?
もし私と同じような疑問を持つ方がいましたら、この記事が少しでもお役に立てれば嬉しいです!
Dependency Injection の基本概念とそのメリット
Dependency Injection(DI)とは、日本語で「依存性の注入」と呼ばれるデザインパターンです。
クラスが自分で依存するオブジェクトをクラス内で生成するのではなく、外部からその依存オブジェクトを「注入」してもらう仕組みです。これによって、モジュール間の結合度を下げ、コードの保守性を向上させることができます。
DIを使わないパターン
まずは、DIを使わない場合のコード例を見てみましょう。
// DIを使わないパターン: UserServiceが直接UserRepositoryを生成
class UserService {
  private userRepository: UserRepository;

  constructor() {
    this.userRepository = new UserRepository();
  }

  getUser(id: string) {
    return this.userRepository.findById(id);
  }
}
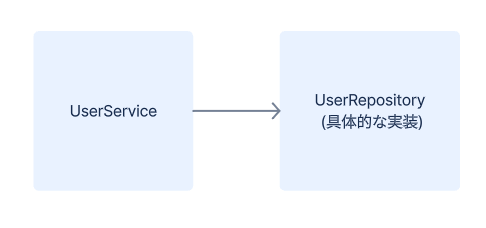
この場合の問題点で言うと、UserServiceがUserRepositoryの具体的な実装に直接依存しているため、もしUserRepositoryを変更したい場合、UserServiceのコードも修正が必要になります。
また、テスト時にUserRepositoryをモックに差し替えることも難しいです。
DIを使うパターン
次に、DIを用いてuserRepositoryを外部から注入する方法を見てみましょう。
interface IUserRepository {
  findById(id: string): User;
}

// DIパターン: userRepositoryを引数としてUserServiceのコンストラクタに渡す
class UserService {
  private userRepository: IUserRepository;

  constructor(userRepository: IUserRepository) {
    this.userRepository = userRepository;
  }

  getUser(id: string) {
    return this.userRepository.findById(id);
  }
}
上記の実装ですと、UserRepositoryはUserService内で生成するのでなく、外部から注入してもらう形式となっています。この場合は、UserRepositoryの実装を変更しても、UserServiceのコードに影響が出ません。
テスト時のモックの注入例:
const mockUserRepository = new userRepository();
const userService = new UserService(mockUserRepository);
依存性逆転の原則(DIP)との関係
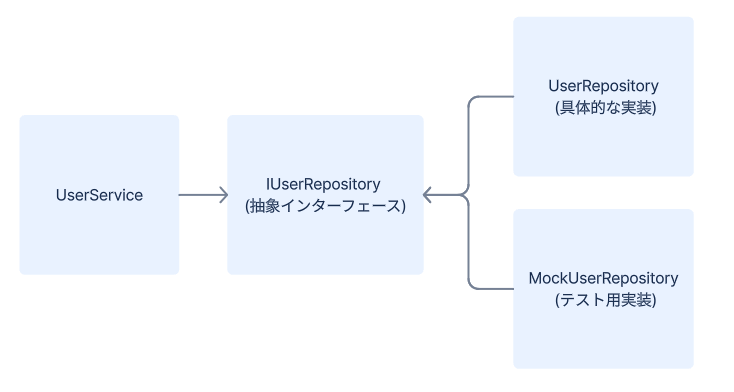
さらに言うと、UserServiceはIUserRepositoryという抽象に依存し、具体的なUserRepositoryの実装には依存していません。
これは、SOLID原則の一つである依存性逆転の原則(Dependency Inversion Principle, DIP)を実現しています。
依存性逆転の原則とは、
- 上位モジュール(ビジネスロジックを持つクラス)は、下位モジュール(データアクセスや外部サービスとの連携を行うクラス)に依存すべきではない。
- 両者とも抽象(インターフェースや抽象クラス)に依存すべきであり、抽象が具体的な実装に依存してはならない。
通常のパターンですと、下記ように上位モジュールが下位モジュールに依存しているため、下位モジュールに変更ある場合、上位モジュールも変更する必要があります。

一方で、DIを使う場合、上位モジュールと下位モジュールの両方が抽象(インターフェース)に依存しているため、下位モジュールの実装を変更しても上位モジュールに影響がありません。

まとめると、Dependency Injectionは依存性逆転の原則を実現する手法として、モジュールの結合度を下げ、柔軟で拡張性の高いコード設計を可能にします。これによって、コードの保守性が向上し、テストもしやすくなります。
InversifyJSを使ったDependency Injectionの実装イメージ
InversifyJSは、TypeScript製のDIコンテナを提供するライブラリです。コード全体で4KBしかない、とても軽量です。
早速InversifyJSを使って、簡単なユーザー認証機能をDIで実装してみましょう。
import 'reflect-metadata';
import { injectable, inject, Container } from 'inversify';

// インターフェース定義
interface IUserRepository {
  findUserByEmail(email: string): Promise<User | null>;
}

// 識別子の定義
const TYPES = {
  IUserRepository: Symbol.for('IUserRepository'),
  UserService: Symbol.for('UserService'),
};

// 実装クラス
@injectable()
class UserRepository implements IUserRepository {
  async findUserByEmail(email: string): Promise<User | null> {
    // データベースからユーザーを検索する
  }
}

@injectable()
class UserService {
  private userRepository: IUserRepository;

  constructor(@inject(TYPES.IUserRepository) userRepository: IUserRepository) {
    this.userRepository = userRepository;
  }

  async authenticate(email: string, password: string): Promise<boolean> {
    const user = await this.userRepository.findUserByEmail(email);
    // ユーザー認証ロジック
  }
}

// コンテナの作成とバインド
const container = new Container();

container.bind<IUserRepository>(TYPES.IUserRepository).to(UserRepository);
container.bind<UserService>(TYPES.UserService).to(UserService);
userServiceを使う時、下記のようにコンテナからインスタンスを取得して、メソッドを使います。
const userService = container.get<UserService>(TYPES.UserService);

await userService.authenticate({ email: 'newuser@example.com', password: "password" });
上記のコードを見る限り、実装のやり方は簡単ですが、いくつかの疑問を感じています。
- コンテナは何でクラスの依存関係を知っているのか?
-
container.getで、userServiceインスタンスを取得するとき、userRepositoryの注入はどのように行われているのか? - そもそも
@Injectable()や@Injectはどういう仕組み?
DIコンテナの内部動作を理解する
こちらの記事のおかげで、Implement a Dependency Injection Container in TypeScript from Scratch、コンテナについての解像度が上がりました。
簡単にまとめると、InversifyJSは主に下記の処理を行っています:
- Symbolを使ってクラスの識別子を定義する
-
container.bind()メソッドで、識別子と実装クラスを関連付け、その対応関係をbindingsに保存する -
@Injectable()と@Injectといったデコレーターを使って、クラスの型情報と依存関係をメタデータに保存する -
container.get()を呼び出すことで、メタデータから対象クラスの依存関係の情報を取得し、再帰的に依存関係を解決してから、クラスに注入しインスタンスを生成する
シンプルなDIコンテナの実装
では、上記の流れに沿って、簡単なコンテナを作ってみましょう。
※1.実際の内容はInversifyJSのソースコードを眺めば良いと思いますので、ここでは、大体の流れを掴むため、シンプル版のコンテナを実装します。
※2.識別子の定義ステップは省略します。識別子はsymbolでなく、シンプルにstringを使います。
import 'reflect-metadata'

type Constructor<T = any> = new (...args: any[]) => T;

class SimpleContainer {
  private bindings = new Map<string, Constructor>();

  // 識別子とクラスをバインドする
  bind<T>(identifier: string, serviceClass: Constructor<T>): void {
    this.bindings.set(identifier, serviceClass);
  }

  // インスタンスの取得(依存関係の解決)
  get<T>(identifier: string): T {

    const targetClass = this.bindings.get(identifier);

    if (!targetClass) {
      throw new Error(`Identifier ${identifier} is not bound`);
    }

    // クラスが注入可能かチェック
    const isInjectable = Reflect.getMetadata('injectable', targetClass);
    if (!isInjectable) {
      throw new Error(`Class ${targetClass.name} is not injectable.`);
    }

    // @inject()デコレーターにより保存されたクラスのコンストラクタ引数の識別子を取得
    const injectedParams: string[] =
    Reflect.getMetadata('injected-params', targetClass) || [];

    // クラスのコンストラクタ引数の型情報を取得
    const paramTypes: any[] =
    Reflect.getMetadata('design:paramtypes', targetClass) || [];

    // 依存関係を再帰的に解決
    const dependencies = paramTypes.map((paramType, index) => {
    const depIdentifier = injectedParams[index];
    return this.get(depIdentifier);
    });

    // インスタンスを生成して返す
    return new targetClass(...dependencies);
  }
}

// @injectable()と@inject()動きに関して、後ほど解説
function injectable() {
  return function (target: any) {
    Reflect.defineMetadata('injectable', true, target);
  };
}

function inject(identifier: string) {
  return function (target: any, propertyKey: string | symbol | undefined, parameterIndex: number) {
    const existingInjectedParams =
      Reflect.getMetadata('injected-params', target) || [];
    existingInjectedParams[parameterIndex] = identifier;

    Reflect.defineMetadata('injected-params', existingInjectedParams, target);
  };
}
上記のコンテナは主に三つのことをやります。
1. 識別子と実装クラスのバインド
container.bind('UserService', UserService)で、識別子UserServiceとクラスUserServiceを関連付けて、bindingsマップに識別子とクラスの対応関係を保存します。
2. クラスの依存関係を解決
container.get('UserService')を呼び出すと、UserServiceのインスタンスを生成するため、まず依存関係の情報を取得し、各依存クラスを再帰的にインスタンス化します。
具体的な処理は:
a. UserServiceを取得
this.bindings.get('UserService')で識別子'UserService'に対応するクラスUserServiceを取得します。
b. 依存関係の識別子配列を取得
Reflect.getMetadata('injected-params', UserService)でUserServiceの依存関係の識別子配列を取得。ここでは['IUserRepository']となります。
c. UserServiceのコンストラクタ引数の型情報を取得
Reflect.getMetadata('design:paramtypes', UserService)でコンストラクタ引数の型情報を取得。ここでは[IUserRepository]となります。
d. UserRepositoryの識別子を取得
UserRepositoryの引数インデスクを参照し、UserRepositoryの識別子を取得する。ここでは、'IUserRepository'となります。
e. UserRepositoryをインスタンス化
UserRepositoryは依存関係を持つ場合、 その依存関係を解決するまで、this.get('IUserRepository')で上記の処理を再帰的に実行します。最後にUserRepositoryのインスタンスを生成、dependenciesに格納します。
3. クラスのインスタンスを生成
return new UserService(...dependencies);で、UserRepositoryのインスタンスをUserServiceのコンストラクタに渡し(つまり注入)、UserServiceのインスタンスを生成します。
DIコンテナでのメタデータとデコレーターの利用
これまでは、シンプルなDIコンテナの実装を通じて、依存関係の解決とインスタンスの生成の基本的な流れを理解しました。依存関係の保存・取得・注入あたりは、DIコンテナは@injectable() や @inject() といったデコレーターとメタデータを利用していますが、実際どういう動きなのか、もう少し解像度を上げたいと思います。
メタデータによる型情報の保存
一言で言うと、コンテナは実装クラスの型情報や依存関係情報はメタデータを利用して、保存・取得しています。
メタデータとは、クラスや関数に付加された追加情報です。
JavaScript自体はオブジェクトのプロパティやメソッドの操作を行えるReflect APIを提供していますが、その機能がとても制限されているため、Reflect オブジェクトにメタデータ操作のメソッドを追加したreflect-metadataライブラリを使うのが多いです。
reflect-metadataを使った型情報の保存と取得
reflect-metadata は、オブジェクトやクラスに対してメタデータを保存・取得するためのライブラリです。TypeScript のデコレーターと組み合わせて使用することで、runtimeに型情報を操作できます。
tsconfig.json ファイルで、emitDecoratorMetadata を true に設定すると、TypeScript コンパイラはデコレーターを適用した場所に自動的に型情報を'design:paramtypes' をキーでメタデータとして保存します。
そのため、事前にReflect.defineMetadata('design:paramtypes', ...)で型情報をメタデータに定義するのが不要です。
Reflect.getMetadata('design:paramtypes', target) を呼び出すと、targetクラス のコンストラクタが受け取る引数の型情報の配列が返されます。
{
  "compilerOptions": {
    "experimentalDecorators": true,
    "emitDecoratorMetadata": true
  }
}
今回の実装で、UserService のメタデータに保存したデータの構造は下記のイメージです。
{
 'design:paramtypes': [ UserRepository ]
 'injectable': true,
 'injected-params': [ 'UserRepository' ]
}
デコレータによる注入対象と依存関係の識別
デコレータとは、TypeScriptがECMAScript標準により提供する機能で、クラスやプロパティ、メソッドに付けると、そのクラスやメソッドに追加機能を与えます。
つまり、デコレータはクラスやメソッドに追加の振る舞いを提供する関数です。
DIコンテナでは、デコレータを使って、注入対象のクラスをマークしたり、その依存関係の対象を識別したりしています。
@injectable()の動き
@injectable() デコレーターは、クラスが DI コンテナによって管理され、依存関係の注入が可能であることを示します。
今回定義したinjectable()の中身を見ると、Reflect.defineMetadata を使用して、
target に対してキー'injectable'で値true を設定し、メタデータに保存しています。
こちらの target は TypeScriptのデコレーター機能によって自動的に提供されるもので、デコレーターが適用されたクラスや関数そのものなので、今回はUserServiceやUserRepositoryになります。
function injectable() {
  return function (target: any) {
    Reflect.defineMetadata('injectable', true, target);
  };
}

// @injectable()をUserServiceクラスに付けると、UserServiceが注入対象であることをメタデータに保存する
@injectable()
class UserService {
  private userRepository: IUserRepository;
    ...
}
そして、DI コンテナは、このメタデータを使用して、クラスが注入可能かどうかを判断できます。
const isInjectable = Reflect.getMetadata('injectable', targetClass);
if (!isInjectable) {
  throw new Error(`Class ${targetClass.name} is not injectable.`);
}
実際のinversifyが定義しているinjectable() の中身も覗いてみましょう。
function injectable() {
  return function <T extends abstract new (...args: any) => unknown>(
    target: T,
  ) {
    if (Reflect.hasOwnMetadata(METADATA_KEY.PARAM_TYPES, target)) {
      throw new Error(ERRORS_MSGS.DUPLICATED_INJECTABLE_DECORATOR);
    }

    const types: NewableFunction[] =
      (Reflect.getMetadata(METADATA_KEY.DESIGN_PARAM_TYPES, target) as
        | NewableFunction[]
        | undefined) || [];
    Reflect.defineMetadata(METADATA_KEY.PARAM_TYPES, types, target);

    return target;
  };
}
実際のinversify では、メタデータの一貫性と拡張性を確保するため、必要な情報を独自に管理しています。@injectable() デコレーター内で 'design:paramtypes' のメタデータを取得し、それを独自のメタデータキー METADATA_KEY.PARAM_TYPES に保存しています。
@inject()の動き
@inject() デコレーターは、依存関係の識別子を指定して、メタデータに保存しています。これによって、コンテナが正しく依存関係を解決できるようになります。
今回定義した@inject()では、TypeScriptから渡される引数のtargetと引数のindex情報を使って、引数の識別子と引数のindexを配列['IUserRepository']形式でキー'injected-params'のメタデータに保存しています。
function inject(identifier: string) {
 // ここでのtarget, propertyKey, parameterIndexはtsコンパイラにより渡される
  return function (target: any, propertyKey: string | symbol | undefined, parameterIndex: number) {
    const existingInjectedParams =
      Reflect.getMetadata('injected-params', target) || [];
    existingInjectedParams[parameterIndex] = identifier;

    Reflect.defineMetadata('injected-params', existingInjectedParams, target);
  };
}

@injectable()
class UserService {
  private userRepository: IUserRepository;

// @inject('IUserRepository')をuserRepositoryに付けると、'IUserRepository'がUserServiceに注入すべきuserRepositoryの識別子であることを明示する
  constructor(@inject('IUserRepository') userRepository: IUserRepository) {
    this.userRepository = userRepository;
  }
}
今回のコンテナの実装では、コンテナは'injected-params'から取得した引数の識別子情報と'design:paramtypes'から引数の型情報を使い、同じindexの引数に対してその識別子を特定することができます。
そして、bindingsからその引数クラスのConstructorを取得し、インスタンス化して、UserServiceのコンストラクタに注入するという流れを実現できています。
    // @inject()デコレーターにより保存されたクラスのコンストラクタ引数の識別子を取得
    const injectedParams: string[] =
    Reflect.getMetadata('injected-params', targetClass) || [];

    // クラスのコンストラクタ引数の型情報を取得
    const paramTypes: any[] =
    Reflect.getMetadata('design:paramtypes', targetClass) || [];

    // 依存関係を再帰的に解決
    const dependencies = paramTypes.map((paramType, index) => {
    const depIdentifier = injectedParams[index];
    return this.get(depIdentifier);
    });
ちなみに、実際にinversifyが定義するinject()関数のコードはこちらinject()関数
おわりに
今回は、@Injectable()は何なのか?といった素朴な疑問から、Dependency Injection の基本概念やDIコンテナの裏の動きについて、いろいろ調べて理解を深めました。
inversifyのソースコードも少し覗いてみましたが、やはり実際のコードは複雑で、すぐに理解するのが難しい感じでした。ただ、簡単なDIコンテナを実装してみたおかげで、container.bindとgetを入り口として、少しづつソースコードの読み解きは進んでいると思います。
inversifyでは、DIコンテナの拡張性を向上するため、スコープの管理やミドルウェアの適用などいろいろ機能を対応しています。もしご興味があれば、ぜひ一度inversify のソースコードを読んでみてください。
その他参照
Angular: Understanding dependency injection
Inversion of Control Containers and the Dependency Injection pattern
TypeScript’s Reflect Metadata: What it is and How to Use it
スペースを簡単に貸し借りできるサービス「スペースマーケット」のエンジニアによる公式ブログです。 弊社採用技術スタックはこちら -> whatweuse.dev/company/spacemarket
Discussion