WinUI3でアプリ通知(トースト)を出す
WinUI3でのトースト通知のメモ。
- .NET 9
- WindowsAppSDK 1.7.250606001
- Unpackaged
参考にするのは下記のページです。
1. 基本のトースト
1-1. プロジェクトの作成
これをベースにします。
PropertyGroupに以下を追加します。
<WindowsAppSDKSelfContained>true</WindowsAppSDKSelfContained>
1-2. App.xaml.cs
WindowHelperは参考ページそのままです。
using System;
using System.Diagnostics;
using System.Runtime.InteropServices;
using Microsoft.UI.Xaml;
using Microsoft.Windows.AppLifecycle;
using Microsoft.Windows.AppNotifications;

namespace App7;

public partial class App
{
    private Window? _window;

    public App()
    {
        InitializeComponent();

        var notificationManager = AppNotificationManager.Default;
        notificationManager.NotificationInvoked += NotificationManager_NotificationInvoked;
        notificationManager.Register();

        var activatedArgs = AppInstance.GetCurrent().GetActivatedEventArgs();

        if (activatedArgs.Kind != ExtendedActivationKind.AppNotification)
        {
            LaunchAndBringToForegroundIfNeeded();
        }
        else
        {
            HandleNotification((AppNotificationActivatedEventArgs)activatedArgs.Data);
        }
    }

    protected override void OnLaunched(LaunchActivatedEventArgs args)
    {
        _window = new MainWindow();
        _window.Activate();
    }

    private void NotificationManager_NotificationInvoked(AppNotificationManager sender, AppNotificationActivatedEventArgs args)
    {
        HandleNotification(args);
    }

    private void HandleNotification(AppNotificationActivatedEventArgs args)
    {
        Debug.WriteLine("HandleNotification");

        if (!string.IsNullOrEmpty(args.Argument))
            Debug.WriteLine(args.Argument);
    }

    private void LaunchAndBringToForegroundIfNeeded()
    {
        if (_window == null)
        {
            _window = new MainWindow();
            _window.Activate();

            WindowHelper.ShowWindow(_window);
        }
        else
        {
            WindowHelper.ShowWindow(_window);
        }
    }
}

public static class WindowHelper
{
    [DllImport("user32.dll")]
    private static extern bool ShowWindow(IntPtr hWnd, int nCmdShow);

    [DllImport("user32.dll")]
    [return: MarshalAs(UnmanagedType.Bool)]
    private static extern bool SetForegroundWindow(IntPtr hWnd);

    public static void ShowWindow(Window window)
    {
        // Bring the window to the foreground... first get the window handle...
        var hwnd = WinRT.Interop.WindowNative.GetWindowHandle(window);

        // Restore window if minimized... requires DLL import above
        ShowWindow(hwnd, 0x00000009);

        // And call SetForegroundWindow... requires DLL import above
        SetForegroundWindow(hwnd);
    }
}
1-3. MainWindow.xaml.cs
using Microsoft.UI.Xaml;
using Microsoft.Windows.AppNotifications;
using Microsoft.Windows.AppNotifications.Builder;

namespace App7;

public sealed partial class MainWindow
{
    public MainWindow()
    {
        InitializeComponent();
    }

    private void Toast1_OnClick(object sender, RoutedEventArgs e)
    {
        var notification = new AppNotificationBuilder()
            .AddText("Hello, World!")
            .BuildNotification();

        AppNotificationManager.Default.Show(notification);
    }
}
1-4. MainWindow.xaml
<?xml version="1.0" encoding="utf-8"?>
<Window
    x:Class="App7.MainWindow"
    xmlns="http://schemas.microsoft.com/winfx/2006/xaml/presentation"
    xmlns:x="http://schemas.microsoft.com/winfx/2006/xaml"
    xmlns:d="http://schemas.microsoft.com/expression/blend/2008"
    xmlns:mc="http://schemas.openxmlformats.org/markup-compatibility/2006"
    mc:Ignorable="d"
    Title="App7">

    <Window.SystemBackdrop>
        <MicaBackdrop />
    </Window.SystemBackdrop>

    <Grid>
        <StackPanel HorizontalAlignment="Center" VerticalAlignment="Center">
            <Button Content="Toast1" Click="Toast1_OnClick"/>
        </StackPanel>
    </Grid>
</Window>
1-5. 実行
ボタンを押すと、トーストが出ます。簡単、素敵。

2. バリエーション
2.1 説明(SetAttributionText)
    private void Toast2_OnClick(object sender, RoutedEventArgs e)
    {
        var notification = new AppNotificationBuilder()
            .AddText("Hello, World!")
            .SetAttributionText("SetAttributionText")
            .BuildNotification();

        AppNotificationManager.Default.Show(notification);
    }
![]/images/winui3-toast/2.png)
2.2 画像(SetInlineImage)
    private void Toast3_OnClick(object sender, RoutedEventArgs e)
    {
        var uri = new Uri($"file:///{Path.Combine(AppDomain.CurrentDomain.BaseDirectory, "Assets", "image.png")}");

        var notification = new AppNotificationBuilder()
            .AddText("Hello, World!")
            .SetInlineImage(uri)
            .BuildNotification();

        AppNotificationManager.Default.Show(notification);
    }

AppNotificationImageCrop.Circle にすると、画像が丸くなります。
.SetInlineImage(uri, AppNotificationImageCrop.Circle)

2.3 ヒーロー画像(SetHeroImage)
    private void Toast4_OnClick(object sender, RoutedEventArgs e)
    {
        var uri = new Uri($"file:///{Path.Combine(AppDomain.CurrentDomain.BaseDirectory, "Assets", "image.png")}");

        var notification = new AppNotificationBuilder()
            .AddText("Hello, World!")
            .SetHeroImage(uri)
            .BuildNotification();

        AppNotificationManager.Default.Show(notification);
    }

2.4 外部の画像
サイズに制限があるものの、httpsで画像を表示できます。
    private void Toast5_OnClick(object sender, RoutedEventArgs e)
    {
        var uri = new Uri("https://res.cloudinary.com/zenn/image/fetch/s--war0vuDr--/c_limit%2Cf_auto%2Cfl_progressive%2Cq_auto%2Cw_1200/https://storage.googleapis.com/zenn-user-upload/deployed-images/5ea8a933fa053c78991dd5b8.jpg%3Fsha%3Dc9954200e0705e5d52b4789efd5317b1be06601d");

        var notification = new AppNotificationBuilder()
            .AddText("Hello, World!")
            .SetHeroImage(uri)
            .BuildNotification();

        AppNotificationManager.Default.Show(notification);
    }
2.5 タイムスタンプ(SetTimeStamp)
これはポップアップには出ませんが、通知のところに指定した日時で表示されます。
    private void Toast6_OnClick(object sender, RoutedEventArgs e)
    {
        var notification = new AppNotificationBuilder()
            .AddText("Hello, World!")
            .SetTimeStamp(new DateTime(2025, 07, 13, 12, 11, 10, DateTimeKind.Utc))
            .BuildNotification();

        AppNotificationManager.Default.Show(notification);
    }

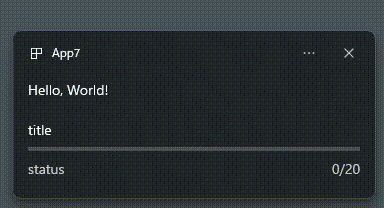
2.6 進捗状況(AddProgressBar)
Show して UpdateAsync で中身を更新、RemoveByTagAsync 等で消す、という段取りになります。
Tagを指定しておかないと、UpdateAsync できないので、生成時に SetTag しておきます。
    private void Toast7_OnClick(object sender, RoutedEventArgs e)
    {
        _totalCount = 20;
        _currentCount = 0;

        var builder = new AppNotificationBuilder()
            .AddText("Hello, World!")
            .AddProgressBar(new AppNotificationProgressBar()
                .BindTitle()
                .BindStatus()
                .BindValue()
                .BindValueStringOverride())
            .SetTag("toast")
            .SetDuration(AppNotificationDuration.Long)
            .BuildNotification();

        builder.Progress = new AppNotificationProgressData(1u)
        {
            Title = "title",
            Value = (double)_currentCount / _totalCount,
            ValueStringOverride = $"{_currentCount}/{_totalCount}",
            Status = "status"
        };

        AppNotificationManager.Default.Show(builder);
    }

    private void Toast71_OnClick(object sender, RoutedEventArgs e)
    {
        _currentCount++;
        var data = new AppNotificationProgressData(1u)
        {
            Title = "title",
            Value = (double)_currentCount / _totalCount,
            ValueStringOverride = $"{_currentCount}/{_totalCount}",
            Status = "status"
        };

        AppNotificationManager.Default.UpdateAsync(data, "toast");
    }

    private void Toast72_OnClick(object sender, RoutedEventArgs e)
    {
        AppNotificationManager.Default.RemoveByTagAsync("toast");
    }

2.7 ボタン(AddButton)
ボタンに Argumentを追加しておいて、App.xaml.csに書いておいた、 HandleNotification で受け取ります。
    private void Toast8_OnClick(object sender, RoutedEventArgs e)
    {
        var notification = new AppNotificationBuilder()
            .AddText("Hello, World!")
            .AddButton(new AppNotificationButton("Hello").AddArgument("action", "Hello"))
            .AddButton(new AppNotificationButton("World").AddArgument("action", "World"))
            .BuildNotification();

        AppNotificationManager.Default.Show(notification);
    }

    private void HandleNotification(AppNotificationActivatedEventArgs args)
    {
        Debug.WriteLine("HandleNotification");

        if (!string.IsNullOrEmpty(args.Argument))
            Debug.WriteLine(args.Argument);
    }
HandleNotification
action=Hello
3. まとめ
他にもグループ化したりできますが、とりあえずこんなところで。
わかりやすくていいですね。
ただ実際のところ、通知を出すことよりも、HandleNotificationでArgumentをもらった後の動作が大変になると思います。
例えば何かの通知を出したとき、「クリックされたらその画面を表示した上で、対象のデータを表示する」みたいな実装がよくあると思いますが、表示する画面の方をうまく作っておかないと、そこにたどり着くまでのコードがめんどくさいことになります。
他にも、画面がすでに表示されているときに、通知により別の画面を表示しないといけないケースなどもいろいろ考慮しないと思ったとおり動かせませんね。
あと通知を見ずに残ったままになっていて、あとからクリックされたりするとそれに関連するイベントはもうなくなってる、みたいなこととかね…
気の利いたことをしようとすると、何かと考えないといけなくて大変です。
Discussion