Vertex AIのAgent Starter Packを使ってみる
AI Agent元年ですね
サントリーこと大橋です。
Vertex AIとかAI Agent周りを調べていて、Vertex AI Agent Engineの中で Agent Starter Packの話が出ていたので、触ってみる
Vertex AI Agent Engine とは三行で
By gemini
Vertex AI Agent Engine(旧称 LangChain on Vertex AI、Vertex AI Reasoning Engine)は、本番環境でAIエージェントをデプロイ、管理、スケーリングするためのフルマネージド サービスです。このエンジンにより、開発者はエージェント固有の機能に集中でき、多様なPythonフレームワークを使用して構築したエージェントを柔軟にデプロイできます。また、VPC Service Controlsなどのセキュリティ機能も提供します
LangChainやLangGraph、AG2などのAI Agent フレームワークで作成されたAI AgentをGCP上にデプロイして管理するためのフルマネージメントサービス
セキュリティ周りとか任せられる
Cloud Runで良くね? と思うところもあるけど、AI Agent用なので、メリットが諸々ありそうな気がする。
Dockerfileを用意しなくてもいい(Cloud Runも用意しなくてもdeployできるけど....)とかWebレイヤー作らなくていいとか、そのうちAI Agentとしての評価/モニタリング/トレースができるようになるだろうから
Agent Starter Pack とは三行で
リポジトリは以下
By Gemini
Google Cloudのagent-starter-packは、生成AIエージェントの開発とデプロイを迅速化するために設計された、本番環境に対応したテンプレートの集まりです。このプロジェクトは、デプロイ、運用、評価、カスタマイズ、監視といった一般的な課題に対処するための包括的なソリューションを提供します。LangGraphやCrewAIなどの多様なエージェントフレームワークをサポートし、CI/CD自動化やデータパイプライン統合などの高度な機能も備えています。開発者は、PythonとGoogle Cloud SDKを利用して、様々なAIエージェントを容易に構築し、活用できます。
Google CloudでAI Agentを作成するにはあれこれサービスがありそれを開発して、デプロイするためのテンプレートの集まり。terraformのテンプレートや、AI Agentフレームワークのテンプレートを利用してCLIから雛形が作れるっぽい
紹介動画は以下
Notebook LMに動画食わせようとしたら、こういう音声なし動画はまとめられないんだって
とりあえずcli経由で色々やるためにインストールガイド からやってみる
普段uvを使ってるのでuvで
pythonのバージョンは 3.12で実施
CLIのインストール
uv init ai-agent-starter-pack-sandbox
cd ai-agent-starter-pack-sandbox
uv venv
. ./.venv/bin/activate
uv pip install agent-starter-pack
特に問題なく入った
プロジェクトの作成
agent-starter-pack create コマンドで雛形を作れるらしいとりあえず何もオプション無しでやってみる
agent-starter-pack create オプションなし
agent-starter-pack create

=== GCP Agent Starter Pack 🚀===
Welcome to the Agent Starter Pack!
This tool will help you create an end-to-end production-ready AI agent in GCP!


> Please select a agent to get started:
1. langgraph_base_react - A agent implementing a base ReAct agent using LangGraph
2. agentic_rag_vertexai_search - A RAG agent using Vertex AI Search and LangGraph for document retrieval and Q&A
3. crewai_coding_crew - A multi-agent system implemented with CrewAI created to support coding activities
4. multimodal_live_api - A real-time multimodal RAG agent powered by Gemini, supporting audio/video/text chat with vector
DB-backed responses

Enter the number of your template choice (1):
何をつくかテンプレートの選択がでてきた とりあえず1で
Enter the number of your template choice (1): 1

> Please select a deployment target:
1. Vertex AI Agent Engine - Vertex AI Managed platform for scalable agent deployments
2. Cloud Run - GCP Serverless container execution

Enter the number of your deployment target choice (1):
デプロイ先 Cloud Runも選べるみたい 今回はあえて Vertex AI Agent Engineにしてみる
> Default GCP region is 'us-central1'
Enter desired GCP region (leave blank for default):
リージョン めんどくさいのでそのまま
Enter desired GCP region (leave blank for default):
path/to/ptyhon/site-packages/google/auth/_default.py:76: UserWarning: Your application has authenticated using end user credentials from Google Cloud SDK without a quota project. You might receive a "quota exceeded" or "API not enabled" error. See the following page for troubleshooting: https://cloud.google.com/docs/authentication/adc-troubleshooting/user-creds.
  warnings.warn(_CLOUD_SDK_CREDENTIALS_WARNING)

> You are logged in with account: 'xxxxxxxx'
> You are using project: 'xxxxxxxxx'
> Do you want to continue? (The CLI will check if Vertex AI is enabled in this project) [Y/skip/edit] (Y):
ProjectがGoogle Cloud SDK(gcloudコマンド)に設定されているプロジェクトになっているっぽい。
直したいのでeditしてみる。
> Do you want to continue? (The CLI will check if Vertex AI is enabled in this project) [Y/skip/edit] (Y): edit

> Initiating new login...
Your browser has been opened to visit:

    https://accounts.google.com/o/oauth2/auth?xxxxxxxxxxxxxx


Application Default Credentials (ADC) were updated.

You are now logged in as [xxxxxxxxxxx].
Your current project is [xxxxxxxxxx].  You can change this setting by running:
  $ gcloud config set project PROJECT_ID
> Login successful. Verifying new credentials...

> You are now logged in with account: 'xxxxxxxxxxx'.
> Current project is: 'xxxxxx'.
> Do you want to continue? (The CLI will verify Vertex AI access in this project) [y/skip/edit] (y):
oh.... ただもう一度ログインさせられてApplication Default Credentialsが上書きされただけで、カレントプロジェクト変えられなかった.....
一回cli抜けてオプションを探す
❯ agent-starter-pack create --help
Usage: agent-starter-pack create [OPTIONS] PROJECT_NAME

  Create GCP-based AI agent projects from templates.

Options:
  -a, --agent TEXT                agent name or number to use
  -d, --deployment-target [agent_engine|cloud_run]
                                  Deployment target name
  -i, --include-data-ingestion    Include data pipeline
  --debug                         Enable debug logging
  -o, --output-dir PATH           Output directory for the project (default:
                                  current directory)
  --auto-approve                  Skip credential confirmation prompts
  --region TEXT                   GCP region for deployment (default: us-
                                  central1)
  --skip-checks                   Skip verification checks for uv, GCP and
                                  Vertex AI
  --help                          Show this message and exit.
ヘルプには無い
一応cliのreadmeを見てみる
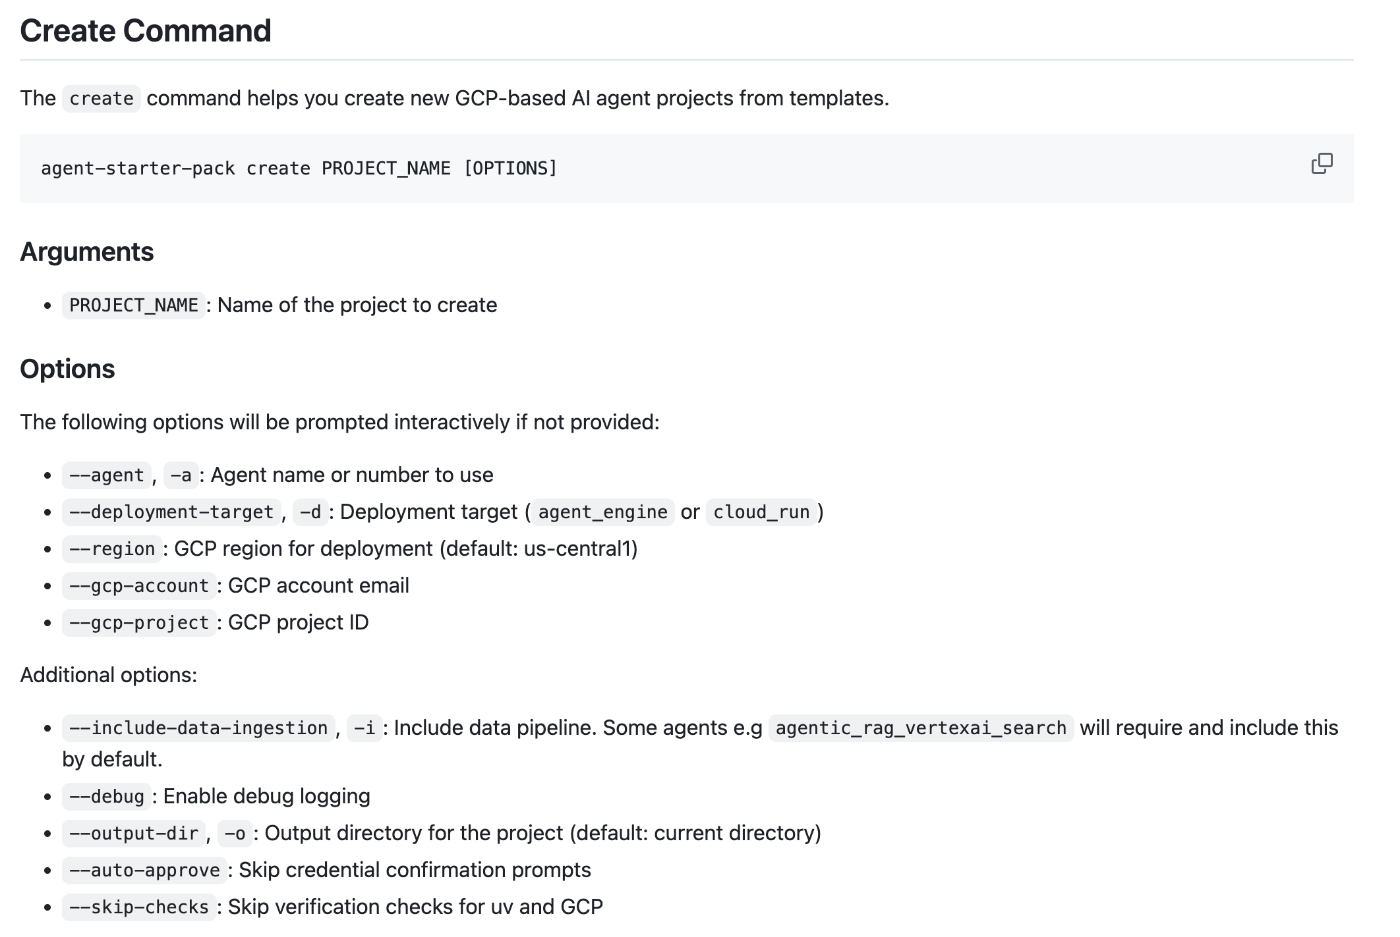
めっちゃある --gcp-project で行けるっぽいのでもう一度
❯ agent-starter-pack create ai-agent-starter-pack-sandbox --gcp-project xxxxxxx
Usage: agent-starter-pack create [OPTIONS] PROJECT_NAME
Try 'agent-starter-pack create --help' for help.

Error: No such option: --gcp-project
うそつき!コードを見た感じもこのオプションはなさそうなのでCloud SDKのproject IDを変更する
gcloud config set project yyyyyyyy
agent-starter-pack create ai-agent-starter-pack-sandbox

=== GCP Agent Starter Pack 🚀===
Welcome to the Agent Starter Pack!
This tool will help you create an end-to-end production-ready AI agent in GCP!


> Please select a agent to get started:
1. langgraph_base_react - A agent implementing a base ReAct agent using LangGraph
2. agentic_rag_vertexai_search - A RAG agent using Vertex AI Search and LangGraph for document retrieval and Q&A
3. crewai_coding_crew - A multi-agent system implemented with CrewAI created to support coding activities
4. multimodal_live_api - A real-time multimodal RAG agent powered by Gemini, supporting audio/video/text chat with vector
DB-backed responses

Enter the number of your template choice (1):

> Please select a deployment target:
1. Vertex AI Agent Engine - Vertex AI Managed platform for scalable agent deployments
2. Cloud Run - GCP Serverless container execution

Enter the number of your deployment target choice (1):

> Default GCP region is 'us-central1'
Enter desired GCP region (leave blank for default):

> You are logged in with account: 'xxxxxxx'
> You are using project: 'yyyyyyyy'
> Do you want to continue? (The CLI will check if Vertex AI is enabled in this project) [Y/skip/edit] (Y):
ちゃんと変わったっぽいので続行
> Do you want to continue? (The CLI will check if Vertex AI is enabled in this project) [Y/skip/edit] (Y):

> Error setting application default quota project:
API  not enabled on project . Would you like to enable and retry
(this will take a few minutes)? (y/N)?
ERROR: (gcloud.auth.application-default.set-quota-project) [None] does not have permission to access projects instance  (or
it may not exist): Cloud Resource Manager API has not been used in project yyyyyyyyyyyyyy before or it is disabled.
Enable it by visiting
https://console.developers.google.com/apis/api/cloudresourcemanager.googleapis.com/overview?project=yyyyyyyyyyyyyy then
retry. If you enabled this API recently, wait a few minutes for the action to propagate to our systems and retry. This
command is authenticated as None using the credentials in
path/to/.config/gcloud/application_default_credentials.json, specified by the  property.
Cloud Resource Manager API has not been used in project yyyyyyyyyyyyyy before or it is disabled. Enable it by visiting
https://console.developers.google.com/apis/api/cloudresourcemanager.googleapis.com/overview?project=yyyyyyyyyyyyyy then
retry. If you enabled this API recently, wait a few minutes for the action to propagate to our systems and retry.
Google developers console API activation
https://console.developers.google.com/apis/api/cloudresourcemanager.googleapis.com/overview?project=yyyyyyyyyyyyyy
- '@type': type.googleapis.com/google.rpc.ErrorInfo
  domain: googleapis.com
  metadata:
    activationUrl:
https://console.developers.google.com/apis/api/cloudresourcemanager.googleapis.com/overview?project=yyyyyyyyyyyyyy
    consumer: projects/yyyyyyyyyyyyyy
    containerInfo: yyyyyyyyyyyyyy
    service: cloudresourcemanager.googleapis.com
    serviceTitle: Cloud Resource Manager API
  reason: SERVICE_DISABLED

> Warning: GCP environment setup failed: Command '['gcloud', 'auth', 'application-default', 'set-quota-project',
'yyyyyyyyyyyyyy']' returned non-zero exit status 1.
> Please check your authentication settings and permissions. Visit https://cloud.google.com/vertex-ai/docs/authentication
for help.
> Continuing with template processing...

> 👍 Done. Execute the following command to get started:
cd ai-agent-starter-pack-sandbox && make install && make playground
❯ ls
README.md			pyproject.toml
ai-agent-starter-pack-sandbox	src
❯ cd ai-agent-starter-pack-sandbox
❯ ls
Makefile			deployment			pyproject.toml
README.md			deployment_metadata.json	tests
agent_README.md			frontend			uv.lock
app				notebooks
エラーが出た
対象のプロジェクトで Cloud Resource Manager API をONにしてなかったからエラーが出たよう
ただ、プロジェクトテンプレート自体は作成されたみたい。
作成されたファイル達
作成されたファイルは以下
.
├── Makefile
├── README.md
├── agent_README.md
├── app
│   ├── agent.py
│   ├── agent_engine_app.py
│   └── utils
│       ├── gcs.py
│       ├── tracing.py
│       └── typing.py
├── deployment
│   ├── README.md
│   ├── cd
│   │   ├── deploy-to-prod.yaml
│   │   └── staging.yaml
│   ├── ci
│   │   └── pr_checks.yaml
│   └── terraform
│       ├── apis.tf
│       ├── build_triggers.tf
│       ├── dev
│       │   ├── apis.tf
│       │   ├── iam.tf
│       │   ├── log_sinks.tf
│       │   ├── providers.tf
│       │   ├── storage.tf
│       │   ├── variables.tf
│       │   └── vars
│       │       └── env.tfvars
│       ├── iam.tf
│       ├── locals.tf
│       ├── log_sinks.tf
│       ├── providers.tf
│       ├── service_accounts.tf
│       ├── storage.tf
│       ├── variables.tf
│       └── vars
│           └── env.tfvars
├── deployment_metadata.json
├── frontend
│   ├── side_bar.py
│   ├── streamlit_app.py
│   ├── style
│   │   └── app_markdown.py
│   └── utils
│       ├── chat_utils.py
│       ├── local_chat_history.py
│       ├── message_editing.py
│       ├── multimodal_utils.py
│       ├── stream_handler.py
│       └── title_summary.py
├── notebooks
│   ├── evaluating_langgraph_agent.ipynb
│   └── intro_agent_engine.ipynb
├── pyproject.toml
├── tests
│   ├── integration
│   │   ├── test_agent.py
│   │   └── test_agent_engine_app.py
│   ├── load_test
│   │   ├── README.md
│   │   └── load_test.py
│   └── unit
│       ├── test_dummy.py
│       └── test_utils
│           └── test_tracing_exporter.py
└── uv.lock

19 directories, 49 files
READMEがあるので読んでみる
README内に書いてあったファイルの説明は以下
ai-agent-starter-pack-sandbox/
├── app/                 # Core application code
│   ├── agent.py         # Main agent logic
│   ├── agent_engine_app.py # Agent Engine application logic
│   └── utils/           # Utility functions and helpers
├── deployment/          # Infrastructure and deployment scripts
├── notebooks/           # Jupyter notebooks for prototyping and evaluation
├── tests/               # Unit, integration, and load tests
├── Makefile             # Makefile for common commands
└── pyproject.toml       # Project dependencies and configuration
app ディレクトリ
agent.py
app/agent.pyは以下 見た感じ、
- langchainとlanggraphを使った簡単なAI Agentを書いている
- モデルは
gemini-2.0-flash-001 - langchainの tool calling でpythonの関数を呼び出している
- 関数内はただ引数から判定して文字列を返すだけの単純なもの APIとかは呼び出していない
- langgraphもかなり単純なReAct 構造
# Copyright 2025 Google LLC
#
# Licensed under the Apache License, Version 2.0 (the "License");
# you may not use this file except in compliance with the License.
# You may obtain a copy of the License at
#
#     http://www.apache.org/licenses/LICENSE-2.0
#
# Unless required by applicable law or agreed to in writing, software
# distributed under the License is distributed on an "AS IS" BASIS,
# WITHOUT WARRANTIES OR CONDITIONS OF ANY KIND, either express or implied.
# See the License for the specific language governing permissions and
# limitations under the License.

# mypy: disable-error-code="union-attr"
from langchain_core.messages import BaseMessage
from langchain_core.runnables import RunnableConfig
from langchain_core.tools import tool
from langchain_google_vertexai import ChatVertexAI
from langgraph.graph import END, MessagesState, StateGraph
from langgraph.prebuilt import ToolNode

LOCATION = "us-central1"
LLM = "gemini-2.0-flash-001"


# 1. Define tools
@tool
def search(query: str) -> str:
    """Simulates a web search. Use it get information on weather"""
    if "sf" in query.lower() or "san francisco" in query.lower():
        return "It's 60 degrees and foggy."
    return "It's 90 degrees and sunny."


tools = [search]

# 2. Set up the language model
llm = ChatVertexAI(
    model=LLM, location=LOCATION, temperature=0, max_tokens=1024, streaming=True
).bind_tools(tools)


# 3. Define workflow components
def should_continue(state: MessagesState) -> str:
    """Determines whether to use tools or end the conversation."""
    last_message = state["messages"][-1]
    return "tools" if last_message.tool_calls else END


def call_model(state: MessagesState, config: RunnableConfig) -> dict[str, BaseMessage]:
    """Calls the language model and returns the response."""
    system_message = "You are a helpful AI assistant."
    messages_with_system = [{"type": "system", "content": system_message}] + state[
        "messages"
    ]
    # Forward the RunnableConfig object to ensure the agent is capable of streaming the response.
    response = llm.invoke(messages_with_system, config)
    return {"messages": response}


# 4. Create the workflow graph
workflow = StateGraph(MessagesState)
workflow.add_node("agent", call_model)
workflow.add_node("tools", ToolNode(tools))
workflow.set_entry_point("agent")

# 5. Define graph edges
workflow.add_conditional_edges("agent", should_continue)
workflow.add_edge("tools", "agent")

# 6. Compile the workflow
agent = workflow.compile()
agent_engine_app.py
次は app/agent_engine_app.py
- Vertex AI Agent EngineへのデプロイスクリプトとAI Agent Engineの中で動くlanggraphラッパー
- ルートディレクトリに履かれていた
Makefileから呼び出して使うっぽいmake backend
- app/utils 以下にある各種Google Cloudサービスとの接続も行っている
- GCS: 多分デプロイするときに必要なagentのコード置き場
- Cloud Trace:Traceloopを利用して、LLMに関するトレース情報をCloud Traceへ書き込んでいる
-Traceloopはopentelemetryの LLM用OSSラッパーOpenLLMetryを作ってる会社 とそのSDK名
- exporter を Cloud Traceにして、Cloud Traceへ書き込んでいる
- Cloud Traceには属性値の256バイト制限があったり、Cloud Loggingには256kb制限があるので、それらの制限に引っかかった場合はGCSに書き出すような作りをしている
- 正直AI AgentのTraceとしてCloud Traceでは機能マッチしてないので、他のプロダクトを入れてほしい
コードは省略
frontend ディレクトリ
streamlit を利用したフロントエンドアプリケーション
playgrand的な扱いっぽい UI最初からあるのは楽
ルートディレクトリの Makefileから make playground で起動できるっぽい
あとで試す
deployment ディレクトリ
CI/CDスクリプトやterraformを含むディレクトリ
- env.tfvarsにCI/CD用プロジェクト、staging用プロジェクトと、production用プロジェクトを書き込んで、terraformを実行すればとりあえずプロジェクトのセットアップは終わるっぽい
- プロジェクトの作成は自分でする
- 実際にやっているのは
- APIのEnable
- テストとかログ用のGCSバケットの作成
- CICD用のSAの作成
- 各種ログのBQへのLog Sinkの作成
- IAMの設定
- CI/CDのCloud Buildへの登録
- production/stagingとは別に dev 環境も準備可能で 環境変数
PROJECT_IDを設定してmake setup-dev-envをすれば作成できる- dev環境へのデプロイは
make backendを利用する
- dev環境へのデプロイは
- CI/CDはCloud Buildで実施
- CI/CDは以下

- CI/CDは以下
こまけぇことは以下の動画みろと

notebooks ディレクトリ
AI Agent Engineの説明と、AI Agentの Vertex AI GenAI Evaluation Service を用いたAI Agentの評価方法について説明した Jupyter Notebook
ただ自分が設定したプロジェクト用の雛形になっているわけではなく、サンプルコードが羅列されている感じなので、サラッと読むだけでいいように見える
tests ディレクトリ
テストコード用のディレクトリ AI Agentのテスト、Agent Engineのテスト、Locustを利用した負荷テストのコードがおいてある
AI AgentのテストとAgent Engineのテストは make testから実行できる
負荷テストはdev環境へ30病患、2-10ユーザでリクエストを送る
セットアップ
ということでREADMEに書いてあるsetupから実行していってみる
まずはローカルの準備から
ローカルの準備
make install
uvを使って、ライブラリインストール uvがinstallされてないと勝手にインストールする....
開発環境devプロジェクトの設定
devプロジェクトの設定をする
export PROJECT_ID="YOUR_PROJECT_ID"
export LOCATION="us-central1"
gcloud config set project $PROJECT_ID
gcloud auth application-default login
gcloud auth application-default set-quota-project $PROJECT_ID
Readmeには書いてないけど、make setup-dev-envでdevプロジェクトのセットアップできるのでやっておく
make setup-dev-env
terraformが走って諸々セットアップされる
productionやstagingは今回はやらない
ローカルで開発
とりあえずplaygroundを実行してみる
make playground
streamlitを使ったアプリケーションがローカルで立ち上がったっぽい

サイドバーでAgentTypeが選べて、「ローカル」「AI Agent Engine」「Remote URL」が選べる
え ぐぅ優秀
ローカルのAgentを使って会話してみる
ちゃんと動いてるし、ツールの実行状況も見える
AI Agentの開発用としては十分な対話ツールっぽい
AI Agent Engineへデプロイ
今度はAI Agent Engineへデプロイしてみる
make backendでPROJECT_IDで設定している任意のプロジェクトへデプロイできるっぽい
なおさっきのPlaygroundの「Deploy」ボタンはStreamlitのもので勘違いしないように(私はえ?まじでボタンでいけるの?ってなった)

ということで素直に make backendしてみる
make backend
uv export --no-hashes --no-sources --no-header --no-emit-project --frozen > .requirements.txt && uv run app/agent_engine_app.py
warning: `VIRTUAL_ENV=/path/to/git/ai-agent-starter-pack-sandbox/.venv` does not match the project environment path `.venv` and will be ignored

    ╔═══════════════════════════════════════════════════════════╗
    ║                                                           ║
    ║   🤖 DEPLOYING AGENT TO VERTEX AI AGENT ENGINE 🤖         ║
    ║                                                           ║
    ╚═══════════════════════════════════════════════════════════╝

INFO:root:Created bucket yyyyyyyyyyyyyyyyyyyy-agent-engine in US-CENTRAL1
INFO:root:Agent config: {'reasoning_engine': <__main__.AgentEngineApp object at 0x10e04af90>, 'display_name': 'ai-agent-starter-pack-sandbox', 'description': 'This is a sample custom application in Agent Engine that uses LangGraph', 'extra_packages': ['./app']}
INFO:root:Creating new agent: ai-agent-starter-pack-sandbox
Using bucket yyyyyyyyyyyyyyyyyyyy-agent-engine
INFO:vertexai.reasoning_engines._reasoning_engines:Using bucket yyyyyyyyyyyyyyyyyyyy-agent-engine
Writing to gs://yyyyyyyyyyyyyyyyyyyy-agent-engine/reasoning_engine/reasoning_engine.pkl
INFO:vertexai.reasoning_engines._reasoning_engines:Writing to gs://yyyyyyyyyyyyyyyyyyyy-agent-engine/reasoning_engine/reasoning_engine.pkl
Writing to gs://yyyyyyyyyyyyyyyyyyyy-agent-engine/reasoning_engine/requirements.txt
INFO:vertexai.reasoning_engines._reasoning_engines:Writing to gs://yyyyyyyyyyyyyyyyyyyy-agent-engine/reasoning_engine/requirements.txt
Creating in-memory tarfile of extra_packages
INFO:vertexai.reasoning_engines._reasoning_engines:Creating in-memory tarfile of extra_packages
Writing to gs://yyyyyyyyyyyyyyyyyyyy-agent-engine/reasoning_engine/dependencies.tar.gz
INFO:vertexai.reasoning_engines._reasoning_engines:Writing to gs://yyyyyyyyyyyyyyyyyyyy-agent-engine/reasoning_engine/dependencies.tar.gz
Creating ReasoningEngine
INFO:vertexai.reasoning_engines._reasoning_engines:Creating ReasoningEngine
Create ReasoningEngine backing LRO: projects/yyyyyyyyyyyyyy/locations/us-central1/reasoningEngines/zzzzzzzzzzzzzzzzzzzzzzzzz/operations/5175727889974296576
INFO:vertexai.reasoning_engines._reasoning_engines:Create ReasoningEngine backing LRO: projects/yyyyyyyyyyyyyy/locations/us-central1/reasoningEngines/zzzzzzzzzzzzzzzzzzzzzzzzz/operations/5175727889974296576


ReasoningEngine created. Resource name: projects/yyyyyyyyyyyyyy/locations/us-central1/reasoningEngines/zzzzzzzzzzzzzzzzzzzzzzzzz
INFO:vertexai.reasoning_engines._reasoning_engines:ReasoningEngine created. Resource name: projects/yyyyyyyyyyyyyy/locations/us-central1/reasoningEngines/zzzzzzzzzzzzzzzzzzzzzzzzz
To use this ReasoningEngine in another session:
INFO:vertexai.reasoning_engines._reasoning_engines:To use this ReasoningEngine in another session:
reasoning_engine = vertexai.preview.reasoning_engines.ReasoningEngine('projects/yyyyyyyyyyyyyy/locations/us-central1/reasoningEngines/zzzzzzzzzzzzzzzzzzzzzzzzz')
INFO:vertexai.reasoning_engines._reasoning_engines:reasoning_engine = vertexai.preview.reasoning_engines.ReasoningEngine('projects/yyyyyyyyyyyyyy/locations/us-central1/reasoningEngines/zzzzzzzzzzzzzzzzzzzzzzzzz')
INFO:root:Agent Engine ID written to deployment_metadata.json
AI Agent Engine(昔の名前は reasoningEngines なのでその名前がちらほら見える) へデプロイして、deployment_metadata.jsonに諸々書き込んだよう
deployment_metadata.jsonの中身は以下の感じ
{
  "remote_agent_engine_id": "projects/xxxxx/locations/us-central1/reasoningEngines/xxxxxx",
  "deployment_timestamp": "デプロイ日"
}
ちなみにAI Agent EngineはまだCloud ConsoleにUIが無いので画面でデプロイ状況は確認できない。
Cloud SDK? そんなものは無い。ここはAI Agent元年だ。
デプロイ状況はREST APIか、Vertex AI SDK for pythonでしかとれない。
とりあえずcurlで
export LOCATION=us-central1
export PROJECT_ID=xxxx
curl -X GET \
     -H "Authorization: Bearer $(gcloud auth print-access-token)" \
     "https://$LOCATION-aiplatform.googleapis.com/v1/projects/$PROJECT_ID/locations/$LOCATION/reasoningEngines"
結果は以下
{
  "reasoningEngines": [
    {
      "name": "projects/xxxxxxx/locations/us-central1/reasoningEngines/yyyyyyyyyy",
      "displayName": "ai-agent-starter-pack-sandbox",
      "spec": {
        "packageSpec": {
          "pickleObjectGcsUri": "gs://xxxxxxxxxxxx-agent-engine/reasoning_engine/reasoning_engine.pkl",
          "dependencyFilesGcsUri": "gs://xxxxxxxxxxxx-agent-engine/reasoning_engine/dependencies.tar.gz",
          "requirementsGcsUri": "gs://xxxxxxxxxxxx-agent-engine/reasoning_engine/requirements.txt",
          "pythonVersion": "3.11"
        },
        "classMethods": [
          {
            "name": "query",
            "api_mode": "",
            "description": "Process a single input and return the agent's response.",
            "parameters": {
              "required": [
                "input"
              ],
              "$defs": {
                "RunnableConfig": {
                  "title": "RunnableConfig",
                  "properties": {
                    "callbacks": {
                      "title": "Callbacks",
                      "anyOf": [
                        {
                          "items": {},
                          "type": "array"
                        },
                        {},
                        {
                          "type": "null"
                        }
                      ]
                    },
                    "run_id": {
                      "title": "Run Id",
                      "anyOf": [
                        {
                          "type": "string",
                          "format": "uuid"
                        },
                        {
                          "type": "null"
                        }
                      ]
                    },
                    "run_name": {
                      "type": "string",
                      "title": "Run Name"
                    },
                    "configurable": {
                      "type": "object",
                      "title": "Configurable"
                    },
                    "metadata": {
                      "type": "object",
                      "title": "Metadata"
                    },
                    "tags": {
                      "items": {
                        "type": "string"
                      },
                      "type": "array",
                      "title": "Tags"
                    },
                    "max_concurrency": {
                      "title": "Max Concurrency",
                      "anyOf": [
                        {
                          "type": "integer"
                        },
                        {
                          "type": "null"
                        }
                      ]
                    },
                    "recursion_limit": {
                      "type": "integer",
                      "title": "Recursion Limit"
                    }
                  },
                  "type": "object",
                  "description": "Configuration for a Runnable."
                }
              },
              "properties": {
                "config": {
                  "anyOf": [
                    {
                      "$ref": "#/$defs/RunnableConfig"
                    },
                    {
                      "type": "null"
                    }
                  ]
                },
                "input": {
                  "anyOf": [
                    {
                      "type": "string"
                    },
                    {
                      "type": "object"
                    }
                  ]
                }
              },
              "type": "object"
            }
          },
          {
            "name": "register_feedback",
            "api_mode": "",
            "description": "Collect and log feedback.",
            "parameters": {
              "required": [
                "feedback"
              ],
              "properties": {
                "feedback": {
                  "type": "object"
                }
              },
              "type": "object"
            }
          },
          {
            "name": "stream_query",
            "api_mode": "stream",
            "description": "Stream responses from the agent for a given input.",
            "parameters": {
              "required": [
                "input"
              ],
              "$defs": {
                "RunnableConfig": {
                  "title": "RunnableConfig",
                  "properties": {
                    "callbacks": {
                      "title": "Callbacks",
                      "anyOf": [
                        {
                          "items": {},
                          "type": "array"
                        },
                        {},
                        {
                          "type": "null"
                        }
                      ]
                    },
                    "run_id": {
                      "title": "Run Id",
                      "anyOf": [
                        {
                          "type": "string",
                          "format": "uuid"
                        },
                        {
                          "type": "null"
                        }
                      ]
                    },
                    "run_name": {
                      "type": "string",
                      "title": "Run Name"
                    },
                    "configurable": {
                      "type": "object",
                      "title": "Configurable"
                    },
                    "metadata": {
                      "type": "object",
                      "title": "Metadata"
                    },
                    "tags": {
                      "items": {
                        "type": "string"
                      },
                      "type": "array",
                      "title": "Tags"
                    },
                    "max_concurrency": {
                      "title": "Max Concurrency",
                      "anyOf": [
                        {
                          "type": "integer"
                        },
                        {
                          "type": "null"
                        }
                      ]
                    },
                    "recursion_limit": {
                      "type": "integer",
                      "title": "Recursion Limit"
                    }
                  },
                  "type": "object",
                  "description": "Configuration for a Runnable."
                }
              },
              "properties": {
                "config": {
                  "anyOf": [
                    {
                      "$ref": "#/$defs/RunnableConfig"
                    },
                    {
                      "type": "null"
                    }
                  ]
                },
                "input": {
                  "anyOf": [
                    {
                      "type": "string"
                    },
                    {
                      "type": "object"
                    }
                  ]
                }
              },
              "type": "object"
            }
          }
        ]
      },
      "createTime": "xxxx",
      "updateTime": "xxxxxx",
      "description": "This is a sample custom application in Agent Engine that uses LangGraph"
    }
  ]
}
ちゃんとデプロイされたっぽい
AI Agent EngineにデプロイされたAI Agentを試す
さっきのPlaygroundを利用して試してみる
make playground
立ち上げてサイドメニューのAgent TypeをRemote Agent Engine IDにするとデプロイしたAgent EngineのIDが設定されている優秀
そのまま使ってみる
ちゃんとRemote App経由で動いているっぽい経過が出てる
trace
Cloud Traceに実行した結果が入っているはずなので見てみる
ちゃんと入っているっぽい
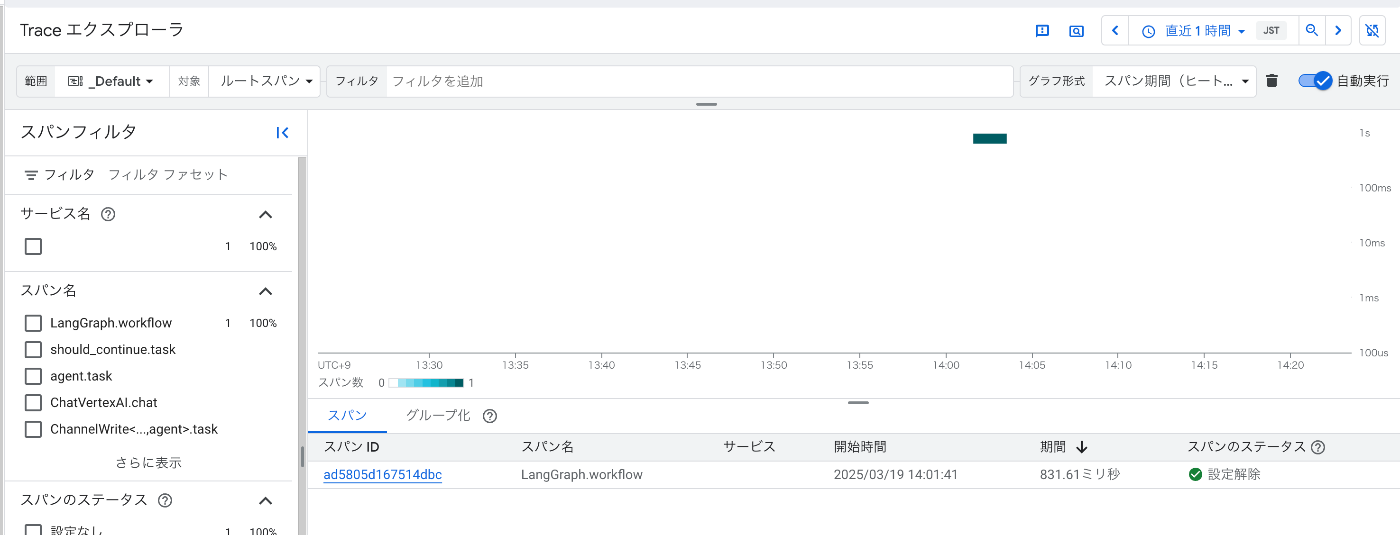
AI Agentの動きの流れ(LangGraphの流れ)がわかる
ただAttributeに入力したメッセージが入っているけど、encodeされてしまってるので、そこは行けてない
どうにかできるのかしら...

このあたりはちゃんとLangSmithやLangfuseなどAI Agent専用のプロダクトを利用したほうがいいかもしれない
その他
AI Agentの削除や、プロジェクトのクリーンアップ系のスクリプトは用意されてないので自分でやる必要がある
Agent Engineの削除は以下のコードでできる
remote_agent.delete()
なのでapp/agent_engine_app.py に以下のコードを追加する
# 以下を追加
def delete_agent_engine_app(
    project: str,
    location: str,
    agent_name: str | None = None
):
    vertexai.init(project=project, location=location)
    existing_agents = reasoning_engines.ReasoningEngine.list(
        filter=f"display_name={agent_name}"
    )
    if existing_agents:
        logging.info(f"Delete existing agent: {agent_name}")
        existing_agents[0].delete()
        return
    else:
        logging.error(f"Agent not found agent: {agent_name}")
        return
で argparseの設定に以下を足す
parser.add_argument('--delete', action='store_true')
あとはdeleteを呼び出すように修正
    # ここをprintの前に追加
    if args.delete:
        print(f"""
        ╔═══════════════════════════════════════════════════════════╗
        ║                                                           ║
        ║   🤖 DELETING AGENT TO VERTEX AI AGENT ENGINE 🤖           ║
        ║                                                           ║
        ╚═══════════════════════════════════════════════════════════╝
        """)

        delete_agent_engine_app(
            project=args.project,
            location=args.location,
            agent_name=args.agent_name
        )
通常のdeployコードは elseに入れておく __main__の全体像は 以下
if __name__ == "__main__":
    import argparse

    parser = argparse.ArgumentParser(description="Deploy or delete agent engine app to Vertex AI")
    parser.add_argument(
        "--project",
        default=None,
        help="GCP project ID (defaults to application default credentials)",
    )
    parser.add_argument(
        "--location", default="us-central1", help="GCP region (defaults to us-central1)"
    )
    parser.add_argument(
        "--agent-name",
        default="ai-agent-starter-pack-sandbox",
        help="Name for the agent engine",
    )
    parser.add_argument(
        "--requirements-file",
        default=".requirements.txt",
        help="Path to requirements.txt file",
    )
    parser.add_argument(
        "--extra-packages",
        nargs="+",
        default=["./app"],
        help="Additional packages to include",
    )
    parser.add_argument(
        "--set-env-vars",
        help="Comma-separated list of environment variables in KEY=VALUE format",
    )
    parser.add_argument('--delete', action='store_true')
    args = parser.parse_args()

    # Parse environment variables if provided
    env_vars = None
    if args.set_env_vars:
        env_vars = {}
        for pair in args.set_env_vars.split(","):
            key, value = pair.split("=", 1)
            env_vars[key] = value

    if not args.project:
        _, args.project = google.auth.default()

    if args.delete:
        print(f"""
        ╔═══════════════════════════════════════════════════════════╗
        ║                                                           ║
        ║   🤖 DELETING AGENT TO VERTEX AI AGENT ENGINE 🤖           ║
        ║                                                           ║
        ╚═══════════════════════════════════════════════════════════╝
        """)

        delete_agent_engine_app(
            project=args.project,
            location=args.location,
            agent_name=args.agent_name
        )
    else:

        print("""
        ╔═══════════════════════════════════════════════════════════╗
        ║                                                           ║
        ║   🤖 DEPLOYING AGENT TO VERTEX AI AGENT ENGINE 🤖         ║
        ║                                                           ║
        ╚═══════════════════════════════════════════════════════════╝
        """)

        deploy_agent_engine_app(
            project=args.project,
            location=args.location,
            agent_name=args.agent_name,
            requirements_file=args.requirements_file,
            extra_packages=args.extra_packages,
            env_vars=env_vars,
        )
でmakefileにdeleteを追加しておく
delete-backend:
	uv run app/agent_engine_app.py --delete
実行してみる
make delete-backend


        ╔═══════════════════════════════════════════════════════════╗
        ║                                                           ║
        ║   🤖 DELETING AGENT TO VERTEX AI AGENT ENGINE 🤖           ║
        ║                                                           ║
        ╚═══════════════════════════════════════════════════════════╝

INFO:root:Delete existing agent: ai-agent-starter-pack-sandbox
Deleting ReasoningEngine : projects/xxxxxxxxx/locations/us-central1/reasoningEngines/yyyyyyyyyy
ReasoningEngine deleted. . Resource name: projects/xxxxxxxxx/locations/us-central1/reasoningEngines/yyyyyyyyyy
Deleting ReasoningEngine resource: projects/xxxxxxxxx/locations/us-central1/reasoningEngines/yyyyyyyyyy
Delete ReasoningEngine backing LRO: projects/xxxxxxxxx/locations/us-central1/operations/4258735192409112576
ReasoningEngine resource projects/xxxxxxxxx/locations/us-central1/reasoningEngines/yyyyyyyyyy deleted.
削除できた
まとめ
AI Agent Starter Packを利用してAI Agentを作成し、AI Agent Engineへデプロイ/実行、トレースを確認までやってみました。
Agent Starter Packの名の通り、Google CloudでAI Agentを作成する最初の一手としては十分すぎる気がする
特にStreamlitを使った、FrontendアプリケーションはAI Agentを作ろうと思うと意外と手作り必要で、面倒だったりする部分だし、CI/CDが最初から定義されている点、Cloud TraceなどのMonitoring周りが作られているところも非常に良い
Google CloudのAI Agent周りは名前がしょっちゅう変わったり、UIがなかったりとまだまだ混迷している感はあるけど、AI Agent元年というぐらいなので、これから揃ってくると思う
Agent Starter Packは少なくともGoogle Cloudの今の現状におけるAI Agentの作成方法を十分に助けてくれるツールになっていると思う