NVIDIA Isaac Sim: LIDARの使用
概要
シミュレーション内でLIDARを作成します。
Issac Simのtutorialに上記の内容が記載されており、この内容に沿って進めます。
実行環境
- インストール実行環境
| unit | specification |
|---|---|
| CPU | i9-11900H |
| GPU | GeForce RTX 3080 Laptop |
| RAM | 32GB |
| OS | Ubuntu 20.04.3 LTS |
- Nvidia Driverバージョン
- 510.39.01
- Issac simバージョン
- 2021.2.1
手順
GUI上からの操作と、Python APIからシーンにLIDARを追加します。
- LIDARの追加(GUI)
- LIDARの追加(Python API)
1. LIADRの追加(GUI)
こちらのページに記載してある手順を進めます。
1.1 OmniverseからIssac Simを起動する

1.2 シーンを作成する
メニューバーのCreate > Physics > Phisics Sceneを選択します。

1.3 LIDARの追加
作成したシーン内に、LIDARを追加します。
メニューバーのCreate > Isaac > Sensors > LIDAR > Rotatingを選択します。

1.4 LIDARの設定
追加したLIDARのプロパティを調整します。
右側にあるStageの中で、追加したLIDARを選択します。
選択した状態で、右下にあるPropertyの中から、次の値を変更します。
- Raw USD Propertiesの”drawLines”にチェックを入れ、enableにする
- Raw USD Propertiesの"rotationRate"を1.0にする

この状態で、Viewportの左側のPLAYボタンを押すと、LIDARが回転します。
また、Raw USD Propertiesの"rotationRate"を0.0にすると、全方向にLIDARのレーザが出力される状態になります。

1.5 オブジェクトの追加
LIDARセンサは、シーン内に存在するオブジェクトの内、CollisionがEnableになっているオブジェクトを認識します。
シーンにオブジェクトを追加し、LIDARで認識できるようにします。
まず、シーンにCubeを追加します。
メニューバーのCreate > Mesh > Cubeを選択します。

右側にあるStageの中で、追加したCubeを選択します。
選択した状態で、右下にあるPropertyの中から、次の値を変更します。
- TransformのtranslateのXを200にする
- TransformのtranslateのYを0にする
- TransformのtranslateのZを0にする

右下のPropertyの”+Add”をクリックし、Physics > Colliderを選択します。
選択すると、オブジェクトにCollisionのプロパティが追加されます。

この状態で、Viewportの左側のPLAYボタンを押すと、CubeにLIDARのレーザが照射された状態になります。

1.6 オブジェクトにLIDARをアタッチする
CylinderにLIADRをアタッチします。
Viewport内で右クリックし、Create > Mesh > Cylinderを選択します。

右側にあるStageの中で、追加したCylinderを選択します。
選択した状態で、右下にあるPropertyの中から、次の値を変更します。
- TransformのtranslateのXを0にする
- TransformのtranslateのYを0にする
- TransformのtranslateのZを0にする

右側のStageタブの中で、LIDARを選択し、Cylinderの下にドラッグアンドドロップで移動させます。

次に、CylindarとLIDARの相対位置を変更します。
右側にあるStageの中で、LIDARを選択します。
選択した状態で、右下にあるPropertyの中から、次の値を変更します。
- TransformのtranslateのXを50にする
- TransformのtranslateのYを50にする
- TransformのtranslateのZを0にする

この状態で、Viewportの左側のPLAYボタンを押し、Cylindarを移動させると、相対位置を保ったままLIDARも移動します。

1.7 ロボットにLIDARをアタッチする
前項と同じ手順でロボットにLIDARをアタッチします。
今回は、CarterのExampleを使用し、CarterにLIDARをアタッチします。
メニューバーのIsaac Examples > Import Robots > Carter URDFを選択します。

メニューバーのCreate > Isaac > Sensors > LIDAR > Rotatingを選択します

右側のStageタブの中で、LIDARを選択し、/carter/chassis_linkrの下にドラッグアンドドロップで移動させます。

右側にあるStageの中で、LIDARを選択します。
選択した状態で、右下にあるPropertyの中から、次の値を変更します。
- Raw USD Propertiesの”drawLines”にチェックを入れ、enableにする
- Raw USD Propertiesの"rotationRate"を0.0にする

この状態で、Viewportの左側のPLAYボタンを押し、Carterが移動し、LIDARはレーザを照射します。

2. LIDARの追加(Python API)
2.1 LIADRの追加
Python APIから、LIDARを使用します。
メニューバーのFile > Newを選択します。
次に、メニューバーのWindow > Script Editorを選択します。

Script Editorに次の内容を記述します。
import omni
import asyncio
from omni.isaac.range_sensor import _range_sensor
from pxr import UsdGeom, Gf, UsdPhysics

stage = omni.usd.get_context().get_stage()
lidarInterface = _range_sensor.acquire_lidar_sensor_interface()
timeline = omni.timeline.get_timeline_interface()

omni.kit.commands.execute('AddPhysicsSceneCommand',stage = stage, path='/World/PhysicsScene')
lidarPath = "/LidarName"
result, prim = omni.kit.commands.execute(
            "RangeSensorCreateLidar",
            path=lidarPath,
            parent="/World",
            min_range=0.4,
            max_range=100.0,
            draw_points=False,
            draw_lines=True,
            horizontal_fov=360.0,
            vertical_fov=30.0,
            horizontal_resolution=0.4,
            vertical_resolution=4.0,
            rotation_rate=0.0,
            high_lod=False,
            yaw_offset=0.0,
            enable_semantics=False
        )

CubePath = "/World/CubeName"
cubeGeom = UsdGeom.Cube.Define(stage, CubePath)
cubePrim = stage.GetPrimAtPath(CubePath)
cubeGeom.AddTranslateOp().Set(Gf.Vec3f(200.0, 0.0, 0.0))
cubeGeom.CreateSizeAttr(100)
collisionAPI = UsdPhysics.CollisionAPI.Apply(cubePrim)

async def get_lidar_param():
    await omni.kit.app.get_app().next_update_async()
    timeline.pause()
    depth = lidarInterface.get_linear_depth_data("/World"+lidarPath)
    zenith = lidarInterface.get_zenith_data("/World"+lidarPath)
    azimuth = lidarInterface.get_azimuth_data("/World"+lidarPath)

    print("depth", depth)
    print("zenith", zenith)
    print("azimuth", azimuth)

timeline.play()
asyncio.ensure_future(get_lidar_param())
記述後、Ctrl+Enterを押すとScriptが実行され、シーン内にLIADRが追加されます。

2.2 PointCloudのSegmentaiton
Depthデータにsematinc labelを追加し、segmentationの結果をPointCloudとして表示させることが可能です。
Script Editorに次の内容を記述します。
import omni                                                     # Provides the core omniverse apis
import asyncio                                                  # Used to run sample asynchronously to not block rendering thread
from omni.isaac.range_sensor import _range_sensor               # Imports the python bindings to interact with lidar sensor
from pxr import UsdGeom, Gf, UsdPhysics                         # pxr usd imports used to create cube

stage = omni.usd.get_context().get_stage()                      # Used to access Geometry
timeline = omni.timeline.get_timeline_interface()               # Used to interact with simulation
lidarInterface = _range_sensor.acquire_lidar_sensor_interface() # Used to interact with the LIDAR

# These commands are the Python-equavalent of the first half of this tutorial
omni.kit.commands.execute('AddPhysicsSceneCommand',stage = stage, path='/World/PhysicsScene')
lidarPath = "/LidarName"
# Create lidar prim
result, prim = omni.kit.commands.execute(
            "RangeSensorCreateLidar",
            path=lidarPath,
            parent="/World",
            min_range=0.4,
            max_range=100.0,
            draw_points=True,
            draw_lines=False,
            horizontal_fov=360.0,
            vertical_fov=60.0,
            horizontal_resolution=0.4,
            vertical_resolution=0.4,
            rotation_rate=0.0,
            high_lod=True,
            yaw_offset=0.0,
            enable_semantics=True
        )
UsdGeom.XformCommonAPI(prim).SetTranslate((200.0, 0.0, 0.0))

# Create a cube, sphere, add collision and different semantic labels
primType = ["Cube", "Sphere"]
for i in range(2):
    prim = stage.DefinePrim("/World/"+primType[i], primType[i])
    UsdGeom.XformCommonAPI(prim).SetTranslate((-200.0, -200.0 + i * 400.0, 0.0))
    UsdGeom.XformCommonAPI(prim).SetScale((100, 100, 100))
    collisionAPI = UsdPhysics.CollisionAPI.Apply(prim)

    # Add semantic label
    sem = Semantics.SemanticsAPI.Apply(prim, "Semantics")
    sem.CreateSemanticTypeAttr()
    sem.CreateSemanticDataAttr()
    sem.GetSemanticTypeAttr().Set("class")
    sem.GetSemanticDataAttr().Set(primType[i])

# Get point cloud and semantic id for lidar hit points
async def get_lidar_param():
    await asyncio.sleep(1.0)
    timeline.pause()
    pointcloud = lidarInterface.get_point_cloud_data("/World"+lidarPath)
    semantics = lidarInterface.get_semantic_data("/World"+lidarPath)

    print("Point Cloud", pointcloud)
    print("Semantic ID", semantics)

timeline.play()
asyncio.ensure_future(get_lidar_param())
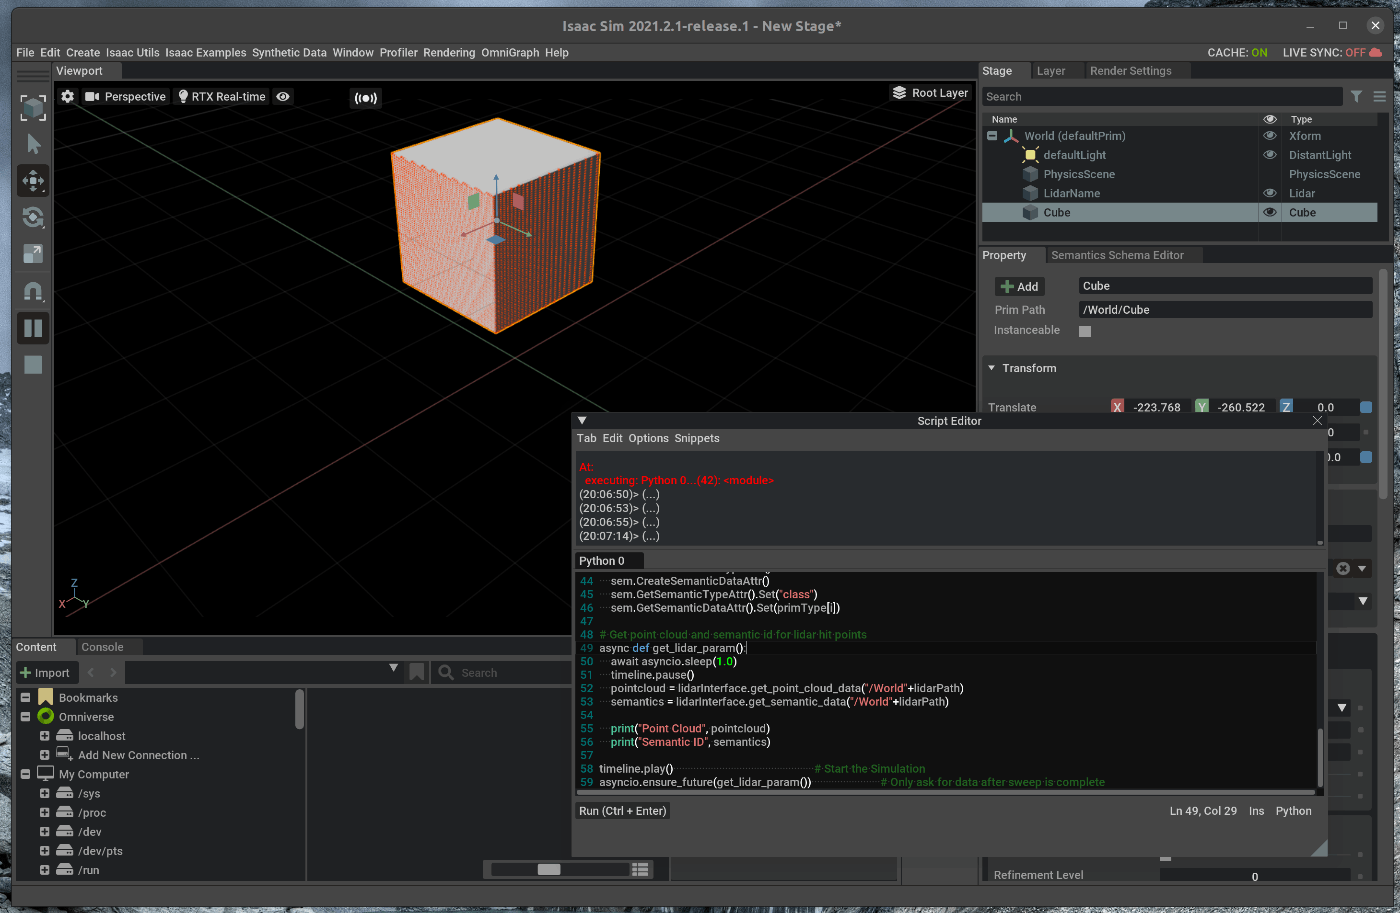
記述後、Ctrl+Enterを押すとScriptが実行され、Cubeの表面にPointCloudが表示されます。
Discussion