🐖
ChatGPTだけでディレクトリやファイル等も含むサイト生成🌾🐖
ChatGPTを活用したディレクトリやファイル等も含む、Webサイト自動生成の手順
🎯 目的
ChatGPTにWebサイトの制作を依頼し、ローカル環境で自動的にディレクトリやファイルを生成する仕組みを構築する。
「PythonファイルをChatGPTのアプリで編集できるのであれば、そのファイルの変更を監視し、編集が行われた際に自動でそのファイルを実行して、ディレクトリやファイルを生成するコードを記述すればChatGPTだけで完結するのではないか、という考えです。」
🖥️ 環境
- OS: macOS
- 使用アプリケーション:
- ChatGPT(デスクトップアプリ)
- PyCharm(Python開発用IDE)
🛠️ 必要ファイル
以下の2つのPythonファイルを作成します:
1. watcher.py
-
概要:
watchdogライブラリを使用し、exe.pyの変更を監視。 -
役割:
exe.pyが更新されると、自動的にそれを実行。
2. exe.py
- 概要: ChatGPTが生成したWebサイト構築用コードを書き込むファイル。
- 役割: WebディレクトリやHTMLなどの生成処理を記述。
🔁 動作の流れ
- PyCharmで新しいPythonプロジェクトを作成。
-
watcher.pyとexe.pyの2ファイルを用意。 - ChatGPTにサイト生成コードを依頼し、その内容を
exe.pyにコピー&保存。 -
watcher.pyがexe.pyの変更を検知。 - 自動的に
exe.pyが実行され、指定されたディレクトリ構成やファイルが生成される。
💡 補足
ChatGPTのアプリケーションは、ユーザーのローカルファイルを操作できるため、このような連携が可能です。Web制作の自動化やディレクトリ構成の整備を、対話形式で進められるのが特長です。
✏️実際のコード
- wacher.py
from watchdog.observers import Observer
from watchdog.events import FileSystemEventHandler
import time
import subprocess
import os

WATCH_FILE = "exe.py"  # 監視するファイル
COMMAND = ["python", "exe.py"]  # 実行するPythonスクリプト

class FileChangeHandler(FileSystemEventHandler):
    def on_modified(self, event):
        if event.src_path.endswith(WATCH_FILE):
            print(f"{WATCH_FILE} が更新されました。スクリプトを実行します。")
            subprocess.run(COMMAND)

if __name__ == "__main__":
    path = os.path.dirname(os.path.abspath(WATCH_FILE))
    event_handler = FileChangeHandler()
    observer = Observer()
    observer.schedule(event_handler, path=path, recursive=False)
    observer.start()
    print(f"{WATCH_FILE} の監視を開始します...")

    try:
        while True:
            time.sleep(1)
    except KeyboardInterrupt:
        observer.stop()
    observer.join()
-
exe.py
空で良い。 -
プロンプト
下記のプロンプトを見て順次実行するpythonプログラムをexe.pyに書いてください

以下の要件をすべて満たす Python スクリプト `exe.py` のコードを生成してください。
レイアウトを今風のモダンなbootstrap5を使ったオシャレなサイトデザインで生成してください。

1. **フォルダ作成**
   ルートに `css/`、`js/`、`img/`、`videos/` を自動で作成する。

2. **ライブラリ自動インストール**
   - `opencv-python` と `numpy` がインポートに失敗したら自動で `pip install opencv-python numpy` を行い、再度インポートを試みる。失敗時は動画はダミー(空ファイル)を生成する。
   - ※Excel出力は不要のため `pandas` 等は不要。

3. **CSS生成(`css/style.css`)**
   - Google Fonts “Inter” を読み込み。
   - CSS変数によるカラーパレット(primary, accent, bg)設定。
   - ヘッダー:sticky、左右ナビメニュー、ホワイトバック、ドロップシャドウ。
   - ヒーロー:動画背景を敷き、グリッド中央配置、高さ80vh。
   - ヒーロー見出し:タイピング+点滅アニメーション。
   - CTAボタン:accent色、ホバーで浮くアニメ。
   - セクション見出し:左ボーダー、フォントサイズ2rem。
   - 制作実績カード:グリッド、カードホバー浮上、ポップインアニメ(staggered)。
   - フェードイン:スクロール検知で要素を下からフェードアップ。
   - レスポンシブ対応(600px以下でヘッダー縦並び・ヒーロー高さ60vh)。

4. **JavaScript生成(`js/app.js`)**
   - `.html` へのリンククリックをスムースに遷移。
   - IntersectionObserver で `.fade-in` 要素に `.visible` を付与。
   - 制作実績カードに CSS変数 `--i` をセットして staggered pop-in。

5. **ダミー画像生成**
   - `img/work1.jpg`〜`work3.jpg` を空ファイルで生成。

6. **動画生成**
   - OpenCV が使える場合、左右グラデーションが5秒間動く `videos/hero.mp4` を生成。
   - 使えない場合は空の `videos/hero.mp4` を生成。

7. **HTMLファイル自動生成**
   ルート直下に以下5ファイルを出力:
   - **共通ヘッダー**:
     ```html
     <header>
       <h1>TestSite<span style="display:block;font-size:0.7em;font-weight:400;">テストサイト</span></h1>
       <nav>
         <a href="index.html">トップ</a>
         <a href="about.html">私たちについて</a>
         <a href="services.html">サービス</a>
         <a href="works.html">制作実績</a>
         <a href="contact.html">お問い合わせ</a>
       </nav>
     </header>
     ```
   - **index.html**:Hero動画背景+各セクション(`hero`/`about`/`services`/`works`/`contact`、すべて `class="fade-in"`)+制作実績カードグリッド+フッター
   - **about.html**, **services.html**, **works.html**, **contact.html**:本体は `<main><section class="fade-in">`+見出し+ダミーテキスト+フッター。

8. **完了メッセージ**
   最後に実行した**現在時刻**を
   ```python
   print(f"生成完了: {datetime.now().strftime('%Y-%m-%d %H:%M:%S')}")
- 実際に出力されたexe.py
#!/usr/bin/env python3
import os
import sys
import subprocess
from pathlib import Path
from datetime import datetime
# 1. フォルダ作成
for d in ('css', 'js', 'img', 'videos'):
Path(d).mkdir(exist_ok=True, parents=True)
# 2. ライブラリ自動インストール&インポート
def try_import(name):
try:
return __import__(name)
except ImportError:
return None
cv2 = try_import('cv2')
np = try_import('numpy')
if cv2 is None or np is None:
subprocess.check_call([sys.executable, '-m', 'pip', 'install', 'opencv-python', 'numpy'])
cv2 = try_import('cv2')
np = try_import('numpy')
opencv_available = (cv2 is not None and np is not None)
# 3. CSS生成 (css/style.css)css = """@import url('https://fonts.googleapis.com/css2?family=Inter:wght@400;600&display=swap');
:root {
--primary: #0d6efd; --accent: #6610f2; --bg: #f8f9fa;}
body {
background: var(--bg); font-family: 'Inter', sans-serif; margin: 0; padding: 0;}
/* Hero */
.hero {
position: relative; height: 80vh; background: #ccc; display: grid; place-items: center; overflow: hidden;}
.hero video {
position: absolute; inset: 0; width: 100%; height: 100%; object-fit: cover;}
.hero .content {
position: relative; z-index: 1; text-align: center; color: #fff;}
.hero h1 {
font-size: 3rem; white-space: nowrap; border-right: .15em solid var(--accent); overflow: hidden; animation: typing 3.5s steps(30), blink .75s step-end infinite;}
@keyframes typing { from { width: 0 } to { width: 100% } }
@keyframes blink { 50% { border-color: transparent } }
/* CTA Button */
.btn-accent {
background: var(--accent); color: #fff; transition: transform .3s;}
.btn-accent:hover {
transform: translateY(-5px);}
/* Section Heading */
section h2 {
border-left: 4px solid var(--primary); padding-left: .5rem; font-size: 2rem; margin: 2rem 0 1rem;}
/* Cards */
.cards {
display: grid; grid-template-columns: repeat(auto-fit, minmax(200px,1fr)); gap: 1rem;}
.card {
background: #fff; border-radius: .5rem; box-shadow: 0 2px 5px rgba(0,0,0,0.1); transform: translateY(20px); opacity: 0; animation: popin .5s forwards;}
.card:hover {
transform: translateY(-5px);}
@keyframes popin { to { transform: translateY(0); opacity: 1; } }
/* Fade-in */
.fade-in {
opacity: 0; transform: translateY(20px); transition: all .6s ease-out;}
.fade-in.visible {
opacity: 1; transform: translateY(0);}
@media (max-width:600px) {
.navbar { flex-direction: column !important; } .hero { height: 60vh; }}
"""
Path('css/style.css').write_text(css, encoding='utf-8')
# 4. JavaScript生成 (js/app.js)js = """// Smooth scroll to HTML pages
document.querySelectorAll('a[href$=".html"]').forEach(a => {
a.addEventListener('click', e => { e.preventDefault(); document.querySelector(a.getAttribute('href')) .scrollIntoView({ behavior: 'smooth' }); });});
// IntersectionObserver for fade-in
const observer = new IntersectionObserver(entries => {
entries.forEach(entry => { if (entry.isIntersecting) entry.target.classList.add('visible'); });}, { threshold: 0.1 });
document.querySelectorAll('.fade-in').forEach(el => observer.observe(el));
// Staggered pop-in for cards
document.querySelectorAll('.card').forEach((card, i) => {
card.style.setProperty('--i', i); card.style.animationDelay = `${i * 0.2}s`;});
"""
Path('js/app.js').write_text(js, encoding='utf-8')
# 5. ダミー画像生成
for i in range(1, 4):
Path(f'img/work{i}.jpg').touch()
# 6. 動画生成
video_file = Path('videos/hero.mp4')
if opencv_available:
import cv2
import numpy as np
w, h, fps, duration = 640, 360, 30, 5
fourcc = cv2.VideoWriter_fourcc(*'mp4v')
out = cv2.VideoWriter(str(video_file), fourcc, fps, (w, h))
for f in range(fps * duration):
t = f / (fps * duration)
grad = np.linspace(0, 1, w)
frame = np.tile(grad, (h, 1))
frame = np.dstack([
(frame * 255 * (1 - t)).astype('uint8'),
(frame * 255 * t).astype('uint8'),
np.zeros_like(frame, dtype='uint8')
])
out.write(frame)
out.release()
else:
video_file.touch()
# 共通ヘッダーとフッター
header_html = """<header class="sticky-top bg-white shadow-sm">
<nav class="navbar navbar-expand-lg navbar-light container"> <a class="navbar-brand" href="index.html">TestSite<br><small>テストサイト</small></a>
<button class="navbar-toggler" type="button" data-bs-toggle="collapse" data-bs-target="#navMenu"> <span class="navbar-toggler-icon"></span> </button> <div class="collapse navbar-collapse" id="navMenu"> <ul class="navbar-nav ms-auto"> <li class="nav-item"><a class="nav-link" href="index.html">トップ</a></li>
<li class="nav-item"><a class="nav-link" href="about.html">私たちについて</a></li>
<li class="nav-item"><a class="nav-link" href="services.html">サービス</a></li>
<li class="nav-item"><a class="nav-link" href="works.html">制作実績</a></li>
<li class="nav-item"><a class="nav-link" href="contact.html">お問い合わせ</a></li>
</ul> </div> </nav></header>"""
footer_html = """<footer class="bg-light text-center py-3">
<small>© 2025 TestSite</small></footer>"""
# HTML生成関数
def make_page(filename, body_content):
html = f"""<!DOCTYPE html>
<html lang="ja">
<head>
<meta charset="UTF-8"> <meta name="viewport" content="width=device-width, initial-scale=1"> <title>{filename.replace('.html', '').title()}</title>
<link href="https://cdn.jsdelivr.net/npm/bootstrap@5.3.0/dist/css/bootstrap.min.css" rel="stylesheet"> <link rel="stylesheet" href="css/style.css"></head>
<body>
{header_html}
<main class="container my-5">
{body_content}
</main>
{footer_html}
<script src="https://cdn.jsdelivr.net/npm/bootstrap@5.3.0/dist/js/bootstrap.bundle.min.js"></script>
<script src="js/app.js"></script>
</body>
</html>"""
Path(filename).write_text(html, encoding='utf-8')
# 7. HTMLファイル自動生成
hero_section = """
<section class="hero fade-in">
<video src="videos/hero.mp4" autoplay muted loop></video> <div class="content"> <h1>Welcome to TestSite</h1> <a href="contact.html" class="btn btn-accent">Get Started</a> </div></section>
"""
sections = ['about', 'services', 'works', 'contact']
cards_html = '<div class="cards">' + ''.join(
f'<div class="card"><img src="img/work{i}.jpg" class="img-fluid"><h3>Work {i}</h3></div>'
for i in range(1, 4)
) + '</div>'
works_section = f'<section class="fade-in"><h2>制作実績</h2>{cards_html}</section>'
body = hero_section
for sec in sections:
if sec == 'works':
body += works_section
else:
body += f'<section class="fade-in"><h2>{sec.title()}</h2><p>ダミーテキスト...</p></section>'
make_page('index.html', body)
for sec in sections:
make_page(f'{sec}.html', f'<section class="fade-in"><h2>{sec.title()}</h2><p>ダミーテキスト...</p></section>')
# 8. 完了メッセージ
print(f"生成完了: {datetime.now().strftime('%Y-%m-%d %H:%M:%S')}")
-
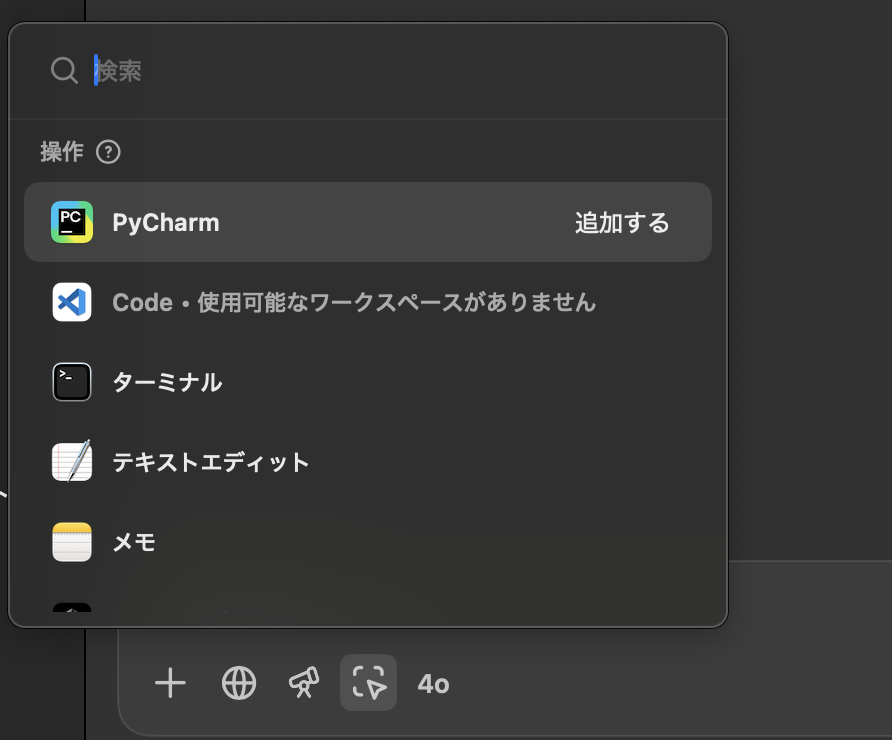
ChatGPTアプリのpycharm操作設定画面(watcher.pyは先に起動しておく)
-
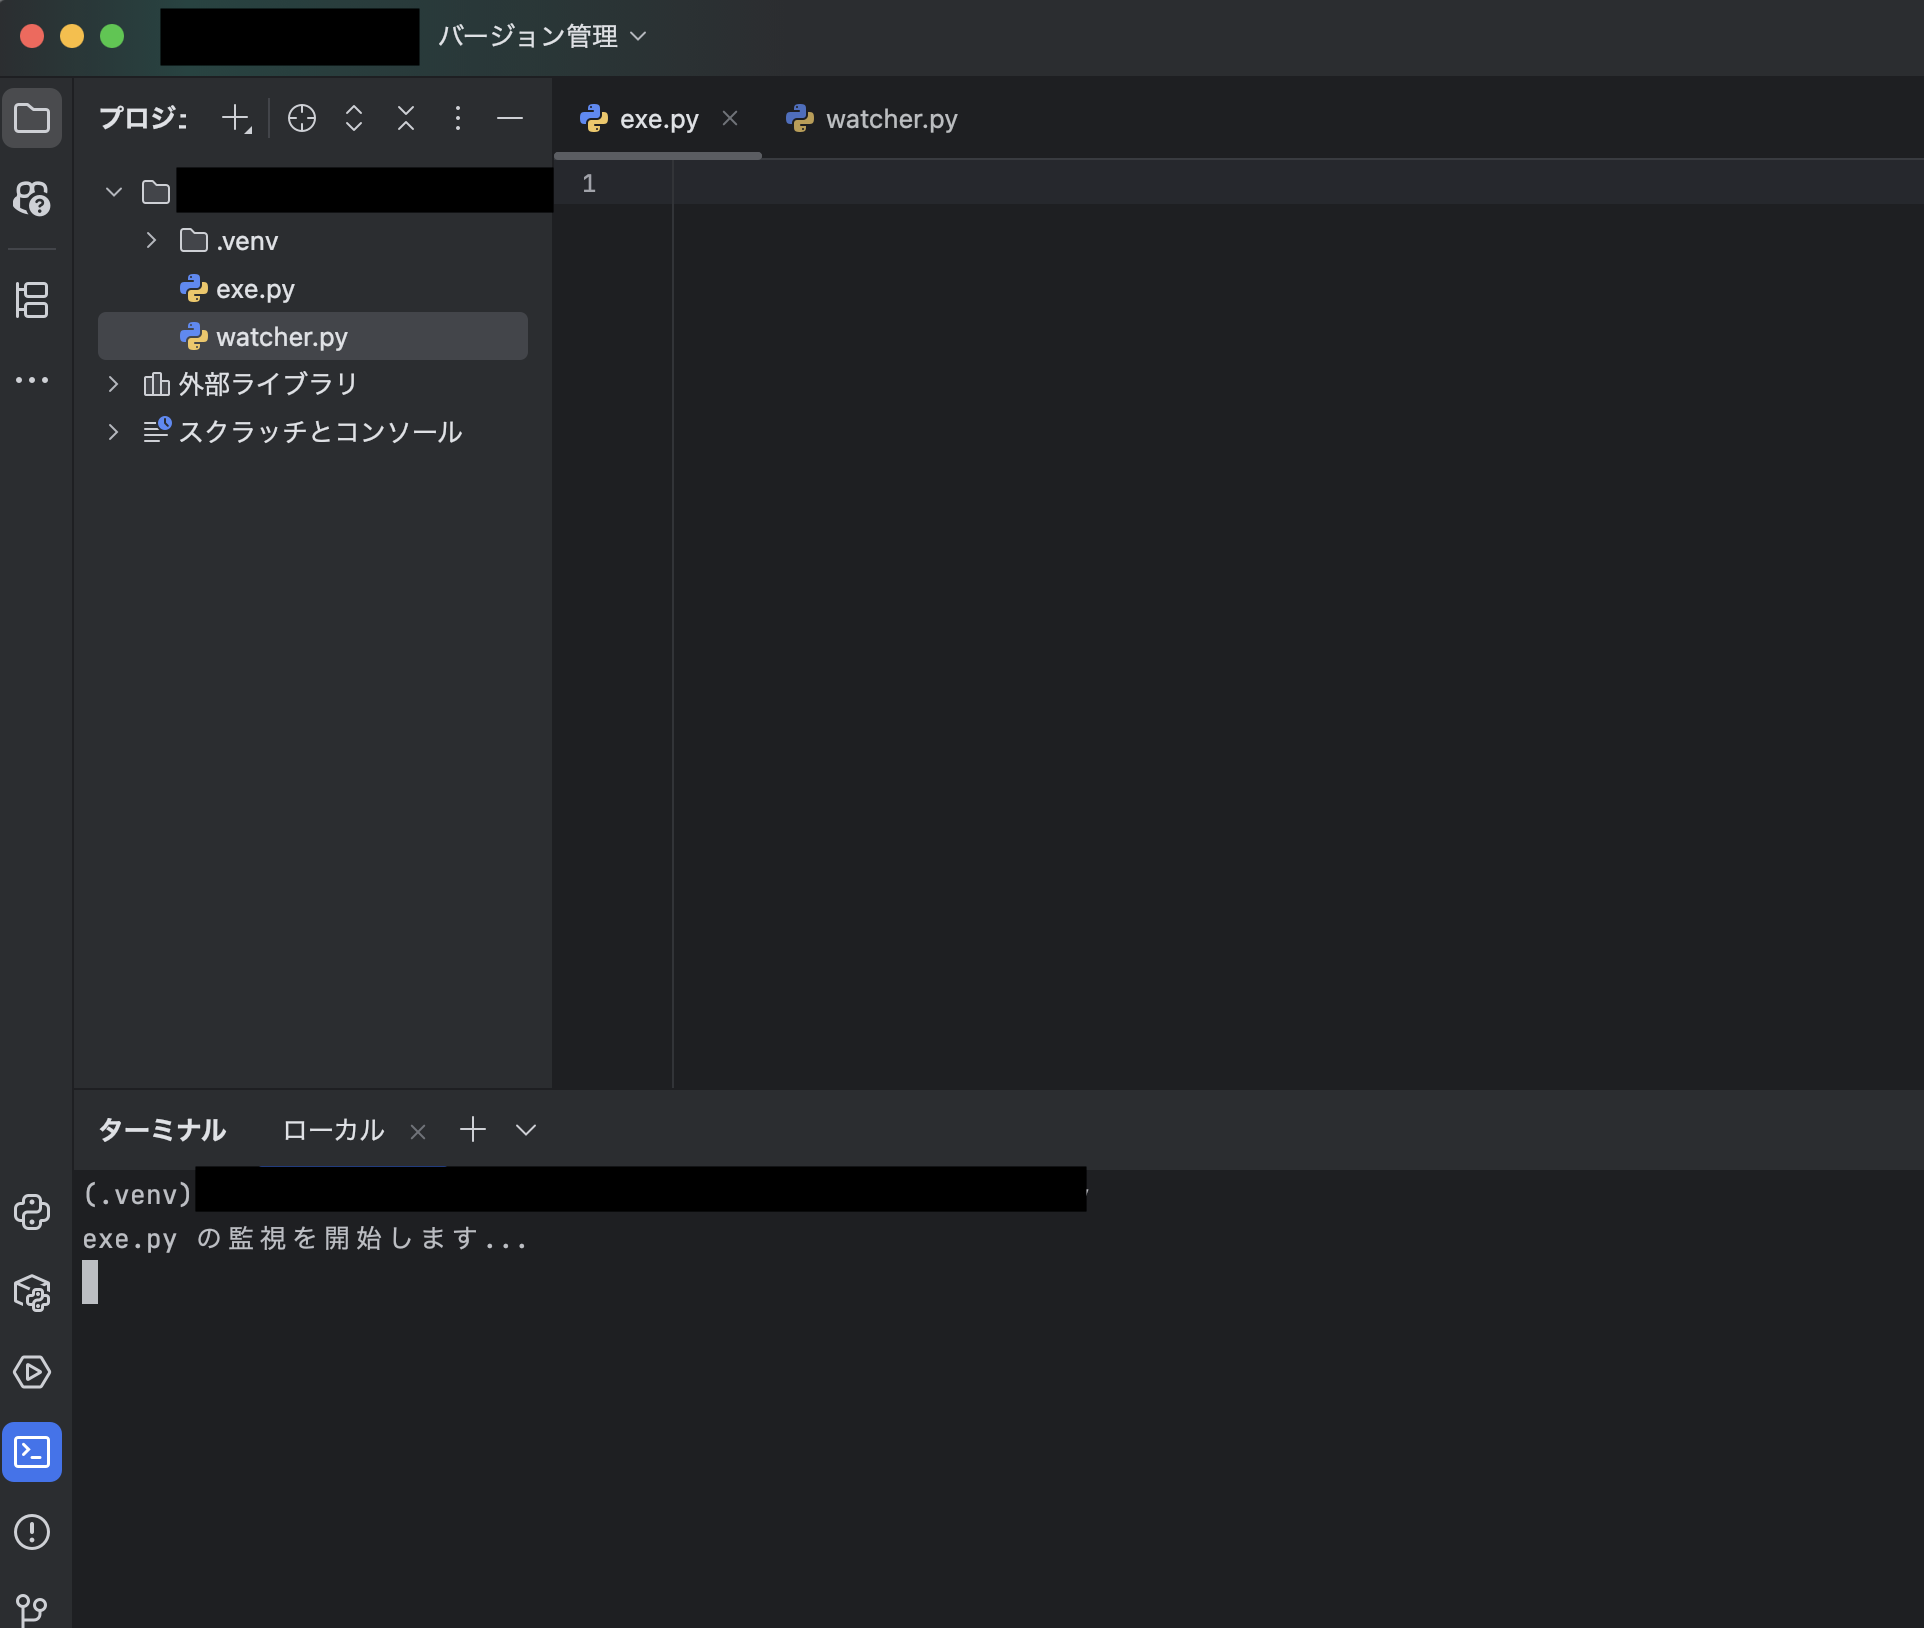
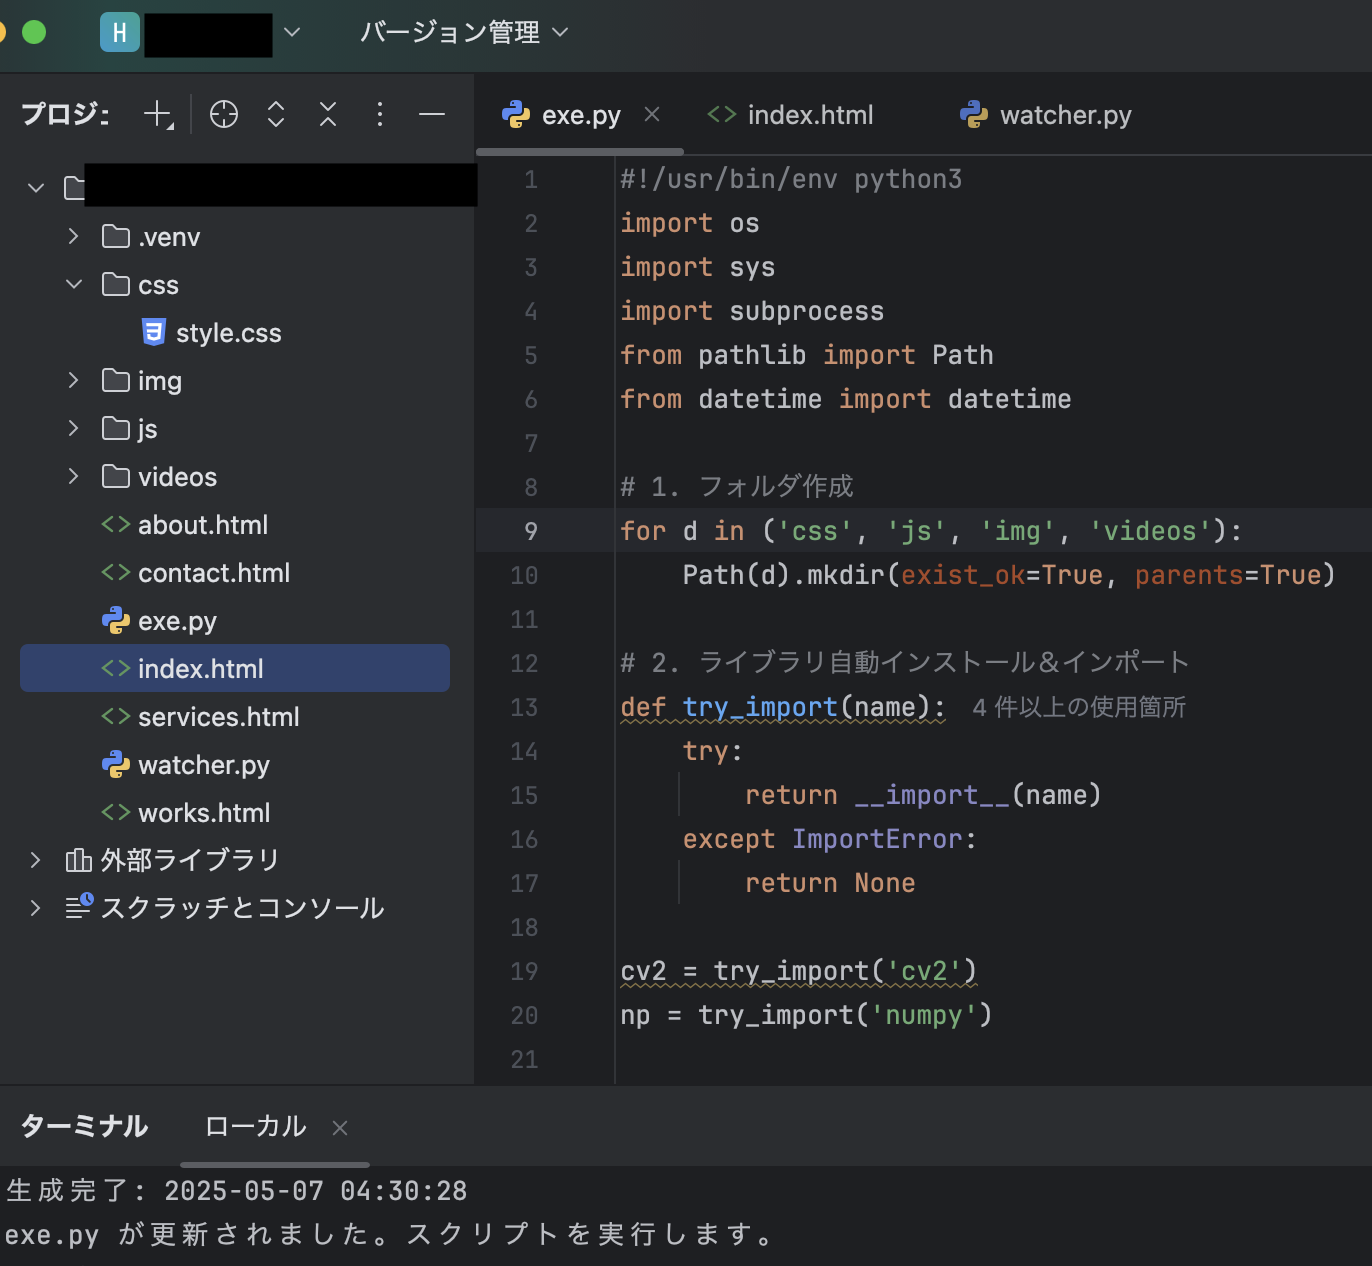
pycharm画面(必ずexe.pyの編集ページを表示)
-
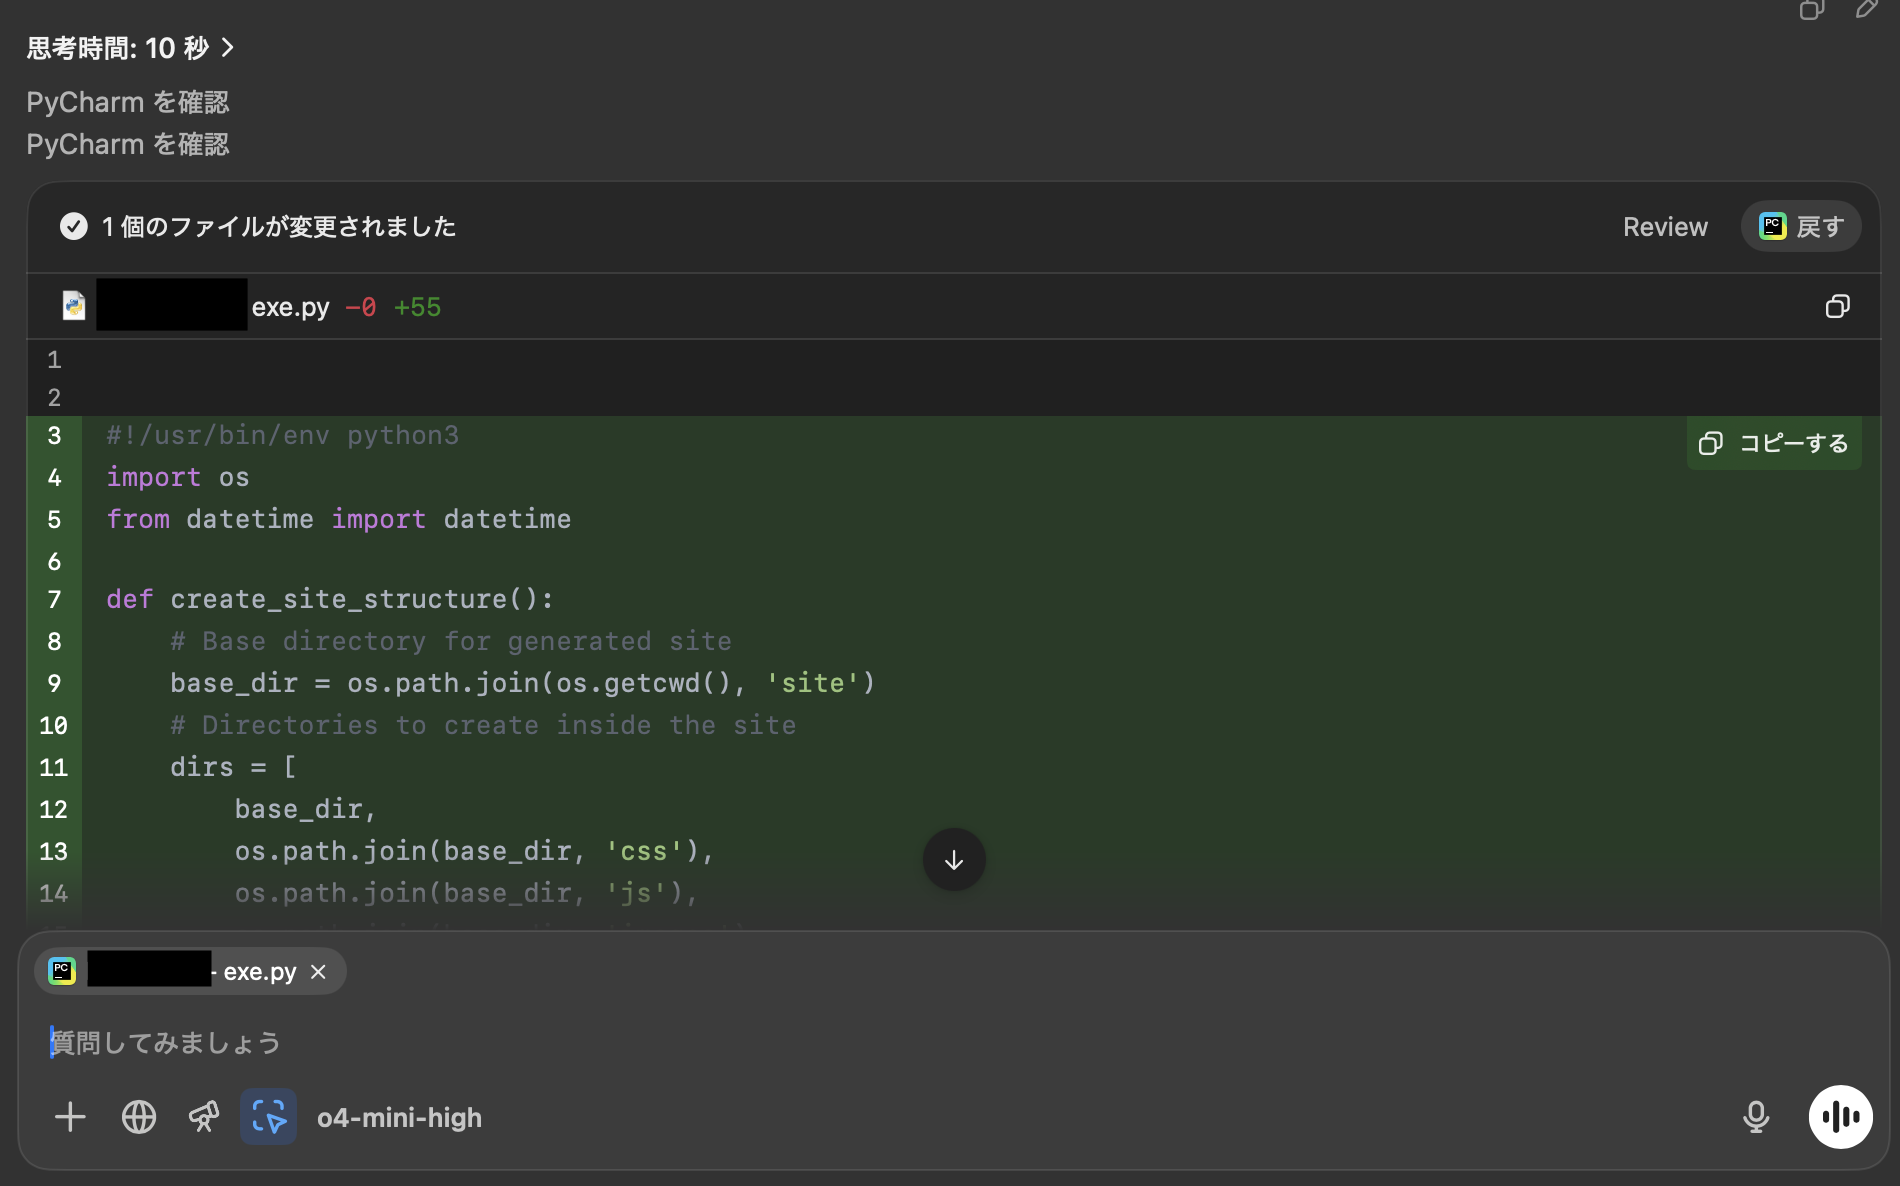
ChatGPTアプリ実行画面(必ずexe.pyが選択されているのを確認)
-
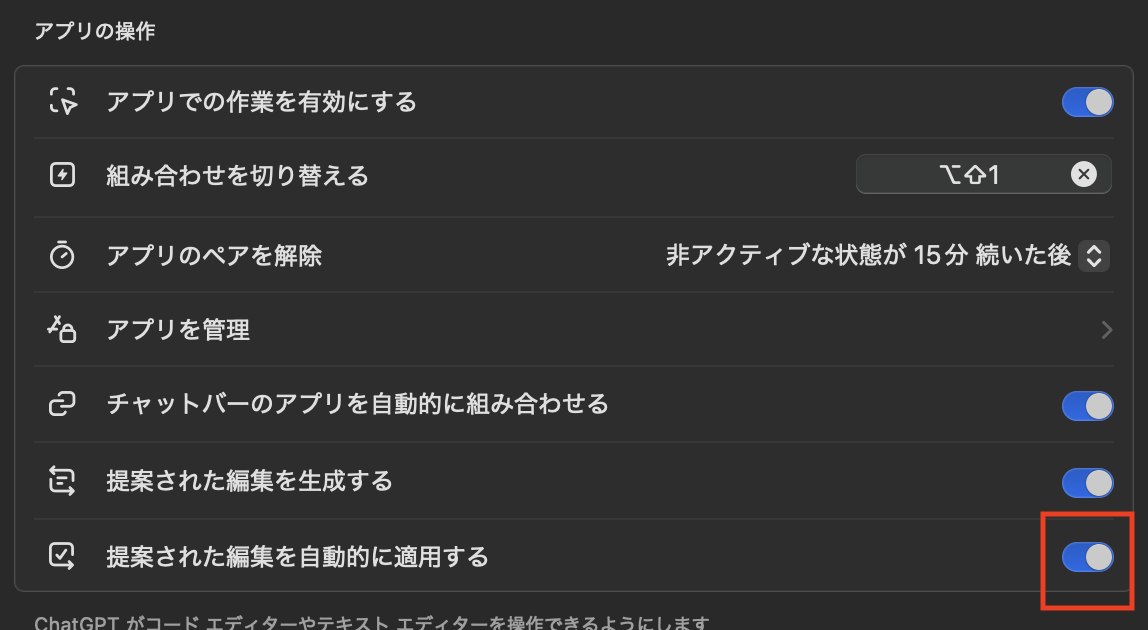
ChatGPTアプリ自動実行設定画面
-
サイト自動生成後構造画面
-
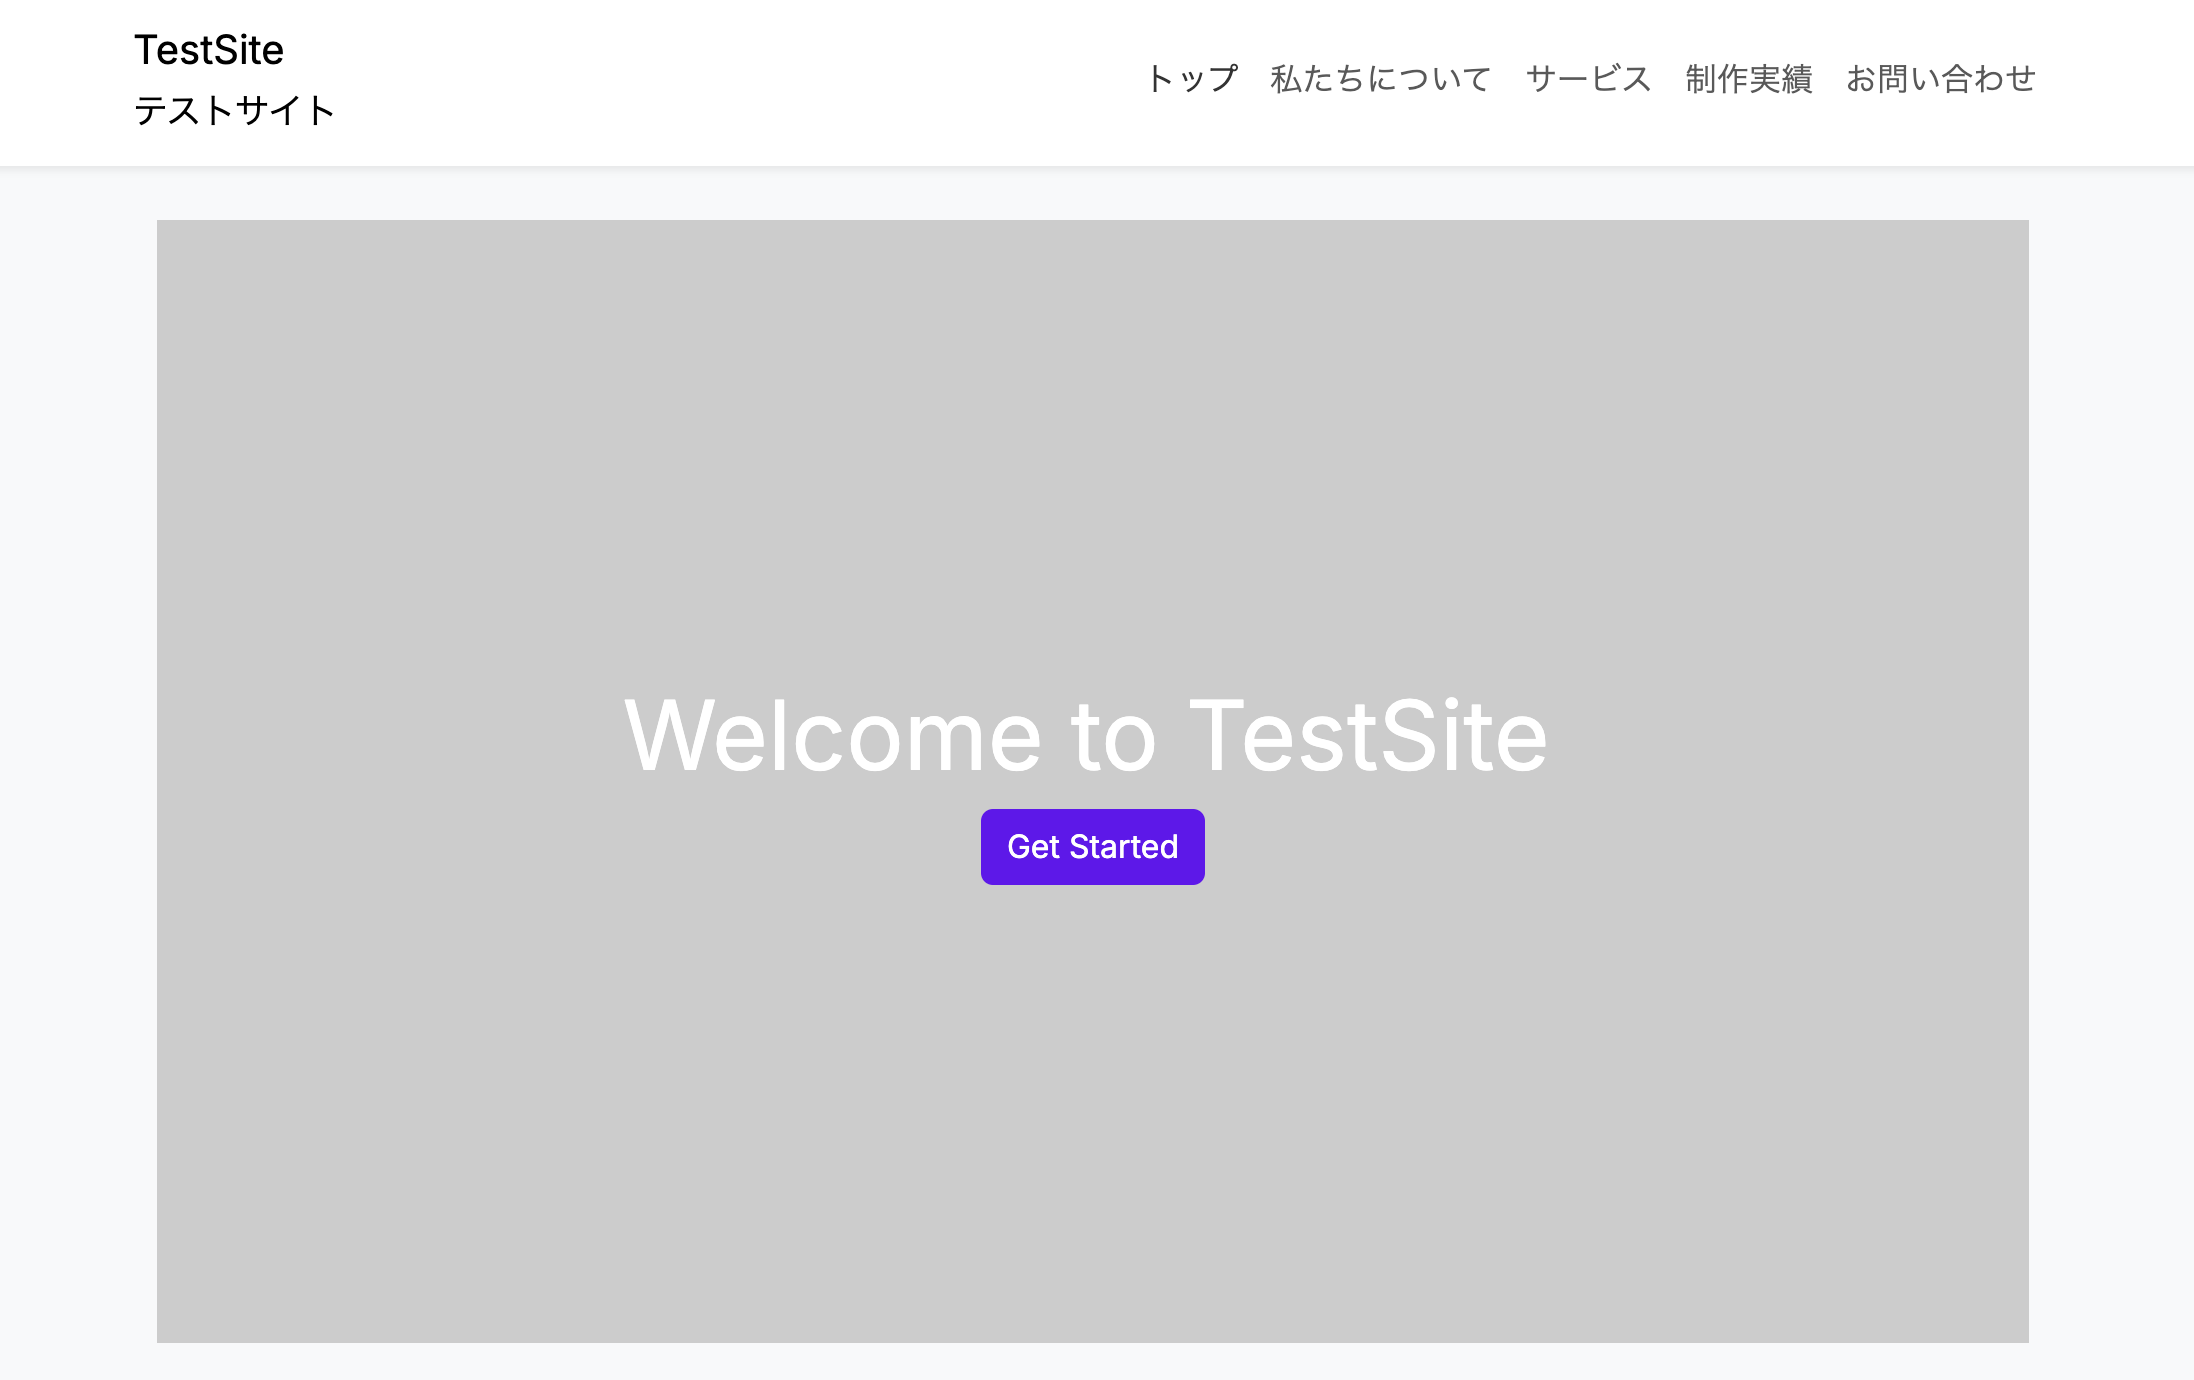
サイト自動生成後のブラウザ表示画面
⚠️ Pycharm以外での操作
理由は分かりませんが自分の環境では、Pycharm以外(CursorやVsCode)では書き換えは可能でしたが自動保存は出来ず各アプリケーションで保存する一手間が必要でした。
Discussion