Vue3+Firebase V9環境におけるStripe Elementsを使ったWeb決済処理の実装


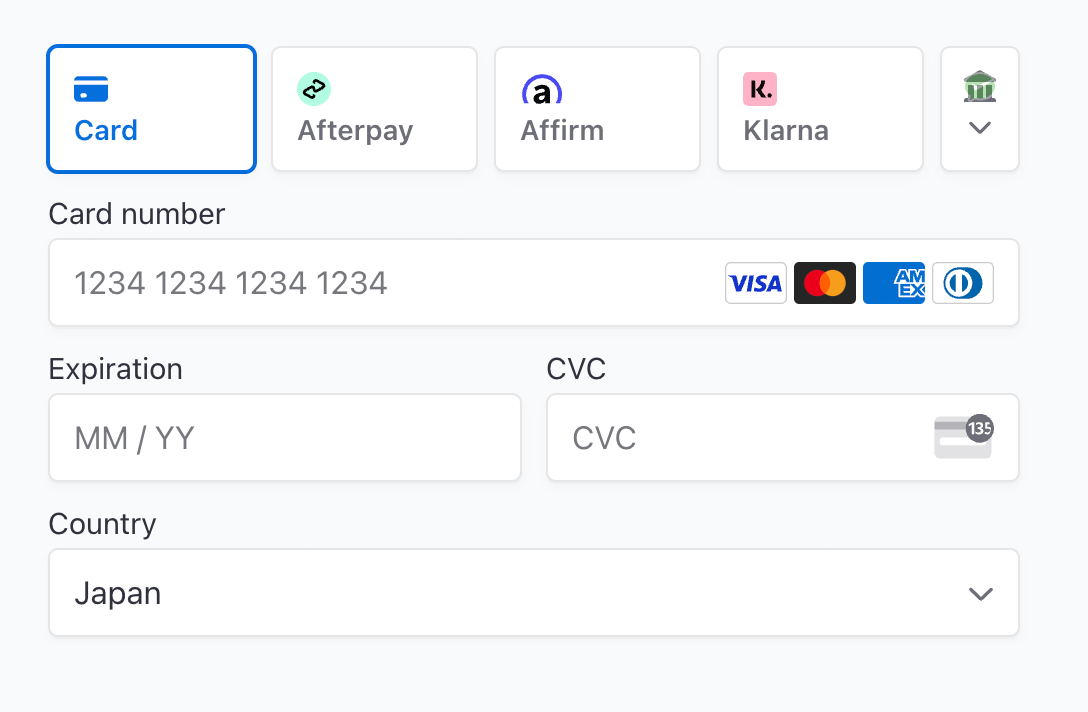
こういうのを実装する
Stripeとは
公式サイトから引用
Stripeは、あらゆる規模のインターネットビジネス向けのオンライン決済処理およびコマースソリューションをサポートするAPIスイートです
つまりは決済処理APIを提供しているサービスってことです。
StripeのAPIを使えば独自実装するにはコストが高い決済処理を簡単に実装できます。
決済API
Stripeの決済APIは大きく分けて3つあります。
下に行くほどカスタマイズ性が高くなります。
- Checkout
- Payments
- Elements
Checkoutは、Stripe側で決済画面ごと提供しているためカスタマイズ性は低いものの最も簡単に実装できます。
Elementsはその逆で、決済画面のカスタマイズ性は高いものの最も実装に手間がかかります。
Paymentsはこれらの中間くらいです。
Stripe Elements
今回は最もカスタマイズ性の高いElementsを使って実装していきます。
なぜElementsかというと、CheckoutとPaymentsは、Stripe側に商品を登録しなければなりません。
したがって、自サービスで商品データを持っている場合など逐次商品が登録されるようなECモールやフリマサービスには向きません。
この自サービスで商品データを持っているという要件がある場合はElements一択になります。
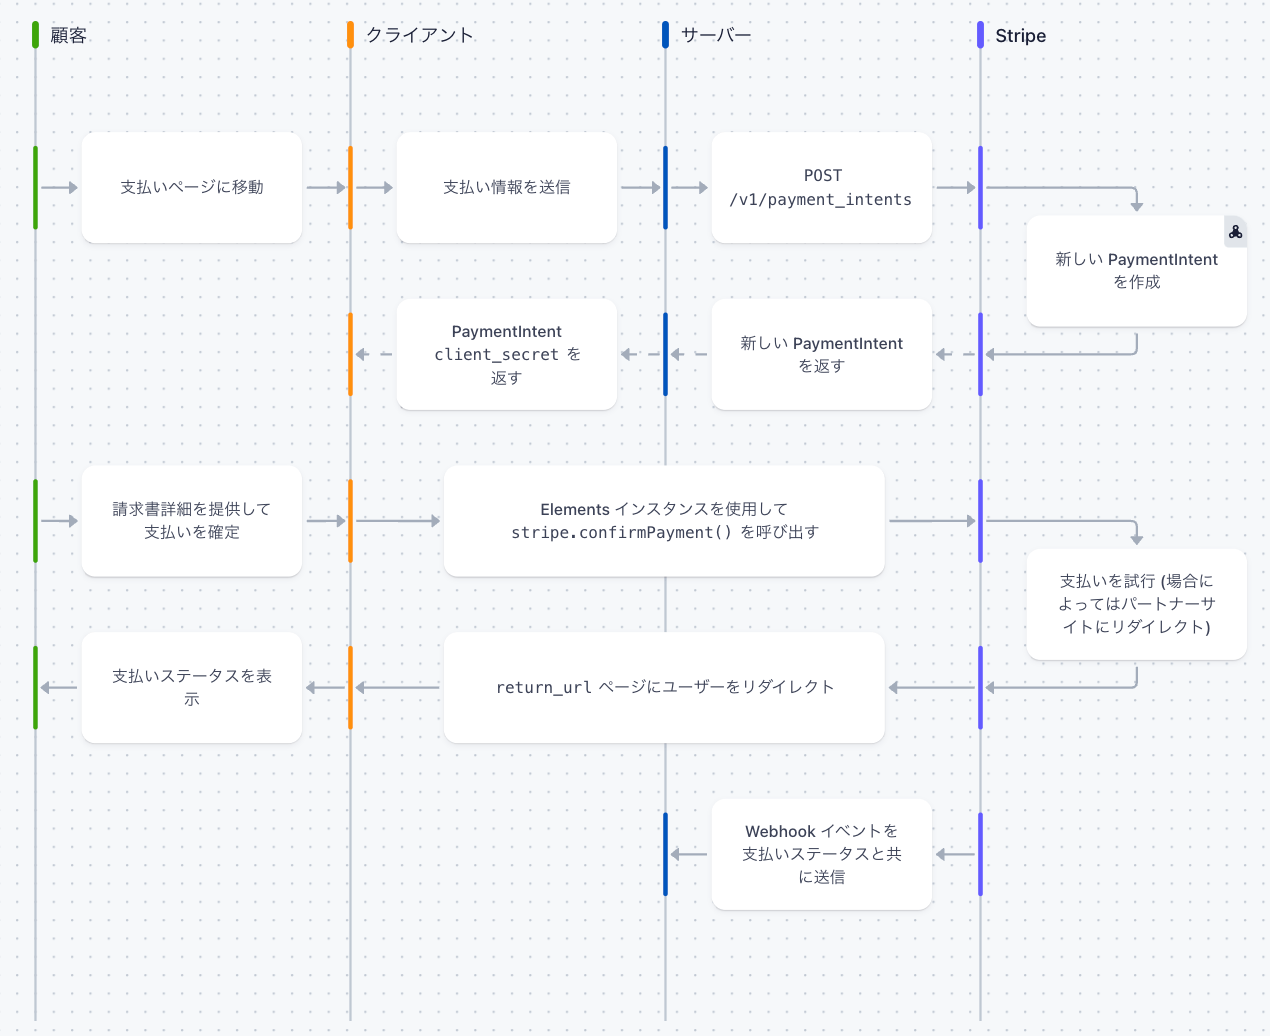
決済処理の実装
全体の流れはこちらの通り
template部分
まずはtemplateで決済フォームの雛形を構築します。
<template>
  <div class="StripeElement">
    <form id="payment-form">
      <div id="payment-element">
      </div>
      <button id="submit">
        <div class="spinner hidden" id="spinner"></div>
        <span id="button-text">¥1000</span>
      </button>
      <div id="payment-message" class="hidden"></div>
    </form>
  </div>
</template>
ただし、これだけだと最初の画像のようなイケてる決済フォームはできません。
イケてる感じにするにはscriptでいじってあげる必要があります。
script(装飾部分)
基本的には以下のコードを追記するとtemplateの部分がイケてる感じになります。
const appearance = {
  theme: 'stripe',
};
const elements = stripe.elements({ clientSecret, appearance })

const paymentElement = elements.create("payment");
paymentElement.mount("#payment-element");

const form = document.getElementById('payment-form');
ここで注意すべきは、clientSecretという変数です。
この変数にclient secretという決済処理ごとの一意のキーを入れて上げる必要ああります。
このキーはServerAPIから取得しなければなりません。
PaymentIntentの生成
ここからはCloud Functionsに置くAPIの説明です。
このAPIで前述のClient secretを含むPaymentIntentを生成し、PaymentIntentオブジェクトを返します。
PaymentIntentは、これからこういう決済処理を始めますよ〜という合図のようなものなので、ここで支払金額を設定したりできます。
const functions = require('firebase-functions');
const admin = require('firebase-admin');
admin.initializeApp();

// Payment Intentsの生成
exports.getPaymentIntent = functions.https.onCall(async(data, context) => {
    // シークレットキーを設定(sk_test_~)
    const stripe = require('stripe')('sk_test_~');
    // カスタマーオブジェクトはDB等に保存してユーザデータと紐付けると次回からの決済が楽になります
    const customer = await stripe.customers.create();

    // paymentIntentを生成
    const paymentIntent = await stripe.paymentIntents.create({
        customer: customer.id,
        setup_future_usage: 'off_session',
	// ここで支払金額を設定できる(今回はClientから送られてきた値を入れてます)
        amount: data[amount],
        currency: 'jpy',
        automatic_payment_methods: {
          enabled: true,
        },
      });
    return paymentIntent;
});
ServerAPIの呼び出し
Cloud FunctionsにgetPaymentIntentを置いたらクライアントから呼び出してあげます。
const functions = getFunctions();
    const getPaymentIntent = httpsCallable(functions, 'getPaymentIntent');
    await getPaymentIntent({ amount: 1000 })
      .then((result) => {
        // PaymentIntentオブジェクトからclientSecretだけを抜き取り
        clientSecret = result.data["client_secret"]
      });
    const appearance = {
      theme: 'stripe',
    };
PaymentIntentのオブジェクトが返ってきますので、その中からclient_ecretを指定してclientSecretを抜き出してあげます。
これをscript(装飾部分) で説明した
const elements = stripe.elements({ clientSecret, appearance })
に設定してあげます。
決済
あとはフォームにクレジットカード情報を入力してもらい、ボタンをクリックすれば以下の処理が走るようにしてあげます。
form.addEventListener('submit', async (event) => {
      event.preventDefault();

      const { error } = await stripe.confirmPayment({
        elements,
        confirmParams: {
	  // 決済完了後のリダイレクト先
          return_url: 'http:~',
        },
      });

      if (error) {
        const messageContainer = document.querySelector('#error-message');
        messageContainer.textContent = error.message;
      } else {
        // 好きな処理入れて
      }
    });
  },
これで決済が完了します。
ちゃんとできているかはStripeのダッシュボードで確認しましょう。
補足(見た目もコピペで実装したいめんどくさがり屋さん用にStyle部分)
/* Variables */
* {
  box-sizing: border-box;
}


form {
  width: 30vw;
  min-width: 500px;
  align-self: center;
  background-color: #ffffff;
  box-shadow: 0px 0px 0px 0.5px rgba(50, 50, 93, 0.1),
    0px 2px 5px 0px rgba(50, 50, 93, 0.1), 0px 1px 1.5px 0px rgba(0, 0, 0, 0.07);
  border-radius: 7px;
  padding: 40px;
}

.hidden {
  display: none;
}

#payment-message {
  color: rgb(105, 115, 134);
  font-size: 16px;
  line-height: 20px;
  padding-top: 12px;
  text-align: center;
}

#payment-element {
  margin-bottom: 24px;
}

/* Buttons and links */
button {
  background: #5469d4;
  font-family: Arial, sans-serif;
  color: #ffffff;
  border-radius: 4px;
  border: 0;
  padding: 12px 16px;
  font-size: 16px;
  font-weight: 600;
  cursor: pointer;
  display: block;
  transition: all 0.2s ease;
  box-shadow: 0px 4px 5.5px 0px rgba(0, 0, 0, 0.07);
  width: 100%;
}

button:hover {
  filter: contrast(115%);
}

button:disabled {
  opacity: 0.5;
  cursor: default;
}

/* spinner/processing state, errors */
.spinner,
.spinner:before,
.spinner:after {
  border-radius: 50%;
}

.spinner {
  color: #ffffff;
  font-size: 22px;
  text-indent: -99999px;
  margin: 0px auto;
  position: relative;
  width: 20px;
  height: 20px;
  box-shadow: inset 0 0 0 2px;
  -webkit-transform: translateZ(0);
  -ms-transform: translateZ(0);
  transform: translateZ(0);
}

.spinner:before,
.spinner:after {
  position: absolute;
  content: "";
}

.spinner:before {
  width: 10.4px;
  height: 20.4px;
  background: #5469d4;
  border-radius: 20.4px 0 0 20.4px;
  top: -0.2px;
  left: -0.2px;
  -webkit-transform-origin: 10.4px 10.2px;
  transform-origin: 10.4px 10.2px;
  -webkit-animation: loading 2s infinite ease 1.5s;
  animation: loading 2s infinite ease 1.5s;
}

.spinner:after {
  width: 10.4px;
  height: 10.2px;
  background: #5469d4;
  border-radius: 0 10.2px 10.2px 0;
  top: -0.1px;
  left: 10.2px;
  -webkit-transform-origin: 0px 10.2px;
  transform-origin: 0px 10.2px;
  -webkit-animation: loading 2s infinite ease;
  animation: loading 2s infinite ease;
}
Discussion