.NET 6 (C#) で Twitter API v2 の OAuth 2.0 を試す
概要
Twitter API v2 でユーザー認証も OAuth 2.0 になり権限を細かく設定できるようになったらしいとのことでちょっと試してみました。
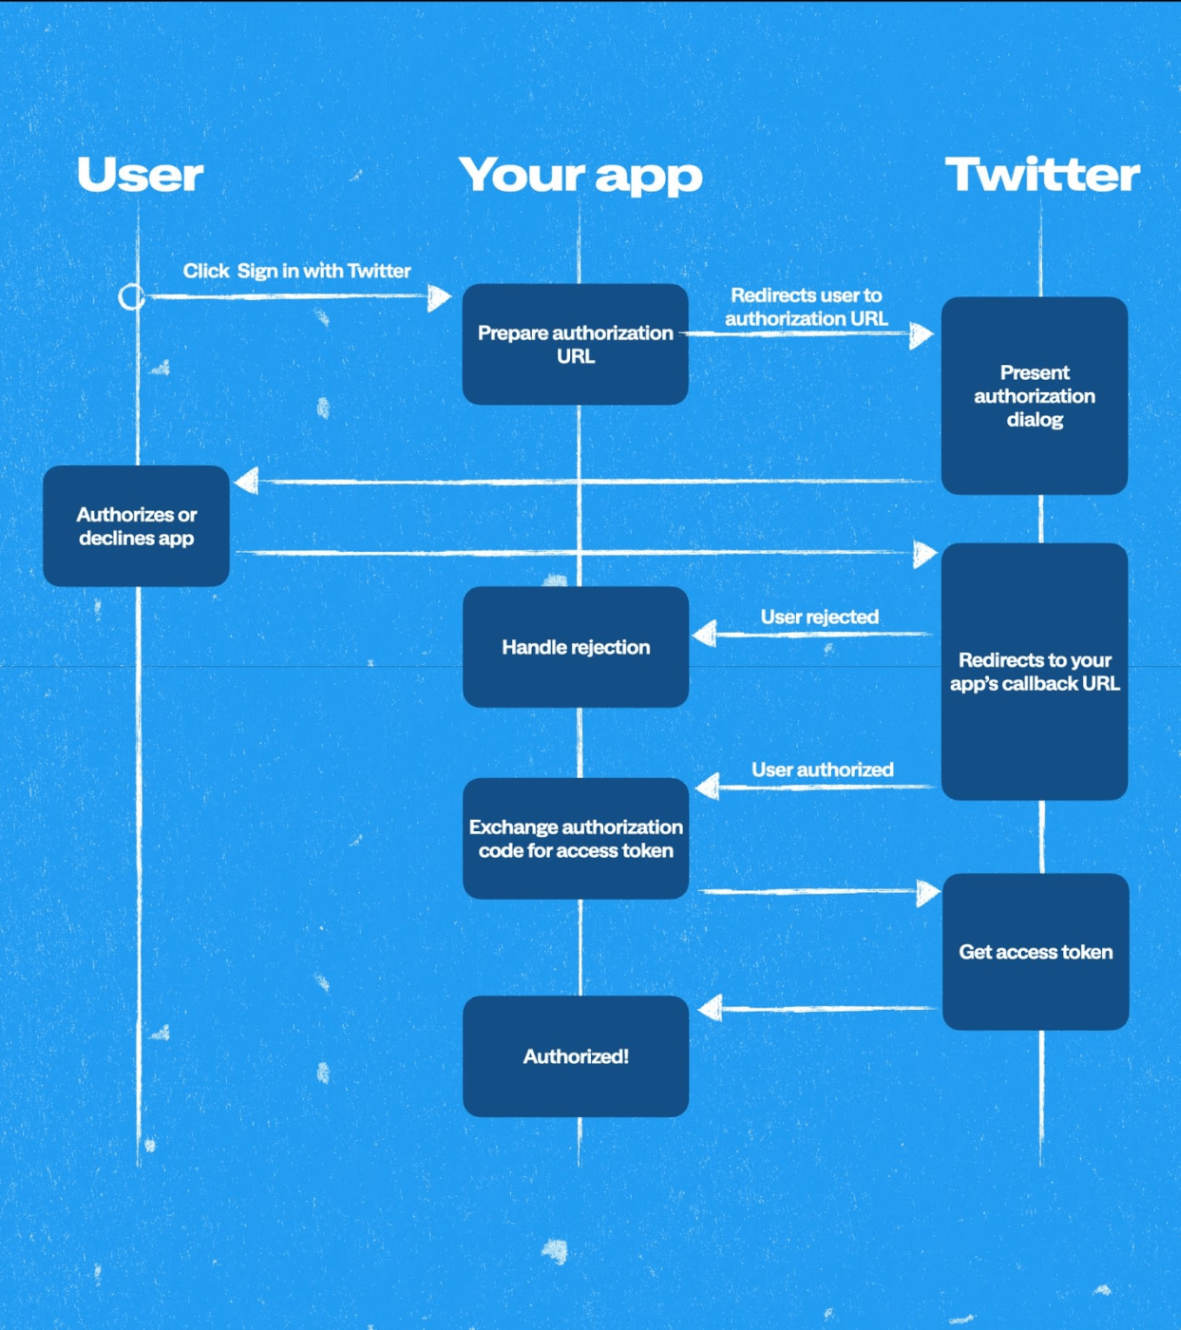
OAuth 2.0 Authorization Code Flow with PKCE
詳しい説明はドキュメントや上の記事を参照してもらった方が確実なのでここでは説明しません。
画像だけドキュメントから引用しておきます。
アプリの登録
登録済みのアプリがあったので OAuth 2.0 の登録だけやります。
歯車アイコンをクリック。

Edit をクリック。

OAuth 2.0 を有効化。

Type of App で Web App (サーバーで動くアプリを指してます)または Automated App or bot を選択。
後述しますが今回は Confidential Client で説明していきます。

iOS / Android アプリの場合は Native App, ブラウザで動く JS は Single Page App を選択してください。
この記事では説明しませんが認証方法が少し異なります。
クライアントのタイプ
Confidential Client は、許可されていない第三者にクレデンシャルを公開することなく安全な方法でクレデンシャルを保持し、クライアントの秘密を安全に保つ認証サーバーで安全に認証できます。Public Client は通常、ブラウザまたはモバイルデバイスで実行されており、クライアントシークレットを使用できません。Confidential Client であるアプリのタイプを選択すると、クライアントシークレットが提供されます。
クライアントのタイプには confidential と public の2種類があります。
ユーザーに秘匿情報が見えないものと見えるものです。
この記事では秘匿情報が見えない前提の Confidential Client を扱います。
クライアントシークレットが使えます。
.NET 6 (C#) でコードを書く
プロジェクトを作って動かすところは割愛します。
コアなコードだけ紹介していきます。
まずはクラスの全体像です。個々の説明は後述します。
public class Twitter
{
    private static readonly HttpClient HttpClient = new HttpClient();

    public string ConstructAuthorizeUrl(string clientId, string redirectUri, IEnumerable<Scope> scopes, string state, string challenge, string challengeMethod = "S256") {}
    public string RetrieveAuthorizationCode(string callbackedUri, string state) {}
    public async Task<string> GetAccessToken(string clientId, string clientSecret, string redirectUrl, string code, string verifier) {}
    public async Task<string> RefreshToken(string clientId, string clientSecret, string refreshToken) {}
    public async Task<string> RevokeToken(string clientId, string clientSecret, string accessToken) {}
    public async Task<string> GetTweet(string accessToken, long id) {}
    public async Task<string> PostTweet(string accessToken, string text) {}
}

public enum Scope {}
public static class ScopeExtension {}
HttpClient はリクエスト毎に Dispose してはいけないのでクラスに持ちます。
便宜上1つのクラスにしてパラメーターを全て引数で受け取っていますが、実際はもうちょっと工夫した方がいいような気がします。お試しコードなのでご容赦を。
スコープ
一覧はこちら。
各 API に必要なスコープは下記またはそれぞれのドキュメントに記載されています。
扱いやすいように enum に定義しておきます。
文字列に戻すために拡張メソッドを利用しています。
public enum Scope
{
    TweetRead,
    TweetWrite,
    TweetModerateWrite,
    UsersRead,
    FollowRead,
    FollowWrite,
    OfflineAccess,
    SpaceRead,
    MuteRead,
    MuteWrite,
    LikeRead,
    LikeWrite,
    ListRead,
    ListWrite,
    BlockRead,
    BlockWrite,
    BookmarkRead,
    BookmarkWrite,
}

public static class ScopeExtension
{
    private static Dictionary<Scope, string> Values = new Dictionary<Scope, string>()
    {
        { Scope.TweetRead, "tweet.read" },
        { Scope.TweetWrite, "tweet.write" },
        { Scope.TweetModerateWrite, "tweet.moderate.write" },
        { Scope.UsersRead, "users.read" },
        { Scope.FollowRead, "follow.read" },
        { Scope.FollowWrite, "follow.write" },
        { Scope.OfflineAccess, "offline.access" },
        { Scope.SpaceRead, "space.read" },
        { Scope.MuteRead, "mute.read" },
        { Scope.MuteWrite, "mute.write" },
        { Scope.LikeRead, "like.read" },
        { Scope.LikeWrite, "like.write" },
        { Scope.ListRead, "list.read" },
        { Scope.ListWrite, "list.write" },
        { Scope.BlockRead, "block.read" },
        { Scope.BlockWrite, "block.write" },
        { Scope.BookmarkRead, "bookmark.read" },
        { Scope.BookmarkWrite, "bookmark.write" },
    };

    public static string GetValue(this Scope scope)
    {
        return Values[scope];
    }
}
認可 URL の生成
生成される URL がドキュメントと少し異なるようだが動いてはいる。
public string ConstructAuthorizeUrl(string clientId, string redirectUri, IEnumerable<Scope> scopes, string state, string challenge, string challengeMethod = "S256")
{
    var query = HttpUtility.ParseQueryString("");
    query.Add("response_type", "code");
    query.Add("client_id", clientId);
    query.Add("redirect_uri", redirectUri);
    query.Add("scope", string.Join(" ", scopes.Select(x => x.GetValue())));
    query.Add("state", state);
    query.Add("code_challenge", challenge);
    query.Add("code_challenge_method", challengeMethod);

    var uriBuilder = new UriBuilder("https://twitter.com/i/oauth2/authorize")
    {
        Query = query.ToString(),
    };
    return uriBuilder.Uri.AbsoluteUri;
}
redirect_uri はアプリに登録したものしか許可されません。
state は CSRF 対策のランダムな文字列です。(~500文字)
認可コードを取得する際に一致しているか確認します。
code_challenge, code_challenge_method は PKCE 用のパラメーターです。
code_challenge_method は S256 または plain が指定できますが S256 が推奨されます。
   plain
      code_challenge = code_verifier

   S256
      code_challenge = BASE64URL-ENCODE(SHA256(ASCII(code_verifier)))

   If the client is capable of using "S256", it MUST use "S256", as
   "S256" is Mandatory To Implement (MTI) on the server.  Clients are
   permitted to use "plain" only if they cannot support "S256" for some
   technical reason and know via out-of-band configuration that the
   server supports "plain".
今回はお試しなので plain を使いました。(なので S256 で変換するコードはありません)
code_verifier の値をそのまま code_challenge に入れています。
code_verifier は43~128文字のランダムな文字列です。
アプリにアクセスを許可
認可 URL へブラウザでアクセスしてアプリにアクセスを許可します。
new[] { Scope.TweetRead, Scope.TweetWrite, Scope.UsersRead } の場合。
昔みたいに怖い文言が並んだりしませんね。

追加で Scope.OfflineAccess も付与しておくと無期限にでき、refresh_token が取得できます。

今回は単なる動作検証なので手動でブラウザへアクセスしました。
プログラムでやる場合 WinRT だと WebAuthenticationBroker が使えたんですが、 .NET MAUI ではどうするのがいいんでしょうか?ご存知の方いたら教えていただけると助かります。
認可コードを取得
アプリにアクセスを許可すると redirect_uri に指定した URL へ飛ばされます。
この URL から(state が一致しているか確認した上で)認可コードを取得します。
public string RetrieveAuthorizationCode(string callbackedUri, string state)
{
    var uri = new Uri(callbackedUri);
    var query = HttpUtility.ParseQueryString(uri.Query);
    if (query.Get("state") != state)
    {
        throw new InvalidDataException("state is not valid.");
    }
    return query.Get("code");
}
認可コードの期限
認可コードの有効期限が30秒しかないようなので発行されてから30秒以内にアクセストークンを取得する必要があります。
Authorization code
This allows an application to hit APIs on behalf of users. Known as the auth_code. The auth_code has a time limit of 30 seconds once the App owner receives an approved auth_code from the user. You will have to exchange it with an access token within 30 seconds, or the auth_code will expire.
期限切れになると以下のエラーが返ってきます。
プログラムで実行する分にはさほど問題ないでしょうが検証中に手動でやってると嵌りがち。
{
  "error": "invalid_request",
  "error_description": "Value passed for the authorization code was invalid."
}
アクセストークンの取得
クライアント ID とクライアントシークレットを : で繋げたものを base64 エンコードしてベーシック認証します。
public async Task<string> GetAccessToken(string clientId, string clientSecret, string redirectUri, string code, string verifier)
{
    var parameters = new Dictionary<string, string>()
    {
        { "code", code },
        { "grant_type", "authorization_code" },
        { "redirect_uri", redirectUri },
        { "code_verifier", verifier },
    };
    var content = new FormUrlEncodedContent(parameters);
    var request = new HttpRequestMessage(HttpMethod.Post, "https://api.twitter.com/2/oauth2/token");
    request.Headers.Authorization = new AuthenticationHeaderValue(
        "Basic",
        Convert.ToBase64String(Encoding.ASCII.GetBytes($"{clientId}:{clientSecret}"))
    );
    request.Content = content;
    var response = await HttpClient.SendAsync(request).ConfigureAwait(false);
    return await response.Content.ReadAsStringAsync().ConfigureAwait(false);
}
各 API へリクエスト
認証はデフォルトヘッダーを設定した方がいいかもしれませんが今回はそれぞれでやってます。
そのため SendAsync を使ったやや冗長なコードになっています。
HttpClient.DefaultRequestHeaders.Authorization = new AuthenticationHeaderValue("Bearer", accessToken);
ツイートを取得
public async Task<string> GetTweet(string accessToken, long id)
{
    var request = new HttpRequestMessage(HttpMethod.Get, $"https://api.twitter.com/2/tweets/{id}");
    request.Headers.Authorization = new AuthenticationHeaderValue("Bearer", accessToken);
    var response = await HttpClient.SendAsync(request).ConfigureAwait(false);
    return await response.Content.ReadAsStringAsync().ConfigureAwait(false);
}
ツイートする
public async Task<string> PostTweet(string accessToken, string text)
{
    var parameters = new Dictionary<string, string>()
    {
        { "text", text },
    };
    var json = JsonSerializer.Serialize(parameters);
    var content = new StringContent(json, Encoding.UTF8, MediaTypeNames.Application.Json);
    var request = new HttpRequestMessage(HttpMethod.Post, "https://api.twitter.com/2/tweets");
    request.Headers.Authorization = new AuthenticationHeaderValue("Bearer", accessToken);
    request.Content = content;
    var response = await HttpClient.SendAsync(request).ConfigureAwait(false);
    return await response.Content.ReadAsStringAsync().ConfigureAwait(false);
}
トークンの更新
public async Task<string> RefreshToken(string clientId, string clientSecret, string refreshToken)
{
    var parameters = new Dictionary<string, string>()
    {
        { "refresh_token", refreshToken },
        { "grant_type", "refresh_token" },
    };
    var content = new FormUrlEncodedContent(parameters);
    var request = new HttpRequestMessage(HttpMethod.Post, "https://api.twitter.com/2/oauth2/token");
    request.Headers.Authorization = new AuthenticationHeaderValue(
        "Basic",
        Convert.ToBase64String(Encoding.ASCII.GetBytes($"{clientId}:{clientSecret}"))
    );
    request.Content = content;
    var response = await HttpClient.SendAsync(request).ConfigureAwait(false);
    return await response.Content.ReadAsStringAsync().ConfigureAwait(false);
}
トークンの破棄
public async Task<string> RevokeToken(string clientId, string clientSecret, string accessToken)
{
    var parameters = new Dictionary<string, string>()
    {
        { "token", accessToken },
        { "token_type_hint", "access_token" }
    };
    var content = new FormUrlEncodedContent(parameters);
    var request = new HttpRequestMessage(HttpMethod.Post, "https://api.twitter.com/2/oauth2/revoke");
    request.Headers.Authorization = new AuthenticationHeaderValue(
        "Basic",
        Convert.ToBase64String(Encoding.ASCII.GetBytes($"{clientId}:{clientSecret}"))
    );
    request.Content = content;
    var response = await HttpClient.SendAsync(request).ConfigureAwait(false);
    return await response.Content.ReadAsStringAsync().ConfigureAwait(false);
}
ドキュメントには記載がないのですが token_type_hint がないとエラーになります。
{
  "error":"invalid_request",
  "error_description":"Missing required parameter [token_type_hint]."
}
感想
OAuth 1.0a だとパラメーター並び替えて signature 作ったりで複雑でしたが OAuth 2.0 だと code_challenge を生成するくらいでシンプルですね。
OAuth 2.0 自体も元々(ユーザーに紐付かない)アプリケーション認証として実装されていたものなのでトークンさえ取得できれば各 API へのアクセス方法はさほど変わらないのではないかと思います。
Discussion
C# だと関係ありませんがブラウザ JavaScript で実装するときは Twitter API が CORS に対応していないのでアクセストークンを取得するリクエスト (
POST https://api.twitter.com/2/oauth2/token) だけサーバーで処理する必要があります。クライアントのタイプも Confidential Client を選択します。