🐡
ReorderableListViewでドラッグの対象を全部にする方法
はじめに
タスクなどを管理するアプリを見ていると、ドラッグ&ドロップでタスクを入れ替えることができる機能があったりします。FlutterのReorderableListViewを使うことでできるのですが、実際にドキュメントのサンプルコードだと右端のIconでしかドラッグ&ドロップをすることができなです。個人的にはどこを選択してもできるようにしたいので調べてみたところ、ReorderableDragStartListener()を使うことで実現できそうなので実際に試してみました。
ReorderableListViewの基本
ReorderableListViewとはユーザーがドラッグすることで順序を変更したりすることができるWidgetです。主なプロパティとしては以下のものがあります。
- children: リスト内に表示するWidgetのリストです。各Widgetは一意のKeyを持つ必要があります。これにより、位置が変わっても区別することができます。
- onReorder:リスト内のリストアイテムが新しい場所にドラッグされた時に呼ばれるコールバックで、アプリケーションはアイテム順序を更新します。
ReorderableDragStartListenerとは
実際にドキュメントのサンプルコードを試してみます。
コードサンプル
import 'dart:ui';
import 'package:flutter/material.dart';
/// Flutter code sample for [ReorderableListView].
void main() => runApp(const ReorderableApp());
class ReorderableApp extends StatelessWidget {
const ReorderableApp({super.key});
Widget build(BuildContext context) {
return MaterialApp(
home: Scaffold(
appBar: AppBar(title: const Text('ReorderableListView Sample')),
body: const ReorderableExample(),
),
);
}
}
class ReorderableExample extends StatefulWidget {
const ReorderableExample({super.key});
State<ReorderableExample> createState() => _ReorderableExampleState();
}
class _ReorderableExampleState extends State<ReorderableExample> {
final List<int> _items = List<int>.generate(50, (int index) => index);
Widget build(BuildContext context) {
final ColorScheme colorScheme = Theme.of(context).colorScheme;
final Color oddItemColor = colorScheme.secondary.withOpacity(0.05);
final Color evenItemColor = colorScheme.secondary.withOpacity(0.15);
final Color draggableItemColor = colorScheme.secondary;
Widget proxyDecorator(
Widget child, int index, Animation<double> animation) {
return AnimatedBuilder(
animation: animation,
builder: (BuildContext context, Widget? child) {
final double animValue = Curves.easeInOut.transform(animation.value);
final double elevation = lerpDouble(0, 6, animValue)!;
return Material(
elevation: elevation,
color: draggableItemColor,
shadowColor: draggableItemColor,
child: child,
);
},
child: child,
);
}
return ReorderableListView(
padding: const EdgeInsets.symmetric(horizontal: 40),
proxyDecorator: proxyDecorator,
children: <Widget>[
for (int index = 0; index < _items.length; index += 1)
ListTile(
key: Key('$index'),
tileColor: _items[index].isOdd ? oddItemColor : evenItemColor,
title: Text('Item ${_items[index]}'),
),
],
onReorder: (int oldIndex, int newIndex) {
setState(() {
if (oldIndex < newIndex) {
newIndex -= 1;
}
final int item = _items.removeAt(oldIndex);
_items.insert(newIndex, item);
});
},
);
}
}
挙動は以下のようになります
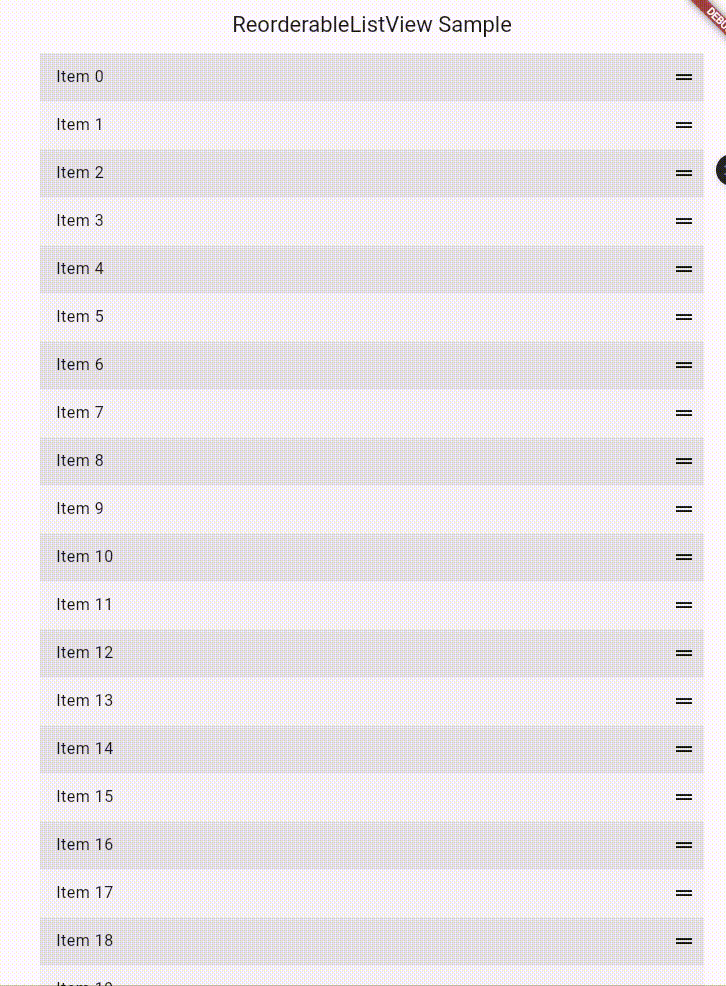
右端のIconではないと動かすことができないです。
では実際にReorderableDragStartListener()を使って実装してみましょう。最初のサンプルコードのReorderableListViewのchildrenの部分を以下のように変更します。
children: <Widget>[
        for (int index = 0; index < _items.length; index++)
          ReorderableDragStartListener(
            index: index,
            key: Key('$index'),
            child: Container(
              margin: const EdgeInsets.symmetric(vertical: 4),
              color: _items[index].isOdd ? oddItemColor : evenItemColor,
              child: ListTile(
                title: Text('Item ${_items[index]}'),
              ),
            ),
          ),
      ],
挙動は以下のようになります。
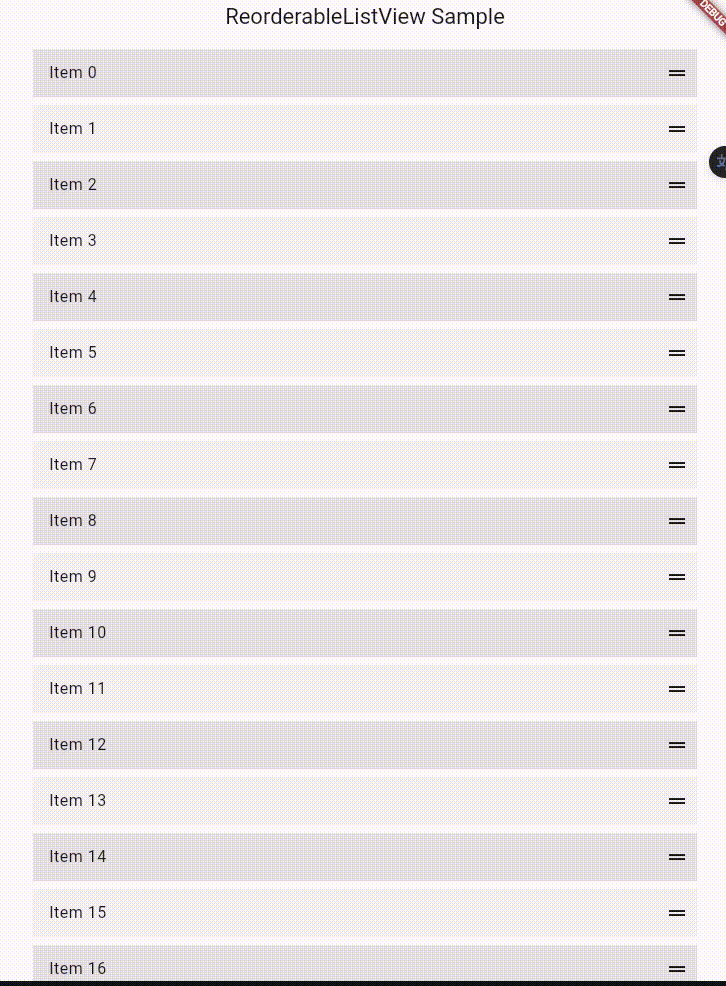
他の部分でも動かすことができるようになりました。
おわりに
今回はドラック&ドロップでの入れ替えについて記事を書きました。本当はもっといい方法とかあるかもしれないです。新しいことがわかったら情報を追加しようと思います。最後まで読んでいただき、ありがとうございました。
参考文献
Discussion