【OpenRR】RustでRobot!#02 「ROSとROS2とOpenRR」
2-1. はじめに
こんにちは、Smile Roboticsの内山活です。前回に引き続きOpenRRの記事です!今回はOpenRRを用いてROS/ROS2上でTurtlebot3を動かしてみようと思います。
Topic: OpenRRとは?
ぜひこの記事をご覧ください。
2-1-1. 環境
Ubuntu 20.04 LTSを用いて開発をしています。ROSのdistributionはNoetic、ROS2はGalacticです。
2-1-2. セットアップ
今回はROSやROS2がすでにインストールされている前提で進めていきます。インストールしていない場合は公式のWikiなどをもとに準備してください。以下にいくつかのリンクを示しますので参考にしてください。
参考リンク: "ROS Wiki", "ROS Wiki (JP)", "ROS 2 Documentation: Galactic"
今回はROSとROS2を両方使っています。しかし両方準備するのは面倒という場合は、ROS2の方を準備し、ROSの部分を読み飛ばしてこの記事を進めることをおすすめします。
またTurtlebot3をシミュレーション上で用いるので、ROBOTIS社の公式のガイドをもとに必要なパッケージを用意してください。
2-2. arci (Abstract Robot Control Interface)

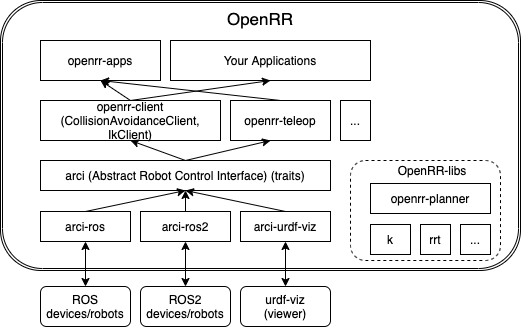
これはOpenRRのREADMEにあるOpenRRの構造の図です。現在ではもっと拡張されているため実際はこれよりも多いです。最新のリポジトリはここから見られます。
arciは"Abstract Robot Control Interface"の略でその名の通り、ROSやROS2などの各ソフトウェアやRustのCrateを抽象化しています。rosrustやr2rなどRustでROSを扱うCrateやGilrsというゲームパッドを扱うCrateなど様々なものをまとめています。実際に自分のプログラムで扱う場合は、GitHubのexamplesを参考にして使うことができます。使用例は今後の記事やGitHubのexamplesにて公開していきます。
2-3. arciからROSでTurtlebot3を動かす
うれしいことにopenrr/arci-rosにはexamplesディレクトリがあります。ではこのexamplesを覗いてみましょう。
#[tokio::main]
async fn main() -> Result<(), anyhow::Error> {
    use arci::{BaseVelocity, MoveBase};
    use arci_ros::RosCmdVelMoveBase;

    // Initialize node
    arci_ros::init("arci_ros_cmd_vel_example");
    let c = RosCmdVelMoveBase::new("/cmd_vel");
    let mut count = 0;
    let mut vel = BaseVelocity::default();
    println!("\"cmd_vel\" Publisher is running!");
    while count < 100 {
        vel.x = 0.001 * (count as f64);
        c.send_velocity(&vel)?;
        std::thread::sleep(std::time::Duration::from_millis(100));
        count += 1;
        println!("{count}, {vel:?}");
    }
    while count >= 0 {
        vel.x = 0.001 * (count as f64);
        c.send_velocity(&vel)?;
        std::thread::sleep(std::time::Duration::from_millis(100));
        count -= 1;
        println!("{count}, {vel:?}");
    }
    Ok(())
}
どうやら/cmd_velトピックを配信しているようなので、そのままroslaunchでGazebo上にTurtlebot3を出してexampleコードを実行します。
roslaunch turtlebot3_gazebo turtlebot3_world.launch
cargo run --package arci-ros --example ros1_cmd_vel
これらを実行すると、Gazebo上でTurtlebot3が動くとともにcargo runを実行した方のターミナルに次のようなことが出力されたと思います。
cmd_vel is running!
1, BaseVelocity { x: 0.0, y: 0.0, theta: 0.0 }
2, BaseVelocity { x: 0.001, y: 0.0, theta: 0.0 }
3, BaseVelocity { x: 0.002, y: 0.0, theta: 0.0 }
...
99, BaseVelocity { x: 0.098, y: 0.0, theta: 0.0 }
100, BaseVelocity { x: 0.099, y: 0.0, theta: 0.0 }
99, BaseVelocity { x: 0.1, y: 0.0, theta: 0.0 }
...
1, BaseVelocity { x: 0.002, y: 0.0, theta: 0.0 }
0, BaseVelocity { x: 0.001, y: 0.0, theta: 0.0 }
-1, BaseVelocity { x: 0.0, y: 0.0, theta: 0.0 }
ターミナルに出力された行ごとの最初の数字に応じて、Gazebo上に現れたTurtlebot3が少しずつ進み、しばらくすると減速しながら止まった思います。while文の中で配信している値に応じて、ターミナルに出力された値もxが徐々に大きくなっていき0.099をピークに小さくなっていっています。ちゃんと/cmd_velトピックを送れているようです。別のターミナルでrostopic listを実行してみても確認できます。
2-4. arciからROS2でTurtlebot3を動かす
2-4-1. ただの/cmd_velの送信
今度はROS2で行ってみたいと思います。
source /opt/ros/galactic/setup.bash
cargo build --features ros2
OpenRRをROS2にfeatureさせます。先程ROSで行ったのと同じようなことをROS2でも行います。まずはexamplesを覗いてみます。
#[cfg(feature = "ros2")]
#[tokio::main]
async fn main() -> Result<(), anyhow::Error> {
    use arci::{BaseVelocity, MoveBase};
    use arci_ros2::{r2r, Ros2CmdVelMoveBase};

    let ctx = r2r::Context::create().unwrap();
    let c = Ros2CmdVelMoveBase::new(ctx, "/cmd_vel");
    let mut count = 0;
    let mut vel = BaseVelocity::default();
    while count < 100 {
        vel.x = 0.001 * (count as f64);
        c.send_velocity(&vel)?;
        std::thread::sleep(std::time::Duration::from_millis(100));
        count += 1;
        println!("{count}, {vel:?}");
    }
    while count >= 0 {
        vel.x = 0.001 * (count as f64);
        c.send_velocity(&vel)?;
        std::thread::sleep(std::time::Duration::from_millis(100));
        count -= 1;
        println!("{count}, {vel:?}");
    }
    Ok(())
}

...
先程cargo buildしたときにfeatureしたのはこのためです。これを実行していきます。結論からいえば同じ動きをします。
export GAZEBO_MODEL_PATH=$GAZEBO_MODEL_PATH:/opt/ros/galactic/share/turtlebot3_gazebo/models
ros2 launch nav2_bringup tb3_simulation_launch.py
しなくてもGazebo上では動きますが、2D Pose Estimateにて初期位置を設定します。そして、以下のようにして実行すればTurtlebot3が動き出します。
source /opt/ros/galactic/setup.bash
cargo run --package arci-ros2 --example ros2_cmd_vel --features ros2
これでも同じように/cmd_velを配信しています。


2-4-2. openrr_appsによる/cmd_velの送信
ちなみに前回取り上げたOpenRRのアプリケーションであるopenrr-appsを用いることで、GUI上からGazebo上のTurtlebot3を操作することもできます。前回はopenrr_apps_robot_commandとopenrr_apps_joint_position_senderを用いました。今回はロボットに(角)速度の司令を送ることのできる、openrr_apps_velocity_senderを利用します。以下の2つを別々のターミナルで実行しますることで使っていきます。
ros2 launch nav2_bringup tb3_simulation_launch.py
openrr_apps_velocity_sender --config-path ./openrr-apps/config/turtlebot3_robot_client_config_ros2.toml
2つ目のコマンドを実行したあとに出てきたGUIアプリケーション上の矢印ボタンかスライドバーをいじることでGazebo上のTurtlebot3が動いてくれます。openrr_apps_velocity_senderでconfigファイルを読み込むことで実行しています。
move_base = "arci_ros2"
navigation = "arci_ros2"

[openrr_clients_config]

[plugins.arci_ros2]
path = "../../target/debug/libarci_ros2"

[[plugins.arci_ros2.instances]]
name = "arci_ros2"
type = "MoveBase"
args = """
topic = "/cmd_vel"
"""

[[plugins.arci_ros2.instances]]
name = "arci_ros2"
type = "Navigation"
args = """
action_name = "/navigate_to_pose"
"""
既にopenrr-appsとしてGUIでのアプリケーションが実装されているため、--config-pathから読み込んだconfigファイルを書き換えることで別のロボットを動かすこともできます。前回のopenrr_apps_robot_commandもopenrr_apps_joint_position_senderもつづくcommandやconfigの中身を書き換えるだけで共通して多くのロボットに対応できます。特に今回の設定ではopenrr_apps_velocity_senderから、GUIアプリケーショを通じて/cmd_velを配信しているため'/cmd_vel'で動くロボットは同様にして操作することができます。

2-5. 結び
今回はOpenRRを用いることでGazebo上のTurtlebot3を動かしました。次回は同じようにして現実上でiRobotのCreateというROS2対応のロボットを操作してみようと思います。またOpenRRの別の方法でも操作する予定です。
更新歴
2022-06-24 完成
Discussion